Welding of gas pipes is carried out using various technologies: plasma, gas, argon, electric arc. Connections must be of high quality; novices are not allowed to install gas pipelines, only specialists with a personal stamp. The process is regulated by GOST 16037-80 and SNiP III-42-80. The choice of welding method depends on the alloy. Rolled steel and plastic are used for installation. Metal is traditionally used for domestic gas pipelines.
Connection methods in gas pipelines
Welding a gas pipeline involves various types of connections, depending on the material from which the pipeline is made and the location of its installation. Gas pipelines are made of metal and polymer.
The following types of welding are used:
- Gas.
- Manual electric arc.
- Argon.
The welding method is chosen depending on the wall thickness of the gas pipes, the outer diameter, whether they are steel or plastic.
Welding steel gas pipelines has its own characteristics. Since they are designed to transport gas through them, in order to avoid leakage, burns and leaks that impede its normal movement are unacceptable.
Obtaining approval for gas pipeline replacement
Whether a transfer is possible or not can only be decided by authorized bodies, that is, the gas service of your city (district). Only a qualified specialist has the right to carry out any dismantling and installation work. Of course, pipes cannot be moved without approval.
Even such a simple step as cutting a pipe by 10 cm must be approved, since all work related to the gas pipeline falls into the risk category
The permit is issued in the following sequence:
- Find out the contact details of the gas service at the place of registration, contact specialists, explain the situation, and consult.
- You draw up an application (using a standard form) that will “launch” the approval process.
- Based on your application, a gas service representative will arrive at your home. The time will be confirmed in advance.
- The specialist performs an inspection, listens to wishes, and answers questions. Often at this stage it is necessary to change plans, since the desired transfer does not meet safety requirements (a preliminary study of the gas pipeline installation standards will eliminate this unpleasant moment).
- Approval of the final transfer scheme, drawing up an estimate. All documents are prepared by the organization providing the services. No work will be carried out without the consent of the property owner.
- If the transfer conditions are met, pay for the service using a receipt and agree on the start time of the work.
The approval procedure usually takes several days; it can drag on for a long period for only one reason: if the property owners and representatives of the gas service have not found a compromise solution.
Any factors that violate the installation standards for gas stoves (boilers, meters, water heaters) may cause refusal to move pipes.
Pipe preparation
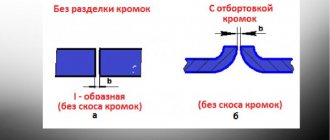
Welding work on a gas pipeline requires preparatory work. They consist of cleaning the welded surfaces from dirt and rust. Oil stains are removed using a solvent. Edges are formed on thick walls. Welding of thin walls is carried out without this. The sharp edges are dulled.
Then the pipes are centered to align their axes. This can be done using special equipment. Reliable fixation is mandatory. It is convenient to do this using tacks - short transverse seams made at a certain distance from each other, depending on the diameter of the pipes.
Safety precautions
Welding work is dangerous, so read the safety rules before you begin. Processing gas systems is unsafe for the health of the welder, so the rules should not be neglected.
Rule #1. Do not open gas cylinders suddenly. They have built-in oxygen reducers, which easily ignite when gas is suddenly supplied. The cylinder is under high pressure, so any incorrect movement can cause it to explode.
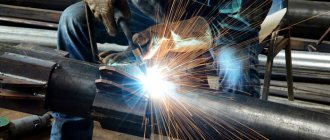
Arc welding
Electric arc welding is used if the amount of work to be done is small. Before starting welding, it is necessary to prepare the edges of the pipes. To do this, it is convenient to use a grinder and remove the remaining burrs with a file. Then the joints are cleaned and degreased.
Before laying the main seam, the pipes are fixed using transverse tacks. The number of passes depends on the thickness of the pipe walls:
- three-millimeter walls are welded in one pass;
- walls up to six millimeters - in two passes;
- over six millimeters - in three passes or more.
If access to the place of work is difficult, then the work is performed in separate fragments.
Technology
Gas welding work includes two stages: preparation of the parts to be welded and the welding process itself.
Pipe preparation
Before work, the metal must be cleaned of dirt, rust, and technical oils. Clean the edges and the surface adjacent to them - internal and external - to a distance of at least 20 mm.
Then follows mechanical processing of the parts - if the metal thickness is more than 3.5 mm, bevels are made on the edges at an angle of about 45º. This is due to the ability of the metal to heat up to a depth of 4 mm. If the thickness is less than 3.5 mm, bevels are not necessary. The sharp edge of the edge is dulled so that the metal does not melt and flow into the pipe. The exact bevel angle and bluntness are regulated by GOST 16037-80.
In cases where the pipeline is not intended to transport gas or liquid under high pressure, other connection options are used:
- with backing ring, without beveled edges;
- with insert ring and socket;
- with making an internal tuck in the pipes for their alignment.
Before starting gas welding work, the pipes are centered and clamped in different places at equal intervals. The number of tacks depends on the diameter.
The material for tack welding is usually the same as for welding - welding wire. The surface of the tack is cleaned, and during operation it is melted or removed.
Gas welding methods
Pipe welding is carried out in two ways:
- The seam is made from left to right (right method). This method is used when the metal thickness is more than 5 mm. When working in the right way, the torch flame is directed backwards - towards the already processed part of the seam, the welding wire is located behind the torch. This helps to increase the depth of melting. The right method has the advantages: low consumption of combustible gas and high labor productivity.
- Laying the seam from right to left (left method). Thin-walled elements are welded in this way. In this case, the torch flame is directed forward - towards the still unwelded joints, the welding wire is located in front of the torch. The welder has a clear view of the work surface. This is a more labor-intensive method, but the result is a more accurate seam, uniform and beautiful.
If the object can be rotated during the welding process, then the work is performed in the lower position. If the joint is fixed, then the work is carried out in stages using the bottom, vertical and ceiling seams. This is the most complex version of gas welding work. If the diameter does not exceed 150 mm, the lower half of the seam is performed first, then the upper half in the opposite direction. Wider pipes (up to 300 mm and more) are welded along four sections of the circumference.
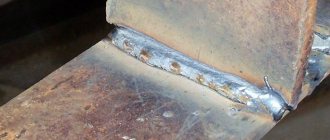
After welding, the seams are cleaned of slag and scale and checked for defects: cracks, holes, undercuts. The convexity of the seam should be 1-3 mm, but not more than 40% of the metal thickness, the width should not exceed the thickness of the pipe wall by more than 2.5 times. The surface must be flat and smooth. If the seam has defects, it must be corrected.
Argon arc welding
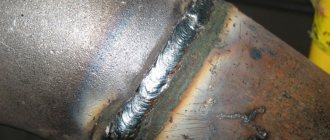
Argon arc welding is used to connect pipes made of steel. Argon welding, called TIG, occurs in a gas environment. Its main feature is the use of electrodes characterized by refractoriness. The outer coating of these electrodes is tungsten. During the formation of a seam, such electrodes do not melt, which is their advantage.
The arc occurs between the tungsten electrode and the metal surface of the pipe. The argon entering through the nozzle blocks the flow of oxygen to the site of the welding process. When using argon welding, the seam is of high quality and the pipe connection is reliable.
MIG and MAG welding
The MIG/MAG method combines filler wire and a protective gas atmosphere.
The welder can feed the filler material into the weld pool manually, use a semi-automatic machine in which he controls only the feed rate, or use automatic equipment that controls the wire completely mechanized.
The first technology is the most economical option. Manual feeding of filler wire does not require expensive equipment with complex microcircuits and automation.
But this method is more difficult: manual application of the additive can be learned after months of practice.
Automatic equipment for MIG/MAG costs from five hundred dollars. This price did not come out of thin air. The machines handle most of the processes themselves.
The welder only lights the arc and leads it, creating a connection. Wire feeding and speed are fully automatic.
A semi-automatic welding machine is more versatile. It helps the welder deal with the additive, which makes the job easier. It costs less than an automatic one, but the quality of finished seams is not inferior to it.
In addition, the semi-automatic machine can be used for different steels: low-carbon, high-carbon, stainless steel and others.
The connection under such conditions is formed due to two factors: melting of the edges of the pipes and solder of the filler material. If you practice and learn how to use a semi-auto well, you will have a sealed gas design.
To do this, you also need to correctly install the supply from the gas cylinder. A gearbox will simplify the task. A little shielding gas is consumed, and no more should be consumed.
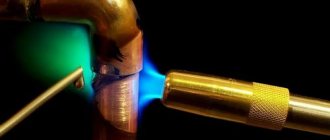
Gas welding
Gas welding of pipes is carried out by melting metal under the influence of a flame. It is formed during the combustion of gas, which is supported by an oxygen environment.
Gas welding of pipelines is often used for pipes with a wall thickness of more than 3.5 millimeters. If a thin-walled pipeline is to be welded, then protective fluxes are used to protect against burns. Gas welding is convenient to use for welding pipes of small diameter, despite the fact that the strength of such a seam will be lower than with other methods.
The gas used is acetylene or other flammable gases. They create a high temperature, under the influence of which the metal begins to melt. Then this melt fills the joint between the parts to be welded.
Main reasons for the transfer
The placement of a gas pipeline in apartment buildings and individual buildings is provided for at the design stage, choosing the best option for this. Typically, the gas riser runs close to the windows in such a way as to ensure ventilation of the area next to the gas stove. At the same time, the gas outlet should not be located too far from the water supply - this will lead to inconvenience when installing the kitchen unit.
From the above standard it follows that it is prohibited to use a flexible line of greater length and if the normal distance between the shut-off valve and the gas-consuming installation is exceeded, it will have to be compensated by lengthening the steel pipe.
If an owner needs to move a gas pipe, most often he does this for the following reasons:
- Installation of new equipment to replace old or additional equipment. If a water heater is installed in a room (for example, in the bathroom of an apartment), you will have to stretch a pipe from the kitchen to another room to supply gas. A similar situation may arise in an individual cottage when placing new or additional appliances: gas boilers, hobs, water heaters.
- One of the common reasons for transfer is related to regulatory requirements, for example, if the consumer previously had a stove with one entrance installed, then when placing a separate hob and oven, each appliance will need its own connection. To provide two inputs, you will have to change the configuration of the pipe with cutting in the connecting fittings and performing operations equivalent to transfer.
Rice. 2 Methods for connecting gas consuming equipment
- Redevelopment. The gas stove is moved if for some reason the kitchen layout is changed, partitions are demolished or added, or the kitchen area is increased by adding a balcony or loggia to it. When implementing the latter option, the slab is sometimes taken out onto an insulated balcony, with a pipeline connected to it (the option is not very acceptable from the point of view of legality and safety standards).
- Transferring the slab. Sometimes the designers’ decisions on the placement of the gas pipeline do not always coincide with the owners’ vision of arranging the kitchen space; for example, they decided to create a cooking area in the middle of a large kitchen. In this case, gas pipes have to be moved or hidden to ensure a convenient, aesthetic supply of gas to the hob.
- Purchase of a kitchen set with built-in gas equipment. The gas riser in all city apartments is designed to connect one stove in a certain place; if the owners purchase cooking appliances built into the kitchen furniture, it is highly likely that the standard position of the riser outlet will not fit them - it will have to be moved.
- To improve the aesthetics of appearance. Gas pipes made of low-carbon steel, painted with light paint, which turns yellow over time, spoil the appearance of many modern kitchens, where the owners want to achieve a high decorative effect. If it is not possible to hide the gas pipeline in the upper cabinets of the kitchen unit, consider one of the rare options of placing the pipes in the grooves (channels) of the walls under easily removable decorative panels.
- Changing the location of the gas meter. A gas meter is a rather voluminous device that takes up a lot of space on the wall. If it creates inconvenience or too clearly disrupts the aesthetic appearance of the kitchen, it is not possible to place the device in a kitchen wall cabinet; consider options for moving it to another location (usually downstairs) along with the piping.
Rice. 3 Pressure characteristics of gas pipelines for various purposes according to SNiP 2.04.08-87
Welding pipes in an apartment
This may be necessary, for example, if it is necessary to move gas pipes. Welding gas pipes in an apartment begins with turning off the gas supply. This will help prevent a fire.
If pipes of different diameters are welded, then it is necessary to use special adapters, which reduces the likelihood of gas leakage. Most often this work is performed using the butt method. To remove residual gas in the pipes, they are purged.
If it is necessary to move the pipes to another location, drill a hole in it and insert an outlet into it. After this, a valve in the form of a lever is attached to the outlet, designed to regulate the gas flow rate.
After this, you need to check for possible gas leaks. To do this, apply a foaming substance, for example, a soap solution, to the joint. After waiting for some time, you should make sure that there are no bubbles. If they occur, this will indicate a leak, and the welding will have to be repeated.
After finishing the work, you need to turn on the gas supply.
What is included in gas equipment maintenance?
MINIMUM LIST OF WORK PERFORMED (SERVICES PROVIDED) FOR MAINTENANCE AND REPAIR OF IN-HOUSE
AND (OR) IN-Apartment GAS EQUIPMENT
according to the Decree of the Government of the Russian Federation dated 05.14.2013 No. 410 (as amended by the Decrees of the Government of the Russian Federation dated 04.15.2014 N 344, dated 09.04.2015 N 941, dated 09.09.2017 N 1091, dated 06.10.2017 N 1219, as amended Decision of the Supreme Court of the Russian Federation dated December 10, 2013 N AKPI13-826)
Name of the serviced object
1. Visual inspection of the integrity and compliance with regulatory requirements (inspection) of in-house and (or) in-apartment gas equipment
intra-house and (or) intra-apartment gas equipment
2. Visual check for free access (inspection) to intra-house and (or) intra-apartment gas equipment
intra-house and (or) intra-apartment gas equipment
3. Visual check of the condition of the painting and fastenings of the gas pipeline (inspection)
4. Visual inspection of the presence and integrity of the cases in places where they are laid through the external and internal structures of apartment buildings and households (inspection)
5. Checking the tightness of connections and disconnecting devices (instrumental method, soaping)
intra-house and (or) intra-apartment gas equipment
6. Checking the functionality and lubrication of disconnecting devices
shut-off devices installed on gas pipelines
7. Disassembly and lubrication of taps
household gas equipment
8. Checking the functionality of devices that allow you to automatically turn off the gas supply when controlled parameters deviate beyond acceptable limits, its adjustment and adjustment
safety valves, gas control systems
9. Adjusting the gas combustion process in all operating modes, cleaning the burners from contaminants
household gas equipment
10. Checking the gas pressure in front of gas-using equipment with all burners running and after stopping the gas supply
individual cylinder installation of liquefied hydrocarbon gases
11. Replacement of cylinders for liquefied hydrocarbon gases
group and individual cylinder installations of liquefied hydrocarbon gases
12. Checking the presence of draft in the smoke and ventilation ducts, the condition of the connecting pipes with the smoke duct
smoke and ventilation ducts
13. Instructing gas consumers on the safe use of gas when meeting domestic needs
Welded joint diagrams
Gas pipeline welding diagrams are part of the working documentation for carrying out this type of work. They are not made to scale, but in the form of sketches.
The diagram of welded joints of a gas pipeline contains designations of joints, both rotary and non-rotary. Rotary joints are easier to make because they can be made in any position convenient for the welder. They also have a lower likelihood of defects.
The diagram indicates the number of each joint. Information is indicated on what type of control after welding it should be subjected to. Information about the object is reported, in particular the class or group of the pipeline.
The summary table contains all the necessary information about welded joints: the number of pipe joints, their parameters, what non-destructive testing methods they should be subjected to.
Scheme of welded joints of a gas pipeline - sample:
The diagram can also be performed in axonometry. It must contain the signatures of the manager and performers. The diagram, in essence, is a guide for the correct implementation of welding of gas pipes, including planning this process and monitoring after it.
Drywall box
Creating an ergonomic interior in the kitchen is a realistic task if you cover the gas pipe with plasterboard. This solution has both its advantages and significant disadvantages.
Drywall box as a means to hide imperfections
Positive sides:
- the development and implementation of the project can be carried out not only with the help of a specialist, but also independently;
- materials for creating the structure are available for purchase at a construction supermarket;
- the cost of the necessary components of the structure is within reasonable limits and affordable for everyone;
- a plasterboard box can harmoniously fit into any interior with the help of appropriate decoration.
Negative sides:
- Covering gas pipes with plasterboard is unacceptable from the point of view of the safety of people living in the house, because at the same time, access to them is completely or partially blocked;
- the design “eats” the useful volume of the kitchen, which is important for cramped spaces;
- It is not recommended to close gas pipes in the kitchen also because when repairing or replacing gas communications, you will have to dismantle the structure.
Technical side of the issue
If, when renovating a kitchen, the pros of masking a gas pipe with plasterboard outweigh the cons, pay attention to the recommendations for the installation procedure for the duct. After installation is completed, the box should be plastered
After installation is completed, the box should be plastered
- We take measurements and determine the size of the future structure.
- We prepare the necessary amount of materials and tools for the work: moisture-resistant drywall, a metal profile or a wooden block, a screwdriver and self-tapping screws, a hacksaw.
- We form the frame of the structure from metal or wooden guides.
- We specify the dimensions locally, cut the plasterboard sheets and cut out the resulting parts.
- Using self-tapping screws, we secure the workpieces to the frame.
- If gaps or chips form, be sure to carefully mask them with foam or putty.
- We carry out the final design of the surface with materials that are in harmony with the idea of the interior of the room.
Polymer pipelines
The polymer material used for the production of gas pipes is able to withstand high temperatures and pressures.
HDPE (low-density polyethylene) pipes are most often used for laying underground gas pipelines. To connect individual sections of polyethylene gas pipelines, the butt method is used.
It consists of heating the end of each section of the gas pipe and then connecting them under a certain pressure. Thus, an interatomic connection of the gas pipe material is made.
A fairly new variety, very simple and in demand. High qualifications are not required to perform the work. The welded joint can withstand pressure of no more than 40 atm.
When assembling large-diameter pipelines, special equipment is used; for assembling small-section pipelines, hand tools are used.
Regardless of the thickness of the gas pipes, work is carried out in one way. Strong heating takes place. Then squeezing and getting a joint. Small diameter pipes are connected using electric couplings. The heating temperature of the edges is no more than 2700.
For polypropylene pipes, the socket welding method is used. Polypropylene pipes are used mainly for laying internal water supply and sewerage systems, some brands are used for heating systems.
Selecting Electrodes
The connection of steel pipeline segments must be carried out using high-quality consumables, otherwise it is unlikely that a good result will be achieved.
For example, when it comes to choosing electrodes, the following models are considered the best:
- ANO-21, ANO-24 and MR-3 . They operate on alternating currents. Work is allowed even with wet coating. The cost of the products is low, which explains their demand in everyday life; they are ideal for connecting structural elements of gates, greenhouses and other light-weight structures that do not experience high loads. Work with pipelines in which the medium is transported under significant pressure is not permitted.
- SSSI . The quality of the cores deserves flattering reviews even from professional welders, but they have a disadvantage - work cannot be carried out at high speed. It is necessary to constantly monitor the stability of the arc; the weld is deposited gradually, so the worker must have some experience in interacting with classic ANO and MR electrodes.
- LB-52U electrodes are excellent for metal pipes . This is a Japanese development. It is the one that is preferred when implementing large projects. They form an even and stable arc, the resulting seam combines strength and aesthetics. The downside is the rather high cost, but they are suitable for both specialists and beginners.
Watch a video on the topic of which electrodes to use for welding pipes:
Basic methods
The connection can be made in one of the following ways:
- Butt joint, when the pipes to be connected are placed opposite each other. The most common option, characterized by relative ease of implementation. However, it is also characterized by certain difficulties. The first point is that it is better to work from below. The second point is that it is necessary to thoroughly weld the metal so that the depth of penetration corresponds to the thickness of the wall.
- Overlapping. This method is focused on connecting elements that initially differ in diameter, or segments, one of which is flared, that is, its diameter is intentionally increased by mechanical action.
- The T-joint is made at a 90-degree angle.
- A corner connection assumes that the angle between the connected segments is less than 90 degrees.
Useful tips
Before electric welding pipes, it is worth remembering a number of tips, following which will simplify the process and also improve the quality of the final result:
- If the connection is made using the butt or tee method, then electrodes whose diameter varies from 2 to 3 millimeters perform best.
- The recommended amperage is from 80 to 100 amperes, with the exception of overlap welding, when it is recommended to increase it to 120 amperes.
- When filling a welding seam, you need to ensure that the rise of the metal above the plane of the element reaches 2-3 millimeters.
- If the cross-section of the pipe is not the usual ovals or circles, but profiles, that is, rectangles and squares, then a point method of connecting it is used.
Its essence is that initially you need to weld a small area on one of the sides. Next - a similar section on the opposite side, then - on the remaining two planes. Only after this the pipe is finally welded.
This approach makes it possible to eliminate the possibility of warping of the product when the temperature rises; its geometry remains stable.
Preparatory operations
The final quality of the joint depends not only on the professionalism of the welder and the use of the “correct” electrodes, but also on how well the preliminary preparation is done.
It consists of the following operations:
- Checking the compliance of the geometry of the connected elements with the selected technology. It must be remembered that the wall thickness must be identical, otherwise it will not be possible to fully weld a thick-walled pipe, and in the case of working with a thin-walled product, on the contrary, the risk of burn-through increases.
- The presence of defects on the welded products, be it cracks, creases or deformations, is not allowed. During the process of thermal expansion, they can turn into areas of complete destruction of the structure.
- Geometric deviations of the cut are not allowed. Its angle must be 90 degrees, otherwise the welding seam will not be strong enough and problems will arise with its formation, which will pose a threat of destruction of the entire structure.
- The edges of the connected pipes must be cleaned until a shiny metal surface appears, for which coarse sandpaper or a special brush is used. The minimum length of the area to be cleaned is a centimeter from the edge.
- Grease and other contaminants, traces of paint and corrosion are removed. The most effective removal agent is a chemical solvent.
This video shows how to prepare the edges of a pipe for clearance using a grinder:
Process Features
Pipe welding technology requires following the following rules:
- The seam must be continuous, that is, end at the point of its beginning. Tearing of the electrode from the surface is not allowed. It is impossible to follow the rule if the pipe diameter is too large. In such a situation, multilayer welding is used. The number of layers must be correlated with the thickness of the walls.