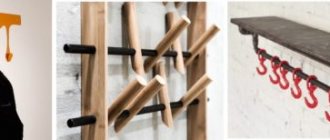
A stand for a drill allows you to significantly expand the functionality of hand tools, which is not difficult to make with your own hands. Placing a drill on such a stand (it can also be made rotary) allows you to turn an ordinary hand tool into an effective drilling machine that can be successfully used to perform various technological operations.
Homemade drill stand made from wooden elements
Will need
- Two old shock absorbers;
- drill with power handle;
- two bearing housings with bearing;
- roller chain and sprocket;
- profile rectangular pipe;
- spindle feed handle and plastic balls;
- steel sheet, plates and angle;
- stud, bolts, washers and nuts;
- extension spring, etc.
We will also need: a square and a marker, a hammer and a countersink, a drill, welding, a shot blasting chamber, a grinder, etc.
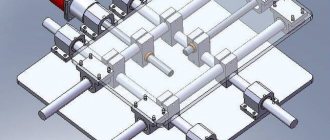
The process of making a drilling machine from shock absorbers
According to the markings, we weld a piece of roller chain to the wide side of the profile pipe.
Using bearing housings, we mark and drill holes in the steel plate for fastening them with hardware.
We screw a nut onto the stud inserted through the bearing, put on the sprocket and secure it with a second nut.
We mark another plate for installation and welding in the center of the profile pipe, drilling holes in the corners and rounding them.
We clean the old shock absorbers, and after drilling the bottoms, drain the oil and knock off the covers. After wrapping the mirrors of the rods and threads with aluminum foil, we place them in the shot blasting chamber for complete cleaning. Finally, remove the levers.
We place the shock absorbers with their upper parts in the corners at the level of the sloping shelves and weld them.
We fix the shock absorbers parallel to the steel plate at the corners using welding.
We apply a piece of profile pipe to the ends of the painted rods and drill two holes along the marks.
We lay it flat and place a U-shaped bracket in the center with its legs facing outwards and weld it.
For a fragment of a profile pipe with a length equal to the width of the larger side, remove the opposite edge. Drill a hole in the center of the square base.
We cut a fragment of a round pipe along the generatrix and weld ears with two holes along the edges of the cut. It turned out to be a kind of clamp.
Insert a bolt into a part made from a profile pipe from the inside and weld it behind the head. We fix the hardware in a vice, place the clamp along the legs with the ears up and connect them by welding.
We place the U-shaped bracket on the profile pipe between the shock absorbers, then the rods will fit into its holes. Screw the nuts onto the threads of the rods and tighten them.
We turn the shock absorbers over and place an assembly of bearing housings, pins and sprockets on the bracket leg. We weld the assembly plate to the bracket.
We weld a plate of different widths to the narrow sides of the profile pipe with a chain flush with the end.
We place the assembly on them, then the sprocket will engage with the chain, and weld the shock absorbers to the plates.
We bend a U-shaped element with rounded corners from a profile pipe. We fix the legs at right angles to the crossbar and weld them.
We weld two corners crosswise to the ends of the legs with a small gap. We make 2 holes in the shelves along the edges.
We cut out a cover for the U-shaped element from a steel sheet and weld them. This unit is the base of the machine.
We attach the assembly plate with shock absorbers to the base with four bolts and nuts.
We put the spindle feed handle on the pin and secure it with a nut.
We screw plastic balls onto the ends of the handle spokes, drilling blind holes in them and cutting threads.
To lift the spindle, we attach a tension spring to the body and spindle.
We attach a clamp with a base to the plate between the shock absorbers, into which we insert a drill with a reinforced body and tighten it.
Car shock absorber strut: for drilling and tapping
It is irrational to throw car parts into scrap metal, because they can be used to make various useful homemade products for the garage and workshop. On our website you will find hundreds of interesting ideas.
In today's article we will tell you how to make a device from a car shock absorber - a stand for a drill or screwdriver.
In addition to the shock absorber, we will need the following materials:
- sheet of plywood or chipboard;
- fastening clamps;
- drill chuck;
- sheet metal;
- profile pipe.
Main stages of work
The first step is to prepare the shock absorber. We cut off all excess from it, and then pour the oil into some container. Using a grinder we clean off the factory paint.
Next, cut off a piece of metal plate. We drill four mounting holes in it.
Then drill another hole in the center. We insert the shock absorber rod into it and scald it. Clean the weld seam.
At the next stage, we cut off a piece of the profile pipe and weld steel mounting clamps for the pipes at the ends.
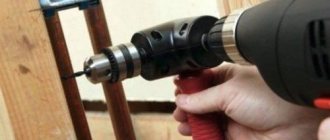
We put the part on the shock absorber body and tighten the clamp. On the opposite side of the corrugated pipe we attach a drill chuck.
You can use a sheet of plywood or chipboard as the base. You can also weld a metal platform. We attach a homemade stand to the base.
We clamp the drill chuck shank in the chuck of a screwdriver or drill. We clamp a drill or tap in the chuck itself (if you need to cut a thread in the hole).
Device bed
The frame for the drilling device from the drill is made of metal (10 mm thick) or wooden (more than 20 mm thick) sheet. The massiveness of the bed that you will use as a base directly depends on the power of the drill used. The dimensions of the frame for a drill machine depend on the specifics of the work performed on such equipment. You can use the following recommendations for choosing frame dimensions:
- machines for vertical drilling - 500x500 mm;
- equipment for performing various technological operations - 1000x500 mm.
The metal frame is a thick plate with welded corners
The frame, made of metal or wooden sheets, is a very simple structure. A stand is placed vertically on it, the stable position of which is ensured by a special support. Such structural elements can be secured to each other using screw connections.
DIY drill stand: 3 design options
We'll tell you how to make your own budget drill stand for a drill at home. We offer 3 different options.
This device will be useful for home craftsmen who cannot afford to purchase a drilling machine.
At the same time, in some cases the stand benefits from its compactness and mobility.
If you make a small rack that does not require installation on a desktop, then it can be easily transported by car (take it with you to field work).
Unlike the same drilling machine, it will allow you to drill holes in both vertical and horizontal planes (for example, if you need to drill a hole in the wall).
To make a stand for a drill with your own hands, we will use inexpensive and accessible materials. Moreover, the stand can be used not only for a drill, but also for a screwdriver.
The purpose of a homemade stand is the same as that of a drilling machine - vertical drilling of holes at an angle of 90 degrees relative to the workpiece.
Using an electric drill or screwdriver it is not always possible to drill perfectly straight holes. A homemade stand (even of the simplest design) can easily solve this problem.
Of course, you can buy a stand for an electric drill at a hardware store or order it online. But if your goal is to save money, it will be more profitable to make it yourself.
Metal drill stand: option No. 2
If you don’t have time to study drawings and various options for rack designs, then we invite you to watch an informative video about creating a very functional mechanism that can satisfy the needs of most home craftsmen.
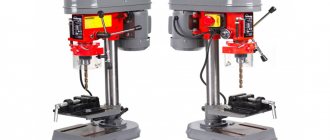
The result of the work will be a stand like this with an original cable drive of the carriage
How to make a simple drill stand for an electric drill
The first version of the homemade design, despite its simplicity, combines several advantages: low cost and functionality.
This stand is more reminiscent of a tabletop mini drilling machine.
The costs of implementing this idea are minimal. In any case, such a homemade product will cost less than buying the most primitive factory model.
The idea of making a stand for a drill with your own hands belongs to the author of the YouTube channel MakeTools. The main material for the manufacture of the structure is a profile pipe with a wall thickness of 1.5 mm.
The size of the drill stand frame is 300x300 mm (however, you can make the base larger if necessary).
The height of the vertical stand is 500 mm (again, you can change it up or down if necessary).
The movable T-shaped part to which the electric drill is attached consists of two parts: vertical (length - 150 mm) and horizontal (length - 100 mm).
Additionally, fastening elements are used in the form of bolts and nuts of different sizes: M10 - for connecting parts, M8 - for fastening the door spring (return mechanism).
Review of the best models
Rating of the TOP 5 best stands for drills for vertical drilling in terms of price and quality ratio.
Stand CALIBR 96202
If you are thinking about a rack, we advise you to take a closer look at the CALIBER 96202 rack. You will have to look for such a compact, light and cheap model.
Of course, it cannot replace a full-fledged drilling machine, but it can help in solving some problems. The diameter of the pipe is 25 mm.
There are no rollers in the design, but there are 3 holes for the size of the pipe in a pair of parts.
The manufacturer strongly recommends lubricating all rubbing parts and threads of the clamps with oil - the design will work without jamming.
The clamp on the pipe should be tightened a little, then no traces (let alone deformations) will remain.
The drilling accuracy is decent, the guide is of high quality, and the clamping insert is made of silumin. The country of origin is China, while the homeland of the brand is Russia.
Specifications:
- stand height: 400 mm;
- weight: 2.05 kg;
- pipe wall thickness 2 mm;
- clamping hole diameter: 43 mm;
- drilling depth: 60 mm.
Advantages
- budget;
- assembly is simple;
- practical;
- quality materials;
- acceptable stand height.
Flaws
- a little loose;
- configuration required;
- silumin in the composition.
Stand DIOLD SMS-43
A convenient and durable stand for drilling machines can be used both as a mobile and as a stationary device for fastening hand-held structures with a mounting neck diameter of 43 mm.
Thanks to it, you can do drilling work on plastic, metal, wood and other materials, namely, make both through and blind holes of high precision in workpieces.
The maximum depth of such a hole will be 85 mm. The vice is made of aluminum.
A metal holder with a screw makes it possible to fix the desired workpiece in a convenient position.
The stand can be adjusted in height using a lever that allows you to lower and raise the tool. The spring ensures easy return of the tool to its original position.
It is allowed to use a drill with a sleeve diameter of 43 mm. The user manual is clear. The stand weighs a little. Production - Russia.
Specifications:
- weight: 2.5 kg;
- bed surface dimensions: 150×170 mm;
- stand height: 550 mm
- maximum size from the frame to the journal mounting diameter: 250 mm;
- Maximum spread of vise jaws: 65 mm.
Advantages
- equipment;
- Ease of use;
- simple assembly;
- light weight;
- metal holder.
Flaws
- not suitable for professional work;
- guide play;
- high price for such quality.
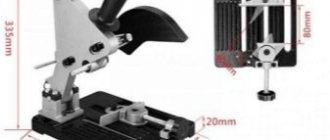
Stand Wolfcraft 4522000
Inexpensive, but needs an addition for the drill. Helps you drill precise point and corner holes in almost all positions (on the wall, overhead, on inclined planes and round materials, baseboards and various types of profiles).
If you connect a construction vacuum cleaner, there will be no dust flying around you at all. A straight stop is provided for serial drilling along one line.
An additional handle helps to point the drill more accurately and also avoid slipping when drilling.
There are 4 holes at the base of the plates, there is a V-shaped groove for fixing round parts.
The drill can be stored in the handle, which is very convenient. The depth limit stop is continuously adjustable.
There is a rotating guide of 2 posts with a scale for precise drilling up to +/- 45°. The bore diameter fits most standard drills.
Country of manufacture: - Germany, warranty is given for 10 years.
Specifications:
- clamping device: Ø 43 mm;
- maximum strut travel: 150 mm;
- landing diameter: 43 mm;
- height: 295 mm;
- diameter: 140 mm;
- weight: 1.55 kg.
Advantages
- rubber buffers for stable fixation on smooth surfaces;
- device for connecting a vacuum cleaner included;
- no slipping when drilling;
- depth limiter;
- groove for fixing round parts.
Flaws
- cannot be used as a cutter with an overhead spindle;
- backlash;
- price.
Stand Wolfcraft 5019000
The stand for angle machines with disc diameters of 115 mm and 125 mm is the ideal solution for stationary work with your tool.
The platform is not large in size, but massive and convenient to cut on.
As a result, the user receives high-quality perpendicular cuts of the profile pipe with minimal effort.
The box contains detailed instructions in Russian with step-by-step pictures and diagrams. The platform is made of cast iron.
Keep in mind that the plastic casing does not fit together with the original casing from the angle grinder and you need to choose one thing. And instead of the standard handle for lowering, it is better to install a handle from an angle grinder.
The kit includes 3 types of screws for securing the angle grinder into the standard holes for the handles: M6, M8, M10.
Specifications:
- pharynx width 100 mm;
- overall dimensions (LxHxW): 240x260x190 mm.
- table area: 203x307 mm;
- working height: 330 mm.
Advantages
- disk saving;
- compact dimensions;
- price;
- metal;
- detailed instructions.
Flaws
- curved plastic casing;
- inconvenient adjustment and lack of a protractor;
- play at some connection points.
Dremel 220 stand
A mobile and compact stand that copes with its task - accurately drilling holes - without any complaints. You can safely buy it for homework.
It assembles quickly, but you need to take into account that during the first assembly the plugs from the rack are not immediately removed.
The machine moves in two planes, down and up, and rotates 90 degrees to the right and left. Some parts of the clamp are made of plastic, the silumin frame is thin.
The machine is ideal for drilling printed circuit boards.
Depth markings for easy selection and fixation of depth, ruler in centimeters and inches, storage of attachments - directly on the tool.
Specifications:
- Max. stroke: 50 mm;
- length: 15.2 cm;
- width: 15.2 cm;
- depth: 30.48 cm.
Advantages
- convenient shaft lock button for unwinding the chuck;
- miniature;
- affordable;
- Possibility of vertical drilling or drilling at an angle;
- step adjustment of 15 degrees.
Flaws
- small backlash of fastening screws;
- sticky fastening of the guide in the frame;
- fragile plastic construction.
Do-it-yourself vertical stand for a screwdriver
Now let's look at the second option for a homemade stand. In general, the design is very simple, but most importantly, it works. The idea belongs to the author of the YouTube channel Gökmen ALTUNTAŞ.
In this case, it is quite compact, since it is designed for use in conjunction with a screwdriver.
However, you can adapt it for an electric drill by slightly increasing its size. And then you will get a homemade drill stand.
The advantage of this design is that its manufacture requires a small amount of materials. You don’t even have to buy many parts - you can find them in the garage.
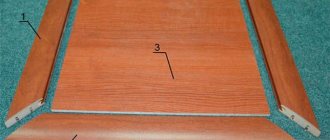
We will make the drill stand stand from 20 mm thick plywood. You can also take a piece of board.
First of all, we saw off a blank of the required size from the plywood. Then we mark and drill two holes in it. Using epoxy glue, glue the guides.
We round the sharp corners of the base on a grinding machine. We make a movable platform from wood or plywood.
In the moving part we drill holes with a diameter of 19 mm for the bearings. Lubricate the outer part of the bearings with epoxy glue and insert the bearings into the holes.
Made of wood
For simple hole drilling operations, wooden stands are often used.
They are easy to make yourself with a minimum set of tools. A slab with a thickness of 20 mm or more is used as the base of the structure, additionally reinforced with plywood, which will provide a smooth working surface. A vertical stand is a board 20 cm wide and up to 70 cm long. The carriage on which the furniture guides are attached is sized according to the size of the electric drill. The disadvantage of using wooden racks is the tendency of the material to deform under the influence of moisture, and lower strength in comparison with metal analogues. At the same time, this option is more affordable in terms of investment cost and is easier to process in a private workshop. It will not require the involvement of additional specialists in the manufacture of structural parts.
Wooden drill stand
DIY drill guide
We bring to your attention the third budget version of a homemade device. The design is also quite simple to manufacture, but is made of metal. This idea belongs to the author of the YouTube channel Be Creative.
Materials that will be required for the manufacture and assembly of the drill stand:
- profile pipe;
- metal bushings;
- clamp for drill;
- steel plates;
- guides;
- return springs.
First of all, it is necessary to make a movable part of the stand to which the electric drill will be attached. In the previous version it was made of wood, in this one it is made of corrugated pipe.
Cut a piece of square profile and cut out the ends of the saddle. Then we weld two bushings to it.
In the middle you need to weld a clamp to attach the electric drill. It can be made from a piece of round pipe, two nuts and a bolt.
Next, we cut off three pieces of steel strip and weld the base of the stand (support platform) from them.
We weld guides made of smooth reinforcement to the base. We put springs on them.
We fix the drill with a clamp, and then put the moving part on the guides.
The homemade drill stand is ready. Yes, it looks very primitive and flimsy, but it can be made very quickly from scraps of metal.
The detailed manufacturing and assembly process of this structure can be seen in the video below.
Mechanism for moving the drill in the vertical direction
A homemade drilling machine must be equipped with a mechanism that will ensure the movement of the drill in the vertical direction. The structural elements of such a unit are:
- a handle with which the carriage with a drill attached to it is brought to the surface of the workpiece;
- a spring necessary to return the carriage with the drill to its original position.
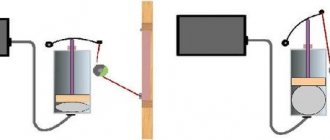
Spring mechanism for moving the drill
You can make such a mechanism using two design schemes:
- the spring is connected directly to the handle of the machine;
- the springs are located at the bottom of the carriage - in special grooves.
According to the first option, the design is carried out according to the following scheme:
- two metal plates are fixed on the machine stand using screws, between which an axis is installed, where the installation handle will be placed;
- on the other side of the rack, plates and an axis are also installed, on which one end of the spring is fixed, and its second end is connected to the handle;
- the pin with which the handle is connected to the installation carriage is placed in a longitudinal groove made in it.
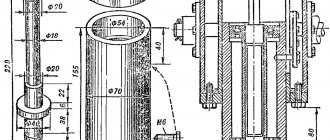
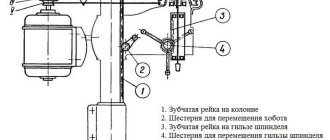
The basis was an old stand from a Crocus photo enlarger made in Poland
If the springs are located at the bottom of the return mechanism, then the handle of the device is also fixed using two plates and an axis that ensures its movement. With this design, the springs are located in the lower part of the guide grooves, which are modified using metal corners that limit their movement.
The principle of operation of a drilling machine, in which the springs are located at the bottom of the carriage, is quite simple: moving down during the drilling process, the carriage with the drill attached to it presses on the springs, compressing them; after the mechanical impact on the springs stops, they unclench, lifting the carriage and drill to their original position.
Pros and cons of homemade racks
The most important and fat plus is saving money. In most cases, you can make a drill stand (guide) for a screwdriver or drill from scrap materials.
Even if you don’t have some components in the garage, you can buy them for pennies at a metal collection center (for example, if you decide to make guides for a moving part from shock absorbers).
To make a tripod (vertical stand), a profile pipe is usually used - many have it in stock, and buying it is not a problem.
Another advantage of a homemade rack is that the structure can be customized to suit you - make it the size you need (for example, if you transport it in a car).
At the same time, you don’t need to climb all over the Internet to find suitable drawings - you can make a rack without them.
The only downside that can be noted is that a homemade drill stand is not designed to perform high-precision operations. And, of course, it is in many ways inferior to a drilling machine.
What is it for?
The stand will help you perform various technological operations.
A device you make yourself can cost less than its Chinese counterparts and not be of inferior quality.
The drill stand is used as a support element during work; it is necessary when performing a number of tasks, when drilling a hole in a strictly specified angle, when it is difficult to hold the drill suspended.
Doing the work manually leads to:
- to towing the drill and its breakage;
- when creating many identical holes in a blank;
- when drilling thick material.
Benefits of use
The use of a resistant device brings additional improvements to the drilling process:
- the workpiece is fixed on the machine, which simplifies drilling when using hand tools;
- a home-made stand fits exactly the tool being used;
- the stand is created for a specific type of work, this further improves the process of its implementation;
- the home version of the device may cost less than ready-made stands;
- in the manufacture of the device it is possible to use scrap materials - parts of old furniture, equipment;
- the ability to expand the functional parameters of the drilling process, for example, make the drill rotate 180 when working.
Creating a rack allows you to get a functional device for a specific type of work.