We tell you how to make your own drum sander with a roller system for feeding workpieces. The main material is sheet lumber (plywood) 20 mm thick.
In addition to this, you will also need other materials:
- wooden blocks;
- board;
- sandpaper;
- rollers;
- loops;
- housing bearings;
- plastic pipe;
- threaded rod.
The author of the YouTube channel DIY Tools shared his personal experience of making a drum sander with us.
An electric motor acts as a drive for the grinding machine. However, in this case, toothed pulleys are used for belt transmission.
Tools
Anyone who was involved in construction work, repairs, restoration of old doors, windows, window sills, etc., was certainly faced with the need for the working surface to be flat, smooth and sliding.
Previously, we took sandpaper in our hands, if the surface was large, then we strengthened the sandpaper on a wooden trowel and, stocking up with great patience, began the monotonous, monotonous work of sanding. Now, a lot of devices, so-called grinding machines and machines, have been created to help professionals and amateurs. Using them for certain grinding operations, we make the process of manual labor easier for ourselves by transferring some of the simple functions to the machine. Today we will talk about grinding machines that are used for processing wooden products. Table of contents:
Purpose, classification and areas of application of grinding machines
Grinding machines are used to reduce the surface roughness of workpieces, as well as to obtain accurate dimensions. Typically, grinding is the final stage of processing pre-prepared parts.
When working on grinding machines, grinding materials and tools are used.
Sanding materials – special powders, pastes, sanding cloths.
Grinding tools include cutting, polishing and grinding tools, wheels, bars and segments.
Depending on their purpose, machines are divided into several types:
— specialized grinding machines.
The classification of machines is based on the following characteristics:
-type of surface to be ground (internal or external, cylindrical or flat);
- type of parts that this machine can process (cylinders, shafts, rollers, racks, etc.);
— design features of machines (centerless, planetary, two-column);
— features of the elements of the processed parts (slots, threads, profiles, etc.).
The area in which grinding machines are used is very wide. Recent advances in machine tool construction, as well as the production of parts by casting, stamping, rolling, turning and carpentry, make it possible to use grinding machines instead of turning and milling machines (horizontal boring machines). Nowadays grinding machines can perform the following operations:
— cutting and peeling of workpieces;
— precise processing of various planes, wheel teeth, rotational surfaces, etc.;
Drum grinding machine: purpose and main elements
The drum grinding machine belongs to the surface grinding machine in type, and to the calibration grinding machine by class. The main tool of the machine is the grinding wheel, which is made in the shape of a cylinder (drum). Typically this machine is used for woodworking. Using it, it is very convenient to sand and calibrate boards, slats and other flat and long wooden parts, such as panel surfaces made of chipboard, MDF, solid wood, veneer, etc.
The main elements of a drum grinding machine are:
— a bed on which all components and parts of the machine are mounted;
— a motor that ensures rotation of the grinding and feeding drums;
- a mechanism that ensures a change in the rotation speed of the feed drum
— device for dust removal;
— mechanism for changing the height of the grinding drum.
You can see how a drum sanding machine works in the video.
Some models of drum-type grinding machines presented on the Russian market
Today, on the Russian market of grinding equipment, the drum grinding machines section presents products from various manufacturers. The leading place here is occupied by products under the JET brand. The American company JET, part of the Swiss holding WMH Tool Group AG, today presents the following industrial and household drum grinding machines:
— JET 10-20 Plus. Price: 25,000 rub.
The drum sander with a total capacity of 500 mm (250 mm x 2) is well suited for a small workshop where space is at a premium.
— JET 16-23 Plus. Price: 37,000 rub.
A universal grinding machine with enormous potential and capabilities: the manufacture of musical instruments, the production of furniture, kitchen sets, shop and bar equipment, and a wide range of carpentry operations.
— Double drum sanding machine JET DDS-225. Price: 160,000 rub.
A very powerful machine, suitable for use in production conditions.
The Russian “Instrumental” - the official dealer of leading foreign manufacturers of tools, equipment, machines, etc., offers the Corvette 57 drum grinding machine manufactured in China. The machine is designed to perform preliminary grinding of flat wooden blanks and bringing products to a given size, processing varnished and primed surfaces.
Corvette 57 - drum grinding machine price : 24,100 rub.
The German company Elmos Werkzeuge, a manufacturer of power tools, woodworking equipment, and garden equipment, presents its drum grinder Elmos DS 163. Price: 16,400 rubles. Designed for use in production as an alternative to hand grinders.
To summarize this brief review of grinding machines that are offered for purchase in the Russian Federation, we can say with confidence that there is a certain choice. You can find machines for use in large-scale production, small business and for personal use. As they say: “Every whim for your money.”
However, not everyone today is ready to shell out a tidy sum for a grinding machine. And the habit left over from the times of the Soviet Union of doing everything from scrap materials and with their own hands forces modern Kulibins to move their brains, rustle through the underbelly and “the eyes are afraid, but the hands are doing” - to produce many useful and necessary things. Moreover, technologically they are not much inferior to their production analogues, but the price is several times cheaper. Below we will look at how to assemble homemade drum sander.
DIY drum grinder
We discussed above what it is useful for, as well as what it should consist of. Therefore, we take a list of the main elements and begin to search and collect them. And then we’ll talk about how to make a drum sander at home
Engine
Let's start with the engine. The easiest way is to take it from an old washing machine. If it is there, then half the job is done. From there you can take all the electrical parts, pulleys and belt.
We recommend taking a motor of 200 - 300 W (powerful and small), 1500 - 3000 rpm, asynchronous (higher efficiency), single-phase (less hassle with connection).
Making a grinding drum
Now about the drum. It can be made from various materials and sometimes seemingly completely unnecessary remnants of repair and construction activities. For example, from wooden rings cut out and glued together, or four cylindrical bars fixed on a metal axis with epoxy glue, or from a paper tube onto which a roll of linoleum is wound.
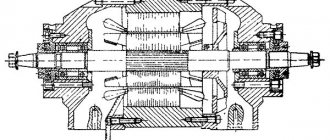
Creation of a drum cylindrical grinding machine
Introduction, background
I would like to talk about the process of designing and manufacturing a woodworking machine.
Describe the process itself, in its entirety, with all the nuances, with small inserts on specialization in each of the affected branches of knowledge (design, engineering, electrical engineering, manufacturing, etc.). Without delving into excessive emotionality and process, and, at the same time, without dry scientific facts and theorizing. I focus on popular and scientific presentation, but not without details and subjective opinion) The background is this: at one time I was engaged in woodworking and I needed to grind and smoothly remove curved surfaces on workpieces made of hard wood. I started this path with a file and a hacksaw, but quickly realized that manual labor is only good at school, and for production it is necessary to use electrical energy. I worked on the first such machine in a relative’s garage, I made the second one myself, and now I present to you the third implementation of this product.
Purpose of the machine, operating features
Such machines are designed for basic and auxiliary operations on grinding the surfaces of wood, plastics and non-ferrous metals in production and at home.
And in simple terms, the drum (with the sanding paper attached to it) rotates, and by bringing and turning the workpiece towards it, you can get exactly what is required. The presence of a table (hand rest and workpiece) allows you to remove at least 0.05 - 0.1 mm per pass. Or, if you need a large amount of removal, you press harder and remove up to 0.6 - 1 mm per pass (using the example of wood such as oak, maple). The amount of feed is also important. In terms of operation, it’s easier to try it yourself than to describe it in words. Compared to other woodworking equipment, this type of machine is quite safe (milling cutter, circular saw): all movements are easily controlled, there is support for the workpiece, the removal is relatively small, there are no sharp rotating parts.
Requirements and restrictions
We will set the following requirements
for the final product:
- The machine should be as mobile and small-sized as possible. Transferring equipment from place to place, moving - all these factors put minimization of weight and dimensions at the forefront.
- Dust removal must be present in the product out of the box. When grinding, fine dust is formed, which is not at all good for health. To implement this point, the design provides for forced dust extraction through the gap between the disk and the desktop. At the back there is a hole for connecting a standard hose from a vacuum cleaner.
- The engine power must be sufficient for grinding small and medium-sized products. An unjustified increase in engine power will lead to an increase in the weight and dimensions of the machine. We take a single-phase motor with a power of 250 watts.
- Fitting the tool on the motor shaft VS decoupling the drive and the tool. Our product is still more of a household tool (rather than a professional tool), the engine power is low - so we can safely choose a scheme with the tool mounted on the motor shaft. Although the separation of the drive and the tool can immediately provide a bonus in the form of adjusting the rotation speed (through pulleys) and reducing vibrations. But this will lead to increased cost and complexity of design, manufacturing and assembly.
- Ergonomics of use. The table should not be too large and, at the same time, not too small. The height of the working surface is important (if you grind more than 20-30 minutes a day). Characteristics are selected individually.
- Lighting of the work area must be present, the light must fall from above. The lampshade must be able to move and be fixed within a wide range.
- The drum should be replaceable, with the sanding belt easily replaceable.
- Reverse. The drum should rotate both clockwise and counterclockwise (required for ease of grinding parts).
A little about computer modeling and development stages
Creating drawings of parts for transferring them to work is the last stage of work. Initially, I think about the product for a long time, “twist” it in my head, arrange the elements, etc. Then comes the paper stage - drawing diagrams, outlines, sketches. I figure out the possibility of implementing everything I’ve drawn, redo it, and so on in a circle. Then comes the stage of working drawings with real dimensions (still on paper). Again, all dimensions and details must be coordinated and taken into account. This is the most difficult stage. Since there is no computer model, everything is in the head - mistakes do occur.
Then everything is simpler: in a 2D CAD program I draw parts for laser cutting, milling, turning, etc. I use DraftSight - this program is free for non-commercial use and has almost the full functionality of AutoCAD for 2D drawing + saves files in *.dxf, *.dwg formats.
Drawing at this stage is the simplest work without a hint of creativity, you just need to be attentive and careful with the entered dimensions. I generally draw some drawings of individual parts on paper - it’s easier and faster. I don’t comply with the ESKD (and I know only partially), but turners, as a rule, understand and do everything that is required 
I am aware of the excessive simplicity and negligence in the preparation of documentation. I'm going to make changes to this process.
At a minimum, I plan to make an assembly model of the product in a 3D modeling program. Pre-visualization of a product is much easier, faster and cheaper than creating a prototype and making adjustments after the fact.
I tried many programs (free) and settled on SketchUp. In it you can quickly make a prototype (with exact dimensions): see the result, rotate the product in 3D, check for errors, etc. Yes, this is not solid modeling, but just a frame made of planes, but at this stage that’s enough for me. The closest analogue (of the free ones) is FreeCAD, but this program is still in beta testing.
In general, the most promising approach is to create a solid 3D model, and then use it to obtain any drawings, sections, sections, test loads, etc. But everything has its time, you need to grow up to it (have the time and energy to master it, do a major project according to this principle).
For example, in this machine I made a mistake in two places (non-critical) when ordering plywood milling. Both errors were quickly eliminated, but I realized that I needed to master the preliminary assembly of parts in 3D (to avoid such phenomena in the future and to simplify my work).
Manufacturing process
I already had the engine and drum (left over from the previous version of this machine).
I quickly ordered the plywood (by email, the parts were delivered via the postal service - I picked up the box at the nearest branch). Electrical part - some were in stock, some were purchased on the market. All the tools were available. I drew a diagram, cut the wires, crimped them, put everything together, checked - it works, spins, switches. The connections of the wires and buttons are all detachable, the twists are soldered and crimped. At first I soldered wires to the buttons, but then I switched to car connectors - it’s easier to assemble and use.
The drum requires balancing. If it is not balanced, the machine will literally “jump” on the table when turned on. I have a separate device for this operation.
The disadvantage of this design is that the engine is “tightly” fixed in the machine body. But the bearings are lubricated, the engine is reliable, there are holes for cooling in the housing - let's hope for long-term operation of the product. Now, of course, I would buy industrial asynchronous motors: they have both a “flange” and “legs” by default, and the rotors in them are better balanced than in motors from washing machines.
As an additional option, I wanted to install a cooling fan in the case (from a computer, 5-12 Volts). But then I abandoned this idea - I would also have to insert a power supply, cut a hole for the fan in the case, make a power button for it, etc. I also did not install a thermal relay to protect the RT-10 type engine.
Also (theoretically), the workplace illumination could also be powered from a single power supply located in the machine body. This would complicate the electrical circuit and installation (together with the relay and fan), but would radically increase the level of the product and the professionalism of the development. As a refreshment lamp, you could choose a household or industrial (36 volt lamps are available) specimen. LED backlighting suggests itself, but a regular incandescent lamp (in terms of spectrum) is closer to me. The choice of lighting system is a separate topic for discussion.
To connect a vacuum cleaner there is a special hole with a diameter of 40 mm in the rear part of the case. Those. it will be possible to connect a D40 mm pipe directly there or a hose from a D32 mm household vacuum cleaner through an adapter. Those. Even at the design stage, standards were used to select the diameter of the hole for connecting the dust removal system.
Assembly - mechanics
We glue the body from cut plywood blanks.
We install the dust collector box. The vacuum cleaner will suck air through the gap between the drum and the work table. Theoretically, dust generated during grinding will be removed along with the air.
The electrics are mounted in the housing.
We balance the grinding drum on a special device.
Bearings are used to ensure rotation of the balancing shaft.
Balancing is done by drilling holes in the body of the disk.
All parts are ready for painting.
The resulting result.
I had nameplates with the corresponding inscriptions. I used them on this machine (installed using rivets). It turned out quite beautiful and informative.
On the back of the case you can see a socket for a standard power cable and a hole (with an installed plumbing sleeve) for a vacuum cleaner.
Assembly - electrical
Let's draw a circuit diagram.
We cut the wires and crimp the ends correctly.
We use a specialized tool.
We put all the components together.
Everything is mounted in the housing.
Testing at work
Testing of the device showed fairly good dust removal during grinding. The engine heats up, but only a little, as it should. The plane of the drum is perpendicular to the table (within no more than a few degrees). The machine is quite mobile and easy to carry. It was not possible to stop the drum by pressing the workpiece against it (I did not press particularly hard). Vibrations of the machine during operation are minimal (but still present).
Received result
As a result, we got a machine with the following characteristics
:
- weight: 8.5 kg
- overall dimensions (LxWxH): 400x300x350 mm
- motor power: 250 W (50 Hz, 220 V)
- grinding drum diameter: 182 mm
- linear grinding speed belts: 13.5 m/s
- output for connecting a dust collector: +
- removable drum (with the ability to replace sanding paper): +
- reversing grinding rotation drum: +
Disadvantages
, possible improvements:
- work area lighting
- forced engine cooling
- installation of a thermal relay to protect the motor
- replaceable grinding wheels drums of different diameters
- tool speed adjustment
- limit spontaneous engine starting in a situation where the power “disappears and appears again”
Conclusions and Conclusions
Designing this is both difficult and simple at the same time.
Making a truly high-quality, thoughtful and detailed product is a long process with many iterations (repetitions). I will be glad to hear your thoughts, comments, suggestions.
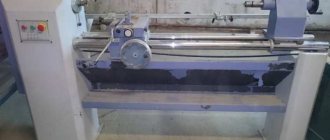
Do-it-yourself grinding and calibrating machine. attempt at discussion.
I apologize in advance to my subscribers, but I only have time for engraving on Saturdays and no more than 4 hours. At the moment the topic of wires came up. I'm looking for free.
And the actual subject:
At the end of April, beginning of May, this happened, but the plywood was delivered to Kazan as defective. And so much that difficulties began. In particular, that instead of 6 mm they brought 6.5 and at times 7 millimeters.
In this regard, I personally came to the conclusion that we need a grinding and calibrating machine that can provide a couple of dozens of accuracy.
In short, something stupid, where you stuck it and got it.
Here are some preliminary estimates, without the frame:
The point is the power of peekaboo.
Who built anything like this?
- motor, shafts and drive belt in the plane of one plate. It is movable in one axis relative to the table.
The planned components are wheel bearings for 2108 (rear), pump pulleys from the classics and a belt from the same.
Grinding shafts and conveyor shafts are still seen as simply turning pipes.
Briefly speaking. It’s a necessary thing, but my experience doesn’t match it.
Let's talk about this topic?
If it takes off, I’ll post the drawings to the public.
But seriously, building something like this is only worth building for very industrial scales. In small volumes there are 2 solutions: 1) Just take a hand sander and remove the excess. Yes, it's dusty, but it's fast enough. 2) The same thing, but take a table and a laser on a clamp so you can see exactly where to cut what. Think about how to fix the laser more precisely.
What’s wrong with your unit: small width, small area, high requirement for shaft precision. What will the shafts be made of? Well, you can’t cover them with sandpaper. Need a way to add sandpaper or quick replacement, plus tension.
As I see it, an industrial solution: the sanding belt is placed in a ring to rotate, ALONG the movement of the board or whatever you are sanding. Behind it is a plate, quite slippery, you can spray a little silicone. She presses him to the board. The gap is quite easy to adjust.
Why is this so: it is quite easy to make the plate level, its support is not complicated, an ordinary channel or rectangular pipe. You can't use wood, it will warm you up there. Aluminum or silumin is possible, for lightness. Compare this with the task of making precise shafts and precision fastenings so that no one accidentally knocks down the installations.
Why across: plywood is very flexible, making it lie flat is very difficult. The slightest effort warps her. And if the force is across, it will not bend. Plus, it is much easier to catch debris; it is swept away to one point. Plus safety - your hand won’t get pulled under the shaft.
The disadvantage is that this scheme is slower than shafts. But the desired performance is determined by the width of the sandpaper strip.
Drum grinders
It’s nice for any home handyman to feel like he has all the necessary tools when doing his favorite job. Branded items collected into a collection with his own hands, his wealth and his pride. He takes care of it, carefully selects it and dreams of replenishing it in the form of a gift or a homemade machine.
Wood carving or home construction, cooperage or making homemade musical instruments - everything requires a high-quality instrument. Including for its finishing. The drum grinding machine is the crown of the entire set of tool equipment.
After it there will simply be nothing to collect if it is from the Jet Plus family. A good workshop, created over many years of effort, is a real pride of its owner.
Machine design
The drum-type grinding machine belongs to the group of surface grinding equipment. It is intended for finishing all kinds of wooden and wood-containing materials with abrasive sandpaper of various grain sizes. The technological cutting process takes place at high speeds and with a large release of abrasive dust and dust from the cut part of the workpiece.
The use of powerful ventilation systems allows you to work on such drum equipment in relatively comfortable conditions. Structurally, such woodworking equipment is:
- portal or console type mechanisms; on console-type drum machines it is possible to produce parts with their rotation, which increases the processing width;
- the portal design of drum machines increases its rigidity, allowing you to work with maximum operating parameters without reducing accuracy;
- stepless cutting depth adjustment;
- with adjustable or stationary feed speed;
The process of sanding wooden materials consists of the following technological methods:
- selection of sanding belt of appropriate grain size in accordance with the required finish; for maximum removal or peeling – 36 units;
- for the standard process – 80 units;
- finishing or final processing – up to 220 units;
- it is possible to wind tape of various grain sizes on equipment with paired cutting drums;
The use of abrasive paper of various grain sizes on paired shafts makes it possible to obtain the best quality indicators in one pass. Especially when processing wood with your own hands.
Operating principle
There are three main designs of wood sanding machines:
1-Disk machine 2-Belt machine 3-Drum machine
A disk machine is a rotating disk on the surface of which an abrasive (sandpaper) is fixed. Grinding is done by applying the edges or side surfaces of the part to the disk, for which a table or support bar is installed approximately in the middle. This design is optimal for sanding straight or convex edges.
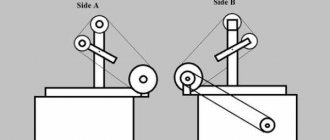
The belt type consists of two drums mounted either vertically or horizontally. One of them is drive, the second is tension. The abrasive is a loop of sandpaper that is glued together using a template. The loop is installed on both drums and tensioned. After starting the engine, it forms a constantly moving strip of abrasive. Sanding occurs by pressing the tape to the surface of the part using a special clamp (“iron”). It moves left and right, ensuring that the sandpaper is pressed against all areas of the surface being treated.
The drum machine is used for grinding concave edges. It is a rotating cylinder of relatively small diameter (6-8 cm), on which the abrasive is installed.
The simplest designs are disk and drum. Making a tape machine is much more complicated, but its efficiency is much greater. Such installations allow high-quality grinding of panels and large-area parts, ensuring high surface quality.
Work principles
The drum grinding machine is quite simple both in performing technological operations and in its maintenance. The operating procedure is as follows:
- set the necessary cutting parameters;
- with your own hands, thread the emery cloth onto the cutting drums equipped with its tensioners;
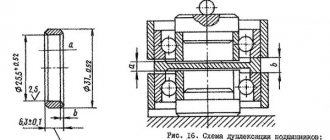
- calibrate the cutting part; such an operation is necessary for accurate alignment of the working drum relative to the feed table;
- This process is carried out using 2 calibrated wooden blocks located along the width of the feed table under different sides of the drum;
- Having achieved symmetrical contact between the main shaft of the 2 bars, they proceed directly to the technological process of manufacturing the part itself.
After several passes, in order to maintain performance and surface quality, it is very useful to carry out preventive cleaning of the abrasive belt yourself with a special pencil. All similar machines are equipped with this pencil, including models 10-20. It can also be purchased separately.
Homemade drum sander
This drum machine for wood has a specific, very practical purpose. It is not universal and its rather rare use in ordinary farms does not contribute to the growth of popularity. The relatively high cost, dimensions and difficulty in pre-setting make such equipment a poor stepchild among grinders, drills and vibrating machines.
Sometimes it makes sense to make a similar tabletop grinding machine with your own hands, using the lightweight Jet series of drum equipment as a basis. The design of such a homemade drum mechanism is not complicated:
- the frame and body of the main cutting part are made of multi-layer plywood or good wood with a thickness of 10 to 20 mm;
- The engine from an old washing machine, disassembled with your own hands, is also well suited for these purposes; the pulley remains in place;
- the grinding drum of a homemade machine is made of a thick-walled plastic pipe of a suitable diameter (like the Jet model 10-20 Plus);
- the hand-made serving table, on the serving side, is mounted on piano hinges;
Drum machine design
Manufacturing should begin with studying the design features of this type of equipment. The drum-type grinding machine is designed for processing wooden surfaces, leveling them and removing burrs.
The device belongs to a type of wood surface grinder that performs a calibration function. There are many models and types of equipment. But the main task before making a unit with your own hands is choosing the optimal design. The best option is to familiarize yourself in detail with factory analogues and draw up a manufacturing scheme based on the data obtained.
Structurally, the machine should consist of the following components:
- frame. The main parts of the equipment are attached to it;
- power unit. Most often, an asynchronous electric motor is installed for this purpose;
- grinding drum. It is important to choose the correct diameter and method for removing chips. With your own hands you can make a base on which the sanding tape is installed. Or order a cylindrical head with a cutting edge from a professional turner. It all depends on the type of work;
- device for changing the frequency of the motor shaft;
- Desktop. The workpiece will be placed on it. When making a machine with your own hands, experts recommend making this component from fiberglass;
How to make a drum grinding machine yourself?
Sanding various wooden parts is a necessity faced by everyone who wants to make repairs in their home, or create some decorative element with their own hands.
Of course, you can sand small parts with regular sandpaper, but to cope with a large amount of work, you should change the sandpaper to a grinding machine. It will help to significantly save time and quickly bring the part into the appropriate form. One such useful device is a drum sander.
Types of woodworking machines
Currently, there are numerous types of sanding machines that are designed to perform various types of work with wood. They differ in their design and are intended for domestic and industrial use. You can easily select both highly specialized models and universal machines that are designed for complex wood processing.
If necessary, you can make a homemade grinding machine for metal or wood, based on a drill, a motor from a washing machine, or using other equipment.
Classification and structure
Drum-type grinding devices belong to calibration class machines. This type of grinding machine is most often used for working on wood, but it can also be used to process other materials.
A cylindrical grinding wheel (drum) allows you to calibrate boards and slats of various lengths and configurations. The blank can also be made of different materials: chipboard, veneer, etc.
Structure of the grinding apparatus:
- Cylindrical grinding drum.
- Feeding device.
- Dust removal device.
- Working surface.
- Drum speed converter.
- The motor that drives the grinding cylinder.
- Bed for fastening key components of the machine.
- Drum height regulator.
- Operator protection device.
The main structural elements of a drum machine are listed here. Depending on the specific model of the device and the specifics of its purpose, the configuration may vary slightly.
Features and Specifications
The main feature of wood sanding machines is a specific method for adjusting the quality of processing. It occurs by changing the grain size of the abrasive. Typically, the process begins with sandpaper with a coarse grain, then successively reduces its size and completes the procedure by sanding with fine sandpaper. In total, 2-3 shifts are used, but there may be more gradual methods.
The second feature is the method of installing the abrasive. If a pre-glued loop is installed on a belt machine, then a circle of sandpaper must be secured to a plane on the disk structures. The best way is to use Velcro, but the easiest way is to stick the abrasive onto adhesive or double-sided tape. The second method is simpler, but also more expensive.
The technical characteristics of each machine are slightly different from each other.
Main device models
Drum-type machines can be purchased ready-to-use. There are several of the most popular and widespread brands for the production of these devices. It makes sense to present their individual models.
JET Company. The American company specializes in the production of modern machines of various types, including drum machines. Its product line includes several grinding machines with a cylindrical working wheel.
- JET DDS-225. This machine is one of the most powerful devices of this type in the manufacturer’s line. It is used both in home workshops and in small industries. A characteristic feature is the double sanding drum. The cost of this machine is appropriate - from 150,000 rubles.
- JET 10-20 PLUS. Compact grinding device that allows you to process up to 50 centimeters of surfaces. Perfect for small home workshops. The cost does not exceed 25 thousand rubles.
- JET 16-23 PLUS. It is considered one of the most versatile machines of its type. It is used to process building materials, kitchen appliances and even musical instruments. Most often, such a machine is used in small furniture production enterprises.
In addition to these machines, there are also good options from German manufacturers. It is worth noting that, depending on the price, German companies also offer corresponding sets of capabilities for their devices. The minimum amount for which you can purchase a grinding machine in the basic configuration is 15-16 thousand rubles.
Video: step-by-step production of a drum sander.
How to make a grinding machine with your own hands?
If you can’t pay quite a lot of money for a decent version of a drum sanding machine, then you should try to make it yourself. For a person who is well versed in mechanics, this is not a very difficult task. In addition, this way you will be able to save significant financial resources.
In order to assemble a drum sanding machine at home, you need to acquire the following parts:
- Grinding drum. A cylindrical device can be created on the basis of “garbage” building materials. For these purposes, even pieces of wooden blocks are often used, which are evenly attached to a special metal axis using glue. In this case, special attention should be paid to the tight fit of these bars to each other. The drum can also be made on the basis of a polyvinyl chloride pipe with a diameter of up to 10 cm, which is placed on an iron rod with a diameter of 1.5-2 cm. It should be slightly shorter in length than the rod itself. We insert special plugs with holes for the rod into the ends of the pipe. We recommend securing the plugs with screws. We thread and secure the rod. We wrap a thick layer of rubber onto the pipe, onto which the sandpaper will be attached.
- Engine. It is best to use a working motor from an old washing machine (as well as pulleys, belts, etc.). The optimal motor power should be from 200 to 300 W. It is desirable that the motor is also asynchronous and single-phase. RPM level – 2000-3000.
- Frame. The design should be simple and convenient. It is best for the machine body to consist of two side panels, a spacer and the table itself. Particular attention should be paid to the strength and rigidity of the work table, which should not be deformed when the workpiece being processed is pressed onto the drum. The desktop must consist of a base and a moving part.
Once the main parts of the machine have been assembled separately, you can begin the final assembly of the entire machine. First of all, you should attach the motor to the bottom of the machine body in place of the pre-drilled holes. The grinding drum is installed in the upper part of the housing and attached to two bearings, which are located on the side walls of the housing.
It is worth noting that creating a drum grinding machine yourself also does not come without certain costs. First of all, this concerns your time, but the machine will cost you less than a factory one only if you have a working motor. Without an engine and certain skills, it is almost impossible to create a cheap analogue of a branded machine.
General concepts and scope
There is a huge amount of sanding equipment that can make any wood surface very smooth. It consists of a frame on which there is a special frame with an electric motor (washing machine motors are used for homemade products) and a mechanism. The mechanism itself, in turn, includes shafts, pulleys and an abrasive belt.
Application area
They are used in all industries where wood is processed. Often, any rough products have an uneven and rough surface. Such blanks cannot simply be painted and put up for sale or installed anywhere. Therefore, for further processing of wood, all its surfaces can be sanded.
Grinding machines are also used for processing sagging and chamfering, and rounding corners. In addition, the grinding tool gives any surface a smooth leveling and calibration.
Types of wood sanding machine
Depending on the surface being processed, the following types of grinding machines are distinguished:
Belt sanding tool
Belt Sanding Machine
This equipment uses an abrasive belt that is tensioned by two shafts. These shafts are driven by an asynchronous electric motor. During wood processing, the abrasive belt does not sag, but rests against the working plane, which has a low coefficient of friction. The tape can be positioned both horizontally and vertically. The advantage of this equipment is the processing of long workpieces.
Universal grinding unit
Universal grinding machine
In this case, the machine has two working grinding surfaces. One is a tape surface, and the other is circular (disc). This universal machine was created for ease of use. By the way, this configuration will significantly save your budget. This device uses only one motor. Based on this, when working on two working surfaces, the load on the motor will not increase much.
Drum grinding tool
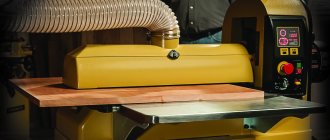
Drum Sanding Machine
In this case, the abrasive belt is wound on two rollers in a spiral manner. Under the rollers there is a tabletop with a smooth surface. The gap between the tabletop and the rollers is adjustable to the required distance. Using such a machine, you can calibrate the surface of a wood piece.
Disc grinding tool
Disc grinding machine
The working area of this equipment is an abrasive wheel. A circle with Velcro is attached to the axis of the electric motor, onto which the abrasive is attached. After starting the motor, the abrasive wheel rotates around its axis, thereby carrying out grinding. This type of machine has the ability to regulate the processing speed, and the number of axis revolutions will not decrease.
Each of the four types of machines can perform certain operations. Now that we have an idea of what grinding equipment looks like, it's time to disassemble the design of the machine.
In addition to the above machines, there are also portable grinding machines . And that’s not all, in order not to spend money on machines, people came up with grinders from a drill , from an angle grinder . The fact is that attachments are attached to these tools and the same grinding is carried out.
Calculation of power for the motor
Important! Before creating any homemade creation that performs grinding functions, it is extremely important to correctly calculate the power of the electric drive. After all, if the motor power is weak or, on the contrary, strong, then you will not be able to do any work.
Power calculation is carried out using a special formula, which belongs to the category of complex mathematical calculations.
The formula is as follows
Where each designation means the following
- q - Means the pressure of the processed wood part on the plane of the abrasive blade (N/ square centimeter).
- k - Index of friction of the reverse side of the abrasive on the working surface.
- n - Efficiency of the entire system.
- K - Indicator of the working plane of the abrasive relative to the workpiece. The priority is the density of the wood and its grain size. The limits of this indicator range from 0.2 to 0.6.
- S - The area of the workpiece that comes into contact with the abrasive, measured in square centimeters.
- U - The speed of rotation of the abrasive, measured in meters per second.
When you calculate the required power of the electric drive of your future unit using the formula, you can safely begin assembling the machine as a whole.
It's time to get acquainted with the design of a homemade machine. Drawings of all four types of equipment can be found in the public domain and downloaded, as well as all kinds of photo diagrams. As an example for visual study, consider a belt sanding tool.
Grinding machine drawing
Machine design and diagrams
Any assembly of homemade equipment begins with the construction of a frame or foundation for future machine equipment. This can be done using metal material or wood material. The standard dimensions of the frame are 500 mm x 180 mm, and the thickness should be 2 cm.
After making the base, you can proceed to the next steps. An asynchronous motor can be installed in several places so that its operation is complete. Prepare a plane on the frame itself or make a platform for the motor, which will be attached to the end of the frame. The other side of the frame is designed to accommodate the shaft, with a pulley for the belt and rollers for the abrasive belt. The tape itself is installed with a slight slope. This is done so that the abrasive comes into smooth and accurate contact with the workpiece plane being processed.
Belt sanding machine diagram
As we can see from the diagram and drawing, the design of the grinding equipment is quite simple. All varieties of these machines are assembled according to the same scheme.
Advice: In the process of assembling your future grinding unit, it is necessary to comply with all the necessary dimensions, and also the calculation of all parameters must be done extremely seriously.
When the design is familiar to us, we can move on to the assembly process.
Grinding machine assembly process
To assemble the grinding tool, you will need the following elements:
- Wood board.
- Wooden blocks or metal profile pipe.
- Ball bearings.
- Electric motor.
- Rubber belt.
- Rubber belt.
- Metal pulley.
- Self-tapping screws, fasteners.
- Abrasive element.
- Working tools (drill, grinder, screwdriver, jigsaw, etc.).
- Welding machine (if the frame structure consists entirely of metal).