I decided to build my first pulse metal detector, Clone PI-W, and now it comes to making a mono search coil. And since I am currently experiencing some financial difficulties, I was faced with the difficult task of making a reel myself from the cheapest materials possible.
Looking ahead, I’ll say right away that I coped with the task. As a result, I got this sensor:
By the way, the resulting ring coil is perfect not only for Clone, but also for almost any other impulse generator (Koschei, Tracker, Pirate).
Next, I will tell you how to make a search coil for a metal detector with your own hands, spending less than 500 rubles on it.
I will tell you in great detail, since the devil is often in the details. Moreover, there are a dime a dozen short stories about making reels on the Internet (like, take this, then cut it off, wrap it, glue it and you’re done!) But you start doing it yourself and it turns out that the most important things were mentioned in passing, and some things were completely forgotten to say ... And it turns out that everything is more complicated than it seemed at the very beginning.
This won't happen here. Ready? Go!
TEMPLATE FOR METAL DETECTOR SENSORS HOUSINGS
Much has already been said and written about vacuum molding of housings for metal detector sensors. It seems to be nothing complicated. A vacuum cleaner, an oven and a box made from improvised materials with many holes. The main question is where to get the template for the body. And so, when I felt the urge to make another sensor, I decided to write this article. So, let's begin. First of all, you need to make a drawing of the sensor in any graphics editor, I use Visio from Microsoft.
When the drawing is ready, we print it out and move to the manufacturing site. I make templates from 20 mm plywood. For my work, a small circular saw, a jigsaw and a drill are very useful to me.
First, glue the drawing onto the plywood and trim off all excess from the outside. Then, holes with the required radius must be drilled in all internal corners. Particular attention must be paid to the perpendicularity of the holes. Otherwise, difficulties may arise when extracting the template.
Next, using a jigsaw, we cut out all the excess from the inside.
Now that we already have a silhouette dear to our hearts in our hands,
We arm ourselves with sandpaper, all kinds of files and rasps, and patiently level out all the unevenness.
If possible, it is necessary to make a slight narrowing at the top, again to make it easier to remove the template from the finished product. Then, in the place where the pressure seal is attached, it is advisable to glue a boss. It will allow you to hide the sealed lead-in nut, and the latter will not interfere with the placement of the capacitors.
Next, using a circular saw, we make the ears. The distance between them was 24 mm, taking into account the thickness of the plastic.
Glue the ears to the template.
To better retract the plastic, it is advisable to make small through holes in the corners.
Voila! Our template is ready.
It took me less than three hours to make, not counting the preparation of the drawing. It remains to check it in action.
And here is the result.
I mostly use white plastic for sensors. It heats up less in the sun, and accordingly the balance floats less. But that is another story. I wish you success. I hope that the article is useful to someone. Attached is a drawing of a butterfly in MSVisio and PDF. Best regards, Slavochny .
Forum for discussing the material TEMPLATE FOR METAL DETECTOR SENSORS CASES
AIMTEC AMSR and AMSRI switching voltage regulators are an excellent replacement for the popular 78xx / 79xx microcircuits.
Code button for restricting access to objects, a simple circuit with a relay on the Attiny13 MK.
High-compensation volume control with adaptation to the tone control - theory and practice.
Making a coil for a pulse metal detector with your own hands
One of the advantages of pulse metal detectors is the ease of manufacturing search coils for them . At the same time, with a simple coil, pulse metal detectors have a good detection depth. This article will describe the simplest and most affordable ways to make search coils for pulse metal detectors with your own hands.
Coils made using the manufacturing methods described below are suitable for almost all popular pulse metal detector circuits (Koschei, Clone, Tracker, Pirate, etc.).
Types of metal detectors
There is a wide range of metal detectors on the market, used in many areas. Below is a list that shows some of the varieties of these devices:
Ground model Deep metal detector Underwater vehicle Security device Industrial metal detector
- Ground. These devices are designed for searching with your own hands for scrap metal, jewelry, coins, etc.
- Deep. These devices are used to search for the above-mentioned metal products at great depths.
- Underwater. Devices of this type are designed to operate underwater. They can work at different depths.
- Metal detectors for searching for gold. These devices allow you to find gold and gold jewelry in any environment.
- Security devices. These devices are used to detect metal products on the human body and in luggage. Such devices are made in the form of arches and are installed at the entrance to places with large crowds of people, for example, at train stations, shopping centers, etc.
- Industrial. This equipment is part of conveyor lines. Their main task is to detect metal in other substances. For example, in a mined sand-soil mixture.
- Army. The military uses such devices to detect mines, unexploded shells, bombs, etc. with their own hands. The military calls such devices mine detectors.
- Do-it-yourself devices are most often assembled by novice “treasure hunters”.
The use of modern materials allows us to design and manufacture devices with high accuracy in detecting metals in different environments. The use of microelectronics has made it possible to minimize their overall weight parameters. In addition, the simplicity of the electrical circuit allows you to make a metal detector with your own hands at minimal cost.
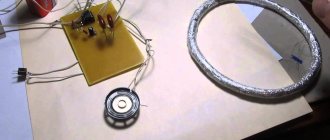
Coil for pulse metal detector made of twisted pair
From twisted pair wire, you can get an excellent sensor for pulse metal detectors. Such a coil will have a search depth of more than 1.5 meters and have good sensitivity to small objects (Coins, rings, etc.). To make it, you will need a twisted pair wire (this kind of wire is used for Internet connection and is available for sale in any market and computer store). The wire consists of 4 twisted pairs of wire without a screen!
The sequence of manufacturing a coil for a pulse metal detector, made from twisted pair wire:
- We cut off 2.7 meters of wire.
- We find the middle of our piece (135 cm) and mark it. Then we measure 41 cm from it and also put marks.
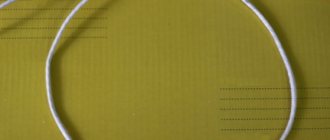
- We connect the wire along the marks into a ring, as shown in the figure below, and secure it with tape or tape.
- Now we begin to twist the ends around the ring. We do this on both sides at the same time, and make sure that the turns fit tightly, without gaps. As a result, you get a ring of 3 turns. This is what you should get:
- Secure the resulting ring with tape. And we bend the ends of our coil inward.
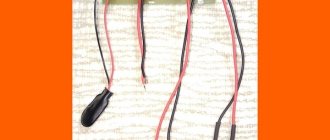
- Then we strip the insulation of the wires and solder our wires in the following sequence:
- We insulate the soldering points using thermal tubes or electrical tape.
- To output the coil, we take a 2*0.5 or 2*0.75 mm wire in rubber insulation, 1.2 meters long, and solder it to the remaining ends of the coil and also insulate it.
- Then you need to select a suitable housing for the reel, you can buy it ready-made, or select a plastic plate of a suitable diameter, etc.
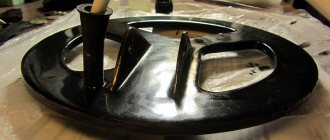
- We put the coil into the housing and fix it there with hot glue, we also fix our solders and wires to the terminals. You should get something like this:
- Then the body is sealed, or if you used a plastic plate or tray, it is better to fill it with epoxy resin, this will give your structure additional rigidity. Before sealing the case or filling it with epoxy resin, it is better to conduct intermediate performance tests! Since after gluing, there is nothing to fix!
- To attach the coil to the metal detector rod, you can use this bracket (it’s very inexpensive), or make a similar one yourself.
- We solder the connector to the second end of the wire, and our coil is ready for use.
When testing such a coil from Koschey 5I metal detectors, the following data were obtained:
- Iron gates – 190 cm
- Helmet – 85 cm
- Coin 5 kos USSR – 30 cm.
Finish painting
I found an excellent paint for fiberglass and fiberglass products - epoxy resin with the addition of a dye of the desired color. Since the entire structure of my sensor is made on the basis of bauxite, the resin-based paint will have excellent adhesion and will fit like original.
I used alkyd enamel PF-115 as a black dye, adding it until the required hiding power was obtained.
As practice has shown, a layer of such paint holds very firmly, and looks as if the product was dipped in liquid plastic:
In this case, the color can be any depending on the enamel used.
The final weight of the search coil together with the cable after painting is 407 g
The cable separately weighs ~80 grams.
Large coil for a DIY pulse metal detector.
Here we will describe a method for manufacturing a 50*70 cm depth coil for pulse metal detectors . This coil is good for searching for large metal targets at great depths, but it is not suitable for searching for small metal.
So, the process of making a coil for pulse metal detectors:
- We make a pattern. To do this, in any graphics program, draw our pattern and print it in 1:1 size.
- Using a pattern, we draw the outline of our coil on a sheet of plywood or chipboard.
- We drive nails around the perimeter, or screw in screws (the screws must be wrapped with electrical tape so that they do not scratch the wire), in increments of 5 - 10 cm.
- Then we wind a winding around them (for the Clone metal detector 18 -19 turns) of winding enamel wire 0.7-0.8mm, you can also use stranded insulated wire, but then the weight of the coil will be a little more.
- Between the studs, we tighten the winding with cable ties or tape. And coat the free areas with epoxy resin.
- After the epoxy resin has hardened, remove the nails and remove the coil. We remove our zip ties. We solder leads from a stranded wire 1.5 meters long to the ends of the coil. And we wrap the coil with fiberglass and epoxy resin.
- To make a cross, you can use a polypropylene pipe with a diameter of 20 mm. Such pipes are sold under the name “Heat-welded pipes”.
- You can work with polypropylene using an industrial hair dryer. It must be heated very carefully, because... at 280 degrees the material decomposes. So, we take two pieces of pipe, heat the middle of one of them, dig a hole through it, expand it so that the second pipe fits into it, heat the middle of this very second pipe (continuing to keep the middle of the first one hot) and insert one into the other. Despite the complex description, it doesn’t require any special dexterity—I did it the first time. Two heated pieces of polypropylene are glued together “to death”; you don’t have to worry about their strength.
- We heat the ends of the cross and cut them with scissors (heated polypropylene cuts well) in order to obtain “notches” for winding. Then we insert the crosspiece inside the winding and, alternately heating the ends of the crosspiece with the recesses, “seal” the winding in the latter. When putting the winding on the crosspiece, you can pass the cable through one of the crosspiece pipes.
- We make a plate from a section of the same pipe (by hot flattening), bend it into the letter “P” and weld it (again hot) to the middle of the cross. We drill holes for everyone’s favorite bolts from the toilet lid.
- In order to give additional strength and tightness, we seal the remaining cracks with all kinds of sealants, wrap doubtful places with fiberglass and epoxy, and finally, wrap everything with electrical tape.
Description of the Garrett ACE 250 device
The device is manufactured using modern technologies similar to those used in more expensive models. It is easy to set up and control, has high sensitivity, and quickly responds to the target. The Garrett metal detector has the ability to search in “all metals” and “discrimination” modes, which allows you to select the type of metal you want (silver, copper, gold), rather than tearing out debris from the iron. The weight of the device is slightly more than a kilogram, it fits comfortably in the hand and is easy to work with. The metal detector contains the following modes:
- any metals;
- jewelry only;
- relics;
- all coins;
- custom.
Using the simple metal detector modes, the user can quickly and conveniently search for certain objects, filtering out unnecessary signals. In addition, the operator can specify his operating mode.
Housing for metal detector
After assembling a metal detector or other radio circuits, the question arises: what kind of housing to come up with for it and where to get it. I found a simple and inexpensive solution to this problem. As a housing, I will use the box for the starter machine and place the Pirate metal detector in it. Below I will provide detailed instructions and a description of how to make a housing for a metal detector.
So, to make a housing for a metal detector, you need to buy, as I said above, boxes and automatic light starters, it is not expensive, around 25-50 rubles.
Since I will be making a housing for the Pirate metal detector, I need to install two variable resistors on it, a power switch and a block for connecting the coil and power source. First, I’ll install the resistors; to do this, we attach them to the body with twisters and mark the marks for the holes with a marker; I decided to install them on the top part.
Then we take a drill to the diameter of the resistor handles and drill holes. Plastic drills very well, so if you don't have the right drill bit, you can use a circular motion to drill out the holes!
Now you need to make a hole for the switch, I decided to install it on the front side of the case, it’s more convenient, and it looks good. To do this, we also take a suitable drill and make a hole.
Next you need to install on the back of the case the power connectors and coils. I took the usual Chinese ones, ordered on Aliexspree, by the way they arrived quickly and of very good quality, I took 50 pieces, there were about 20 left. If anyone is interested, here is a link to the product! And they look like this:
To install the pads, you need to mark 4 points for the legs.
Then take a small drill and drill holes. Then insert the pads there. I took a drill slightly smaller than the diameter of the legs, this is necessary so that the block fits tightly into the holes and stays there without glue. After the block is installed, the legs will stick out inside the case, and I will solder the wires to them. If you don’t have such a block, then there are a lot of other options; by the way, in stores where they sell light bulbs, wires, etc., there are other types of blocks, they can also be used. In general, you need to experiment!
Now you can install all parts of the circuit in their places. Let's start with resistors:
Then we will install the switch, having first soldered to it one wire from the circuit (I took the negative one), the second wire from the switch will go to the block.
And solder the wires to the pads, not forgetting to indicate with a marker on the back side where the plus goes and where the minus goes!
Now we install the speaker. To mount the speaker, I used glue gun, coated the speaker on the front side in four places and glued it inside the case.
Next, we solder the wires for the coil and coat it with hot glue; this must be done in order to avoid the wires touching each other, since the legs are very close to each other.
Now, using hot glue, glue the board to the second part of the case. Well, or you can carefully secure it with screws, and screw the other part of the case into place! I advise you to coat all wire connections with hot glue to avoid short circuits or damage.
Well, that’s all, our body is ready, beautiful and neat! In this case, you can install not only a metal detector board, but also many other radio structures. If your board is too large and does not fit in such a case, then the store has wider boxes, you can also buy a square box for wiring, it also looks quite nice and is larger in size. In general, experiment and write comments! Bye!
Facilitating
To reduce the weight of the coil, it was decided to cut out some sections of the structure:
This manipulation allowed me to lose 168 grams of excess weight. At the same time, the strength of the sensor has practically not decreased, as can be seen in this video:
Now, with hindsight, I understand how the coil could have been made a little lighter. To do this, it was necessary to make large holes in the middle pancake in advance (before gluing everything together). Something like this:
The voids inside the structure would have almost no effect on the strength, but would reduce the total mass by another 20-30 grams. Now, of course, it’s too late to rush around, but I’ll keep it in mind for the future.
Another way to simplify the design of the sensor is to reduce the width of the outer ring (where the wire turns are laid) by 6-7 millimeters. Of course, this can be done now, but there is no such need yet.
Powerful DIY metal detector Pirat
This metal detector received this name due to the fact that it is pulsed, this is the designation of its first two letters (PI-pulse). Well, RA-T is consonant with the word radioskot - this is the name of the developers’ site where the homemade product was posted. According to the author, the Pirate is assembled very simply and quickly; even basic skills in working with electronics are enough for this.
The disadvantage of such a device is that it does not have a discriminator, that is, it cannot recognize non-ferrous metals. So it will not be possible to work with it in areas contaminated with various types of metals.
Materials and tools for assembly: - KR1006VI1 microcircuit (or its foreign analogue NE555) - the transmitting unit is built on it; — transistor IRF740; - K157UD2 microcircuit and BC547 transistor (the receiving unit is assembled on them); — wire PEV 0.5 (for winding the coil); — NPN type transistors; - materials for creating the body and so on; - electrical tape; - soldering iron, wires, other tools.
You also need to find a suitable plastic box for mounting the electronic circuit. You will also need a plastic pipe to create a rod on which the coil is attached.
Metal detector assembly process:
Step one. Creating a printed circuit board
The most complex part of the device is, of course, the electronics, so it makes sense to start there. First of all, you need to make a printed circuit board. There are several board options, depending on the radio elements used. There is a board for NE555, and there is a board with transistors. All the necessary files to create the board are included in the article. You can also find other board options on the Internet.
After the coil is wound, it must be installed on a rigid body; there should be no metal on it. Here you need to think a little and look for any suitable housing. It is needed to protect the coil from shock while working with the device.
The leads from the coil are soldered to a stranded wire with a diameter of about 0.5-0.75 mm. It is best if there are two wires twisted together. Step five. Setting up a metal detector
When assembling exactly according to the diagram, you do not need to adjust the metal detector; it already has maximum sensitivity. To fine-tune the metal detector, you need to twist the variable resistor R13, you need to achieve rare clicks in the speaker. If this can only be achieved in the extreme positions of the resistor, then it is necessary to change the value of resistor R12. The variable resistor should set the device to normal operation in the middle positions. [center]
If you have an oscilloscope, you can use it to measure the frequency at the gate of transistor T2. The pulse duration should be 130-150 µs, and the normal operating frequency is 120-150 Hz.
How to operate a metal detector
After turning on the device, you need to wait about 10-20 seconds for the operation of the metal detector to stabilize. Now you can twist resistor R13 to adjust. After this, you can start searching.
Examination
After our homemade metal detector coil was completely ready, we had to check it for internal breaks. The easiest way to check is to use a tester to measure the winding resistance, which normally should be very low (maximum 2.5 Ohms).
In my case, the resistance of the coil together with two meters of connecting cable turned out to be around 0.9 Ohm.
Unfortunately, this simple method will not be able to detect an interturn short circuit, so you have to rely on your accuracy when winding. A short circuit, if there is one, will immediately manifest itself after starting the circuit - the metal detector will consume increased current and have extremely low sensitivity.
Pirate metal detector coil
The search coil for the Pirate metal detector is also easy to make. Wound on a 190 mm frame. and contains 25 turns of 0.5 mm PEV wire. This is a fairly common way of winding a spool on an embroidery hoop; its diameter is just right. Personally, I take an ordinary saucepan, wind a coil on it and tie it all together with electrical tape, then I make a frame out of thin plywood and secure it to it. There are a lot of frame options, so it is not necessary to use plywood, the main thing is that it is not metal.
Simple metal detectors from ready-made electrical appliances
- A metal detector can be made from a radio receiver by adding a simple HF transmitter to it: The search coil is wound from a 0.5 mm² wire: 16 turns 12 cm. When a metal object enters the range of action, a receiver tuned to the MF/LW range will change the tone of the sound.
- A homemade metal detector made from a cell phone is nothing more than a myth. Upgrading its electrical circuit at home is not feasible, and it is technically impossible to make a standard mobile phone work as a metal detector.
- In fact, there is no need to make a metal detector out of a magnet. You simply bring a powerful neodymium magnet to the place where there is a metal object and physically feel the force of attraction. Of course, this only works with metals that have ferromagnetic properties (iron, steel).
Regardless of the complexity of the design, making a homemade metal detector will require a lot of time and effort from you. Therefore, out of curiosity, such devices are not made. But for professional use, this is an excellent alternative to factory copies.
Pirate metal detector circuit
The pirate metal detector consists of transmitting and receiving units. The transmitting unit consists of a pulse generator which is assembled on the NE555 microcircuit and a powerful switch on the IRF740 transistor. The receiving unit consists of a K157UD2 microcircuit and a BC547 transistor.
In fact, the details are quite common, but if you still couldn’t find them, try using analogues. The NE555 timer can be replaced with a domestic analog KR1006VI1. Instead of the IRF740 transistor, you can install any bipolar NPN structure with an NEC of at least 200 volts, you can even remove it from an energy-saving lamp or phone charger; in extreme cases, even a KT817 will do. Transistors BC557 and BC547, for domestic KT3107 and KT3102. The K157UD2 operational amplifier has a complete analogue of the KR1434UD1V, it can also be replaced with an imported TL072, but in this case, you will need to redo the board pinout, since it has 8 legs. I also have a Pirate metal detector on TL072, the circuit diagram and board are in the general archive. By the way, the pulse generator can also be assembled using transistors:
Material selection
I planned to use plexiglass as the material. It is perfectly processed and glued with dichloroethane. But, unfortunately, I couldn’t find it for free.
All sorts of collective farm materials such as plywood, cardboard, bucket lids, etc. I immediately discarded them as unsuitable. I wanted something strong, durable and preferably waterproof.
And then my gaze turned to fiberglass...
It's no secret that fiberglass (or glass mat, fiberglass) is used to make whatever your heart desires. Even motor boats and car bumpers. The fabric is impregnated with epoxy resin, given the desired shape and left until completely cured. The result is a durable, water-resistant, easy-to-handle material. And this is exactly what we need.
So, we need to make three pancakes and ears for attaching the barbell.
Assembling the Pirate metal detector:
First, of course, you need to prepare the board. To do this, open the Sprint-Layout program and print a blank of our future board, then transfer the drawing in any convenient way onto the prepared board, etch it and drill holes for the parts. I use LUT technology, although I don’t have a laser printer, I do it at work.
But when it is not possible to print on a laser printer, you can make a drawing on an inkjet printer, then cut the fiberglass of the desired shape, attach the drawing to the board and mark the holes with a sharp object, then drill and draw the tracks manually with a permanent marker. Well, or translate it using a carbon copy.
Be sure to clean the board with fine sandpaper and degrease it with acetone before applying the design, so the image will transfer well and the etching process will be faster and more reliable. After the board is etched, you need to wipe off the toner or marker again with acetone and rub it a little with sandpaper.
Then we take a soldering iron and tin the tracks with tin. After tinning, be sure to wipe off excess rosin with acetone in order to avoid problems in the future. If desired, you can ring the tracks.
Now you need to solder all the parts onto the board. To do this, we also open the signet in the Sprint-Layout program and look at where the parts are located. I strongly advise you to install sockets for microcircuits, just in case. First of all, solder the jumpers, there are 2 of them in the circuit, and one is located under the NE555 chip, so if you forget about it, it will be difficult to find the fault, since I’m sure you won’t remember these jumpers! Legs from resistors can be used as a jumper.
When all the parts are in place, all that remains is to solder the taps to the variable resistors, coil, speaker and power.
A correctly assembled circuit starts working immediately, without any settings! The coil, as I said above, is wound on a 19-22 cm frame and contains 25 turns. To search for smaller objects, you can wind a coil less than 15 cm - 17 turns or 10 cm - 13 turns. To search for ferrous metal, it is of course better to use a coil with a diameter of 19 cm.
I want to say a few words about the tonality of the sound. He seemed too rude to me. You can change the tonality by selecting capacitor C1, I replaced it with 47nf and the sound became higher.
It is better to take a speaker like 3GDSH TRYD 4070-02 8 Ohm so the sound will be much more powerful, I replaced the old speaker in my metal detector with this one. The speakers from the headphones also perform very well.
A link to the printed circuit board, as well as a list of parts needed to assemble the Pirate, which can be bought very cheaply on AliExpress with free shipping, are at the end of the video article!
And finally, a video of the Pirate metal detector in action:
Spinning rod care
Careful and proper care of the spinning rod can greatly increase its service life. To do this, you need to put it in order after fishing, carry out periodic maintenance and preventive maintenance.
Spinning for beginners: caring for the rod blank
Pole rod care
After every fishing, you need to wash your rod with soap and warm water. Before washing, be sure to close the connecting sleeves with plugs so that water does not get inside the elbows. Using a soft brush, clean fish mucus and dirt from the surface of the blank and the space between the legs of the guide rings. After washing and cleaning, wipe the surface of the rod with a dry soft cloth or towel and dry the handle. Wipe the inner parts of the bushings and inserts of the guide rings with alcohol using a cotton swab. Before sending the spinning rod for winter storage, coat the connecting sleeves with paraffin.
Caring for a telescopic spinning rod
The most vulnerable point of the telescope spinning rod is the joints between the knees. Dust and sand falling into these places scratch the surface, and cracks may appear at the site of the scratches during further use. To avoid this, periodically wash the outer surface of the joints with soap, as well as the inner surfaces of the knees using a wire and a cotton swab. After the procedures, the spinning rod must be thoroughly wiped, dried and lubricated with paraffin or silicone waterproof lubricant at the junction of the knees.
Varnishing a spinning rod
If, when inspecting the spinning rod, you find scuffs and scratches on the form or cracks on the winding for fastening the guide rings, you must cover them with transparent waterproof polyurethane varnish. You can use parquet polish by pouring it into a bottle of regular nail polish. Pre-clean the bottle and brush with acetone. Apply the varnish in the thinnest layer, you will need to apply 2-3 layers. After applying each coat, allow the varnish to dry slightly. After varnishing the rod, polish its surface with a soft linen or flannel cloth.
Caring for the neck (handle) of a spinning rod
Cleaning the spinning rod handle (cork)
To give the spinning rod handle a fresh, velvety look, first of all you need to wipe its surface with a cotton swab soaked in alcohol. Then, use the same swab to wipe the reel seat and remove dirt from under its clamping nut and along the entire length of the thread of this nut. Before sending the spinning rod for winter storage, the nut threads are lubricated with paraffin. After the cork surface has dried, sand it with fine sandpaper to remove the top worn layer, while restoring the original velvety and color of the handle.
Cleaning the spinning rod handle (neoprene, foam rubber)
Handles made of materials other than cork can be cleaned with soapy water, and after drying, the shiny top layer can be sanded off using fine-grained sandpaper.