Technological nuances of hardening
Hardening, which is a type of heat treatment of metals, is performed in two stages.
First, the metal is heated to a high temperature and then cooled. Different metals and even steels belonging to different categories differ from each other in their structure, therefore their heat treatment modes do not coincide. Heat treatment modes for some non-ferrous alloys
Heat treatment of metal (hardening, tempering, etc.) may be required for:
- its strengthening and increasing hardness;
- improving its ductility, which is necessary when processing by plastic deformation.
If you decide to harden the metal on your own, it is very important to correctly carry out such a procedure as heating. This process should not be accompanied by the appearance of black or blue spots on the surface of the product
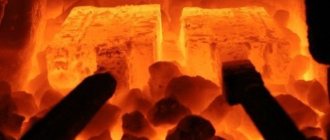
The bright red color of the metal indicates that heating is occurring correctly. This video demonstrates this process well, which will help you get an idea of the degree to which to heat the metal subjected to heat treatment.
As a heat source for heating the metal product that needs to be hardened to the required temperature, you can use:
- a special oven powered by electricity;
- blowtorch;
- an open fire that you can make in the yard of your house or in your country house.
Hardening a knife on open coals
The choice of heat source depends on the temperature to which the metal to be heat treated must be heated.
The choice of cooling method depends not only on the material, but also on the results to be achieved. If, for example, it is not necessary to harden the entire product, but only a separate section of it, then cooling is also carried out pointwise, for which a stream of cold water can be used.
Rapid cooling, which uses one type of coolant, is optimal for hardening steels classified as carbon or alloy. To perform such cooling, you need one container, which can be a bucket, barrel, or even an ordinary bathtub (it all depends on the size of the item being processed).
Cooling the knife blank in oil
In the case of other categories or if, in addition to hardening, tempering is required, a two-stage cooling scheme is used. With this scheme, a product heated to the required temperature is first cooled with water and then placed in mineral or synthetic oil, in which further cooling occurs. Under no circumstances should an oil-based cooling medium be used directly, as the oil may ignite.
In order to correctly select the hardening modes of various steel grades, you should focus on special tables.
Heat treatment modes for high-speed steels
Heat treatment modes for alloy tool steels
Heat treatment modes for carbon tool steels
Requirements for the hardening chamber
The knife hardening chamber can be made from scrap materials without any special investment. The simplest design with good functional qualities consists of several soft bricks and a propane torch.
An oxygen-acetylene mixture can be used as a combustible material. It is capable of heating the workpiece to 2800 °C, which is almost four times higher than that of propane. Adjusting the flame intensity requires some skill. The only drawback of the mixture is its very high cost.
The main thing in the forge is the choice of bricks from the right material. They must be made of fireproof clay. This is the key to long-term operation of the entire structure. If you plan to harden long knives, you can make a forge of one and a half or two bricks.
When choosing a propane burner, you should pay attention to the presence of a control valve. This will allow you to select the optimal temperature regime based on the size and type of knife.
The hole for the heating chamber can be made with a regular drill. Refractory materials are not very hard, so this procedure does not take much time. In addition, it is necessary to make a side hole for the burner flame. It should be remembered that the nozzle should be located at a distance of 2-3 cm from the edge of the brick.
With this design, you can quickly and conveniently heat small knives. Alternative heat sources will be discussed below.
Hardening and heat treatment of an ax
Blacksmith Valery Samovich: “Using an ax as an example, I want to talk about the heat treatment of steel at home, which includes three stages: annealing, hardening and tempering. The need for hardening arises if the manufacturer violates the heat treatment technology.
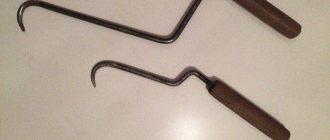
If the ax quickly becomes dull during use and dents appear on the tip, then the steel is soft. And this means that the ax is not hardened. And if the tip chips or cracks, that is, the steel is very hard and brittle, then this is possible if tempering has not been carried out after hardening.” A clean file with a fine notch will help us evaluate the hardness of steel, and therefore the quality of hardening.
If the hardness of the steel is high, then the file glides over it almost without catching. If the hardness of the steel is average, then the file will take it a little. And if the hardness of the steel is low and the file takes it easily, it means that the steel is not hardened, or the heat treatment technology was violated.
In the case of this axe, the file takes it easily. In this case, as well as in the case of increased fragility, the ax is subjected to a full heat treatment cycle. First, annealing, and then quenching and tempering. Correct hardening of an ax is considered to be hardening in which different parts of the ax are hardened differently.
In the area of the blade, at a distance of about three centimeters from the tip, the hardness of the steel should be high. The hardness of the rest of the ax should be much less. This hardening ensures the wear resistance of the blade and the ductility of the rest.
And it is a guarantee that during operation the butt will not burst or the blade will not break off.
GOST 18578 – 89 construction axes
The next point that we need to know to carry out effective heat treatment is the grade of steel from which the ax is made.
All construction axes that were manufactured in the Soviet Union and are now manufactured in the post-Soviet space must comply with GOST 18578 - 89 Construction axes.
This GOST specifies steel grades for the manufacture of axes. Each of these steels has its own heat treatment temperature regimes. And your own quenching media.
You can find out about this in steel grade books or in thermist’s reference books, which are freely available in the library. However, I want to emphasize the fact that the main materials for making axes are U7 and U7A steels. The ax I chose for experiments has a mark.
Above, the year of manufacture is 1963. On the left is the size according to GOST A2. On the right is steel. From which the ax is made. This is tool, carbon steel U7. Heat treatment modes for U7 steel are as follows:
Before heat treatment, the cutting edge of the ax must be dulled so that its thickness becomes approximately one millimeter.
Vacation
The last heat treatment operation is called tempering. Tempering is necessary to reduce the brittleness of hardened steel and relieve internal stresses in the metal that appeared during the hardening process. I bake in a regular oven.
The ax is kept for one hour at a temperature of 300 degrees, and then cools in air. This is the handsome guy we got after our vacation. The color of the tarnish is blue, indicating that the tempering temperature was approximately 300 degrees.
You can see this color if you turn the metal surface towards the light in a certain way. We check the hardness of the metal after tempering and make sure that the blade has become a little softer. As we already know, the hardening temperature of U7 steel is 800-830 degrees. And it cannot be reduced.
The higher the tempering temperature, the more ductile and softer the steel will be after tempering. Data on the hardness of steels after tempering, depending on the tempering temperature, is available for each grade in steel grade books.
Hardening with self-tempering
Another method of hardening a tool is self-tempering. First, the tool is heated in a furnace to the hardening temperature. Then, the cutting part is cooled to a temperature of 150-170 degrees. After this, the cutting part is cleaned of scale in order to see the tarnish colors. Let's see how the purple color goes.
The tool is kept in air until the heat from the hot part heats the cooled part to a temperature of 250-300 degrees. We judge this by the color of the tarnish. Everything is purple. Cool. Water is used as a quenching medium. Only to cool the cutting part it is heated to 30 degrees.
And for the final cooling of the ax it is heated to 50 degrees.
DIY file knife
You can’t do your work without:
- A good, large, Soviet-made file.
- Hacksaws for metal (several spare blades).
- Working file with a comfortable handle.
- Sandpaper and block.
- Workbench and vice.
- Clamps (2 pcs.).
- Wood (kebab) charcoal for the forge.
- Processing (of old motor oil) for hardening.
Good products are obtained from files with ground teeth - in this case, you do not have to waste time removing them.
At the initial stage, the metal is annealed. But before this, you should make a “camping” forge: pour a hearth of earth, insert a two-inch pipe (to allow air to flow in) and light the coal. When the steel turns red, stop supplying air and leave the workpiece to cool slowly. The metal will be pliable and can be easily processed.
All excess is cut off with a hacksaw according to pre-prepared patterns. Try to repeat the future shape as accurately as possible in order to use less file work. Cut a shank as long as your fingers.
Then process the workpiece using a file or emery, shaping it according to the pattern. Press the future knife against the workbench and use a clamp to sharpen the slopes. This part of the work is responsible and should not be done by eye. The two sides should be symmetrical, the metal removal angle should be the same along the entire length of the trigger, including the bend of the tip. For convenience, you can build an auxiliary device in the form of a metal pipe with a guide, and attach a long file to it.
Since the workpiece is annealed, it does not require much effort to process it. After the rough shaping is completed, the final finishing is done with sandpaper. For maximum effectiveness, it can be wound on a small wooden block.
The blade is ready, but the softness of the annealed steel will not allow you to use it to your fullest, so hardening will be required.
Hardening procedure
During this procedure, the structure of the metal changes, it becomes hard and slightly brittle. Quenching is carried out in processing oil. The finished product should be heated until it acquires a dark cherry hue.
When the weather is sunny outside and it is difficult to determine the temperature by color, readiness can be checked using a magnet: if the steel is well heated, it will not be magnetized. Then quickly lower the blade into the container with oil. To cool it faster, place a bowl of cold water under the container - this way you can achieve a more effective result.
Glassware will help check the hardness: if it is well tempered, grooves will remain on it. The main disadvantage is the labor-intensive manufacturing process. Another feature is that a file cannot be used to make a thin and flexible blade.
Among the indisputable advantages are the strength and durability of such products. The material for manufacturing is freely available, practically free, with a butt thickness of 6 mm, which does not allow knives made from files to be classified as edged weapons.
How to properly harden a knife
You need to harden knives in order to improve the quality characteristics of the metal, and you can do this at home as follows:
- a ready-made blade from a file is heated until red;
- immediately lower it into a container with mineral oil (working off);
- repeat the manipulation, increasing the time the metal is in mining.
Some craftsmen use the shock hardening method - keep the blade on fire and then in mineral oil for no more than 2 seconds, repeating the manipulation 10-15 times. If the process was performed correctly, then with such a knife it will be possible to leave pronounced scratches on the surface of the glass.
The use of spring steel for making a knife
How to make a knife with your own hands at home
Spring material 65G is used by amateur knife makers to make knives. Thanks to its unique characteristics, the metal finds its application in various fields.
Spring steel.
Blades for the kitchen, hunting, tourism - all show excellent cutting qualities. If there is a special need, you can actually forge a sword or an ax. After hardening, the steel acquires good rigidity, which allows the product to be cut. Examples of using spring steel:
- Kitchen knife. In difficult times for the country, after the collapse of the USSR, not all people could afford a good set of kitchen knives. I had to get out. Springs and plates made of 65G steel were easily accessible. In the kitchens of the post-Soviet space, homemade products were often found. The handle was made from improvised material: wood, simple epoxy, and electrical tape - which did not prevent the knives from remaining at their height.
- Tourist knife. The disadvantage of spring metal is that it is susceptible to corrosion and requires constant care after use. The knife is suitable for use in hiking conditions. An important point is hardening. If it is weak, the blade will quickly become dull on the tin can. You should know the hardness of the knife.
- Army. Tactical or, nowadays, military knives do their job well. Serrated sharpening will increase the scope of use of the blade. Withstands piercing blows without problems. In everyday conditions it will become a valuable assistant for a fighter or a “survivalist”.
- Axe, machete or sword. Alloy 65G and analogs allow you to make truly formidable weapons. The thickness of the product certainly plays a significant role. When producing such a masterpiece, you need to stock up on springs from a truck, or get a long plate.
With proper processing of the metal, we are guaranteed to get an excellent blade. Little experience with the manufacture of steel products, nonsense. Further, in the article we will provide a detailed description of the manufacture of knives from springs using various methods.
How to harden a knife at home?
To harden a knife at home, you can use several plates. It will be as an experience. So, the first one can be heated unevenly. In this case, the temperature starts from the minimum and rises to the maximum. Then the plate is lowered into a liquid, which is water or oil. After that it is installed in. Now you need to examine the fracture site. Depending on the grain size, the quality of metal processing is determined. They must be large.
As you can see, the specific heating temperature is not indicated. Since it is better to determine it empirically for a specific case. This processing method will have the result that needs to be achieved.
The next thing you need for hardening is a medium. This procedure can be carried out in nitrogen and other conditions. But the most popular option is oil. It heats up to a temperature of two hundred degrees. Then the plate is lowered into it and left for a while. It can be either twenty minutes or two hours. Its choice depends on what metal is used. After this, plunge into cold water, as shown in the video.
At this stage you can also experiment. By alternating the medium, double hardening is achieved. It makes the product very durable with excellent cutting properties. This technique consists of heating the plate to a certain temperature. Then it is tested for strength in a vice. At the same time, it should break at thirty degrees. Then it is tempered so that the fracture occurs at forty-five degrees, as shown in the photo.
Tempering a knife at home: tips
When hardening a knife at home, you should take into account the recommendations of specialists. They relate to the pre-treatment of the blade, which consists of annealing it. This will result in a minimum of cracks. In this case, the procedure is carried out slowly and evenly. It is better to do this using a muffle furnace, which is adjustable. The procedure can also be carried out for hardened steel.
If hard hardening is carried out, the blade is lowered vertically into the liquid. In this case, you cannot move it, it must be motionless. This will allow you to get a product with a long service life.
You can see how knives are hardened in the video below. The whole process is clearly shown here with its features and subtleties that will certainly help.
How to carry out the procedure yourself
To do this, you do not need to have any experience - just follow the instructions exactly, which will tell you how to harden knives at home on your own. The procedure can be used for any type of blade - an ax, scissors, and other cutting tools.
Heating source
In the open air, part of the heat emanating from the fire evaporates - the resulting temperature, especially when heat treating high-carbon steel, may not be enough. In these cases, it is better to use a muffle furnace, cutter, blowtorch, forge, even a regular electric or gas stove. When making a batch of knives, it is better to determine the hardening time experimentally using a test. To do this, several metal plates are heated: one to the maximum, the other a little less.
The fuel is coals, which are heated to a maximum white color. The shade of the flame is yellow-orange or crimson. The fire should be distributed evenly over the entire area of the fire. After heat treatment, the hot object is dipped into the oil three times for a few seconds. The last stage is immersion in a container of water. The liquid should be thoroughly mixed (shaken) beforehand.
Blowtorch
FurnaceForge
Gas stove
Temperature
There are several methods for hardening steel with different heating temperatures, holding times and cooling rates. Each grade of metal requires a certain temperature regime:
- for knives made of low-carbon steel, the temperature range should be 757-950 ° C;
- blades made from high-carbon grades are hardened at 680-850 °C;
- alloying alloys will require heating to 850-1150 °C.
In production conditions, to determine the degree of heating, a non-contact measuring device is used - a pyrometer; in everyday life, an ordinary magnet is used. With a significant increase in temperature, the magnetic properties of the metal decrease: if the steel workpiece is not attracted to it, the temperature is optimal.
Experienced craftsmen are able to determine the quality of hardening by the color of the steel: the lighter it is, the stronger the heating. The metal should not be overheated, otherwise it will turn black and it will be impossible to clean it. The sharpened part of the blade is heated 3 times to an almost purple color, that is, to a temperature of 285 ° C. The cutting part is processed on fire only once, but heated more strongly, until a yellow-orange tint appears, that is, up to 950-1000 ° C.
Red color indicates heating to 720-950 °C. Raspberry or light cherry shades of steel mean that the heating temperature corresponds to 800-850 °C. The appearance of a burgundy color in the flame indicates that the blade is not heated enough, only to 650-720 °C, brown - the temperature is not higher than 530-580 °C.
Cooling and holiday
Depending on the heat treatment method and the type of blades, different cooling methods are used, for example, in mineral oil (waste oil) or ordinary water with added salt. Options:
- if the blades to be hardened are heated red-hot, they are cooled in oil, dipping into it three times, so that each subsequent cooling is longer than the previous one; the last stage is immersion in pre-mixed water;
- for knives with double-sided blades, to give them greater sharpness and elasticity, the blades, on the contrary, are first dipped in water for a couple of seconds and then used for sharpening;
- To make the middle of the blade as elastic as possible, you can first warm it up with a metal rod, then immerse the knife in boiling water for a couple of hours, then in ice water.
It should be taken into account that metal cools 2 times faster in oil (working oil). To determine the cooling rate of a material in different solutions, you can refer to the summary table.
| Environment used | Cooling rate, °C |
| Water heated to 27 °C | 450 |
| Room temperature oil | 150 |
| Ice water | 600 |
| Machine oil heated to 20 °C | 150 |
Steel that has been quenched and cooled is still too brittle. To further increase the characteristics of plasticity and viscosity, it should be heated again for an hour, but only to 150-200 ° C (this procedure is called tempering). For alloyed metal, the temperature should be in the range of 270-320 °C, for high-speed metal – even higher. To prevent the blade from bending during rapid cooling, it must be lowered into the liquid strictly vertically, the cutting edge must be at the bottom, and the blade must remain motionless.
Cooling in oil
Vacation
Shutdown
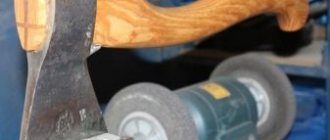
Let the metal cool and start grinding. For this you will need a grinding machine. Remove uneven surfaces and excess metal. A forged knife should be shiny and perfectly smooth. The grinding process usually removes 1-2 mm of thickness, so after processing the knife will become noticeably thinner and lighter. At this stage the leg is sharpened. Finally, it is hardened.
Hardening a knife begins with heating it to an orange color. After this, it is lowered into oil or water. Add 3 tablespoons of salt per 1 liter to the water. The oil should have a temperature of about 25-30 degrees, and the water - up to 25 degrees. After hardening, the blade is released.
To do this, you need to hold the knife over the flame and monitor its changes. Immediately after the surface of the knife is covered with a yellow-orange film, the knife must be removed from the fire and allowed to cool. Good luck!
Shaping the blade and handle of the blade
The cooled workpiece is fixed in a vice and the excess parts are cut off, giving a shape according to the patterns prepared in accordance with the drawing. The precision of removing excess metal with a hacksaw will reduce the duration of sharpening the product with a file. When cutting out the shank, you need to take into account that its size must correspond to the length of the fingers. Processing with an abrasive disc attached to an electric sharpener will help give the knife the intended shape.
When turning slopes, the workpiece is secured to the workbench with clamps. When performing this operation, it is necessary to control the symmetry of the processing of both sides of the product, removing layers of metal at one angle throughout the descent. Holes drilled on the handle of the blade will allow you to attach the handle plates using rivets. When the future knife takes on the intended shape, begin finishing the surface with sandpaper secured to the block. The softness of the annealed metal makes it easier to form a blade, but to get a good knife, the steel must be hardened and tempered.
https://youtube.com/watch?v=-rWxWfg12Uc
Increased hardness over open fire
In everyday life, hardening is often carried out over an open fire. This method is only suitable for a one-time process of increasing surface hardness.
All work can be divided into several stages:
- First you need to make a fire;
- at the time of lighting the fire, two large containers are prepared that will correspond to the size of the part;
- In order for the fire to produce more heat, you need to provide a large amount of coals. they give a lot of heat for a long time;
- one container should contain water, the other should contain motor oil;
- special tools should be used to hold the hot part being processed. In the video you can often see blacksmith pliers, which are the most effective;
- After preparing the necessary tools, you should place the object in the very center of the flame. in this case, the part can be buried in the very depths of the coals, which will ensure heating of the metal to a fusible state;
- coals that are bright white are hotter than others. The metal smelting process must be closely monitored. the flame should be crimson, but not white. if the fire is white, then there is a possibility of overheating of the metal. in this case, performance deteriorates significantly and service life is reduced;
- the correct color, uniform over the entire surface, determines the uniform heating of the metal;
- if darkening to a blue color occurs, this indicates a strong softening of the metal, that is, it becomes excessively plastic. this should not be allowed, since the structure is significantly disrupted;
- when the metal is completely heated, it should be removed from the source of high temperature;
- after this, the hot metal should be placed in a container with oil with a frequency of 3 seconds;
- The final stage can be called immersing the part in water. In this case, the water is periodically shaken. This is due to the fact that the water quickly heats up around the product.
When performing work, care should be taken as hot oil can cause damage to the skin. In the video you can pay attention to what color the surface should be when the desired degree of plasticity is achieved. But to harden non-ferrous metals, it is often necessary to be exposed to temperatures in the range of 700 to 900 degrees Celsius
It is practically impossible to heat non-ferrous alloys over an open fire, since it is impossible to achieve such a temperature without special equipment. An example is the use of an electric furnace, which can heat the surface up to 800 degrees Celsius
But to harden non-ferrous metals, it is often necessary to be exposed to temperatures in the range of 700 to 900 degrees Celsius. It is practically impossible to heat non-ferrous alloys over an open fire, since it is impossible to achieve such a temperature without special equipment. An example is the use of an electric furnace, which is capable of heating the surface up to 800 degrees Celsius.
Comments
- Vitaly: 07/30/2015 at 04:34
Hello, I have a question. How long should the blade be kept in lead for tempering? Thank you in advance! - Taras:
08/04/2015 at 18:41U10 steel (U10A, U12, etc.), usually used for the manufacture of files, tends to lose hardness at a temperature of 300 degrees (in molten lead). Such a vacation may lead to the need for frequent sharpening of the knife, however, for these purposes you can use the first stone that comes to hand. I would let it go in the oven (muffle, molten salt) at a temperature of 180-200 degrees for one to two hours. This results in a hardness of about 60 HRC. It is also possible to perform zone hardening with self-tempering: lower only the cutting edge into the hardening medium, and leave the butt on the surface. Try to study the topic of tempering traditional Japanese swords, their method is also worth attention.
- Alexander:
09/13/2015 at 13:49Hello, should you carry out finishing and sharpening after the holidays? Thank you in advance.
- Taras:
09/14/2015 at 09:18Alexander, sharpening and finishing are the final operations. They are carried out at the very end, after the hilt and sheath (if any) are ready. Otherwise, cuts are guaranteed.
- Tar-k:
09/14/2015 at 20:57Hello. If, after hardening the blade: water (1 sec.), then in oil until it cools completely, the top layer of metal burns out on the blade and grooved spots appear, can this negatively affect the quality of the blade? He tempered it with coals, immersed the blade in a pipe with a sealed end, poured coal into it and heated it so that the carbon did not burn out.
- admin:
09/16/2015 at 09:53There may be several options here. The most likely possibility is that when immersed in water, some of the scale came off the metal. This is not scary; after hardening, you will have to grind it in any case. The question is why this scale formed. Here one can only guess, since it is not known what the pipe was heated with, to what temperature and how long the temperature was maintained. In general, in such cases, a photo of the final result is desirable.
- Anton:
12/22/2015 at 13:42Can you tell me how long to keep the workpieces in production?
- womanblog:
12/12/2016 at 16:44The men got a knife from the plane. Made a blank. Should I first make the bevels with a reserve so that I can grind them later after hardening? Did I understand everything correctly? Or such steel does not need to be hardened. This one holds up well.
- Andrey:
12/23/2016 at 20:13Please tell me, if the blade is polished from a file, it will not rust at all (even if the blade is left wet)? And why is the blade etched?
- Semyon:
03/24/2017 at 16:02High-quality material, only the article misses the final chord - sharpening the knife. After all, the performance of the product depends on this process. It is no secret that the final finishing of the knife is done on expensive Japanese stones. The stones are really expensive and it is difficult to buy them. I tell you how to replace Japanese stone. We take an ordinary porcelain mug, turn it over and sharpen the knife on the bottom. The result will shock you. With a knife sharpened using this method, you can shave safely. Try it!
- Vladislav:
03/24/2017 at 20:36My father taught me how to make knives. It was he who gave me this love for edged weapons. I work at a steel mill, where I prepare the base for the knife. I make a handle from wood, buy it at the store, and then start creating. I have about 100 knives made and have already collected a whole collection. I advise everyone to try making a knife with their own hands, it’s really cool.
Hardening quality assessment
At the end of the work, a homemade knife that was reforged from an old saw or any other used tool should be checked for quality. To do this, take a file and make circular movements along the blade. If you managed to harden it well, it will slide with ease. But if the knife sticks to its surface and the edge bends, then this is a sign that the process went wrong. It clearly needs to be done again.
@tytmaster.ru
Quality is checked according to the following criteria:
- a well-hardened knife retains its sharpness for a long time;
- if the blade comes into contact with hard metals, it does not deform;
- the blade remains durable, but at the same time has flexibility and ductility.
If the device that is being hardened is forged from steel with a low carbon content, then it is not advisable to cool it in clean water. You need to pour a little regular table salt into it.
Hardening a knife is a responsible procedure and requires a certain skill and attention. But if you follow all the nuances of the technological process, the result will justify itself. In any case, it is not the gods who burn the pots! Having spent some time acquiring a certain skill, you can confidently show your friends and acquaintances the results of your blacksmithing work.
Choosing steel for knife hardening
Steel is an alloy of iron with carbon and various impurities. Depending on the content of the latter components, the following types of this metal are distinguished:
- carbon;
- alloyed.
Carbon steel contains no more than 2.14% carbon. The less it is, the greater the ductility of the blade; the more, the harder and more durable the product will be. Such a blade cuts well, but will hold an edge poorly and will wear out faster. However, it will not be difficult to sharpen such a knife. The metal is susceptible to corrosion. As a plus, good welding ability can be noted. However, low-carbon steel cannot be hardened.
A special feature of this steel is its low red resistance, which is equal to 250°C. When heated to higher temperatures (which happens during hardening), it loses its properties and becomes brittle. That is why, when starting to harden a future knife, you should take into account what it is made of and, based on this, choose the optimal temperature regime for subsequent work. For those who want to make a knife with their own hands, this steel will be an ideal option, because it is easy to work with.
When hardening carbon steel, a certain temperature regime must be observed so that the metal does not warp or crack. For low carbon content, temperatures between 727 and 950°C are ideal; for high (up to 2.0% carbon content) – from 680 to 850°C.
The following grades of steel are most often used for making knives at home:
- from U7 to U16 (subject to deep corrosion, the blade of such steel grades will be sharp and hard);
- 65G is an ideal option for knives intended for chopping, because it has impact toughness. Such a blade will not hold an edge well and will quickly rust;
- O-1 is very popular among experts in its field, due to its reasonable cost and ease of hardening. Since this is high-carbon steel, it is also very hard (up to 60 HRC), wear-resistant, but it is also susceptible to corrosion;
- M-2 – its hardness reaches 66 HRC. The blade holds an edge for a long time and rusts easily. It has greater red resistance compared to others;
- 1095 - often used for making knives. Of its series, this brand contains the largest amount of carbon, thanks to which such a blade will sharpen well, hold an edge well, while maintaining decent hardness.
What steel to choose for making a knife?
Today, a brand of steel and alloys can offer metal in several thousand names and grades. In addition to iron, the steel alloy may contain tungsten, nickel, vanadium, and zinc. The physical and chemical properties of the metal depend on this; with tungsten it becomes hard and durable, zinc makes it soft, and the aluminum component allows it to be drawn. But this is not important for a knife; the determining factor here is how much carbon the metal contains. The higher the carbon component, the stronger it is, but it is also more fragile. But the less carbon, the more ductile the metal, no, not softer, but more ductile.
Therefore, when choosing a metal for a knife, it is recommended to pay attention to high-grade steels and high-alloy grades; a blade made of such metal will be both durable and flexible, remaining sharp for a long time.
How to harden stainless steel? Safety precautions
To ensure that working with metal does not harm human health, the following safety rules must be observed:
- The room in which the metal hardening process takes place should be regularly ventilated. It is recommended to install a special hood in the room. Children and animals should not be allowed into the room where work is taking place.
- During the process you need to use special gloves. As soon as the instruments begin to heat up, they are immersed in water until completely cooled.
- When working with fire, you should follow fire regulations and do not approach the fire with flammable liquids.
- If the product is hardened in oil, then the container is tightly closed with a lid.
- You need to work in special protective clothing. Sleeves and legs must be covered, as there is a risk of burns to the extremities.
So, we looked at how to harden stainless steel. As you can see, this operation can be done with your own hands at home. The main thing is not to forget about safety precautions and follow the instructions exactly.
Knife design and shaping
One of the most difficult tasks in making a knife is designing its shape. The simplest solution for a novice knife maker would be to copy the outlines from any product you like. It is best to pay attention to models with simple forms, since it will be problematic to repeat complex elements, which most often negatively affect functionality, at home.
Having some experience in fine arts, you can draw a unique author’s project. In this case, you should pay attention to the harmony of the lines and the combination of shapes of the handle and blade. The most common design mistake is a “break” along the butt line at the point where they join. If the specific application (such as a boning or skinning knife) does not require just such an articulation, then it would be best to make the transition along a straight line or a smooth arc.
The next point is the length of the handle. For most manufacturers, this parameter is 110 - 120 mm and almost does not depend on the length of the blade. In any case, even if the knife is made to suit your own hand, it is advisable to comply with such tolerance.
You should also not get carried away with the number and depth of finger grooves and stops. This reduces the convenience of working with a reverse grip and may well transform the product into the category of edged weapon.
To match the chosen shape, first make a simple cardboard template and check the correctness of the work by checking it.
One of the essential parts of a knife is the handle. For its manufacture, various types of wood are most widely used. Our version uses oak overlays, which will be connected with brass rivets. To install them, three holes must be drilled in the tail part of the workpiece. This work will not be difficult with annealed metal.'