Long and trouble-free operation of a car engine depends entirely on its technical condition. Unfortunately, there are no perpetual motion machines, and moving parts inexorably deteriorate over time. One of the most loaded parts of an internal combustion engine are the valves in the cylinder head. They let the fuel mixture inside the cylinder and at the same time, for the duration of the operating cycle, become part of the walls of the combustion chamber, taking on all the destructive effects. Therefore, valve repair is an inevitable stage in the operation of any engine. Special tools are required to do this job correctly. In particular, this is a set of cutters for valve seats. But to understand why they are really necessary, you should delve a little deeper into the theory.
Lada 1977 - tuning
Nizhny Tsasuchey
Lada 2101, 1983
30 000 ₽
Mound
Lada 2101, 1971
18 000 ₽
Voronezh
Lada 2101, 1985
31 000 ₽
Zmeinogorsk
Lada 2101, 1982
35 000 ₽
See more cars on Drome
Participate in the discussion can only registered users.
Login Register
This is interesting: Drilling machines
What is needed for grinding in
The grinding process is performed with the cylinder head removed. Therefore, in addition to tools for grinding valves, the car owner will also need a tool for dismantling the cylinder head. As a rule, these are ordinary locksmith keys, screwdrivers, and rags. However, it is also advisable to have a torque wrench, which will be needed at the stage of reassembling the head into place. The need for it arises because the fastening bolts holding the head in its seat must be tightened with a certain torque, which can only be ensured with the help of a torque wrench. Depending on which method of valve grinding is chosen - manual or mechanized (more on them a little later), the set of tools for the work will also differ.
To directly grind the valves, the car owner will need:
- Manual valve holder . Automotive stores or auto repair shops have ready-made such products for sale. If for some reason you do not want or cannot buy such a holder, then you can make it yourself. How to do it is described in the next section. The manual valve holder is used for manual lapping of valves.
- Valve grinding paste . In most cases, car owners buy ready-made compounds, since there are currently quite a lot of these products in car dealerships, including at different prices. As a last resort, you can make a similar composition yourself from abrasive shavings.
- Drill or screwdriver with reverse capability (for mechanized grinding). As a rule, grinding is performed in both directions of rotation, so the drill (screwdriver) must rotate in both directions. You can also use a hand drill, which itself can rotate in one direction or the other.
- Hose and spring . These devices are necessary to perform mechanized lapping. The spring should have low rigidity, and the diameter should be two to three millimeters larger than the diameter of the valve stem. The same applies to the hose, so that it can be placed flush on the rod. You can also use a small clamp to secure it. You also need some short metal rod with a diameter similar to the piston rod, so that it also fits the rubber hose closely.
- Kerosene . It is used as a cleaner and subsequently to check the quality of the grinding performed.
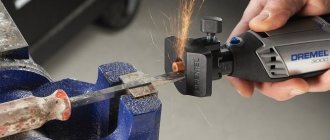
- "Sharoshka" . This is a special device designed to remove damaged metal in the valve seat. Such devices are sold ready-made in auto stores. Currently, in auto stores you can find this part for almost any engine (especially for common cars).
- Rags . Subsequently, you will need to use it to wipe the treated surfaces (including your hands) dry.
- Solvent . Needed for cleaning work surfaces.
- Scotch . It is a necessary component when performing one of the mechanized cleaning methods.
Valve grinding tool
If the car owner does not have the opportunity/desire to buy a factory device for grinding valves with his own hands (manually), a similar device can be made independently using improvised means. For this you will need:
- A metal tube with a cavity inside. Its length should be about 10...20 cm, and the diameter of the inner hole of the tube should be 2...3 mm larger than the diameter of the engine valve stem.
- An electric drill (or screwdriver) and a metal drill with a diameter of 8.5 mm.
- Contact or gas welding.
- Nut and bolt with a diameter of 8 mm.
The algorithm for manufacturing a device for grinding valves will be as follows:
- Using a drill, at a distance of about 7...10 mm from one of the edges, it is necessary to drill a hole of the above diameter.
- Using welding, you need to weld the nut exactly above the drilled hole. In this case, you need to work carefully so as not to damage the threads on the nut.
- Screw the bolt into the nut so that its edge reaches the inner surface of the tube wall opposite the hole.
- As a handle for the pipe, you can either bend the opposite piece of pipe at a right angle, or weld another piece of pipe or any other metal part of a similar shape (straight).
- Unscrew the bolt back, insert the valve stem into the tube, and use the bolt to tighten it tightly with a wrench.
Currently, such a factory-made device can be found in many online stores. However, the problem is that they are clearly overpriced. But if the car owner does not want to carry out the manufacturing procedure himself, he can easily buy a device for grinding valves.
Valve mechanism design - operating principle and possible malfunctions
Valves are used to seal engine cylinders during gas exchange. The principle of their operation is to ensure the intake of a mixture of fuel and air for its further compression. After ignition and exhaustion, the gases enter the exhaust system, and valves are also responsible for this. This mechanism operates in the aggressive conditions of an internal combustion engine and is constantly subjected to high dynamic loads, high speeds and heat. To reduce the rapid wear of the running parts of this part, the manufacturing materials most often have a high degree of alloying with nickel and chromium.
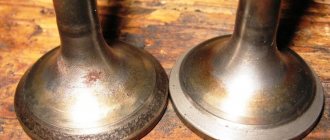
The valve mechanism has two main components: the head and the stem. These car components come with a tulip-shaped, flat and convex head. At the end of the rod there are conical, shaped or cylindrical grooves for fixing springs on them. The main manifestation of a valve mechanism malfunction is a loss of engine power, as well as unstable operation of the engine as a whole. Failures of this type occur due to sticking and the appearance of a gap. Carbon deposits can also cause this problem; it accumulates near the valve itself and prevents it from closing.
Another sign of a malfunction is increased smoke emission during exhaust. A worn rod and guide of this mechanism will cause unnatural engine noise.
Valve lapping methods
There are actually two ways to grind valves - manual and mechanized. However, manual grinding is a labor-intensive and time-consuming process. Therefore, it is better to use the so-called mechanized method, using a drill or screwdriver. However, let's look at one and the other method in order.
Regardless of the chosen lapping method, first of all it is necessary to dismantle the valves from the cylinder head (it must also be previously dismantled). To remove the valves from the cylinder head guides, it is necessary to remove the valve springs. To do this, use a special device, and then remove the “crackers” from the spring plates.
Manual grinding method
To grind in car engine valves, you must follow the algorithm below:
- After dismantling the valve, it is necessary to thoroughly clean it from carbon deposits. To do this, it is better to use special cleaning agents, as well as an abrasive surface in order to thoroughly remove plaque, grease, and dirt from the surface.
- Apply a continuous thin layer of lapping paste to the valve chamfer (use coarse-grained paste first, and then fine-grained paste).
- If the homemade lapping device described above is used, it is necessary to insert the valve into its seat, turn the cylinder head over, and place the holder on the valve located in the valve sleeve and lubricated with lapping paste. Next, you need to tighten the bolt in order to secure the valve in the pipe as tightly as possible.
- Then you need to rotate the lapping device together with the valve alternately in both directions by half a turn (approximately ±25°). After one or two minutes, it is necessary to turn the valve 90° clockwise or counterclockwise and repeat the back-and-forth grinding movements. The valve must be ground in by periodically pressing it against the seat, and then releasing it, repeating the procedure cyclically.
- Manual grinding of the valves must be performed until a matte gray, even, uniform band appears on the chamfer . Its width is about 1.75...2.32 mm for the intake valves, and 1.44...1.54 mm for the exhaust valves. After grinding in, a matte gray band of the appropriate size should appear not only on the valve itself, but also on its seat.
- Another sign by which one can indirectly judge that the grinding-in can be completed is a change in the sound of the procedure. If at the beginning of rubbing it is purely “metallic” and loud, then towards the end the sound will be more muffled. That is, when it is not metal rubbing against metal, but metal rubbing against a matte surface. Typically the grinding process takes 5...10 minutes (depending on the specific situation and condition of the valve mechanism).
- Typically, grinding is performed using paste of different grain sizes. First, use a coarse-grained paste, and then use a fine-grained one. The algorithm for using them is the same. However, the second paste can be used only after the layer of the first paste has been well sanded and hardened.
- After lapping, it is necessary to thoroughly wipe the valve itself and its seat with a clean rag, and you can also rinse the surface of the valve in order to remove any remaining lapping paste from its surface.
- Check the quality of lapping by checking the concentricity of the valve disc and its seat. To do this, apply a thin layer of graphite with a pencil to the chamfer of the valve head. Next, the marked valve must be inserted into the guide sleeve, lightly pressed against the seat, and then turned. Based on the resulting traces of graphite, one can judge the concentricity of the location of the valve and its seat. If the grinding is good, then with one turn of the valve all the applied lines will be erased. If this does not happen, the grinding must be repeated until the specified condition is met. However, a complete check is performed using another method described below.
- Upon completion of valve lapping, all working surfaces of the parts are washed with kerosene to remove residual lapping paste and dirt. The valve stem and bushing are lubricated with engine oil. Next, the valves are installed in their seats in the cylinder head.
During the valve grinding process, it is necessary to get rid of the following types of defects:
- Carbon deposits on the chamfers that do not lead to deformation of the chamfer (valve).
- Carbon deposits on the chamfers leading to deformation. In particular, a stepped surface appeared on their conical surface, and the chamfer itself became round.
Please note that if in the first case the valve can simply be ground in, then in the second case it must be grooved. In some cases, grinding is performed in several stages. For example, rough grinding is carried out until all pits and scratches are removed from the surface of the workpiece. Often, paste with different levels of grain size is used for lapping. Coarse abrasive is intended for removing significant damage, and fine abrasive is for finishing. Accordingly, the finer the abrasive used, the better the quality of valve grinding is considered. Usually pastes have numbers. For example, 1 is finishing, 2 is roughing. It is undesirable for abrasive paste to get on other elements of the valve mechanism. If it gets there, wash it off with kerosene.
Grinding in valves with a drill
Grinding in valves using a drill is the best option to save time and effort. Its principle is similar to manual lapping. The algorithm for its implementation is as follows:
- Take a prepared metal rod and put a rubber hose of a suitable diameter on it. For better fastening, you can use a clamp of the appropriate diameter.
- Secure the mentioned metal rod with an attached rubber hose in the chuck of an electric drill (or screwdriver).
- Take the valve and put a spring on its stem, then install it in its seat.
- Having slightly pulled the valve out of the cylinder head, apply a small amount of lapping paste to its chamfer along the perimeter of its plate.
- Insert the valve stem into the rubber hose. If necessary, also use a clamp of the appropriate diameter for better fastening.
- At low speeds of the drill, start grinding the valve into its seat. In this case, you need to move it back and forth, which, in fact, is what the installed spring will help with. After a few seconds of rotation in one direction, you need to switch the drill to reverse and rotate it in the opposite direction.
- Carry out the procedure in the same way until a matte band appears on the valve body.
- Upon completion of grinding, thoroughly wipe the valve from any remaining paste, preferably using a solvent. Moreover, the paste must be removed not only from the valve chamfer, but also from its seat.
Grinding in new valves
There is another grinding in of the new valves on the cylinder head. The algorithm for its implementation is as follows:
- Using a rag soaked in solvent, it is necessary to remove dirt and deposits on the chamfers of all new valves, as well as on their seats (seats). It is important that their surfaces are clean.
- Take a piece of double-sided tape and stick it on the plate of the valve being ground in (instead of double-sided tape, you can take regular tape, but first make a ring out of it and compress it until flat, thereby turning it double-sided).
- Lubricate the tip of the rod with machine oil and install it in the seat where the device is supposed to be ground in.
- Take any other valve of a similar diameter and insert it into the chuck of a screwdriver or drill.
- Align the plates of the two valves so that they are glued together with tape.
- Apply slight pressure on the drill or screwdriver at low speeds to begin grinding. The electrical device will rotate one valve, which, in turn, will transmit rotational movements to the valve being ground in. Rotation must be both forward and reverse.
- Signs of completion of the procedure are similar to those described above.
Please note that many modern car engines do not lend themselves to valve grinding. This is due to the fact that they are made of aluminum, and if there is significant damage to engine components, there is a risk of frequent valve replacement. Therefore, it makes sense for owners of modern foreign cars to further clarify this information or better contact a car service center for help.
Remember that after lapping, the valves cannot be swapped, since lapping is performed for each valve individually.
How does a car engine valve mechanism work?
To understand the specifics of using cutters or countersinks for valve seats, you must first understand how the valve mechanism of a car engine operates, as well as what can lead to malfunctions in its operation.
Each of the cylinders of any internal combustion engine (ICE) works in conjunction with two valves, one of which is inlet and the other is exhaust. The operation of the internal combustion engine is carried out through repeating processes (cycles). Each of these processes consists of supplying a fuel mixture to the working cylinder. This occurs when the intake valve opens. After it is closed and the fuel mixture is burned, it is necessary to remove the exhaust gases from the cylinder, which is ensured by opening the exhaust valve. The inlet and outlet valves, when closed, must ensure complete sealing of the working cylinder.
Valve mechanism diagram of an internal combustion engine
During engine operation, valves are subjected to both significant mechanical loads and various influences of the aggressive environment in which they operate:
- thermal;
- mechanical;
- dynamic;
- chemical
To ensure that the valves are able to withstand such severe impacts over a long period of time, they are made from a high-alloy steel alloy, the chemical composition of which contains significant amounts of chromium and nickel.
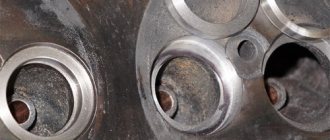
During operation, valve seats wear to varying degrees.
The valve design consists of two main elements: a guide rod and a head, which can be flat, convex or tulip-shaped. The valve guide rod can be completely cylindrical or made with a shaped groove, which is necessary for more reliable fixation of the spring.
The fact that malfunctions have appeared in the valve mechanism of the internal combustion engine can be determined by several signs, the most obvious of which are:
- reduction in engine power, which affects the speed characteristics of the car;
- unstable operation of the internal combustion engine at any speed;
- unnatural knocking sound coming from the car’s engine compartment;
- a large amount of smoke coming out of the exhaust pipe.
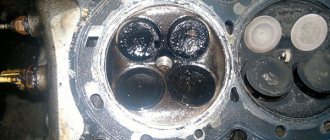
The appearance of a gap between the valve and its seat leads to the formation of carbon deposits, and subsequently to burnout of the valve seat
If we talk about the most common internal combustion engine malfunctions associated with its valve mechanism, these include:
- the appearance of a gap between the cylinder block body and the head with which such a block is equipped, which is associated with their loose fit to each other (this gap, formed for a number of reasons, leads to depressurization of the system);
- formation in places where the valve is in contact with the cylinder block, coke and carbon deposits (such carbon deposits prevent the valve from completely closing the cylinder, which also leads to depressurization of the system).
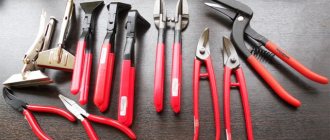
Tools for performing work, lapping pastes
Let's go through the valve accessories.
There are special tools for removing the crackers that hold the valve head in the seat plate.
There are many designs, we won’t describe them all. Let us only note that they all operate on the same principle.
With this device, the valve springs are compressed, the valve mounting plate moves down, releasing the crackers, and they are removed.
But you can do it in a simple way. You will need a piece of tube with a diameter slightly smaller than the mounting plate.
This tube is placed on a plate and hit sharply with a hammer. Due to the impact, the springs are compressed, the plate sags and the crackers jump out.
In this case, it is better to cover the hole on the side on which the blow will be struck with something so that the crackers do not fly out through it.
Now about the lapping device.
It can be purchased, usually such a device consists of a nut clamp, a rod and a wrench.
But you can do it yourself. To do this, you will need a rod with a diameter equal to the diameter of the valve. A knob is welded to it to form a T-shaped structure.
On the other side of the knob, a piece of rubber tube is placed on the rod.
1 – metal rod with a diameter of 5 – 8 mm, depending on the diameter of the valve stem, 2 – rubber tube, 3 – clamp clamps.
The inner diameter of the tube must be chosen so that it fits tightly onto the rod.
You will also need another clamp; it will clamp the edge of the rubber tube, which will be placed on the valve stem.
Pastas.
For grinding valves, devices alone are not enough, since this operation is performed using special pastes.
They are not difficult to find; you can buy both cheap lapping pastes and very expensive ones.
For lapping, it is better to purchase kits consisting of two pastes or just two pastes - for primary roughing and for secondary finishing.
You may also need to use a cutter. It is a conical head for a drill with metal cutters inserted into it.
Use it to treat the damaged surface of the saddle.
Removing the seat
First, let's look at what not to do, although some automotive garage gurus recommend doing just that.
-valve welding + knocking out
https://www.youtube.com/watch?v=mEe3wNJwuKQ
First, the old unnecessary valve is adjusted to the dimensions of the seat, inserted onto the seat and the valve is welded to the seat. While it is still warm, knock out the valve and it comes out along with the seat. Due to the different expansion of metals - steel and aluminum - the tension decreases; when it cools down, it will not be so easy to come out.
Why shouldn't you do this? During welding, the entire head heats up and it will certainly move, it will become crooked and in addition to this, hidden cracks will open where there were internal stresses in the metal (and they exist in any case). Then you will wonder why my head suddenly turned out to be pierced.
The best way is to bore the valve seat on a machine until it becomes the size of foil and jumps out of the seat hole. But... this cannot be implemented in a garage due to the high cost of the equipment, and not every village will have such a machine. Therefore, let’s consider another method, easy and safe, and can be implemented in any garage.
Choosing garage technicians: a simple and safe way
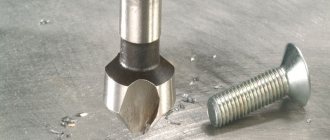
Using a milling cutter, grind the saddle all the way through one edge. The seat will weaken, lose tension and jump out of the seating hole on its own, without even having to sharpen it through, reaching the seating plane, when a little less than 0.5 mm of tension remains, the tension is no longer enough to hold on. By opening the ring, the saddle will no longer be able to resist.
A drill cutter is sold in any hardware store and costs no more than a drill, which is why this method is so affordable.
Now that the saddle is out, we need to think about what we are going to put in there.
Main stages
The grinding procedure is divided into three stages:
- At the first stage, the cylinder head is disassembled. Using a desiccant, the retaining rings are removed, the springs are pulled out, and the valves themselves are removed from the cylinder head. An important point that should be observed is that it is advisable to mark all the springs so that later assemblies they are installed exactly in their old places. This is done when old valves and springs are left behind. Having completely disassembled the cylinder head, it must be washed from dirt and carbon deposits. Next, a visual inspection of the seats and guide bushings is carried out for the presence of cracks, holes, and chips. If they are not there, then proceed to the next stage.
- The second step is to grind the valves using paste, using a device to perform the actions manually. A composition with a coarse abrasive is applied to the working surface of the part cup and the part begins to rotate in the seat of the block head. Rotate both clockwise and counterclockwise, distributing an equal number of rotations. During rotation, the part is pressed tightly against the functional surface of the combustion chamber. As grinding progresses, the composition is changed to a more gentle one. This achieves a smooth, dense grinding. A similar operation is carried out with each of the valves located in the cylinder head. Having achieved ideal evenness of the parts, as well as the seats directly in the combustion chamber, they begin to check the quality of the grinding.
- Quality is checked using kerosene. Having installed the valves back and assembled their mechanism completely, you need to turn the cylinder head over so that the combustion chambers are in front of your face. Pour kerosene into each chamber and leave it in this position for several hours, ideally overnight. After the required time has elapsed, the combustion chambers are inspected. If the liquid does not flow out through the valves, it means that everything was done efficiently, the process can be considered complete. In the event of a kerosene leak, the procedure must be repeated until it is done perfectly.
Manual grinding is a rather long, labor-intensive and complex process. Carrying it out requires enormous patience and care. If it is not possible to do such painstaking work, it would be better to entrust it to professionals who will complete the operation much faster, ensuring high quality.
This is interesting: Welding oscillator - device and DIY production
How to restore valve seats
In the event that it is not intended to replace valve seats with new ones, but to restore old ones, repair work is carried out in the following sequence:
- The cylinder head is located on a flat surface.
- The cutter is fixed on a mandrel installed in the machine chuck.
- The axis of the tool is aligned with the axis of the hole in the cylinder head intended for the valve guide rod.
- Slowly and without strong pressure, rotating the cutter clockwise, remove carbon deposits and a thin layer of metal from the working surface of the valve seat.
Processing the working chamfer of the seat with a roller cutter at an angle of 45 degrees
It should be borne in mind that three chamfers must be machined on the valve seat: upper, working and lower. To process each of these chamfers, a countersink is used, which has a certain angle of inclination of the cutting part.
Valve seat processing diagram (using the example of a VAZ engine)
This is what the seat chamfer looks like at various stages of work.
To ensure maximum tight contact of the valve head with the working surface of the seat after processing with a countersink, it is necessary to grind them in. This operation, which uses abrasive paste, is often carried out manually. To do it faster and with minimal labor, you can use a valve grinding tool, which can be a regular drill.
In the event that the valve seat is replaced rather than restored, and the valves themselves are replaced with new ones, the procedure for grinding in the mating surfaces may not be performed.
Lapping Tools
Lapping devices are divided into 2 groups.1.
Clamping the valve from above, fixed on the rod.
There is a handle on one side. To achieve the result, you need to pull and rotate it. 2.
"Suckers". They are fixed on the valve plate and are also equipped with a handle. To use, you need to press the valve against the plate and rotate the device in different directions.
Valve lapping tool: top clamping model
If you don't have a tool, a screwdriver or drill will do. Regardless of the tool you choose, you will need the following equipment: ✔ abrasive or diamond paste; ✔ spring - such that you can easily squeeze it with your hands and put it on the valve; ✔ kerosene. Can't get hold of abrasive paste? Prepare it! To do this, you will need fine-grain sandpaper or sandstone shavings. Remove the stones from it and mix them with grease or a similar substance in a ratio of 2 to 1. The consistency of the mixture should resemble shampoo. In extreme cases, standard motor oil will work as a base.
Applying abrasive paste
Valve seat repair
Before the seat processing procedure itself, it is advisable to replace or at least repair the valve guide. The roller cutter guide will rest on it. After this, processing is carried out with cones (cutters) - from small to large angles, if specific valve seats allow this. Processing is carried out until the chamfer width increases to 2 mm for the intake valves and 2.5 mm for the exhaust valves. After this, the working surface is ground to remove any possible burrs. This completes the actual milling of the saddles.
A mandatory final procedure is grinding in the valves. It allows you to check how accurately the milling was done. To perform grinding, a special abrasive paste with fine grain is used. Diamond pastes are not recommended due to the solid particles they contain. They can further accelerate wear on the seats. Grinding occurs by rotating the valve on the seat. At the same time, the valve is periodically raised and lowered so that the squeezed out paste falls back onto the working surface of the seat. If after 1-2 minutes the surface has not rubbed in, it means that the milling was performed unsatisfactorily. Re-processing required.
Checking the quality of lapping
After grinding in all valves, it is recommended to check the tightness of their fit to the seats.
To do this, you first need to install all the valves in place, install the springs with mounting plates and dry them.
Here you can’t do without a device for desiccation.
Next, the head is installed on a flat surface with the valve plates facing up.
Kerosene is poured into the combustion chambers because it has high fluidity. Its level is measured and the cylinder head is left for a day.
If, over time, the kerosene level has not decreased or decreased very slightly, the grinding has been done well and the engine can be assembled.
Also read why valves bend on engines.
POPULAR WITH READERS: Is it worth warming up an injection engine?
If a kerosene leak is noticed, the valve grinding operation is performed again, but only those on which the leak is noted.
Gas distribution mechanism
As already mentioned, the valves admit and release the fuel mixture into the combustion chambers of the cylinders. Since the compression force of the mixture acts on the plate during the operating cycle, the edge of the plate is ground to a cone. The combustion chamber window also has a chamfer corresponding to this cone. The place where the valve disc meets the edge of the window is called the seat. Many operational indicators of the engine’s operating process, including the most important thing – compression, depend on how well the part adheres to the surface.
The tighter the valve fits to its seat when closed, the greater the tightness in the cylinder will be achieved. Consequently, the required operating power will be maintained while the engine is running.
The need for special tools for repairs
Valve seats inevitably wear out after a long mileage. The chamfer on the surface of the seat becomes more cylindrical over time. The window itself is made oval due to uneven wear. A violation of the geometry can also appear due to engine overheating, when the block head warps and its geometric parameters change. Cavities also appear on the surface of the valve seat, directly on the chamfer itself.
Such defects lead to leaks in the combustion chamber and have a destructive effect on its edge. Therefore, when carrying out a mandatory inspection, it is subjected to grinding in of the mechanisms to their seats using a special tool, in particular, a roller cutter for repairing valve seats. Without them, not a single major repair of an internal combustion engine is carried out.
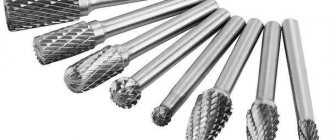
Countersinks and cutters for repairing valve seats – what to choose?
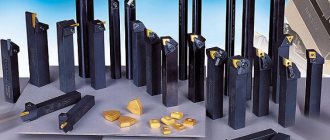
Replacing valve seats with your own hands requires the presence of not only a rough tool, but also an almost jewelry one - a roller cutter or a countersink. These highly specialized tools are used only for repairing internal combustion engines. A set of cutters for valve seats is used to grind out the desired shape of their internal diameter . This operation allows you to achieve a tight seal from the plate. In order to accurately process the valve seat, it is advisable to have a drawing of the mechanism at hand.
The cutter is made in the form of a metal cylinder, in which there is a hole and two or one conical surface; its angle can vary from 15 to 60 degrees. There are incisors on the surface of the cone. A set of countersinks for repairing valve seats is used in the same way as cutters, but there is one difference. The countersink can be used on mechanical and electrical tools.
Required Tool
The work of grinding valves is not particularly difficult, but it takes a long time to complete, especially if you do it yourself.
It is impossible to perform them on a car; you will have to partially disassemble the power plant, namely remove the cylinder head.
Therefore, when deciding to grind the valves, you should immediately take care of having a new cylinder head gasket.
The tools you will need to perform this operation are:
- Set of keys and sockets;
- Device for desiccation of valves;
- Device for performing grinding;
- Grinding pastes;
- Rags;
- Kerosene.
Replacing valve seats with your own hands - we analyze the specifics of the work
This operation is performed in two ways. The first one is rough, but the simplest and fastest. It is carried out quite primitively: an old valve is welded onto a worn seat ring, and then the ring is simply knocked out with a hammer from its regular place in the cylinder head; by the way, it can be damaged, which is very undesirable. Next comes the process of pressing in the new one. The soft method is much more complicated, however, it can be done in your garage without the intervention of expensive equipment. The saddle in this method is carefully turned on a machine. After this, the seat is cleaned and also ground.
Indications for use of special tools
The use of a cutter for valve seats is necessary in the following cases:
- damage to the working surface of the seats, which can be restored;
- after grinding the valves on the glasses;
- after or saddles;
- when carrying out complex engine repairs.
In all cases, repairs using cutters are possible in a garage, of course, if you have the skills to assemble and disassemble the engine. All work is carried out on the removed cylinder head.
Roller cutter for car valve seats
Long and trouble-free operation of a car engine depends entirely on its technical condition. Unfortunately, there are no perpetual motion machines, and moving parts inexorably deteriorate over time. One of the most loaded parts of an internal combustion engine are the valves in the cylinder head. They let the fuel mixture inside the cylinder and at the same time, for the duration of the operating cycle, become part of the walls of the combustion chamber, taking on all the destructive effects. Therefore, valve repair is an inevitable stage in the operation of any engine. Special tools are required to do this job correctly. In particular, this is a set of cutters for valve seats. But to understand why they are really necessary, you should delve a little deeper into the theory.
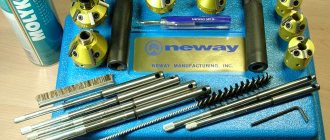
Features of Neway brand tools
Neway valve seat cutters are one of the most popular tools for lapping valves and milling seats. A special feature of this tool are special cutters. With their help, repairing valve seats is especially easy, without the use of special physical force.
This tool is completely manual. Another distinctive feature is the quick-release pilots. These are devices installed in the valve guides. Thanks to the precision processing of parts, high milling accuracy is achieved. As a result, subsequent valve grinding is not required. You can immediately start operating the engine, without running in.
countersinks
During repairs, you can also use countersinks for valve seats. Their difference from cutters is the installation of a fixed (and sometimes adjustable) cutter. The advantage of such devices is that they can form the entire working surface of the saddle at once.
Another difference is the different way the support is installed. One support is installed on the valve sleeve, the second on the bracket. This significantly increases the precision of working surface processing.
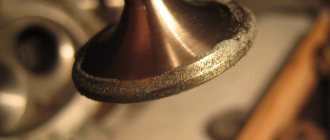
Cone for removing excavation
This tool is used to restore valve seats. To determine whether you need to use a roller cutter or can do without it, you should inspect the saddles. They can be covered with soot and shells, but if the chamfers have the correct conical shape, you can immediately proceed to lapping; otherwise, if the chamfers are rounded or have steps on them, you will need to give them the correct shape using a cutter.
Article on the topic: How to repair a distributor yourself
Since the shapes and sizes of the seats on different heads are different (for example, for the VAZ-2106 and VAZ-2109), you need to select the appropriate tool. Seats can be processed manually or, to save time, using a drill. To do this, the cutter is fixed in the chuck, like a regular drill, and under its influence the surface layer of metal is removed. The signal to stop removing the excavation is the appearance of a shiny, even circle, the shape corresponding to the valve plate.
In the video you can see how the saddles are processed with a rolling cutter.
Execution technology
The work is complex, but if you have the necessary skills, it can be done in a garage.
There are several ways to remove the saddle. A quick, but not very correct method is to weld the valve onto the seat and then knock it out. The valve is ground to the size of the seat, inserted into it and scalded. Until the metal had time to cool. The saddle must be knocked out with a hammer. The entire structure should come out without any problems. But remember that welding heats up the metal, which can cause deformation of the head. By knocking it out, you can damage the seat under the saddle, which will entail additional work on processing the cylinder head. It is best to use a lathe. This way you can grind the saddle to such a size that it becomes like foil and can be easily taken out. If you don’t have a machine, you can use a drill and a cutter attachment. Stitching is carried out on one side until the tension weakens. The saddle can now be reached by hand.
The ideal option for installing a new seat is nitrogen, in which the seats should be pre-cooled. The fact is that their dimensions are slightly larger than the holes, and due to cooling the outer diameter decreases. Naturally, nitrogen in the garage is very rare. Then remember the properties of metal to expand and contract. The saddle is simply placed in the freezer for a couple of hours, and the hole is heated with a burner.
If during installation it will be necessary to apply force, it is recommended to take a block suitable for the diameter of the seat and use it to press it.