In addition to them, for this task there are also shutters, armored blinds, screens, but their potential is in most cases unnecessary and they are not always feasible in terms of cost, design, convenience, ease of use (they must be specially closed, limiting the view, etc.).
A fence made of metal strips, rods, with different cell sizes is not only more practical, but also, perhaps, the only option if solid protection is not required: it is simple in design, but at the same time will create a serious obstacle to intruders. We will describe how to assemble different options for window grilles, especially monolithic welded ones, and compile a step-by-step guide. Let's consider what tools and materials will be needed, and methods of fastening.
Can it be done?
Window grilles are not grilles, which are intended for decoration (false grilles) and/or strengthening of glazing (for sash), but a traditional protective structure made of solid, heavy, durable metal strips, rods, and fittings.
There are only decorative products of this kind, but if we consider it in the classical sense, from the point of view of practicality and functionality, as is required for most private properties, then the direct task of this fence is protection, ensuring the burglary-resistant qualities of not only the double-glazed window, but also the opening .
Purpose of security bars, their types according to purpose:
- Protective .
Provide anti-burglary properties of openings, windows, and double-glazed windows. The decorative effect can be extremely low, for example, if you use corrugated fittings. But usually they take at least the smooth one, and it has a completely normal appearance. Such barriers are often created from inexpensive, but quite reliable, durable stamped, drawn, rolled strips of metal. Forged and cast materials can be used, but if only a security function is needed, they are used less often. - Decoration . Fences created primarily for design purposes only. They are distinguished by thin rods and flimsy fastening. They can be attached to the window frame and not through it. Practicality and functionality may be present, but to a lesser extent.
- Combining the above two tasks . This is the vast majority of gratings. Their rods can create certain shapes, cells, and themselves be more aesthetic (twisted). Forging and casting in this segment are the best that you can choose, but in most cases they make quite beautiful grilles from square rods and strips. That is, very standard elements are also used, but more attention is paid to design.
Types of gratings according to their manufacturing method and materials:
- Welded . The most common. Standard ready-made rods and strips of metal are used, so the aesthetics are not at a very high level. But such a structure is easiest to build with your own hands, and the material is easier to work with. More accessible tools are used. The process itself will be faster, less experience, skills, costs will be required, and the equipment will be simpler.
- Forged . Difficult to manufacture. The metal has increased aesthetics, a characteristic beautiful texture (dullness, patina, etc.), curls, petals, artistic figures, and images are made from it. There is a special appeal, even with a more modest, laconic appearance.
- Forged and welded . The level of attractiveness is the same as the previous ones, but slightly lower. This is a combination of forged elements and welded ones, for example, in the role of the first, you can take individual petals, curls and weld them to square rods. Simplicity of manufacturing has been introduced here using welding applied to forged decorative elements.
- Cast . They are not at all suitable for independent creation: while forging can be mastered at home (there are compact forges and bending equipment), then these products are manufactured exclusively in a production environment, in workshops with complex equipment and furnaces (you need to melt the metal). This is the most expensive product. And also in first place in terms of weight and reliability.
Reference ! The easiest way to make window grilles is by welding. This can be done with only minimal experience. Even a person who is encountering this method for the first time, who has received a minimum of information on how to implement it, will cope with the job.
You will need a few tools, the main one of which, and if you exclude auxiliary tools, then the only one, is the usual simplest inverter welding machine, the size of a tool box.
Before work, you need to decide on the design of the grille. There are such varieties :
- Monolithic, they are also deaf . Solid, without sashes, do not swing open, firmly, tightly fixed to the wall. Disadvantage: in the event of smoke, gas contamination, or fire, such a fence will turn the room into a trap.
- Swing . One or two doors open to the sides, they are closed with a lock (hinged or hidden in the frame). This design is the most fireproof, but somewhat more vulnerable. The sashes are attached directly to the window block, but more often to a common frame, which is fixed to the wall, and then they are hung on it. When assembling it yourself, you will need to buy hinges.
- Folding . Similar to the previous ones, but the sash is of the transom type and opens upward.
- They are folding and sliding . Hinged mechanism with movable joints, all its elements are interconnected. They are quite suitable for making them yourself: you just need to drill holes in the strips and connect them with bolts so that they move. Such grilles, as a rule, are attached from the inside of the room and also have a lock.
Mounting types by location:
- Internal. In the room itself with fixation on the opening or between two windows.
- External. Directly into the wall from the street side. More reliable option.
- In the slope (at the end of the wall near the window frame).
- On or through the facade (overhead type).
- In the frame, window block. Typically used for wooden windows. Usually this is a through mount, so the reliability is quite good.
- Through, when the anchor pierces through the wall or glass unit and is fixed inside the room with a nut and washer - this is only possible when driving the fastener not into the end of the slope, but into the facade, perpendicular to the wall. This is the best way - such an anchor is almost impossible to pull out.
- Superficial. The fastener is screwed in, driven in to a certain depth, but does not pierce the wall through (it is logical that this is always the case when fixing it on the side edges of slopes).
We must always remember that blind (without sashes) grilles on windows, firmly attached to the wall or double-glazed window frame, can turn the room into a trap in the event of a critical situation, for example, in a fire.
It is advisable that the facility have emergency exits . This disadvantage is not so significant for swing and sliding structures, but they are used less frequently. In addition, they also represent some kind of barrier, since if they are locked from the inside, it will take time to find the key and insert it into the keyhole, which is not so easy to do in stressful situations.
Types of window grilles
Grilles, depending on their types, have varying degrees of design complexity, so before making a choice for self-production, you need to understand what they are.
So, the following can be installed on windows:
- Blind grilles . They are fixed to the wall of the house or embedded into it on slopes, and also fixed to the window frame. This option is an excellent protection against penetration from the outside. However, if you think in advance about compliance with fire safety, it will become clear that such a design of grilles in an emergency situation can make the house a “slammed trap” for its residents.
Despite this, solid grilles are the most popular type of protection against intruders due to the ease of their installation. However, before choosing this particular protective design option, you need to think carefully about all the pros and cons.
- Hinged grilles can have one, two or even more opening doors. They consist of a common metal frame into which shutters are hung on hinges and locked from the inside of the structure. This option for fencing a window opening can be easily opened if necessary, which in an emergency can save the lives of people in the house, and therefore is certainly safer. In this case, both the hinged hinges and the lock can be hidden so that from the outside it will be impossible to determine whether this grille is hinged or blind.
- A sliding or folding grille has a complex structure, since all the intersections of its elements are connected to each other by movable hinge joints.
Most often they are installed from the inside of the room, but sometimes they can be seen from the outside of the windows. In any case, such grilles are closed with a secret lock, which cuts into the side elements of the frame. This type of structure, if properly cared for, can be opened and closed at any time, so it will not become an insurmountable barrier for people inside the building in the event of a fire.
However, due to the complexity of independent production and installation, as well as the high price of the finished product, such models are used much less frequently than those mentioned above.
What materials can it be made from?
Only metals are used for protective grilles. You can use any alloys, but the softer they are, the easier it is to cut them with special cutters (even non-hydraulic ones), break them, saw them, cut them with a grinder. For example, copper is used extremely rarely; it is appropriate only in cases where special aesthetics are required in already protected, closed areas.
The same applies to brass and bronze, although they are stronger, they are still perceived as an exception. Moreover, they themselves can become an object for hunters for non-ferrous metals.
Aluminum is found somewhat more often, but only with thickness and additives that strengthen it . But iron, although it cannot be called particularly durable, is popular because it is cheap and easy to process, but it corrodes quickly and must be especially carefully coated with protective paint.
The best material for gratings, the default standard, when special strength is required, is steel: special, structural, reinforcing. You can take forged, rolled (cold rolled is better), drawn, stamped.
Reinforcing steel is used more often; it is more reliable than some other types : a rod with a cross-section of 14 mm is equivalent to 20 mm of structural (regular) alloy. And this metal can be cut, but not with hand tools - you will need hydraulic shears.
The stronger the steel, the better: special alloys, “diamond” (ХВ5), eutectic (У7, 65ГС), alloyed with manganese, molybdenum, vanadium, but their price is high. Such rods can be extremely thin and cannot even be seen from afar, but in order to cut them you will need a plasma cutter. Thieves will not be able to enter the premises, but rescuers will also have to try their best in critical situations inside the house.
Reference ! The disadvantage of especially strong steels is that their ductility is lower, that is, it is extremely difficult to create openwork curls, this is out of the question. More standard alloys are used more often not only because they are easy to work with, but also because they, when available and at an affordable price, create a sufficient, even excessive, level of protection.
They work with special steel only in a production environment , so we do not consider it as a material for making gratings ourselves. We will describe the creation of gratings from reinforcing steel - of all the available options, it is the most durable, and you can work with it at home. However, for other metals the assembly process is similar.
Features of welding reinforcement
All methods of fastening reinforcing bars are regulated by GOST 14098-91. When creating lattice frames, it is possible to obtain cross connections comparable in strength to reinforcement. It is preferable to connect the rods end-to-end, increasing them to the required length. The strength of end-to-end frames is higher than when welding overlapping reinforcing bars. The alignment and symmetry of load distribution is disrupted. The metal is welded by surfacing and melting. The reliability of the molten joint is higher than that of surfacing, but the method is not applicable on construction sites when welding reinforcement at height.
Before hot processing, the metal should be cleaned so that there is no rust or metal particles in the working area. For butt joints, the edges are aligned with a cutter.
Tools and accessories
Tools for creating a welded window grill with your own hands:
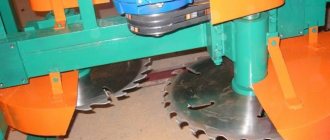
Welding (inverter) machine.
This fairly simple, compact device can be purchased at an affordable price or rented. Often households have the device for repairing gates, fences, and other metal structures.- An angle grinder with wheels for cutting and grinding; it can be replaced with a grinder.
- Metal brushes for removing burrs, rust, scale, and traces of corrosion.
- Large and small vices, clamps (6 or more are required, at least two on each side of the frame).
- Tape measure, pencil, marker or marker for marks.
- Drill, hammer drill, drill bits for metal, wood, concrete, brick.
- Threaded rods from chemical anchors (12 mm cross-section) with nuts, washers.
The above is quite sufficient for a welded structure, but for special modifications of the gratings the following will be required:
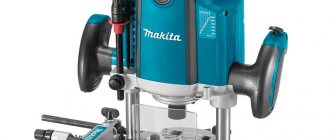
- If forging will be used: compact forge, anvil, hammer, tongs.
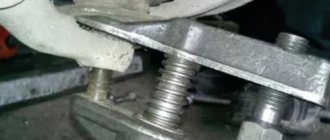
- If they bend the rods, creating simple curls (currencies) from them: bending equipment, which is a platform with levers, protrusions, a twisting segment with vice clamps into which the rod is pushed.
- For hinged (sliding) modifications, bolts and washers will be required. The design can be improved by attaching a wheel from furniture fittings to the bottom of the vertical rod of the sash frame: the roller will facilitate sliding/sliding.
For standard independent work, welding is used, but forging is a process with many nuances.
You need to know how to use a forge, to what temperature to heat metal , how and with what help to make certain patterns, etc., this is a separate topic. Therefore, we will concentrate on assembling window grilles using ready-made reinforcing bars, strips by welding.
Welding methods
There are three main methods of welding reinforcement: lap welding, butt welding and resistance spot welding. Let's look at each of them in more detail.
Overlap welding
Overlap welding is not the most popular method, despite its relative simplicity. It is used in cases where it is necessary to weld not the most critical structures, since such a connection is not very strong. In particular, you should not weld reinforcement at height. If desired, the seam can even be broken using a regular hammer. Take this into account.
The picture below shows an overlap weld. You can see that the rods are offset relative to each other, usually this distance varies from 15 to 30 centimeters. The greater the overlap, the more reliable the entire structure, but the consumption of reinforcement will also increase.
The formation of the seam should be carried out on opposite sides of each of the rods. This is not always convenient. Sometimes there are cases when it is simply not possible to get to the intended welding zone and you have to make the seam in the wrong position. As a result, reliability suffers even more.
The technology of overlap welding of reinforcement involves preliminary preparation of products before welding. Clean the ends of the reinforcement using a stiff-bristled brush. You can also use a grinding wheel or any other cleaning methods for this purpose.
Now about the choice of electrodes for welding. Everything is simple here: the larger the diameter of the fittings, the thicker the electrodes should be. Use our recommendations:
- Fittings from 5 to 8 millimeters - choose electrodes with a diameter of up to 3 millimeters.
- Fittings from 8 to 10 millimeters - choose electrodes with a diameter of 4 millimeters.
- Fittings from 10 millimeters or more - choose electrodes with a diameter of 5 millimeters or more.
It is also important to set the current correctly. Here the cost of a mistake can be too high, so be careful. Below you can see a table showing the diameter of the fittings and the recommended current value. Use this table for the first time, then try to track the results of your work and learn how to configure the device, based on your experience.
As for electrodes, you can choose inexpensive MR and ANO. They are perfect for overlap welding.
Butt welding
Butt welding of reinforcement is used quite often. At first glance, such a connection may seem unreliable. This is indeed true, but only if you simply join two rods and weld them in this way. If done correctly, a butt joint can be quite durable.
To make a butt joint you need to use special welding baths. These are U-shaped metal parts into which the ends of two fittings are placed and welded. It is necessary to melt the ends of two fittings; this procedure is performed at a high current value (at least 400 Amperes). The molten metal fills the bath, simultaneously fastening both rods together. The bath should be larger than the thickness of the rods. Ideally, the distance from the fittings to the wall of the bath should be at least one and a half centimeters.
Step-by-step instruction
Measurements. We take measurements from the window opening, taking into account the specific location of the grille. In our case, the structure has an additional frame that is attached to the facade of the building, but if the fixation is on slopes, then you need to measure more carefully, since the fence must fit inside the opening. Typically, the sides of the rectangle of the product frame will be less than its width and height by approximately 1 cm.
If the grille is attached to the facade (overlay), then its edges can extend on the sides to any distance. We choose such that the distance between the fasteners is not too small (it is better that the anchor is surrounded by as much concrete or brick as possible) - 15...20 cm. We make calculations in a similar way if the structure will be directly fixed to the window frame.
In our example there will be an additional load-bearing base , so we will create a slightly protruding lattice. So, its main parts:
- frame attached to the wall;
- directly the fence itself with its frame, which will be welded to the first one.
That is, it is important for us to calculate the dimensions, as we indicated above, primarily for the supporting frame mounted on the wall.
We make a sketch drawing. In our situation, it is undesirable to make do with approximate sketches; it is important to draw a diagram as accurately as possible, indicating the dimensions .
We select the material. Its quantity is determined according to the drawing with dimensions. Now more specifically about rods, metal strips, additional parts:
- The following rods are suitable for the grill itself:
- square (10x10, 12x12 mm);
- reinforcement (10 - 12 mm) smooth (it is advisable to choose them because of the best appearance), corrugated;
- strips are 6x12, there may be other sizes, the main thing is that they are not too thin or flimsy.
- For the frame under the grille:
- the same square or round rod, but a size or slightly larger than that used for jumpers:
- corner 40x40;
- square or rectangular profile 25x25, 30x30, 15x25, 20x30 mm.
- For fastening:
- strip pieces (width 10…12, thickness 6…8 mm) made of metal for eyes;
- threaded rods (12 mm) from anchors, of suitable length for through or other fastening.
Above we indicated what materials a master can choose from for a welded grating. Similar products of other sizes are allowed, the main rule is: the thicker, stronger, the better. But there is also no need to make it too heavy or overload the structure with oversized, frequently located elements.
We make the grille first, and we assemble the second frame, on which it will be attached and then fixed to the walls of the opening, in the second place.
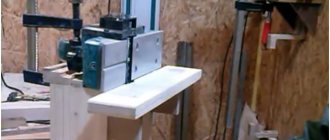
We lay out the material on a convenient work surface: the best option is a metal frame table . You can use one with a tabletop, but it is desirable that it be made of metal or upholstered with it. As a last resort - a flat concrete or cement surface.
In this case, you need to be especially careful that the folded, not yet welded structure does not move, so along its perimeter you can lay bricks close to the rods so that they do not move.
When making window bars, craftsmen use special metal tables with a frame made of a wide thick profile , without a tabletop. This is, in fact, a rectangular frame with thick sides, on which rods are laid according to the diagram, secured with clamps, which is convenient, since you can press the rod from below and from above, reliably stabilizing it for scalding.
As a rule, such auxiliary devices are homemade, welded in the same way as the grille - from rods, a profile, but of a larger size.
The rods can be twisted, simple curly patterns can be made from them on bending equipment , which is actually several thick pins, bars or a small platform with grooves, tightly fixed on the workbench.
Individual parts can be welded, creating the best aesthetically pleasing shapes. But for complex artistic solutions of curls and petals, forging will be required.
Some decorative elements can be attached manually to hide welding seams:
We calculate the length of the shaped elements, rods, weld them, crimp the joints with thick corrugated metal plates, hiding the unattractive appearance.
We lay the structure on the table, secure it with clamps so that it does not move . Once again we check the length, diagonal, other dimensions, if necessary, cut it with a grinder. If any element is shorter, then it is better to replace it, but you can also increase it: weld a piece of the same material to it, and again, if necessary, adjust it. We mark the places where the rods will stand and weld them.
The next stage is scalding.
It must be said that, despite the apparent complexity, the manipulation is extremely simple: turn on the inverter, put on the protection, and work with the electrode. After welding all the rods, you need to lift the grate, place it vertically and weld again, thoroughly welding the parts on all sides, since the initial lying state of the structure did not allow this to be done immediately.
We weld the part that will be attached to the wall .
We lay out the rods on the table; it is better to take a larger size, for example, 12x12: the supporting structure should be stronger and stiffer. We fasten with clamps and weld. Next, we place a square profile (pipe) on this frame, the same height at which the grille will be distant from it, it will serve as a stand during installation. We cut the jumpers with a length corresponding to the given gap, which will connect the two frames, that is, one end of the crossbars will be welded to the supporting frame - the second to the one with the grille. You will need several of these twigs on each side - the more, the better, tougher, and more reliable the product will be. We place the grille on the profile, weld the connecting jumpers, connecting it to the load-bearing part.
We get a protruding grille.
The work took 6 hours and 50 meters of rods. You can attach it to the facade (with studs right through the wall) or into a slope (you can make “ears” with holes for fasteners that go exactly into the opening). It all depends on the initial calculations.
Important ! The method of fastening - into the facade or through the “ears” into the slope, onto the window frame - must be decided immediately, since the size of the grille will depend on it.
The product can be polished, but you can do without it . But you definitely need to knock off the scale and clean the joints with an iron brush. It is advisable to paint it.
How to secure?
Let us recall the options for attaching a grill to a window:
- Right through the façade.
- On the side edges of the slopes, inside the opening. Usually, ears are used that go into it parallel to its side edges; these parts have holes for pins.
- On the profile of the glass unit. Here it is highly advisable to fasten only through. More often this method is applied to wooden windows. Its disadvantages: the double-glazed window frame will be damaged by the holes for the studs.
In the vast majority of situations, the structure is mounted outside , although there are fences mounted indoors, but this is rare. This trend does not apply to sliding, swinging grilles, which are more appropriate to be placed only inside the building. The fixation methods are similar.
A guide on how to attach a grill to a window in different ways:
- Not end-to-end .
They use sections of the same reinforcement, but take a larger section, at least 12x12, of sufficient length. The minimum recommended number of such parts is 6 – 8 for standard product sizes. The more, the thicker the better. If the fence has a wide frame, then holes will be drilled in it, if not, then rods will be welded, and they are drilled into the wall for these elements. The deeper the pin goes into the wall, the better, so the depth is from 10 cm. The rods are driven in, the length is calculated so that they protrude by 25 - 30 mm, they should also be inside. Then they bring the grate and weld it to them. - End-to-end. Best Recommended Method. The fixation is much more reliable: the wall is drilled right through. Studs (threaded from chemical anchors for concrete with washers, bolts) are driven into the wall perpendicular to it, through the facade or window frame, that is, in the direction directly into the room.
The length of the rod is selected so that the grille is separated from the façade by a few cm, and the length of the rod extending inside the room is sufficient for a washer or nut. This end does not add aesthetics to the room, so you will need to cover it with a decorative cover, which will also protect it.Weld the studs to the grille, paint over the ends with a marker, place them against the wall, and drill holes for them along the remaining marks. The structure is inserted, a wide washer is placed on the ends of the studs inside the room, and the nut is screwed in (locked).
- With hardware through the “ears” .
Eyelets with drilled holes from a strip 4 mm thick, 40x50 mm, are welded to the frame. The structure is applied to its future permanent location; points for holes for anchors are marked through the eyes on the slopes or facade. Drilling is carried out, then the grille is placed again and secured by driving bolts through the holes in the ears. It can be mounted through the facade, but this method is excellent for fixing into slopes, if the plates are welded to the grille perpendicular to the opening, that is, so that they, together with the frame, enter it, near its ends.
Without frame
Let's consider a modification without a frame (frame), attached to the walls or window frame directly with lattice strips. Welding is used; bending of rods is minimal.
This option has a somewhat modest, laconic appearance . With this method, financial costs are minimal, and the design efficiency is excellent.
We will describe the fastening through the window frame; this solution is perfect for wooden windows in the country (it’s a bit of a shame to spoil plastic double-glazed windows) and it is reliable, since it is end-to-end. But it can also be fixed to the facade, and if you bend the wide edges of the strips, making “ears” out of them, then into slopes. The solution is suitable when no special aesthetics are required.
Materials:
- Metal strips 40 mm wide, 4 mm thick, smooth reinforcing bars with a cross-section of 14 mm. The total length and number of segments depend on the width of the window opening and the density of the arrangement.
- Studs with a diameter of 10...12 cm. You can make these yourself by taking smooth reinforcement and cutting a thread on it with a die. You will need at least 4 pieces, the length depends on the thickness of the window profile.
If a large-sized grid is assembled, an increased number of transverse strips will be required. The number of threaded rods will also increase, since each will require two pieces.
The work algorithm is step by step, along the way we will also consider other materials and tools:
- Detailed sketch with dimensions compared with the parameters of the window frame.
- We take two long steel strips, the length of which is 5 mm less than the width of the opening. The parts were attached to the top and bottom of the window block, creating a horizontal grille base. There may be more such stripes. These elements will connect all or several of the middle rods, which will give the product rigidity, increasing its reliability. In our example, we took another short jumper rod.
- We bend the ends of the strips, or rather, turn them 90°. Edge segments of 10...12 cm are laid on a durable workbench. We secure the strip with two clamps and a vice through a strong metal gasket. We grab the edge with a large gas or adjustable wrench and turn it 90°. We do this on both sides of each plate. It is important that both ends are turned at exactly the same angle, they are the mounting pads.
- Marking with a core on the finished plates for the holes where we will insert the vertical rods. We perforate with a drill, a metal drill, the diameter is 1...2 mm larger than the cross-section of the rods. In our example, 15...16 mm. On each crossbar, the number of holes corresponds to the number of vertical elements inserted into it. Let's make them.
- We boil all the elements. For all connections without exception, we use a continuous seam rather than a point seam - the reliability will increase.
- We weld a short jumper connecting the four middle vertical rods.
- At the wide ends of the strips - the mounting areas formed when they are bent by turning - we mark the places for welding the studs, for them we retreat from the edges about 10...12 mm.
- We select the studs - the length of each is the same, equal to the thickness of the window profile (block), plus 30 mm.
- The studs are welded (solid seam) on the side pressed against the window profile.
- The assembled fence is cleaned with metal brushes and polished. The slag must be chipped off from all welds. Then - wiping with degreasers (solvents), drying, painting with enamel paint (for external work). If you don’t want to carry out all of the above manipulations, then use a special one for metal.
- Marking on the window frame for holes for anchors. The ends of the fastening rods are painted over with a marker, the structure is attached to the profile of the glass unit - marking points are left. Drill through holes with a wood drill, with a diameter larger than that of the studs by 2...2.5 mm, its length should exceed the thickness of the window block by at least 10 mm.
- The structure is inserted into the holes with anchors, they go right through the wall, the ends stick out inside the room - we throw wide washers on them, tighten the nuts.
If these parts turn out to be longer, then cut off the extra segment. We cover the remaining protrusion with decorative caps (you can use any suitable such products, even wrap them with electrical tape and cover them with bitumen). The thread can be knocked down or the nut can be welded to prevent attackers from unscrewing the fastener from the inside, but you must understand that it will be more difficult to dismantle it yourself if necessary.
Options with hinges and sliding
The grille can also be equipped with hinges so that one or two doors can open. The algorithm of actions is as we described. These parts are simply welded according to the markings onto the frame, onto the sashes, then the latter are simply hung. Next, the eyes for the padlock are welded. It is more advisable to install such a grille from inside the room to make it more difficult for an attacker to gain access to the locking segment.
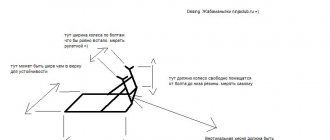
You can also build a sliding modification according to the diagram presented below . It also lists the necessary elements. The creation process is surprisingly quite simple, no more complicated than the options we described: strips are cut, holes are drilled in them, screws and washers are inserted, and connected as shown in the figure. We get articulated joints. The lock can be not only hinged on the eyes, but also hidden in the frame profile.
Sliding window railings are also almost always installed from the inside of the room for the reasons we described above.
Types of fittings welding according to GOST
According to the GOST 14098-91 standard, joining of reinforcement can be:
- electroslag semi-automatic;
- bath-suture;
- electric arc manual;
- contact;
- bathroom.
In this case, the welded joint itself can be:
- lap (for electric arc manual welding);
- butt;
- tee (resistance spot welding, which uses one electrode in the bath).
Let's take a closer look at the most common methods of welding reinforcement.
Possible difficulties and errors
Miscalculations when creating and installing protective grilles on windows:
- Errors in calculations: if the frame is attached to the ends of the slopes, then it must be slightly narrower than the opening in order to fit into it; through anchors must be so long that their ends protrude well inside the room for nuts and washers. We measure not only the length/width, but also the diagonal.
- The rods are too thin. The minimum is 10x10, for strips - thickness from 4 mm, width from 10...12 mm.
- If you lay out the assembled structure without stabilizing it and start scalding it, it will move, which is why there are special table frames, and the product is fixed with clamps on them. If there are no such auxiliary devices, then you can support the assembly with bricks on a flat surface on all sides or come up with something similar.
- Too few fasteners and fixation points. The heavier the structure, the more of them will be required. You cannot attach the fence to only 2 studs, at least there should be 4 of them, 2 on each side for a small window with one sash, and preferably 3. The more, the better, it’s not just a matter of weight: the fewer fasteners, the It’s easier to hack the entire structure, because it’s enough to cut them off.
- It is dangerous to install swinging or sliding grilles on the outside; to open them, you just need to cut off the lock.
- When fastening to the facade (overlay), a too thin section of the wall is left around the anchors, that is, they are too close to the edge of the slope. This mistake is especially relevant if the wall material is not particularly strong: a large weight will gradually tear out the product.
- Ignoring cleaning and painting in welding areas. These are points weakened by high temperature and will therefore corrode.
- They use spot welding, but you need to make a seam.
- The fastening is not through. This is allowed, but if high protective qualities are needed, then we fix only the window block through the walls.
Finishing
The installed structure necessarily requires additional processing - at least painting. It’s better to also treat it with an antiseptic, which will protect the metal from corrosion.
Using paint, you can hide welding areas, this is especially true if you have abandoned decorative elements that can hide them.
Related article: Protecting windows from the sun from the street side
The paint also serves as a protective coating that protects the metal from weather and moisture, thereby extending the life of the structure.
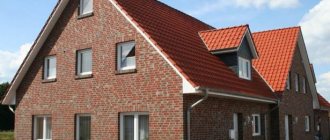
In the photo you can see a design option for the grille.
For sliding structures, you need to additionally install runners with which it can move.
Sliding grilles must be equipped with a burglary-proof mechanism, since opening such a structure is much easier than a stationary one.
Runners can also be visually hidden using decorative elements such as flower pots.
Advantages and disadvantages
The benefits of creating window barriers yourself:
- If you use improvised material, for example, metal lying around, you can save money.
- If we are talking about creating a grating by welding, then the work is not particularly labor-intensive: you just need to take measurements, lay out the rods, fasten them, and scald them.
- Speed. If you approach the process responsibly, you can complete it in 5–6 hours.
- You can create any patterns and geometry you want.
- Gaining experience in welding.
Minuses:
- If you buy metal, you won’t be able to save much.
- You will need a welding inverter; not every household has one (however, you can rent it).
- If you want to equip the product with decorative elements (curls, petals), this will make the work much more complicated. At a minimum, bending equipment will be required (however, it is quite simple). Complex patterns require forging (forge, fuel, etc.), which not everyone can do.
- The work is not particularly labor-intensive during scalding, but it is so at the fastening stage: you will have to lift the grille, place it against the window, drill holes in the walls, and drive in anchors.
Creating and attaching decorative elements is a rather complex process:
general information
First, let's define what reinforcement is. Reinforcement is steel rods of various diameters; they can have a ribbed or smooth surface. The reinforcement differs from a regular metal rod in that it is pre-hardened for greater strength. In most cases, fittings are made from different grades of steel, but recently fiberglass products have appeared on the market. Its service life is much longer, since fiberglass is not subject to corrosion.
The most popular fittings are A3 A500C. There are even special electrodes for welding A500C reinforcement. They have a diameter of 5 millimeters and are suitable for fittings with a cross-section of less than 15 mm.
Prices and costs
In our first example, 50 m of square 10x10 (“ten”) rod was used for the grille; the structure is large, for an opening of 213x158 cm (about 1.7 m²), in two layers, that is, with a supporting frame.
A linear meter of square rod 10x10 costs about 50 rubles , our costs amounted to 50x50 = 2500 rubles. (you can add 700 rubles to this figure for consumables).
We took the cheapest welded products. If you buy a ready-made lattice, then for 1 m² (100x100 cm) you will have to pay an average of 1000 - 1200 rubles, and if there are loops (swing option), simple curls, then we will add at least 1100 rubles. As you can see, the savings are not significant or there are none at all. It is present only if you make complex designs with loops, and then not in a particularly large size, since these parts will have to be purchased (200...300 rubles/piece).
But if you create a forged, rather than welded, grating, you will save a decent amount , since such products are much more expensive.
Features of bath welding
The essence of this technology is the melting of steel rods, which are immersed in a special form made of low-carbon steel material - a bath (you can make it yourself or buy a ready-made matrix). After this, the ends of the reinforcement bars are melted with electrodes (with a cross-section of 5-6 mm) at a fairly strong current of the order of 450-550 A. When the melted liquid metal fills the bath, the reinforcing bars are connected, which turn into a single rod, the cross-section of which will depend on the dimensions of the mold .
Healthy! If welding of reinforcement using the hot tub method is performed at low temperatures, then the current power must be increased by 15%.
This type of welding is suitable for columns, foundations and other structures that will bear heavy loads. In addition, this method is used for:
- large reinforcement products (bar diameter 2-10 cm);
- reinforcement in the form of a lattice (when the frame is laid in several rows);
- joining flanges made of steel strips of the largest cross-section;
- connections of complex frames.
Using a bath for welding reinforcement allows you to join rods both horizontally and vertically. Thanks to this, the procedure for creating seams is greatly simplified; edging of the structure is not required.
What this type of welding process looks like is clearly shown in the video: