Metal structures welded from metal are in demand in various spheres of life. However, during welding work, various types of weld defects may occur. They shorten the possible service life of the connection and reduce the safety level of the finished product.
Welding undercut
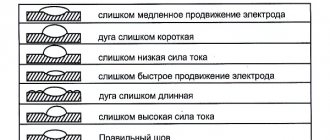
An undercut is a defect in the form of a groove along a seam in metal. Usually occurs when the arc is too long or the voltage is insufficient. The seam becomes wide, the arc temperature is not enough to warm up. The metal around the edges quickly hardens, forming these grooves. It can be corrected by using a shorter arc or adjusting the current strength upward. If the welding speed is too high and the voltage is too high, the weld seam is formed “humpbacked”. Due to the rapid solidification of the weld pool, undercuts are also formed. Reducing the welding speed gradually reduces the size of the undercut and ultimately eliminates this defect.
With an angle or T-joint, an undercut is formed due to the fact that the electrode is more directed towards the vertical plane. Then the metal flows down, a groove is formed again, but for a different reason: too much heating of the vertical part of the seam. It is eliminated by reducing the current and/or shortening the arc.
Undercuts most often occur when welding fillet welds and the first layers of multi-layer butt welds.
The undercut leads to a sharp concentration of stress in cases where it is located perpendicular to the direction of the main stresses acting on the welded joint. For structures operating under vibration loads, undercutting significantly reduces the strength of the welded joint.
The undercut is eliminated by surfacing a small thin weld along the line of this defect.
For a number of reasons, it is permissible to use undercut welds, which are most often forced to be used in complex structural solutions. To accurately determine the need to eliminate the undercut, the following factors are taken into account:
Source
Classification of defects in welded joints
Not in every case is it possible to achieve ideal quality of the welded joint. If desired, you can find deviations from the established requirements. The full classification of welded joints is set out in paragraphs of GOST 30242-97. The document contains information about all possible flaws. Of these, we can highlight some that are most often encountered during control inspection of connecting joints.
Cracks
Cracks have the greatest negative impact on the quality of the weld. Potentially, they are the most dangerous, since they can cause rapid destruction of the entire structure, which in turn can lead to tragedy.
Cracks appear for various reasons:
- the joints are positioned incorrectly;
- the welding site was sharply cooled;
- incorrectly selected consumables;
- the metal crystallized due to excessively high temperature.
Based on the method of formation, cracks can be longitudinal, transverse or radial, and based on size, it is customary to distinguish between macro- and microcracks. Regardless of the type, causes and method of formation, a crack is an unacceptable defect.
Undercuts
Visually, the flaw is a longitudinal depression on the outer part of the seam. Due to the undercut, the cross-section of the seam is reduced and internal joint stress is generated. The strength of such a seam is highly questionable. The main reason for the formation of a defect is an overestimated welding current. Most often, undercuts are characteristic of horizontal seams.
Surges
Excess melt flows onto the surface of the workpiece, cools and forms a false bead. This is an influx that does not have strong fusion with the working surface. Most often, a defect is formed during horizontal welding of butt or fillet welds. The reason for their formation is insufficient heating of the base metal, due to excess filler material or scale on the edges of the mating surfaces.
Burns
A flaw is a through hole that is formed due to metal leaking out of the weld pool. As a rule, an influx forms from the reverse side. Burn-through is caused by too slow movement of the electrode along the joint line, too much current, insufficient thickness of the gasket or its loose fit, or a large gap between the parts.
Lack of penetration
If there are areas between the seams and the base metal where lack of fusion between them is visible, then this is a lack of fusion. That is, the base metal did not warm up properly to form a single whole with the melt. Such a defect greatly reduces the strength characteristics of the connection and the entire structure as a whole. The reason for lack of penetration may be too high a speed of movement of the electrode, poor preliminary preparation of the edges, the presence of scale, rust and other contaminants on the surface of the workpieces being joined.
Craters
Small depressions in the weld bead are formed as a result of a break in the welding arc. Defects lead to a reduction in the cross-section of the joint, which reduces its strength. The secondary danger of the crater is that its bottom may have additional loose inclusions, leading to the appearance of cracks.
Fistulas
Flaws are surface defects in the form of cavities. They reduce the strength of the joint and are additionally dangerous because they can provoke the formation of cracks. Fistulas are characterized by an arbitrary shape and can form both on the outside and on the inside.
Pores in the weld
Gas-filled pores may form during the welding process. The reason for their occurrence is various contaminants on the surface of the workpiece, high speed of electrode movement, and too high carbon content in the filler material.
Foreign inclusions
The quality of the weld is significantly reduced due to foreign inclusions - slag, flux, oxide, tungsten and others. The main reason that causes them is an incorrectly selected welding mode.
Weld undercut
The existing actual defects on the metal product complicate the principle of using the structure for its intended purpose. But, if you correctly and professionally carry out the elimination of a defect, for example, undercutting a defect in a weld, then you can achieve excellent results in the mechanical and physical properties of the material. Most often, the undercut of a weld seam is recognized as a clear flaw in the technological process, which arises from the natural overheating of the metal, or the place where the seam is formed, the so-called technological shrinkage at the edges, which occurs during the melting process. Most often, this effect occurs when the welder uses a high speed of welding activities, as well as in the event of a violation of the welding processes, for example, there is a place where a high welding current appears.
In addition, the incorrect angle of inclination of the product creates the direction of the arc burning zone of the welding machine to places with thin edges, which in turn creates the technological depth of the weld seam undercut. As a result, in a natural gas environment, at sufficiently high temperatures, it is possible to burn the metal, and this leads to a violation of the strength of the structural structure of the metal.
Example of a weld undercut
Defect detection methods
Various methods are used to identify weld defects:
- joint measurements and visual inspection;
- checking connections for leaks;
- searching for defects using special instruments;
- laboratory tests of samples for strength.
Visual determination of the quality of the weld is carried out only after thoroughly cleaning its surface from slag, eliminating various contaminants and frozen metal spatters. The dimensions, shape, and presence of defects are checked - burns, fistulas, cracks, craters and other flaws.
Thanks to leakage tests, it is possible to determine the presence or absence of pipeline defects - pores, cracks, lack of fusion. The tightness of the structure is checked in the following ways:
- air blowing;
- filling with water under pressure;
- kerosene treatment.
If a defect is detected, additional processing is required to eliminate it.
How are defects formed?
Let's try to figure out what undercutting a weld seam is and how it affects the physical nature of the metal structure. The undercut itself is a structural recess inside the base metal, located along the edges of the finished weld. Most often, such a defect occurs due to the appearance of an excessive welding current during the work process of welding or soldering metal. Also, the reasons for undercutting the weld are caused by the uncontrolled length of the electric arc. In this case, the length of the weld will unnaturally increase, and the edges of the finished edges will be heavily melted.
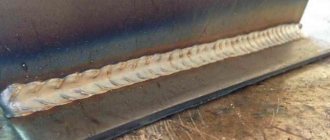
Appearance of weld undercut
In the photos presented, the undercut of the weld can be seen if the electrode is displaced towards the most visible and closest part of the horizontal wall. In this case, the vertical wall itself melts as quickly as possible than the horizontal one. The molten metal in this case instantly flows down the horizontal part. In this case, there is a tolerance for undercutting the weld on the vertical part, and sagging is formed in the horizontal plane.
Internal defects
Hot or cold cracks
Hot cracking is caused by using the wrong type of filler rod. The metals of the part and the electrode must be compatible.
For example, you cannot weld stainless steel with an aluminum rod. These metals have completely different characteristics. Aluminum simply cannot cook stainless steel efficiently, and therefore cracks will appear.
The second reason may be an incorrect attempt to seal the crater. If, when correcting this defect, the impact is abruptly interrupted, the seam may crack.
Cold cracks appear after the seam has cooled. If it is made poorly, then when it hardens, the canvas may burst. Or if the connection is subjected to a mechanical load exceeding its resistance level.
This type of defects can also appear on the surface of the canvas, which partially refers to it as external defects.
Pores
Joint porosity is quite common. Pores inside the weld body can form when the working area is poorly protected from oxygen exposure, or the metal preparation stage is ignored or carried out incorrectly.
If there is rust left on the edges of the joint, there are any inclusions that disrupt the uniformity of the seam. Like cracks, pores can be an internal or external problem.
To avoid the appearance of porosity in the seam, you need to make sure that the supply of protective gas is configured correctly and protect the working area from external influences that could disrupt the protective cocoon (drafts, gusts of wind).
And also carry out the preparatory stage correctly.
Ways to prevent defects from occurring
Despite the fact that there are certain technological regulations for monitoring the defect of GOST 30242-97 undercut welds, it is still recommended to prevent these phenomena by observing the minimum requirements, including the following:
work moderately, do not allow high speeds of work, but slow work does not give the desired result.”
Are undercuts allowed in welds?
For a number of reasons, it is permissible to use undercut welds, which are most often forced to be used in complex structural solutions. To accurately determine the need for an undercut, the following factors are taken into account:
When choosing a device for measurement, we take into account the capabilities of the device. If the device has a measurement limit of 5 mm, then it is impossible to accurately determine the data of a defect with a diameter of less than 2 mm. Carefully read the device instructions and correctly measure the defect depth parameter. We also take into account the general condition of the metal structure; tired metal is a sure sign that undercutting the weld will be ineffective in many respects.
Source
Eliminating undercuts
To eliminate such a defect, the defect area is cleaned of slag and dirt, and then welded with a thin seam. It is desirable that the electrode has a high wettability index. However, this increases the need for consumables. To avoid unforeseen costs, undercuts in welds are eliminated by argon arc welding with a non-consumable electrode. After heating, the blemish is covered with molten metal. However, this method of correction is not recommended if the connection was made by another type of welding, since there may be pores, foreign inclusions, etc. inside. To prevent the strength from decreasing, sections of the welded joint with numerous undercuts are cut down or cut down to the base metal and digested. The size of the removed part should exceed the length of the flaw by 1-2 cm on each side.
After correction, the welded joints are re-inspected. If defects are identified, they are sent for revision. Depending on the type of steel, the same section can be corrected no more than 2-3 times. This is due to changes in the characteristics of the metal after re-welding. When correcting, it should be taken into account that when strengthening the welded joint, the resistance to vibration decreases.
Types of weld defects
All tolerances on weld dimensions are regulated by GOST requirements for each type of welding. Any deviations of the readings from the approved standards are considered to be defects. They can be a consequence of errors in the process of both preparation and execution of welding work.
Most defects in a welded joint have a negative impact on its strength characteristics. All defects are divided into three groups:
- external _ The main indicators are irregular joint shape, cracks, sagging, craters, seam undercuts, burns and other visual signs that can be detected on the surface. They are visible upon careful visual inspection and only a few can be noticed at first glance;
- internal . Defects are incomplete or uneven fusion of metals, cracks or porosity in the structure, the presence of foreign inclusions - slag, oxide, non-metallic impurities; other flaws located inside the seam;
- end-to- end Cracks, undercuts, burns and other damage that are end-to-end and visible on both sides.
Any defects are grounds for rejection of the work and must be corrected. This rule is especially relevant for supporting metal structures - frames, frames, sheathing, etc. They must be welded flawlessly to withstand the expected loads. Otherwise, the structures may become a source of danger to others.
Are undercuts allowed in welds?
Mounted structures are accepted for operation if the dimensions of the undercuts in the welds do not exceed the standards specified in GOST 30242-97. The final decision is made after considering the following factors:
The device for measuring flaws must have the required measurement limit. Therefore, you should carefully study the instructions to know its capabilities. A device with a limit of up to 5 mm will not be able to measure a defect of up to 2 mm with the required accuracy.
Even experienced welders will experience undercuts, so beginners should not be discouraged if not all welds are perfect. To reduce the number of flaws during the training period, it is better to perform welding with multifunctional inverters. Additional options for such equipment compensate for the lack of experience.
Source
Undercuts in welding - what they are, why they appear and how to eliminate them
Any defect in the welds is unacceptable if you need to get a high-quality, strong and reliable connection. Undercuts, as well as lack of penetration, as well as other defects, lead to the connection weakening and lacking strength.
The occurrence of undercuts in welding occurs for the following reasons:
Quite often, weld undercuts also occur when welding corner joints, as well as the first layer of multilayer joints. Undercuts in welding greatly reduce the strength of welded joints, especially those products that will operate under high vibration loads.
Group 2. Pores
Pores in metal are cavities that are filled with gas. They begin to form when the metal is in a liquid state. At this time, the process of gas formation is observed, but only some of the bubbles come out. The size of the cavity varies from micrometers to several millimeters. Sometimes entire clusters of pores are observed, forming shells. Usually the cavity has a round shape.
Pores can appear for a number of reasons. The first of them is the low quality of cleaning surfaces from contamination. Particles of rust, scale, and oil may remain on the edges. At high welding speeds, the gas simply does not have time to leave the liquid substance, remaining in it in the form of bubbles. As already noted, the tendency to form pores is especially pronounced when working with carbon steels.
Violation of welding technology will lead to negative consequences. Particular attention should be paid to climatic conditions. High humidity affects the state of the flux. The appearance of pores leads to the fact that after preliminary gouging the surfaces have to be cleaned and welding repeated.
The cavity (200; A) can be of any shape with rounded corners. The bubble contains hydrogen, nitrogen or carbon monoxide. Gradually the metal hardens and a pore forms. Often these two concepts are separated, since the pore has a spherical shape, and the cavity is irregular. But in this classification these defects are identical. A series of pores distributed evenly (2012) is a defect observed when working with non-ferrous metals. Its variety is a chain (2014) and a cluster of pores (2013).
A special case of a pore is a fistula (2016; Ab). The index shows that this is a defect of the same type, but the fistula is represented by a tubular cavity that penetrates the suture right through. The reason for its occurrence is high humidity. The shape of the fistula depends on the gas released. Sometimes a fistula occurs when the metal overheats or an accidental short circuit caused by contact of a tungsten electrode with the surface. Such a defect must be corrected by complete removal of the metal followed by overcooking.
A crater, marked as defect 2024 or “K,” forms a shell at one edge of the weld bead. Usually appears as a result of a sharp detachment of the electrode. If in appearance the crater does not have cracks, then upon closer examination they most often appear, so such a defect must be eliminated.
Expert opinion
Bagrov Viktor Sergeevich
Welder of the highest 6th category. He is considered a master of his craft, knows the intricacies and nuances of the profession.
Crater formation is the result of inept welder actions.
How to fix a weld undercut
The following nuances should be taken into account:
Undercuts in welding are a fairly common defect that leads to a decrease in the strength of welded joints. To prevent them from occurring, it is important to understand the reasons for the appearance of undercuts, as well as to know exactly how to eliminate them.
Source
Weld undercuts, other possible defects and quality control
The organization of the work process includes many factors, including labor regulation. The approval of uniform standards of the labor process increases the efficiency and speed of production, both when installing similar structures and completely different products. Temporary standards are key.
Tack welding is an important technological process that allows the assembly of a welded structure with maximum accuracy. The application of tack welds precedes the main welding work, and certain requirements are imposed on their implementation, which depend on the type of metal and the type of welded structure or assembly.
Today we’ll talk about proper arc welding. Arc welding is largely based on technique and the correct selection of materials, which determines the quality of the work performed. Let's take a closer look at the basic technique for performing the work, as well as the rules for welding the most common seams.
stalevarim.ru
What is an undercut in welding?
Novice welders often ask questions: “What is an undercut in welding? What are the reasons for the formation of undercuts during welding? How to repair weld undercuts? and this article has answers to all these questions.
Content
Similar definitions for this type of weld defect are indicated in the welding regulatory documents GOST 2601 and GOST 30242:
An undercut is a defect in the form of a depression along the line of fusion of the weld with the base metal. An undercut is a longitudinal depression on the outer surface of the weld bead, formed during welding.
We remind you that in the article on defects in welds and in the manual on defects in welds Yukhina N.A. There are photographs, causes and ways to eliminate all welding defects.
Causes of weld defects
Any defect is formed due to a certain factor. There are different reasons for the formation of weld defects:
- During the work, low-quality consumables were used;
- the technology for performing welding work was not followed;
- low quality metal used to create the welded structure;
- equipment malfunction or poor quality work;
- incorrectly selected welding mode;
- technological errors were made due to the low qualifications of the specialist.
To obtain a high-quality metal structure, strict adherence to technological parameters and welding standards is required, and specialists with a sufficient level of qualification are involved in the work.
Reasons for the formation of undercuts during welding
The reason for the formation of an undercut during welding is when welding is performed either at elevated conditions or at high speed. Also, the result may be the choice of an incorrect angle of inclination to the thinner edge of the part, which in turn causes it to overheat.
Research shows that as the temperature of a solid surface decreases, its wetting with liquid metal worsens and improves with increasing temperature. Therefore, one of the main factors affecting wetting is temperature. On horizontal planes, wetting plays a key role because Due to the action of surface tension forces, liquid metal on a cold surface tends to compress, reducing its area and the surface it occupies, which leads to the formation of an undercut in the weld. In the vertical plane, i.e. When welding fillet and horizontal welds, an additional reason is the flow of liquid metal under the influence of gravity.
Incorrect use of gas shield, incorrect welding technique and welding position are additional causes of weld undercut.
Welding undercuts have always been a serious problem in the welding industry, so in recent years more and more manufacturers of welding equipment and materials have been making attempts to solve this problem.
The presence of undercuts causes a significant stress concentration near this defect and can cause local or general destruction of the structure. Longitudinal recesses reduce the cross-section of the base metal in the heat-affected zone. As a result, welded seams do not easily withstand dynamic loads and cracks may occur in these areas. When testing welds for tension and bending angle, the destruction of the metal begins from the undercut, with a significant reduction in mechanical properties.
Defects in welding seams and the reasons for their formation
All deviations from technological parameters caused by negligence in work, violation of operating conditions and external causes, often beyond the control of the welder, can lead to defects in the weld seam and the weld zone falling into the thermally affected area. Defects can also be caused by violation of technological methods of both the welding process itself, and poor-quality preparation, equipment malfunction, deviations from the quality standards of welding materials, the influence of weather conditions, and low qualifications of the welder.
The occurrence of defects is often associated with metallurgical and thermal phenomena that occur during the formation of the weld pool and its crystallization (hot and cold cracks, pores, slag inclusions, etc.; These defects reduce the strength and reliability of the welded joint, its tightness and corrosion resistance. All this can have a significant impact on the operational capabilities of the entire structure and even cause its destruction.
Defects in welding seams can be external or internal.
External defects of welding seams
External defects in welds (Fig. 1) include violations of the size and shape of the seam, undercuts and other deviations that can be detected during an external inspection of the welded joint.
Violation of the shape and size of the weld is most often caused by voltage fluctuations in the electrical network, negligence in work or low qualifications of the welder, manifested in the wrong choice of modes, inaccurate direction of the electrode and the method of its movement. Defects manifest themselves in unequal width of the weld along its length, uneven leg of fillet welds, excessive convexity and sharp transitions from the base metal to the deposited one. Deviations from the size and shape of the welded joint, which appear in fillet welds, are associated with improper preparation of the edges, uneven welding speed, as well as untimely control measurements of the seam. In automatic and semi-automatic welding, these defects are most often associated with voltage fluctuations, wire slipping in the feed rollers, and violations of welding conditions.
Lack of penetration is a local lack of fusion between the elements being welded, between the base and deposited metal or individual layers of the weld in multilayer welding. The reasons for lack of penetration are poor preparation of the welded edges (scale, rust, small gap, excessive dullness, etc.), high welding speed, displacement of the electrode from the axis of the joint, insufficient current. As a result of lack of penetration, the cross-section of the weld is reduced and local stress concentration occurs, which ultimately reduces the strength of the welded joint. Under vibration loads, even small lack of fusion can reduce the strength of the connection by up to 40%. Large lack of root penetration can reduce the strength by up to 70%. Therefore, if the lack of penetration exceeds the permissible value, the seam section must be removed followed by overwelding.
Undercut is the most common defect found in welding. It is expressed as a depression along the line of fusion of the weld with the base metal. As a result of undercutting, a local decrease in the thickness of the base metal occurs, which leads to a decrease in strength. Undercutting is especially dangerous in cases where it is located perpendicular to the operating stresses. Undercut usually occurs at increased arc voltage with increased welding speed, when one of the edges is melted deeper, liquid metal flows onto the horizontal plane and is not enough to fill the groove. When welding fillet welds, undercuts occur mainly due to the displacement of the electrode towards the vertical wall, which causes significant heating, melting and flow of the metal onto the horizontal shelf. In butt welds, undercuts are formed when welding at high currents and when the filler material is incorrectly positioned. Increased cutting angles can lead to undercutting. This defect is detected visually and in case of deviations above the established norm, it must be overcooked with preliminary cleaning. Short cuts that weaken the seam section by no more than 5% in structures operating under static loads can be considered acceptable. In endurance structures, undercuts are not allowed.
Sagging - manifests itself in the form of leakage of weld metal onto the surface of the base metal without fusion with it. Sagging sharply changes the outline of the seams and thereby reduces the endurance of the structure. The cause of this defect may be reduced arc voltage, the presence of scale on the edges being welded, or slow welding when excess molten filler metal appears. Most often, sagging occurs when welding horizontal seams on a vertical plane. When welding circular rotary joints, sagging can occur if the electrode is incorrectly positioned relative to the axis of the seam. Long surges are unacceptable.
Burn-through - penetration usually occurs due to high current at low welding speed. It appears in the form of a through hole in the weld, which occurs as a result of leakage of the weld pool. In multilayer welding, burn-through occurs during the first pass of the seam. The causes of burn-through can be an excessive gap between the welded edges, insufficient thickness of the lining or its loose fit to the base metal, which creates the precondition for leakage of the weld pool. Burn-through can occur when the supply of shielding gas suddenly stops. When welding rotary annular joints, burns are caused by incorrect positioning of the electrode relative to the zenith. The defect is detected visually and is digested after preliminary cleaning. Burns are caused by liquid metal entering areas outside the weld.
An unwelded crater is a weld defect that forms in the form of depressions in places where the arc is abruptly torn off at the end of welding. Shrinkage looseness may appear in the recesses of the crater, often turning into cracks. Craters are usually caused by improper welding practices. During automatic welding, a crater may appear in the areas of the lead strips where the weld seam breaks. Craters are often the cause of crack development and are therefore unacceptable. They are cleaned and brewed.
Surface oxidation is scale or a film of oxides on the surface of a welded joint. Surface oxidation depends on poor protection of the weld pool, the quality of preparation of the welded edges, improper adjustment of the supply of shielding gas, its composition, and large electrode overhang.
A fistula is a funnel-shaped depression in a weld seam, developing from a shell or large pore. The reason for the development of a fistula is most often poor preparation of the surface and filler wire for welding. The defect is detected visually and must be overcooked.
| Rice. 1 External defects of welds, revealed by external inspection: A - undercut; B - influx; B - burn; G - unsealed crater; D—fistula. | Rice. 2. Cracks in the weld and heat-affected zone: A - longitudinal hot crack; B - cold crack in the heat-affected zone. |
Internal weld defects
Cracks can be cold or hot (Fig. 2). Cracks can be both external and internal. These are the most dangerous defects in a welded joint, often leading to its destruction. They appear in the form of a gap in the weld or in areas adjacent to it. At first, cracks form with a very small opening, but under the influence of stress their propagation can be commensurate with the speed of sound, resulting in the destruction of the structure. The reasons for the formation of cracks are high stresses arising during welding. Most often, cracks appear when welding high-carbon and alloy steels as a result of rapid cooling of the weld pool. The likelihood of cracks increasing when the parts being welded are rigidly fastened.
Hot cracks - appear during the crystallization of metal at temperatures of 1100-1300°C due to a sharp decrease in plastic properties and the development of tensile deformations. Hot cracks appear at the grain boundaries of the crystal lattice. The appearance of hot cracks is promoted by an increased content of carbon, silicon, hydrogen, nickel, sulfur and phosphorus in the weld metal. Hot cracks can occur both in the weld mass and in the heat-affected zone. Hot cracks can propagate both along and across the seam. They can be internal or come to the surface.
Cold cracks - occur at temperatures below 120°C, that is, immediately after the weld has cooled. In addition, cold cracks can occur after a long period of time. The reason for the appearance of cold cracks is welding stresses arising during phase transformations, leading to a decrease in the strength properties of the metal. The cause of cold cracks may be dissolved atomic hydrogen that did not have time to be released during welding. The reasons for the ingress of hydrogen may be undried seams or welding materials, or violations of the weld pool protection.
Pores are cavities inside the seam, filled with gas that has not yet escaped (primarily hydrogen). They can be round or elongated, and their sizes depend on the size of the bubbles of the formed gases. Pores can be single or develop in a chain along the weld seam. The main reasons for the appearance of pores are: the presence of harmful impurities in the base or filler metals, rust or other contaminants that are not removed from the welded edges before welding. Increased carbon content also contributes to the appearance of pores. Pores can appear when the protection of the weld pool is violated or the welding speed is increased. The main reason for the appearance of pores when welding with a consumable electrode is a damp coating. Single pores are not dangerous, but their chain affects the strength of the welded joint. The area of the weld seam in which pores are present must be rewelded by preliminary mechanical cleaning.
Slag inclusions are weld defects, expressed in the presence of cavities filled with slag that has not had time to float. The formation of slag inclusions occurs due to poor preparation of welded edges and filler material, excessive welding speed or poor protection of the weld pool. When welding in shielding gases, slag inclusions are rare. Slag inclusions can be up to several tens of millimeters in size and are therefore very dangerous. The section of the seam where slag inclusions exceed the permissible standards is subject to cutting and rewelding.
Tungsten inclusions - occur when the protection of the weld pool is violated when welding with a non-consumable tungsten electrode. In addition, tungsten inclusions occur during short circuits or excessive current density. Tungsten inclusions are especially common when welding aluminum and its alloys, in which tungsten is insoluble.
Oxide inclusions are formed as a result of the formation of poorly soluble refractory films. Most often they occur due to significant surface contamination or violations of the weld pool protection. Being an interlayer in the weld mass, oxide inclusions sharply reduce the strength of the welded joint and can lead to its destruction under the load applied during operation.
build.novosibdom.ru
Eight Tips to Reduce the Chance of Weld Undercuts
Below are recommendations that will help reduce the likelihood of undercuts when welding products made from pipes, sheets, channels, angles, etc.
Correct heat input
One of the most important reasons for the formation of undercuts in welds is the large amount of heating when welding near the free edges of the part, resulting in deeper penetration of one of the edges, which leads to the formation of a groove that remains after the metal of the weld pool has solidified. This can cause overheating and melting of nearby base metal or previously applied weld metal. To prevent it, it is necessary to monitor the heat input while reducing the welding current when approaching thinner areas of the part or the free edge of the product.
Group 3. Solid inclusions
Foreign particles reduce the strength of the seam and act as localization sites for excessive stress. If solid inclusions are detected, gouge until healthy metal appears, and then repeat the welding process. Defect 300, which consists in the entry of metal particles into the weld zone, in the presence of at least one acute angle, is called an acute inclusion. An example of such a defect is a slag inclusion (301; Ba), a flux inclusion (302; G), an oxide inclusion (303; J) and a metal inclusion (304 H).
The slag inclusion is divided into linear (3011), isolated (3012) and others (3013). Slag, which is formed as a result of melting of an additive or flux, always floats to the top. But if the technology for guiding the electrode is violated or at high welding speeds, it often remains inside the molten metal. For work in a protective gas environment, the phenomenon of slag inclusions is rare. There are established standards for particle sizes at which the operation of a part is allowed. If this norm is exceeded, the seam is cut out and digested.
Flux inclusions are divided into the same types (3021, 3022 and 3023, respectively). They arise from flux residues that have not had time to react with the metal. It usually floats to the surface, but parts may remain inside, forming a defect.
A similar situation occurs when the flux is selected incorrectly. For example, if it is presented in the form of large granules. Excessive welding speed can also provoke the occurrence of inclusions.
Oxide inclusion is oxide trapped in the weld metal. It is formed as a result of the reaction of a metal with oxygen. The oxide film is refractory and difficult to dissolve, so when it appears, a defect is sure to form. To avoid the formation of a film, it is necessary to protect the welded zone with active or inert gases. Particular attention should also be paid to surface preparation. Oxide inclusions are usually located in the form of a layer in the massif, which leads to the destruction of the seam.
Metallic inclusions of tungsten (3041), copper (3042) and other elements (3043) can occur if the weld pool is not properly protected. In most cases, such defects can be observed during an accidental short circuit of the tungsten electrode. The situation can be recognized by the characteristic crackling sound and sharp arc flashes. Tungsten has a high melting point, so it does not dissolve in liquid metal.
Measuring weld undercut depth
In most cases, weld undercut measurements are made using:
Device for measuring weld undercut depth
The device for measuring the depth of undercut of a weld seam is a support base 1 in which a dial indicator with a special indicator tip is fixed. By installing the base on a flat surface, you must set 0 on the indicator, after which you move the device to the measurement location and install the tip of the indicator into the groove. The size is set by the value on the indicator scale.
By the way, the design of the device provides two types of tips:
Measuring the undercut depth of a weld using a universal welder’s template (UShS-3; UShS-4)
Measuring the undercut using a universal welder's template is done by placing pointer 1 in the groove. The size is determined opposite risks 2 on a scale of 3.
There is no fundamental difference in the inspection methods, so how to measure the undercut of a weld depends only on the availability of one or another measuring tool.
Tolerances for undercuts in welds
Of course, it is better to manufacture structures without defects, but most often this is unreasonably expensive or impossible, so there are always tolerances indicating which defects, their number and size are acceptable in a particular structure and do not affect its performance properties. First of all, the size of undercuts allowed in welds depends on the purpose of the design and the requirements of regulatory documents:
To find out the tolerances for undercuts in welds, first of all you need to find this information in the regulatory document with the requirements for welds.

