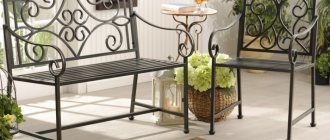
A bench for relaxing in the fresh air should be on any local area. They use different materials for it, but more often we are talking about the symbiosis of metal and wood - a durable frame is made from the first, and the flooring for it is made from the second.
Benches made from profile pipes are popular; this material has many advantages, and the result is of high strength and quality.
A simple do-it-yourself metal bench covered with wood
Various options for metal benches
| View of the bench, photo | Description: |
Bench made of square profile pipe | With low metal costs, structures of varying complexity can be built. |
Bench with flower bed | Metal structures can be of different types. Many come up with additional functionality for them, for example, building in a small flower bed in which you can grow real flowers. |
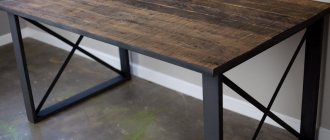
| Bench made of metal and wood | Metal is practically not used in garden furniture. It is usually supplemented with less thermally conductive materials. |
| Bench with backrest made of metal bed | For this bench, an old iron bed was used. Metal has received a new life. |
| Bench from an old cast iron bathtub | Here an old cast iron bathtub was used for a bench. Original solution. |
Transformable bench made of metal | Benches can have a complex and even movable design, allowing them to be folded out from a bench with a back into a bench with a table. |
Benches can be of different shapes - with a backrest, without it, be wide or narrow, combined with a table into one structure. Simple and cheap options can even be welded from rebar or angle steel.
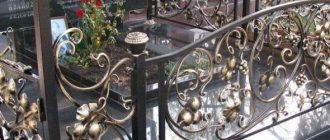
Is forging cold or hot?
This is a starting question that needs to be dealt with right away. Forging can be hot or cold. Classic hot forging will allow you to make anything - right down to thin metal lace. But it is only possible with a furnace or forge for high-temperature heating of metals.
Various forging processes.
The most democratic way of manufacturing metal products is, without a doubt, welding. Forged chairs, for example, can be made even in your own apartment, just don’t forget about safety. They will turn out to be strong and cheap, but you will have to forget about aesthetics and sophistication.
There is only one way in which you can make real artistic furniture without much expense or skill. This is cold forging. The best solution would be a combination of welding and cold forging; these technologies combine well with each other.
Pros of using metal pipes as a frame
For profiled pipes, low-alloy carbon steel is used, which has good elasticity. It has high performance characteristics and is used for both industrial and private construction.
This material is easy to bend, weld or cut; structures of any level of complexity can be made from it, if you have an idea about the correct construction of frames and have knowledge of the basics of working with metal.
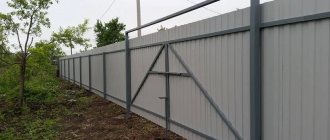
In private construction, such pipes are usually used for the manufacture of gazebos, arches, canopies, frame sheds, fences, gates, stairs, greenhouses, garden swings, and so on.
The products have the following characteristics:
- Low overall weight due to the frame structure of the structure - this parameter depends on the size of the profile pipe and the thickness of its walls.
- The dimensions of metal garden furniture can be any, the main thing is to accurately calculate the possible loads.
- They are much cheaper than analogues made from other materials.
- The structures are durable and resistant to high mechanical loads.
- With proper care and regular renewal of the protective coating, metal pipes have a long service life.
Profiled pipes come in different sections: diamond-shaped, round, rectangular and square.
For frame construction, the last two options are usually used, since the process of joining parts is significantly simplified - they can be connected at different angles, making only precise and even cuts.
Welded frame for future country furniture
This material is easy to work with if you have the necessary tools at hand.
The connections were made using a welding machine, which means you need to know how to work with it. This process requires compliance with safety precautions, and includes many subtleties that make it possible to obtain products with the correct geometry and reliable connections.
For frames of garden furniture, they mainly use a rectangular pipe with a cross section of 20*40 mm. Its average price per linear meter is 70-80 rubles, with a metal thickness of 2-3 mm.
For a powerful and durable frame you will have to pay no more than 1500-2000 rubles. A finished bench in a good quality store will cost at least 10,000 rubles.
Many people prefer to make garden benches from wood; step-by-step manufacturing instructions with drawings and photos can be found on our website.
Finish over the sink
In addition to their main role, pipes in the kitchen can also play a decorative role. Water pipes located above the sink can serve as a replacement for railings for kitchen utensils. Kitchen interior details chosen to match the pipes will create an original and stylish composition.
Photo: huntingforgeorge.com
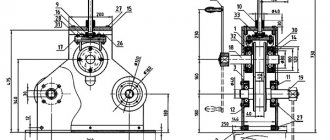
Drawings with dimensions of benches made of profile pipes
Before you start making something similar, it would be a good idea to find or develop drawings according to which all the work will go.
When choosing a drawing, you need to focus on your personal requirements. The material is selected so that the structure can cope with the maximum possible loads, fits in the designated space, and is simply liked.
The size of the frame parts must be correlated with the finishing material, which is often used beams, slats and boards, but plastic and WPC can also be used.
Some people like all-metal products, but they are not so convenient, because metal conducts heat well and will get very hot in the sun or freeze in winter.
Benches with a metal back for a summer residence
Knowing the dimensions of the finish, the parameters of the main parts of the bench (back and seat) are calculated and their shape is set. Data is also entered into the drawings.
Scheme of a simple bench
It is necessary to provide for ways to connect parts - at what angles the ends will cut, and so on.
Drawings of other bench options:
Bathroom decoration
The bathroom is a place where there are a lot of pipes. Usually they are simply hidden in a wall or in a box. But if you make copper-colored pipes and give them a beautiful shape, you can easily leave them outside as an interior decoration. This solution looks good on a dark background.
Photo: antiquers.com
Additional materials for the bench
If we talk about the full production of a bench, then you won’t be limited to just metal and wood. There is also a small list of materials and consumables that will be needed. They are listed in the following table.
| Materials, photos: | Description: |
| Primer paint for metal | The final coating of the metal may vary. Primer enamels are often used, which do not require surface preparation, apart from cleaning it. This paint is applied in several layers. You can even cover rusty areas with it, but we do not recommend doing this, since the service life of the protective layer will be reduced. |
| Grinder circle for cutting metal | For frame structures, the metal always has to be cut to the design dimensions. For cutting, abrasive wheels are used, mounted on a grinder or similar tools. Wheels made of the same material are used for grinding metal and processing welds. |
Wire brush | Before painting, the metal must be cleaned. The task is to remove all the rust and expose its shiny surface. On this basis, even primer paint will adhere much better. |
| Degreaser | Before painting, the metal is degreased. This will seriously increase the adhesion of the material and promote even application of paint layers. As a degreaser, you can use universal compounds, which are ordinary kerosene, or its light varieties, for example, white spirit. |
| Electrodes for welding | Electrodes are also consumables. Without them, the benches definitely cannot be assembled. |
Set of metal drills | You will need to drill a little, but you should always have several drills of the required diameter in stock. Holes are made for bolted and screw connections. The wooden part of the bench is fastened in this manner. |
Bolts and screws | Again, necessary to secure the wooden parts of the frame. Sometimes they are used to connect metal parts, although welding is the preferred method. |
Wood processing materials | We have combined them into one line because different options may apply. Let us note antiseptic impregnations, which significantly increase the service life of wood in the open air, impregnations for changing the color of boards (this includes oils, stains, glazes, waxes, etc.), protective compounds and paintwork materials that create a waterproof film on the surface. These properties may be combined in some materials. For example, oil from water qualitatively protects and transforms the color of wood, making it more saturated. |
Sandpaper for random orbital sander | The surface of the wood must be carefully treated to make it smooth, safe and pleasant to the touch. To do this, it is polished with abrasives of different fractions. |
This variety is accompanied by the following set of tools:
- Bulgarian.
- Carpenter's square.
- Electric drill.
- Sander.
- A hammer for knocking down scale after welding, and indeed this tool is always required.
- Clamps for preliminary fixation of parts.
- Brushes or a small roller for a more even application of paint.
- Welding machine.
- Tape measure, pencil, marker.
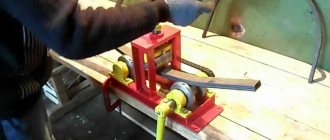
- To create curved parts, a pipe bending machine is required
Pipe bending machine Other
small things can also come in handy, which you will find out for yourself when you start assembling your bench.
Simplicity of the loft
Calculate the exact cost of repairs using an online calculator
and receive a free detailed estimate for repairs
Calculate
Loft style is free and rough. And interiors in this style are often not fully finished. All electrical and pipes remain on the surface. The latter may well look good if you pay attention to their appearance, for example, paint them white or leave the clean metal ennobled.
Photo: housessive.com
DIY metal bench
Next, we will present step-by-step instructions for assembling a homemade bench from a profile pipe.
Frame assembly
In the example under consideration, the master used a 20*40 mm profile pipe bent into an arc as the main material, which remained unused after assembling a small polycarbonate gazebo. Here's how it happened.
Do-it-yourself garden bench from a profile pipe - the source material for making the bench
The use of bent parts made the final result interesting and elegant. If desired, several figured forged elements can be included in the structure.
First of all, it is necessary to cut off the crease that forms after the pipe bender from the bent tube. You can also cut off the second end of the pipe, which remains straight.
Trimming a crease from the end of a pipe using a grinder
Next, marking and cutting of the parts from which the base will be made is carried out. As you can see, this required a section 1 m long. By the way, in fact, the pipe section will be longer, since the tape measure is installed without taking into account the rounding.
The cut of the pipe must be clearly perpendicular - to mark it correctly, use a carpenter's square. First, one part is made, after which it is used as a template to measure the second.
Marking the meter base part
Shorter parts are noted - there will be 4 of them, exactly 40 cm long. Keep in mind that you now need to measure the length of the pipe clearly along the radius, and not directly, as was done earlier.
We assemble the side parts of the bench frame from the obtained parts, as they will be installed after welding. At this stage, you can adjust the position of each element, achieving the most convenient one.
This is what the base of the frame will look like
Again we take up the measuring tool and the grinder. Now we need to check the length of the front legs, which in the example under consideration was 46 cm. In your case, you may get completely different values, since they will be influenced by the steepness of the bend of the pipe and in general your own dimensions, maybe you are 2 meters tall and an oblique fathom in shoulder
After the described manipulations, the fitting of the joined parts begins. The main difficulty is to make cuts at the correct angles, otherwise the finished product may be fragile and even misaligned.
When working with curved parts, it is impossible to use special tools for these purposes. You have to rely only on your own eye. An example of work is shown in the following photo.
Marking the connection of metal parts
We advise you to measure and cut the parts one by one. Before you take up the grinder, double-check it several times, not forgetting the well-known saying. After making sure that there are no errors, we try to make the adjustment. In some places, part-time work may be required. We are not afraid to do them while we are assembling the first side; now we have much more room for maneuver. The second part of the base will have to correspond exactly to the first.
This is what happened in the end.
Parts ready for welding
Parts of the first side of the base are used as templates for the second. The parts are made identical, otherwise there will be irreversible distortions during installation.
The parts of the base are welded exactly according to the markings. It is recommended to first secure them with clamps.
First, spot welding is done in order to only grab the joints without allowing the metal to warp. After this, the seams are completely welded.
We remind you that when performing welding work, you must protect your eyes and skin. Clothing is used only with long sleeves, since due to the abundance of emitted ultraviolet radiation, the skin receives unpleasant burns. We work in a mask, not glasses.
Carrying out welding work
After welding, the metal must be prepared for further work. Parts are cleaned and polished. Scale is knocked off the weld seams, and untidy deposits of metal are removed with a grinder. The main thing here is not to overdo it and not to damage the integrity of the seam.
The rest of the surface is treated with a wire brush. In principle, such processing could have been carried out in advance, since some faces of the structure may be inconvenient to access.
Next, two pieces of 155 cm each are cut from a straight profiled pipe. With their help, both sidewalls will be connected to each other with a plow. The details will give the bench the necessary rigidity. They are welded front and back to form a closed frame, as shown in the following photo.
Frame assembly is almost complete
Welded joints also need to be cleaned of scale and made as smooth as possible.
The boards will be installed on top of this frame. The outer ones will be supported along the length of the metal frame, while the central ones can sag. To prevent this from happening, you can weld one short cross member in the middle, or two, dividing the frame into three equal segments.
The back in the middle should also be strengthened. Fortunately, there is still a piece of bent pipe left for this. The reinforcement is installed without legs.
The tops of the backrest also need to be connected with a piece of profiled pipe. We measure its length after the fact and weld it into an almost finished structure.
Reinforced with jumpers both seat and back
Since the seat and the sides are connected by only two points on each side, there is no need to talk about the reliability of the bench yet. To increase strength, it is worth adding at least one bevel. They are also made from bent parts, if you still have any at your disposal.
Plates should be welded to the legs to increase the stability of the structure. To create them, you can take cut out walls of the same pipe, but it is better to find metal of a larger area.
In our situation, the master showed ingenuity and used old brake pads, ground to evenness, as thrust bearings.
Thrust bearing made from the metal part of the brake pad
Frame covering
To cover the frame, profiled boards 25 mm thick were purchased. If you want to save money, you can use any convenient lumber, but then you will have to spend a lot of time processing it.
Trying on the board - if the calculation is done correctly, everything falls into place
All that remains is to estimate the position of the boards and screw them on; when working with rough lumber, perform the following steps:
- If the boards are moved by a “helicopter”, they are first passed through a surface planer, simultaneously precisely adjusting the size of each element.
- They are then cut into pieces of the same length according to your drawings. For work, it is better to use a miter saw so that the cuts are exactly 90 degrees. The boards need to be cut on all sides.
- The side edges of the boards are processed using a milling machine or a hand router to give them shape.
Forming curved edges with a manual router - Next, the material is polished - first a larger abrasive is used (120), after which it is gradually reduced down to 300.
- If there are cracks on the surface of the boards, it is recommended to putty them, but only if opaque paint is placed on top, otherwise the putty will show through and differ in color from the wood.
Let's return to assembling the bench. Having completed the preliminary layout, we accurately mark the position of the boards so as not to accidentally displace them. We drill holes with an electric drill, simultaneously going through the thickness of both the metal and the board.
First, you should accurately measure the point where the drill enters the wood so that there are no noticeable displacements.
Metal drills are used for work
Since the length of the boards was not adjusted initially, we trim them after installation, drawing one straight line. For this we use a square and a circular saw.
It's easier to mark a tree with a pencil
We leave 10 cm overlaps of the board along the edges of the bench. This way it will look more beautiful and the usable seating area will increase.
We do the same with the back - the gaps between these boards may be larger, since there will not be such a load on them as on the seat.
Further processing of metal and wood
When the parts are ready, the bench needs to be disassembled, so there is no need to tighten the bolts in advance - they are simply inserted into the holes. We do this for the convenience of painting both the frame and the wooden parts of the structure.
- The last metal treatment that was performed was wire brushing. Next, it should be washed with a degreaser. To do this, the composition is poured onto a soft rag and rubbed over all parts of the structure.
- Then the metal frame is painted. The paint chosen is hammer paint, which means the coating will be durable and aesthetically pleasing. The composition must be applied in two layers, allowing time for intermediate drying.
Painting a bench with hammer primer-enamel
The advantage of paints with a hammer effect is that it creates not a simple one-color coating, but an iridescent surface, somewhat reminiscent of granite. This can be seen upon closer inspection.
Hammer paint finish – beautiful and durable
Next we process the boards. They can be coated with dark varnish, which will give the material a noble shade. If you want a deep color change, we advise you to saturate the wood with stain before applying varnish, which will color it thicker.
Lumber transformation
Table functions
A small beautiful table can be made from an ordinary block of wood and a pipe base. It will, of course, look rustic, but if used correctly in the interior, it will be a nice little decoration for your apartment.
Photo: timbangharga.com
Handrails for stairs
Owners of homes with stairs are faced with the need to use handrails, especially if there are elderly people in the family. A stylish and easy-to-implement solution is to use several pipes screwed to the wall. Painted black, they will not look rough; on the contrary, they will add style to the room.
Photo: my.carousell.com
Board processing
Depending on the quality of the raw materials, lumber is prepared. First, round the corners using sandpaper. You just need to carry out this stage without fanaticism, the rounding radius is 1-2 mm. The amount of rounding is not measured with a special tool, but simply checked by hand by touch.
Covering wooden boards with stain
The next point is stain treatment. This is a more decorative part than a functional one. This operation will highlight the structure of the tree. If there is no stain, potassium permanganate will do.
Before processing wood, check the strength of the solution on the back or end side of the board. Such a concentration is necessary so that the wood darkens, but does not turn black.
If, after covering with stain, the wood has acquired a too dark color, then the surface of the boards is lightly sanded with fine sandpaper.
Three holes with a diameter of 6 mm are drilled in each wooden element of the bench. To make the holes for the bolts symmetrical, place the boards in a stack, one on top of the other.
The first and third holes are located 2 cm from the edge, and the second is strictly in the middle. To control, place the boards on the frame of the future bench and check the accuracy of the markings.
The finished holes are countersunk. The depth is selected in such a way that the countersunk heads of the bolts are flush in them.
Required Tools
To work, you need to prepare a basic set of carpentry tools. It is simply impossible to make any wooden furniture without carpentry tools. Professional furniture manufacturers have fully equipped workshops with expensive, specialized equipment. But in order to prove yourself as a carpenter, of course, you shouldn’t immediately buy professional equipment, but you still need to prepare some tools.
Pipes on the walls of the living room
A modern-style living room is often filled with all sorts of technical elements, which naturally require a network connection. To prevent a huge number of wires from bothering you, we offer an interesting option: run them through pipes. They will fit perfectly into an interior with loft elements.
Photo: archilovers.com
Features of the design
Despite the fact that these structures are called metal, in fact, metal is used to create only the support, while the rest of the structure is made of wood.
Metal is not the only material from which a support for a garden bench can be created. In addition, you can choose the following options:
- concrete;
- tree;
- cast iron;
- stone.
If we consider cast iron supports, we should note their greater weight and they are most often used in parks. A similar picture is observed with concrete products. Due to their massiveness and difficulties with transportation, they can be found extremely rarely in residential areas.
Article on the topic: DIY LED chandelier
If you decide to opt for stone supports, then immediately get ready for the large costs of purchasing them. In addition to this, such structures are limited in terms of design.
As for wooden supports, they seem to be an excellent solution, since they not only have an attractive appearance and low weight, but also provide a large number of processing options.
But the tree has certain disadvantages, the main of which is difficulty in care, the need for protection due to low resistance to parasites and fungi. It also does not tolerate various natural disasters well. For example, if a tree interacts with moisture for a long time, this will cause it to swell and rot. Thus, the likelihood increases that the service life of such a bench will noticeably decrease.
Metal supports can be a rational option for summer cottages or a country house. The drawing attached to such designs is quite understandable for most owners. Also, these structures are resistant to corrosion processes and destruction, and, in addition, provide many opportunities for the implementation of various design ideas, which is largely achieved through the use of forged parts.
As a rule, such garden benches last at least 15 years. At the same time, they differ in their affordable price. There are no particular difficulties in terms of their manufacture, and therefore even a non-specialist can produce a similar design of the product.
Making a bed
To tell the truth, sitting on metal is not very pleasant, because it is hard and cold. For this reason, a rocking chair made with your own hands from metal must have additional finishing. There are several options for making a stock:
- made of wooden blocks, each of which is attached to the frame with bolts;
- made of thick cotton fabric stretched over the top and bottom posts;
- of pillows attached to the back and seat and covered with a removable cover;
- made of willow wicker, which is woven around a metal frame.
Regarding the last option, it would be a good idea to first watch a video teaching the basics of weaving. This design looks very elegant and graceful.