Growing vegetables and other crops in a greenhouse allows you to protect them from frost and bad weather, as well as provide optimal conditions in terms of temperature and humidity. And as a result, all the time and effort spent on arranging the building and caring for the plants will more than pay off with a bountiful harvest of high quality. Do you like to do everything around the house yourself? Are you a "jack of all trades"? Then try making a greenhouse from a profile with your own hands.
Do-it-yourself greenhouse from a profile
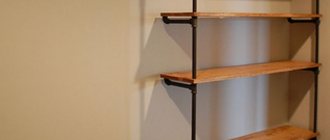
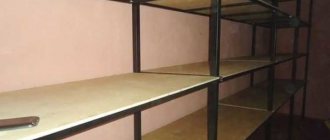
Greenhouse made of profile 25x25 mm
Advantages and disadvantages of profile greenhouses
Why is it worth building a greenhouse from a profile yourself? How will such a structure be better than a wooden greenhouse or a purchased building, which only needs to be brought and assembled on site? Before getting down to business, you should understand what the advantages of a profile greenhouse built with your own hands are.
- Freedom of choice - you can decide for yourself what size and shape your future greenhouse will be. Your imagination can only be limited by the requirements for the strength of the frame and the budget allocated for the arrangement of the greenhouse.
- Savings - metal profiles are cheap, polycarbonate or film cladding is also not expensive. In addition, a markup from the greenhouse manufacturer, which can be significant, is not added to the cost of construction. As a result, a building of equal size and quality can cost you 30-50% less than a purchased one.
Greenhouse frame made of profile pipe
- Durability – galvanized metal profiles do not require additional protection against corrosion. They are not afraid of dampness, moisture and air, they do not rust. With proper construction and care of the greenhouse, the structure will serve you for a very long time.
- Mobility - a frame made of galvanized metal profile and casing made of film or polycarbonate are extremely lightweight. You can move such a greenhouse to a new location without even dismantling the building. If this is necessary, then dismantling and reassembly will not take you much time.
- Ease of construction - to independently build a greenhouse from a metal profile, you do not need to have any special knowledge and skills; you only need basic skills in working with a set of tools that can be found in any home. And for those who have previously repaired and installed plasterboard ceilings, things will go even easier and faster.
Galvanized profile
Prices for galvanized profiles
galvanized profile
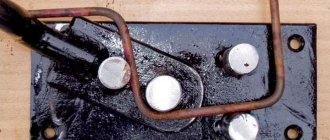
In addition to the advantages, before starting construction work you should also become familiar with the disadvantages of a greenhouse made of metal profiles. In fact, it is one, but quite significant - in winter, under the influence of large masses of snow, the frame and fastenings may not withstand and the greenhouse will collapse. There are two ways to solve this problem.
Insufficient reinforcement of the frame and irregular cleaning of the greenhouse roof from snow can lead to such a sad result
The first is to strengthen the frame of the greenhouse. To do this, the distance between the arches (or trusses, depending on the design) is reduced, additional jibs and pillar columns are introduced to support the roof of the greenhouse. You will have to spend more materials, but these costs will pay off over time.
Introduction of additional jibs and racks into the frame structure
Reducing the spacing between posts and rafters also increases the reliability of the greenhouse.
The second way to solve the problem with snow load is to install a removable roof. This is suitable for those greenhouses that are used only during the summer season. Upon completion, the roof of the greenhouse is removed for the winter. As a result, nothing threatens the frame, and in the spring you just need to remove the remaining snow and mount everything back.
Example of a retractable roof design
Important! If you live in southern latitudes and get little snow in winter, then there is no need to worry about snow load. It is enough to regularly remove it from the roof of the greenhouse after the next precipitation.
Types of profiles
Strictly speaking, a profile greenhouse is a collective concept. It denotes structures that are noticeably different from each other and are built from many types of metal (and not only) profiles. Some of the profiles were originally manufactured for other purposes, while others were created specifically for the construction of greenhouses. The most popular of them are shown in the table below.
Table. Types of profiles suitable for building greenhouses.
| Title, photo | Description |
| U-shaped or U-shaped profile | Many subtypes of U-shaped profiles, differing in width, wall height and metal thickness. They are used for the construction of various structures, including greenhouses. To combat corrosion, depending on the material, it is galvanized (for steel) or anodized (for aluminum). |
| V-profile | Metal profile of V-shaped section with “shelves” for fastening in the lower part and on the edges. A cheap and easy-to-use product, but inferior in strength to some U-profile options. Created specifically for the construction of greenhouses. Reinforced options may be called W-profiles. |
| Profiled pipe | Galvanized steel pipe of rectangular or square section. High levels of strength and reliability. To combat corrosion, it is galvanized or powder coated. |
| CD profile for drywall | Load-bearing ceiling profile (PP) for plasterboard. It has a U-shaped section, bends at the ends. Equipped with corrugations that increase the strength of the product. |
| UD profile for drywall | Guide profile for drywall. It has a U-shaped cross-section and is used to form a frame plane from a CD profile and attach the latter to a wall, floor or ceiling. |
| PVC profile | Profiles made of polyvinyl chloride of U-shaped, square and other sections. It differs from metal analogues in greater flexibility and low cost with less resistance to loads. |
There are several ways to fasten profile elements to each other.
- Bolts and nuts with washers - well suited for profiled pipe, V-shaped and U-shaped structures. They provide ease of subsequent dismantling and reassembly of the greenhouse, but at the same time require preliminary drilling of holes in the profile and careful monitoring of the reliability of the connections.
- Self-tapping screws - used in working with all types of metal profiles, especially CD and UD. For a greenhouse, it is justified to use not “bugs”, but self-tapping screws with a press washer - a thin head will not interfere with the installation of the sheathing. Some of the screws come with drill bits on the ends to facilitate entry into the metal.
- Welding is a reliable and durable permanent fastening. Use only if subsequent dismantling of the greenhouse is not planned. Welding seams require additional protection against corrosion.
- Connectors - a variety of designs used to connect PVC profiles to each other.
Self-tapping screws with press washers
An example of fastening corners with self-tapping screws to a profile
Advice! When choosing a profile for a greenhouse, pay attention to the quality of the anti-corrosion coating, especially on the corners and bends - there it should not have abrasions, stains, foreign inclusions or other defects. Otherwise, the service life of the frame may be significantly reduced due to the gradual destruction of elements affected by corrosion.
Using profile pipes for construction
A profile pipe is a pipe that has a square or rectangular cross-section. Manufacturers offer cold-rolled and hot-rolled pipes, solid and welded. There are no increased requirements for the profile for making a greenhouse frame, so you can purchase those pipes that are cheaper.
Since the greenhouse does not involve large mechanical loads, and the project must reasonably combine the quality characteristics and cost of the entire project, a small profile should be chosen for the frame.
For the construction of a greenhouse frame, the optimal profile would be a profile with cross-sectional sides of 2*2 cm and 2*4 cm. Rectangular pipes are used on load-bearing structures, square pipes are used for the construction of transverse lintels and oblique stops (if they are provided for in the design).
Manufacturers offer standard length pipes of 3, 6 and 12 linear meters. When drawing up a project, you should take this circumstance into account and expect to use a profile without trimmings.
Since the main threat to metal, which is not protected from the destructive effects of atmospheric moisture, is rust, a profile pipe with anti-corrosion galvanization or special spraying would be the ideal choice for building a greenhouse. Here additional protection will be required only at the joints.
Note! For reasons of minimizing the cost of building a greenhouse, pipes for the frame, you can choose a material made of simple steel, without anti-corrosion factory treatment. To protect the finished structure from corrosion, it is enough to clean the metal from rust, prime it and paint it.
Choosing a greenhouse shape
Before you start creating drawings and plans, you need to decide on the general shape of the frame for the future greenhouse. There are several basic options that have their own advantages and disadvantages. Let's look at them separately.
Gable greenhouse . The classic form that has existed, exists and will exist for decades. In essence, it is a reduced and simplified house with a gable roof.
Frame of a gable greenhouse
The advantages of the design are as follows:
The disadvantages of a gable greenhouse are as follows:
- relatively high consumption of materials;
- design complexity;
- inconvenience with roof cladding.
Arched greenhouse. The most common form of greenhouse frame at the moment. It is a set of profile arches connected to each other by horizontal ties.
Arched greenhouse frame
Advantages:
- simplicity of design;
- low material consumption;
- resistance to strong winds;
- quick assembly of the frame and laying of the sheathing.
But the arched greenhouse also has its drawbacks, and noticeable ones:
- the need to regularly clear snow;
- you need a flexible profile or tools to bend it;
- Narrow areas directly next to the wall cannot be used.
Greenhouse with arches from a set of straight elements
A-shaped. Imagine that all that remains of an ordinary greenhouse with a gable roof is the roof, which is very elongated in height. This is what an A-frame greenhouse looks like.
A-frame greenhouse
Quite an unusual design, rare, but with its advantages:
- no problems with snow;
- ease of assembly;
- unusual appearance.
The rarity of the A-frame greenhouse can be explained by its disadvantages:
- problems with usable space;
- more labor-intensive installation of sheathing;
- inconvenience in working with beds.
Single slope greenhouse. It is an ordinary greenhouse, but the roof is tilted only in one direction. The advantages and disadvantages do not differ from those of a gable greenhouse. Well suited as an extension to a residential building and a greenhouse for growing seedlings for a “large” greenhouse.
Lean greenhouse
There are other, more complex structures - dome, tent, etc. However, it must be taken into account that the greenhouse is made independently and from a relatively light frame, therefore it is possible to build such greenhouses, but only with extensive experience, as well as time and effort, which don't mind spending it.
Important! There is a subtype of greenhouse with a gable roof - the Mittleider greenhouse. It differs from the original in that the tops of the slopes are located one above the other, and vents are installed in the resulting vertical wall. As a result, the Mittleider greenhouse is the best in terms of ventilation and air circulation efficiency.
Mitlider's greenhouse
Constructive decisions
Greenhouses with a pipe frame are distinguished by their variability of design:
- Rectangular, characterized by the presence of a gable roof. The appearance of such greenhouses corresponds to the shape of an ordinary country house. Their advantage is their large internal space, which makes it possible to grow tall plants anywhere in the greenhouse, and not just in its center.
- Rectangular, defined as tunnel. They have a flat roof, providing this, on the one hand, with savings on profile pipes, which are quite expensive, and on the other, determining the occurrence of a number of problems. For example, a horizontal roof creates conditions where snow does not have the opportunity to roll off it. As a result, the heat of the greenhouse leads to snow melting, ice is formed and there is a risk of damage to the polycarbonate due to increased pressure.
- Arched, which are the most optimal in terms of consumption of building materials. At the same time, the design features require the presence of special pipe benders, with the help of which the profile pipe is given an arc shape.
The most widely used materials for assembling greenhouses are those with a cross section of 20 by 20 mm and 20 by 40 mm. The latter, in this case, have a fair margin of safety, but are distinguished by greater mass and a higher price.
In this regard, it is unwise to assemble a greenhouse only from larger pipes. It is much more effective to use them only for installation as wall supports and installation of rafters. All other elements of the greenhouse can be assembled from a 20 by 20 mm pipe.
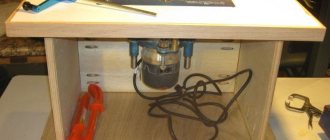
Designing a greenhouse from a profile
Having chosen the shape of the future greenhouse, you need to take several sheets of paper (preferably graph paper or squared), a pencil, an eraser and begin drawing up a drawing of the building. If you have computer skills, the drawing can be drawn up in programs for 3D modeling and design. Of these, the easiest to learn is Google SketcUp.
Designing a Greenhouse Using Google SketchUp
First you need to choose the size of the building. In this case, proceed from the dimensions of a standard sheet of cellular polycarbonate - 6 by 2.1 m. Also take into account the method of connecting individual sheathing elements to each other - using connecting profiles or overlapping. Most often, summer residents choose a greenhouse width of 2-3 m. The length can be 4, 6, 8 and 10 m, with some adjustments to the standard dimensions of the SPK sheet. The height of an arched greenhouse is rarely made more than 2.1 m, but for a gable structure there are no special restrictions, the main thing is to maintain an inclination angle of 25-30° for the slopes.
An example of a greenhouse drawing from a profile
Prices for cellular polycarbonate
cellular polycarbonate
Don’t forget also about the doorway, think about what size it will be convenient for you. Pay attention to the location of windows and transoms, especially in large greenhouses, since the plants in them will especially need ventilation.
The final stage of design is thinking through and drawing profile connections into a single frame on the drawing. Do not forget to calculate the amount of material and fasteners needed for subsequent purchases, taking into account a reserve of 10-15%.
How to bend pipes
The work of bending a profile pipe is the most responsible. The discrepancy between the arches will cause the polycarbonate to skew and its rapid destruction.
To obtain even arches, you will need a pattern made from available material in natural size.
We recommend reading: How to repair a crack in a cast iron sewer pipe yourself
Methods for bending a profile pipe:
- Using filler. In summer, the pipe is filled with river sand, in winter - with water, which is left until it freezes. A profile pipe that is frozen or filled with sand can easily be bent according to the pattern by hand.
- Using a grinder. On the profile in the arch area, cuts are made for 2-3 pipes. The cuts are made, if possible, to the same depth at the same distance. Start from the central upper segment (do not cut through the center!). The pipe is bent according to these marks, and then the cuts are welded.
Foundation arrangement
Some readers may have doubts whether a foundation is needed for a greenhouse at all. On the one hand, this is not a heavy building, and the greenhouse is unlikely to sag under its own weight. But for a greenhouse without a foundation, there is always a risk that it will be blown away by the wind. In addition, the base laid under the greenhouse protects plants from drafts, freezing, rodents, insects and other pests.
Before starting to build the foundation, you need to choose the place where the future greenhouse will stand. Ideally, this should be a flat area with a minimum slope, rich soil, no shade from buildings and some kind of shelter from the north winds in the form of a fence or hedge.
Important! Do not place the greenhouse between two houses or next to such a place - this creates a “wind tunnel” effect, that is, constant and strong drafts.
Choosing the right location to install the greenhouse
The simplest and most affordable type of foundation is a timber structure. Arrangement of some other types is possible, but redundant. For your convenience, step-by-step instructions are provided below.
Step 1. Clear the area for the greenhouse from debris, stones and tall vegetation.
Step 2. Make markings. To do this, you can use pegs or pieces of reinforcement and a thread stretched between them.
Marking a site for a greenhouse
Step 3. Determine the condition of the soil. If it is sufficiently solid, then the timber foundation does not need to be deepened. Otherwise, there is a need to construct a trench.
If the soil is hard, then the timber foundation does not need to be deepened.
Step 4. If the soil is soft, then dig a trench along the perimeter of the greenhouse with the width of a beam and a depth of one spade bayonet.
Foundation trench
Step 5. Compact the bottom of the trench and add a layer of sand or gravel. The layer thickness should be 25-30% of the ditch depth.
Step 6. Measure and cut the timber to the length and width of the greenhouse.
Advice! It is advisable to use larch timber as a material for the foundation - it is resistant to rotting and mold.
Larch timber
Prices for larch timber
larch timber
Step 7. Treat the wood with an antiseptic. Alternatively, you can use copper sulfate, bitumen or used motor oil.
Timber treated with bitumen and joined “in half a tree”
Step 8. Assemble the timber into a rectangular box. Connections can be made using dowels or long half-wood self-tapping screws, or using galvanized metal corners.
Fastening beams to corners
Step 9. Transfer the timber box to the trench, lay it there and level it horizontally. To do this, you can use sand, earth or thin planks.
Step 10. Drill through holes in the corners of the timber box and insert 1 m long reinforcing pins there. Drive them into the ground. This is necessary to securely fasten the foundation of the greenhouse so that it will not be blown away by the wind.
In some cases, it is not necessary to drive pins into the wood itself - reinforcement dug into the inner corners can also protect the greenhouse from being toppled over by the wind
Step 11: Fill the gaps between the trench and the foundation with sand, gravel or soil.
Step 12. For additional protection of the timber, the foundation can be covered on top with a layer of roofing felt or other roll waterproofing.
Frame assembly
Let's consider the process of manufacturing two frame options for a greenhouse - a gable structure made from plasterboard profiles and an arched structure made from V-shaped metal products.
Scheme of a gable greenhouse (top view)
The first option consists of the following elements, assembled separately:
- main and secondary gables;
- side walls;
- roof.
One of the gables of the greenhouse (and in the case of a long building, both) must have an opening for a door, which is assembled separately. The gables themselves were assembled from the base, vertical posts, upper horizontal beam, roof and jibs.
Step 1. Measure the profile for the base and cut it to the required length. To do this, use either a UD guide profile or a ceiling profile, but with bent bends at the ends at the entry points of the vertical posts.
An example of connecting a vertical stand and a base made of CD profiles with bending of the ends
Step 2. Drill holes in the base profile for attachment to the greenhouse foundation. The interval between them is 0.75-1.5 m.
Step 3. Insert the outermost vertical posts "shelf" to the left and right, respectively. Secure it to the base using four self-tapping screws for each connection - two per “foot” of the UD profile.
Step 4. Insert the inner uprights using the same method. Use a horizontal lintel to form the door frame. It can be fastened in two ways - either using a T-shaped connector, or by trimming the sides of the lintel profile and fixing it to the resulting “petal”.
Fastening scheme using a “petal”
Step 5. Install the top horizontal beam from the same profile from which the base is made.
Example of an end from a profile
Step 6. Secure the rafter profiles to the gable wall and to each other by trimming the sides and forming “petals.”
Step 7. Provide gable rafters with ties and jibs to form a stronger structure.
Using the same scheme, build the second gable of the greenhouse. After this, you can begin creating the side walls.
The final version of the gables, with a reinforced structure and a mounted door and window
Step 1. Measure and cut the base profile, drill holes for fastening to the foundation. Leave “petals” at the edges to connect the side walls of the greenhouse with the gables.
Step 2. Prepare vertical posts of the required height, insert them into the base and connect them together with self-tapping screws (two or three on each side of the profile). The interval between the racks, depending on the plan, can be 0.5-1 m. The smaller its value, the stronger the structure, but also the more materials it will need.
Vertical rack mounting diagram
Step 3. Install another horizontal profile on top of the racks, connect everything with self-tapping screws.
Advice! For additional structural strength, provide the side walls with a horizontal beam in the middle. It can be connected to the racks either using cross-shaped “crab” connectors or by trimming the sides of the profile.
Cross-shaped fastening of drywall profiles using a crab connector
Step 4. Mount both gables and both side walls to the foundation, secure with long screws or anchor bolts.
The last stage of frame formation is the arrangement of the roof. It is assembled according to the same principle as on the gables, only the rafters are fixed to the upper horizontal beams using “petals”. For additional structural strength, many craftsmen supplement the frame with jibs that connect the rafters and vertical posts directly.
Fastening the rafters to the wall of the greenhouse on the “petal”
Frame reinforcement
With the help of such oblique elements, you can significantly strengthen the frame and protect it from kinks.
Advice! You can improve the strength of connections between profiles with each other using specialized racks and connectors, as in the images below.
Strengthening connectors
Strengthening racks for profiles
There are many V-profile structures sold on the greenhouse market today. But if you have the proper skills and tools, it will not be difficult to reproduce it yourself, at home. Let's start the construction process with the gables.
Ready-made V-profile building
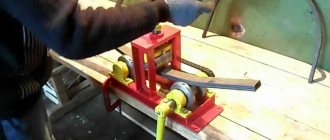
Step 1. Cut individual pieces of profile that will make up the greenhouse arch. The optimal number of its constituent elements is 5 pieces. To make the profile round, use a pipe bender.
Mandrelless pipe bending machine
Bending a profile using a homemade manual pipe bender
Arch elements separately
Arch elements assembled
Step 2. Drill holes for fasteners according to the drawing. To protect against corrosion, treat them with cold galvanizing.
Cold galvanizing spray
Step 3. Connect the arch elements into a single semicircular structure using nuts and bolts.
Connection of arch elements
Step 4. Attach the jibs and crossbars to the arch.
Strengthening the arch
Example of reinforced greenhouse arches
First stage of strengthening
Second stage of strengthening
Step 5. Using corners and triangle plates, mount vertical posts, a door frame and oblique crossbars on the pediment. Also secure the corners for the horizontal ties of the greenhouse in advance.
Fastening profiles with an angle
Connecting profiles
Step 6. Attach the side and top horizontal ties to the gable.
Fastening ties to the pediment
Step 7. In turn, attach the intermediate arches to the ties with bolts.
Intermediate frame arches
Step 8. Steps 6 and 7 are repeated several times in succession to form a solid greenhouse frame.
Fastening horizontal ties
Step 9. Assemble another pediment from the back side, but without a frame for the door.
Step 10. Secure the finished frame to the foundation using angles and self-tapping screws (or anchor bolts). Check that all fastenings are correct and secure.
An example of attaching a frame to a concrete base
Video - Do-it-yourself greenhouse made of metal profile
Video description
The video shows a comparison of an attached and freestanding greenhouse:
The advantage of this option is the reduction of material costs due to the same wall
It is important to attach the frame to its plane as much as possible, making the joining points strong and reliable.
As for materials, there are no restrictions here either. All of the products described above can be used to assemble a frame structure. And such a greenhouse can be covered with films, glass or polycarbonate.
Greenhouse attached to the wall of the houseSource pinterest.com
Greenhouse lining
The last stage of building a greenhouse from a metal profile is the cladding. The most commonly used sheets of cellular polycarbonate are 4 mm thick. Here are step-by-step instructions for working with them.
Step 1. Unpack the sheets and determine which side the stabilizing coating is located on.
Step 2: Cut one of the sheets into two pieces.
Cutting polycarbonate
Step 3. Remove the protective film and seal the ends with perforated tape at the bottom and sealing tape at the top.
Removing the film from the front side
Perforated tape for polycarbonate
Step 4. Place one of the cut sheet halves against the gable with the side with the stabilizing coating facing out.
Step 5. Secure the polycarbonate to the gable using roofing screws or plastic thermal washers. In the latter option, you need to pre-mark and drill holes in the material, taking into account the thermal gap.
Installation of a polycarbonate thermal washer
Step 6. Trim excess sheets, cut out elements for the window and door.
Step 7: Repeat the previous steps with the opposite gable.
The ends of the greenhouse are sheathed
Step 8. Now lay the sheets on the roof and walls of the greenhouse, fastening them in the same way - with the stabilizing layer facing outwards and using roofing screws. Lay adjacent sheets overlapping.
Sheathing the roof and walls of the greenhouse
In addition to polycarbonate, polyethylene film can be used as cladding. In this case, it is secured either with strips, which, in turn, are screwed to the frame with self-tapping screws, or with the help of hoops.
Greenhouse made of galvanized profile under film
Double-glazed greenhouse
True fans of summer cottages are always in search of the best material for construction. Nowadays, double-glazed greenhouses are very popular among gardeners, which have established themselves as one of the most expensive, but durable types of these structures.
If you are already a fairly experienced builder and want to start growing vegetables indoors, be sure to try making a greenhouse with your own hands from a metal profile. Not only will it save you money, but it will also be a fun and rewarding experience.