If you like neat and stylish corrugated roofing, then this article is for you. It is important not only to choose the right quality coating, but also to secure it correctly. Then the metal roof will serve for a long time, without bothering you with the periodic need for local repairs.
How to attach corrugated sheeting to the roof with self-tapping screws and how difficult is it? There are really a lot of subtleties and nuances here: starting from the choice of suitable screws and ending with the puzzle of which wave of the sheet to attach them to - top or bottom. Let's figure it out.
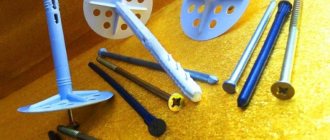
Selecting fasteners for quality installation
The quality of the roof deck depends on the type of fasteners used to install the covering material. It is not recommended to use regular nails. Water will constantly get into the holes, resulting in rust, and dampness under the material will create a favorable environment for the development of mold and mildew. Nails do not provide reliable fastening; in strong winds, the fastening points become loose and the structure may collapse.
The roof requires the use of specialized self-tapping screws, which have a rubber layer that is resistant to external influences. There are fasteners with a latex or neoprene layer. It contracts when the products are screwed on and blocks access to moisture.
Professional self-tapping screws for corrugated roofing are galvanized steel fasteners. By giving preference to such models, the possibility of corrosion is eliminated. During production, the screw head is coated with a special layer of polymer paint, which provides double protection against corrosion.
The best options for self-tapping screws for corrugated sheets include the following models:
- Essve;
- Gunnebo;
- Sfs-intec;
- Daxmer.
Fasteners for metal profile roofing are created in accordance with GOST 17917-86. The manufacturer's logo is depicted on the hexagonal head of the self-tapping screws of this group.
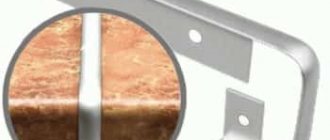
Fastening element for metal profile
The fastener must be longer in comparison with the thickness of the sheathing timber and roofing material. The difference should be 2–3 mm.
They produce fasteners for metal profiles with a length range from 19 to 25 mm and diameter variations from 4.6 to 6.3 mm. Knowing the total thickness of the timber and covering sheets, you can select the most suitable fasteners.
A special drill at the end of the roofing screw allows you to easily pass through strong metal without additionally creating holes with a drill.
The market offers a huge range of colors of fasteners for metal profiles in accordance with the colors of the covering material. This makes the fastener invisible.
Characteristics of the profiled sheet
Profiled sheets (also called corrugated sheets) are a very common material in construction. Among its advantages are lightness, durability, strength, environmental safety, reliability, and ease of installation. The material is excellent for roofing, finishing work, and installation of fences.
The profiled sheet does not need to be painted regularly; the color will not fade under the sun. Galvanized steel is used to make the material. Sometimes a polymer coating is applied on top of it. In appearance, the profiled sheet is similar to slate. Products are produced in many variations, differing in performance characteristics and sizes.
The difference between a drill for metal and wood sheathing
The type of base to which the metal profile will be attached is a key point when choosing fasteners. There are two types of fasteners for sheathing: for wooden or for metal structures.
When attaching corrugated sheets to metal purlins, it is important to choose self-tapping screws with a wide drill bit that allows you to pass through the corrugated sheet and the metal base of the structure. This type of hardware is equipped with a waterproofing washer with a rubber gasket.
With a metal base, you need to choose fasteners taking into account the thickness of the metal:
- mount 4.8*19 mm - for metal slats up to 3 cm thick;
- self-tapping screw size 5.5*25 mm is suitable for metal thickness from 3 to 6 mm;
- fasteners 5.5*35 mm and 5.5*50 mm are used for metal purlins up to 12 mm thick.
Attaching corrugated sheets to wooden sheathing is characterized by its own characteristics. This type of fastener has a large thread pitch. This type of self-tapping screws has a rarer thread than fastenings for metal. Fasteners for wood have a thinner drill bit, which also goes to a cone, which ensures a tighter fit of the screw in the wooden structure.
Wood fasteners are longer than metal fasteners.
For wooden sheathing, use self-tapping screws measuring 4.8*28 mm or 4.8*35 mm.
Experts advise choosing fasteners in the following quantity: 20% for a long rod and 80% for a short version.
If, to fasten a metal profile, you give preference only to self-tapping screws with a long drill, then the quality of work will not deteriorate, but it will be more convenient and easier to tighten a short rod.
Performance qualities of corrugated sheets
Profiled sheet C-10 and its dimensions.
The greater the height of the sheet profile, the stiffer the material. Roofers advise choosing corrugated sheeting with a height of 20 mm or more for the roof. Metal profiles of grade C10 can also be used, but you need to think about the unhindered flow of snow from the roof. Let's look at the main types of profiled sheets:
- Wall. Owners of private houses usually choose brands C10, C20 and C21. They optimally combine cost and characteristics.
- Load-bearing - wall. Brand NS35 is suitable for roofs with a minimum slope. Load-bearing wall sheets of this brand are used in areas with heavy snow load.
Profiled sheet NS35 and its dimensions
The corrugated sheets H60 and H75 have a high cost - their wave height exceeds 6 cm. They are not used for roofing private houses, but they are quite suitable for industrial facilities.
Installation of waterproofing and sheathing for corrugated sheets
As a support for the final covering, you can use a board 2–2.5 cm thick. The lathing is attached to the rafters with nails or self-tapping screws. Considering the very large number of attachment points for self-assembly, it is preferable to use nails, which will significantly speed up and simplify the process.
Installation instructions.
- There are two types of plank lathing: sparse or solid version. For corrugated sheeting, the first type is used. Sparse lathing is characterized by installing boards at a distance of up to 1 meter.
- Nailing the boards begins from the bottom of the rafters. The elements are mounted horizontally.
- Several boards are installed tightly under the ridge without gaps.
- Waterproofing material is laid on the sheathing to protect the space under the roof and structural elements from condensation that forms on the corrugated sheet during large temperature changes. This technique is used for “cold” type of roofing. With the “warm” option, a roofing pie is necessarily formed, which is created by insulation and a film that protects against steam. Insulating the roof reduces heating bills by a third.
- It is better to start attaching the corrugated sheeting to the wooden sheathing from the bottom of the roof. The sheets need to be twisted with an overlap of 15 cm. The joints should be sealed with adhesive tape.
Corrugated roofing: components
Even when installing a conventional gable roof, there are several difficult sections that usually form at the junction of different planes and/or parts of the system. These areas are usually called “nodes”. We examined one such unit in the previous paragraph - the design of the front board and the fastening of gutters. But this is far from the only node where detailed explanation is required.
Installation and sealing of the ridge
The under-roof space under the corrugated sheeting should be well ventilated. This material heats up quickly and cools down just as quickly, which promotes the formation of condensation. Therefore, when installing a metal profile on the roof, in the upper part the sheets on both sides are not joined tightly, but leave a gap of several centimeters - so that the air can freely escape, taking with it water vapor.
The principle of installing a ridge with ventilation
If there are special ridges with ventilation (in the photo), but even if you just install a regular ridge element between the corrugated sheet and its edge, you get a large number of holes - in each depression of the corrugation. The size of this gap depends on the height of the wave - the higher the wave, the larger the gaps are. On the overhang, where the front board is nailed, there are also similar holes. Air movement usually goes from bottom to top - from the overhang, through the under-roof space (for this purpose, when installing the roofing material, it is necessary to leave ventilation gaps, which are formed by the sheathing), to the cracks in the ridge. This is how ventilation and moisture regulation of the insulation occurs, condensation evaporates and is carried away.
Large gaps are good for ventilation, but when it rains/snows with the wind, precipitation clogs them, and dust and leaves get into the attic through them. It is much worse if the holes become clogged with leaves - ventilation will immediately deteriorate. To avoid getting into a similar situation, previously approximately 2/3 of the gap height was filled with sealant, applying it in layers to the roofing material. Crawling back and forth with sealant on the top of the roof, waiting for the previous layer to polymerize a little, is not very convenient. This solution is also incorrect from the point of view of ventilation - the gap decreases and air movement worsens. But there was no other solution. Now it is there - a sealant for corrugated sheets. It is made from polyurethane foam, polyethylene or wood composite. The structure of these materials is porous and allows air to pass through well, but not dust, water or leaves. In shape it either repeats the shape of the corrugation - there is one for different types of corrugated sheets, and there is also a universal tape that is simply pressed in the right places.
Sealing holes in corrugated roofing using a sealant
The seal “sits” on sealant, double-sided tape, glue, there are options with self-adhesive tape. With this compaction, air passes freely, and precipitation remains in the outer layers, from where it later evaporates.
Finishing the overhang with corrugated sheets
In order to cover the overhang with corrugated sheets, a special profile is attached to the front board. A profiled sheet cut into strips of the required width is inserted into its groove. The second edge of the hem is attached to a board nailed to the ends of the rafters. The joint between the filing and the board is closed with two droppers - one is nailed from below, covering the lower half of the board, and the second - from above. The edge of the waterproofing film is then placed on it.
If a drainage system is to be attached, then the hooks for the gutters are nailed after installing the lower drip line. The top dropper is nailed after installing all the hooks.
How to hem a roof overhang with corrugated sheets
See how to make a roof valley here.
Connecting corrugated sheeting to the wall
In some cases, a roof made of metal profiles is adjacent to the wall of a structure. How to make a connection so that there are no leaks? There are two options (see picture). Both use a corner strip, only it has a different size and a different profile.
How to connect a corrugated sheet roof to a wall
You can take a corner strip with shelf dimensions of 150*200 mm. The shorter side is placed on the wall, the longer side is placed on the roof. They are attached to the wall using fasteners depending on the material from which it is made (nails or self-tapping screws if it is wood, dowels if it is brick and building blocks). The joint between the planks and the wall is sealed with silicone sealant. From the roof side, the plank is attached to the crest of the wave, installing special self-tapping screws with rubber washers. Their length is determined in the same way as when connecting adjacent sheets of corrugated sheets (wave height + 20 mm for entering the sheathing board).
The second option is more labor-intensive: a groove (groove) is made in the wall, into which a corner strip with shelves bent at 45° is inserted. The fastening in this case is similar, the difference is in the size of the bar - it can be 100*100 mm or so.
Pipe passage
Many questions arise when sealing the passage of a chimney pipe or ventilation through a corrugated roof. The cross-section of pipes is round and rectangular; each type has its own solution.
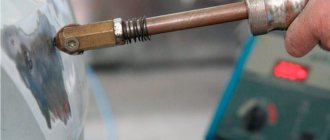
For the passage of round pipes through the roofing material, there are special steel or polymer aprons. Their upper part is made in the form of a cone, the lower part - the skirt - is made of elastic material that can take a given shape. The apron is placed tightly on the pipe and lowered so that the “skirt” rests on the roofing material. Next, you need to give the elastic skirt a corrugated shape. Use a hammer for this (regular or rubber - depends on the type of apron). To prevent water from flowing under the skirt, coat the joint with sealant and press it well.
After securing the skirt, fix the neckline. If the apron is metal, cover the top with a clamp, tighten it, and coat the joint with sealant. When using a polymer apron (master flush), it is put on the pipe with considerable effort (sometimes you even need to lubricate the pipe with soapy water), but the joint, nevertheless, is sealed with sealant for reliability.
With a rectangular (brick) pipe, everything is somewhat more complicated. Elements are cut out of metal sheets to cover the joint with the roofing pie.
Organization of a rectangular pipe bypass on the roof
How to properly install corrugated sheets on the roof
It is necessary to lay the corrugated sheet sequentially with a vertical overlap on one wave. To strengthen the system, experts advise screwing in screws for corrugated sheets no further than 50 cm from each other.
Tips for laying metal profiles.
- Pitched roofs are covered starting from the lower edge of the end. The pilot sheet is laid with a protrusion of 2 cm.
- Preventing the penetration of melt water into the joints is achieved by laying the top row on the bottom row with an overlap.
- Horizontally, one sheet should overlap the other by an amount equal to the wave pitch, that is, more than 10 cm. A small slope of the structure requires more overlap of the sheets.
- The vertical protrusion of the subsequent sheet above the previous one should be 10–20 cm, depending on the angle of the roof slope.
- The need to treat joints with silicone sealant arises when the slopes are inclined less than 15°. This reliably protects the seam area from moisture penetration.
- A profiled sheet along the gable should be attached to each sheathing board, this means that the fastener spacing should be equal to the sheathing pitch. The remaining elements are fastened in a checkerboard pattern at a distance of no more than 50 cm.
- Self-tapping screws are screwed into the lower wave of the corrugated sheet, where they fit tightly to the sheathing to reduce pressure on the roof during squally winds.
- The ridge profile is placed at the joints of the slopes, secured in each wave with self-tapping screws.
Metal profile laying technology
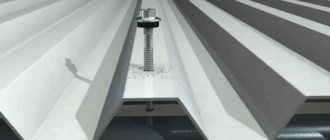
In what wave should the self-tapping screw be fastened? Theory and practice
Now let's move on to the most controversial issue. The fact is that as long as corrugated sheeting has been on sale, disputes about its installation have not subsided.
How to properly attach a self-tapping screw: in the upper or lower wave? It would seem, why do such questions arise at all if the manufacturer clearly indicates that the fastening occurs in the lower wave?
Actually the question makes sense. The self-tapping screw in the lower wave reliably presses the corrugated sheet to the sheathing, and the roof itself looks protected. But, at the same time, the water along the slopes always follows the lower wave, and such fastening is always in the water, unlike the upper one.
Moreover, any error during the installation process will result in roof leakage and rapid corrosion of the roofing material. Therefore, the roofers themselves offer an unusual, but practically justified solution to the problem:
- If the roof is installed by professionals in whom you are confident, then let them screw a self-tapping screw into the lower wave;
- If the team is unreliable and there is a risk that the craftsmen will not observe all the technological details, it is better to go to the top. This method will not affect the overall strength of the roof in any way, but during rain, problematic attachment points will not create problems.
But remember! In case of violation of the installation instructions supplied by the manufacturer, the warranty does not apply to the finished roof. Therefore, weigh the pros and cons and choose the appropriate installation option.
Fastening technology
It is recommended to attach the corrugated sheeting to the roof with self-tapping screws in several steps.
- Mounting hooks for the drain gutter and eaves strips. Long products must be screwed to the eaves beam of the sheathing. The optimal length of such a hook is 20 cm. Short products are fixed on the front board.
- Roof covering with corrugated sheets. A detailed examination of the corrugated sheet fastening scheme is presented below.
- Installation of ridge strip. This stage of work is carried out after installation of the corrugated sheet. To fix the ridge strip, it is recommended to choose metal-to-metal screws with a rubber gasket and a size of 5.5x19 mm. The maximum fastening step should not exceed 80 cm. The use of a special seal allows you to protect the space under the roof from rain and snow.
- The last stage of work is the installation of end strips, drip edges, etc. Before installing them, the support boards should be correctly secured to the gables. Fastening is done to the last upper wave of the metal profile and to the support board using 5.5x19 mm self-tapping screws. The planks are connected with an overlap of 5 cm.
Installation of end strips
How to calculate the number of screws for one sheet?
In total, there are two main schemes for fastening corrugated sheets:
- vertical , which is ideal for corrugated sheeting with a drainage groove. In this case, first lay the first sheet in the first row, fix it for a while, and then the first sheet of the second row. Having laid a block of four sheets in this way, it is leveled and secured to the roof. All other sheets are laid according to the same pattern.
- 3 sheets each , which is suitable for corrugated sheets without drainage grooves. In this case, first lay the first two sheets in the first row, attach the sheet of the top row to them, and after aligning with the eaves, the block is securely attached to the roof.
The fastening scheme also depends on the length of the purchased profiles:
Let us separately dwell on what the overlap of the corrugated sheet should be:
- At an angle of less than 15°, the overlap should be at least 200 mm, and preferably in two waves.
- At an angle of up to 30°, the overlap is made from 150 to 200 mm, depending on the width of the wave.
- At an angle of more than 30°, the overlap can already be from 100 mm.
If the profiled sheet has horizontal overlaps, then they need to be made at least 20 cm, with mandatory sealing of each. To do this, use bitumen mastic or silicone sealant that are suitable for roofing.
To secure a square meter of corrugated sheet, 7-9 screws are required. To calculate the number of hardware for your roof, this number is multiplied by the area of the entire surface. Reduce the resulting number of screws to a multiple of 250. The fact is that screws are sold in packs of 250 pieces or in boxes of 1000 to 4000 pieces. Therefore, it will be more convenient if you immediately decide how many boxes of fasteners you need. At the same time, round the figure up - a small margin is always necessary.
Here is the most rational mounting scheme:
Also keep in mind that the fastening step of corrugated sheeting is different for different brands:
Please note that the more attachment points, the stronger, on the one hand, the corrugated sheet will be mounted on the slope, but at the same time, a large number of holes increases the risk of leaks.
Mounting diagram
Determining the number of fasteners per sheet of corrugated sheeting is important when installing it. An excessive number of screws for fastening sheets increases the risk of deformation on the material and disruption of the tightness of the entire system. If there are too few fasteners, the coating will be fragile.
If you correctly attach the corrugated sheeting to the roof with self-tapping screws, you don’t have to worry about the durability of the roof.
Craftsmen advise using the following rules when attaching a metal profile:
- fasteners for the metal profile are screwed only to the lower crest of the wave adjacent to the sheathing beams;
- Only perpendicular screwing of self-tapping screws to the sheathing slats is allowed (any change in the angle of screwing can lead to the formation of cracks through which precipitation will penetrate);
- the distance between the screws should not exceed 50 cm;
- fasteners around the perimeter of the covering material are placed through one ridge: the central part of the covering is secured with fastening screws in a checkerboard pattern, the end sheets are screwed to all slats, increasing the strength of the flooring;
- average consumption of self-tapping screws ㅡ 6–8 pieces per 1 profiled sheet (the number of fasteners can be calculated based on these data);
- At the junctions of two products, self-tapping screws should be screwed into the upper wave of the flooring.
Mounting Location
There are several types of sheet materials suitable for roof decking. They differ only in the size and shape of the sides.
Materials of grades S-10 and S-20 are equipped with a capillary recess on the front side. Products S-21 and N-60 are characterized by shortening the last corrugation on the front side by several millimeters.
You can lay the corrugated sheet from any edge; be sure to place the first sheet with the inside facing the end. The accuracy of the sheet placement plays an important role in ensuring the aesthetics of the entire roof and maintaining its geometry.
Overview characteristics of profiled sheets
One of the most multifunctional building materials is corrugated board. It can be used both for roofing and for finishing walls, floors, and even the construction of temporary and permanent fences. The undeniable advantages of this material are high reliability, strength, environmental friendliness and durability. It does not need regular painting and does not fade in the sun.
Profiled sheets are made of galvanized steel with the possible application of a polymer coating and resemble slate in appearance. They are available in various sizes and various indicators of anti-corrosion resistance, rigidity and strength.
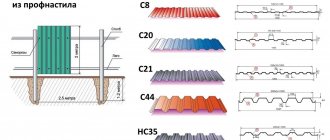
Corrugated sheets come in the following brands
:
- C - used for the construction of light coatings, has a corrugation height from 8 to 44 mm;
- NS – most often used in roofing, wave height from 35 to 44 mm;
- H - has reinforced rigid ribs and is suitable for permanent roofing, corrugation height from 57 to 114 mm.
To cover the roof, it is recommended to use profile sheets with a wave height of 20-60 mm and the presence of a special moisture-wicking groove. Their thickness depends on engineering calculations that take into account all types of possible loads: operational, wind, snow.
When purchasing corrugated sheeting, you must check in advance for the availability of instructions for laying this roofing material and, if it is not available, you should contact the seller.
Every home owner wants his roof to last as long as possible and please the eye for decades. That is why, in order to choose the right profile metal, you must first take into account the climatic characteristics of the region. For areas with increased snow cover in winter, you should choose a profiled sheet with a corrugation height of at least 20 mm, and the roof slope angle should be at least 15°. In private construction, the most commonly used corrugated sheets are NS35 and NS 44.
Be sure to read: Ondulin or corrugated sheeting: choosing a roofing material
Fixing additional elements with self-tapping screws
In order to reliably fix the additional elements, it is important to follow a special fastening technology. The main task of this stage of work is to ensure maximum tightness of all joints.
The bulk of additional elements are installed at the final stage of roof installation on top of the main covering. Therefore, taking into account the total thickness of the corrugated sheet and the additional element, the use of longer self-tapping screws is required.
To install the ridge, you must select certain strips. They are laid with a spacing of 10 cm on the previous element and at intervals of no more than 30 cm. A mandatory type of work is the installation of a seal between the sheets and planks; preference must be given to ventilated types of seals.
When going around the chimney, it is necessary to make and attach an apron and junction strips.
Stages of work.
- Draw a line from the surface of the metal profile at a height of 15 cm on all edges of the chimney.
- Prepare 2 side and 1 bottom parts of the apron. It should be remembered that the parts rise 15 cm to the sides of the chimney and are attached with a 20 cm offset to the slope. The side parts must be adjacent with the horizontal side to the lower element, and the size of the upper side must exceed the size of the chimney 20 cm.
- At the next stage, the lower part is fixed to the sheathing, and the remaining parts are fastened together.
- The main task of the upper part of the apron is to change the direction of water flow above the chimney and send it along the roof, with access to the roofing material located below the chimney. To achieve the given goal, it is necessary to insert the upper part of the apron under the ridge on top of the laid metal profile.
- It is necessary to ensure that the upper element of the apron is in contact with the marked line on the chimney and cover all the side parts with it. It should step under the ridge at the same level as the corrugated sheeting.
- Having connected the top and side parts of the apron, it is necessary to seal the fastening points.
- To protect against moisture, an abutment strip is installed in a pre-prepared fine above the apron along the entire perimeter of the chimney. The fine is treated with sealant.
One of the obligatory elements of complex-shaped roofs are valleys - internal angles formed when a wall adjoins the roof or when two slopes join.
Technology for arranging valleys.
Installation of the valley
- Inside the valley, several boards should be secured between the parts of the sheathing to increase the reliability of the assembly.
- The valley planks begin to be installed from the bottom with a spacing of 25–30 cm.
- Cut the bottom strip so that the cornice is higher than it and form a bend on it. It is necessary to install a seal over the entire length of the strip.
- Position and cut the metal profile adjacent to the valleys. Between the covering material and the valley it is necessary to leave a gap of 6–10 cm in all directions. The metal profile can be fastened together with the valley strips, but in this case it is recommended to leave a gap of 25 cm between the center line of the assembly and the place where the profiled sheet is attached.
- Installation of the upper strips serves as decoration for the oblique cuts of the corrugated sheet and protects the space between it and the valleys from snow and rain. You need to start installing the strips from the bottom edge, gradually rising. The planks are attached with an overlap of 10 cm, secured with self-tapping screws to the upper corrugations of the metal profile.
Types of corrugated sheets (grades)
Sheets of corrugated sheets differ in color, the presence of a protective coating, and material. Non-ferrous metal profiles are used to cover the roofs of private houses. The polymer layer protects the metal from negative environmental factors, and the selected shade completes the appearance of the building. Although simple galvanized sheets are much cheaper, they are only suitable for temporary structures and the service life of such material is shorter.
By purpose
As already mentioned, metal profiles come in different thicknesses and have deep or minimal grooves. Sheets with small indentations (marked “C” on them) are used for walls or fences. Making a roof from a thin metal profile is not the best idea only if there is frequent sheathing and there is no heavy snow load.
Sheets made of thick metal (marked with the “H” code) are intended for roofing with high snow or wind loads. Universal corrugated sheeting is designated by two letters “NS” and is suitable for most homes.
When marking, you can notice the numbers - this is the wave height indicated in millimeters. For example, wall C10 is suitable for a fence, and HC30 is recommended for roofing. Additional grooves in the wave increase the rigidity of the corrugated sheet.
By type of coverage
Despite the same appearance, the price of two sheets of corrugated sheets may differ. For some reason, many take this as deception on the part of the store, but no. It's all about using different materials and technologies. The coating is:
- Tsinkov - the technology is well studied and put into production, so the cost of the sheets is lower;
- Alyumotsinkov is a relatively new technique, which means that the price of a metal profile reflects the costs of modern equipment, while this type of protection extends the service life of the product.
Waves on a profiled sheet are formed using cold rolling or emulsion.
In the first case, the metal is pressed through with a special roller without preparation. The work uses expensive equipment, otherwise there is a risk of damaging the applied protective layer on the sheets.
During the formation of a wave by an emulsion, the surface of the material is treated with oil or water and then pressed. It is very important not to violate the technology: first dry the sheets and then fix the paint by firing in an oven. If the manufacturer did not treat the work conscientiously, the material will soon rust.
Popular coatings include polyester, pural, PVDF, plastisol. The advantages and disadvantages of each are presented in the table.
| Type of polymer coating | pros | Minuses |
| Polyester | Low price, plastic layer, resistance to damage during installation of metal profiles | Glossy polyester glares and is susceptible to corrosion |
| Pural | Uniform and reliable coating, color protection for 10 years | High price |
| Plastisol | Resistant to environmental factors, does not rust, has an affordable price tag | Destroyed by exposure to ultraviolet radiation (fades) |
| PVDF | Tolerates any frost, sun and even aggressive environments. The coating is easily cleaned of dirt during rain, which returns the roof a beautiful shine | Expensive, not always available in small towns |
The best option for a country house is a roof made of corrugated sheets with a protective polyester coating. Corrosion can only occur if the installation technology is incorrect or the sheets are damaged during transportation.
Common fastening errors
Attaching corrugated sheeting to the roof is a complex and painstaking job, but knowing the main mistakes during installation will allow you to easily cope with the task.
Below is a list of the most popular fastening errors:
- the drill is not the right size: if you use a drill that is too large, the structure will be leaky and unstable in use, but if the drill is much thinner than necessary, the fasteners will break (a mismatched drill can lead to the threads of the self-tapping screws breaking off);
- weak fastening of the self-tapping screw: the tightness of the rubber gasket to the corrugated sheeting will be broken, which will cause water to get under the roof;
- strong fixation of the screw: excessive tightening of the fastener will cause overstressing of the rubber layer of the screwed element and make the product unusable (high pressure on the gasket of the screw contributes to the appearance of cracks, as a result of which the waterproofness of the structure will be reduced to zero);
- the metal profile came loose on one side due to the use of nails and screws that were not intended for fastening the corrugated sheet (the only solution is to replace the damaged corrugated sheet and fasteners).
To avoid overtightening the washer or breaking the drill, experts advise using a screwdriver with adjustable torque. The permissible screwdriver speed for proper installation of corrugated sheets on the roof should not exceed 1800 revolutions. This speed will allow you to control the angle of entry of the fastener into the roof.
Self-tapping screw caps for metal profiles are very sensitive to overtightening when tightened.
If the fastener was screwed in the wrong place or did not fit into the sheathing, then this problem can be solved by closing the hole from the element with a small amount of sealant or a regular rivet.
We arrange the connection between the roof and the wall
It is impossible to create a house from a metal profile with your own hands without using step-by-step instructions. To connect the end of the roof to the wall, it is recommended to use a ridge seal. It is laid between the joint strip and the upper edge of the corrugated sheet on the roof.
If you use a side connection of a flat roof to a wall, then you will need a longitudinal seal. This is necessary to ensure that the cracks do not become clogged with snow in cold weather. When installing a steep roof, this measure will not be needed.
So, our article has come to an end. We told you about the process of installing a corrugated roof. This is not a difficult procedure at all, provided that you follow all the necessary instructions. We recommend that you additionally refer to photo and video materials. They will help you see live the entire process of installing roofing materials. Well, if you want to achieve an ideal result, then turn to professionals. They can easily do all the necessary work for you.
What is prohibited to do
Due to the fragility of the covering material, sheets for roof installation should not be fed slack. This process should be organized using installed boards.
It is not recommended to transport corrugated sheets on vehicles whose body or trailer length is significantly less than the length of the metal profile. Sagging of the corrugated sheet, even when packaged, can lead to its deformation.
It is forbidden to walk on the laid sheets in heavy shoes, or step on them in places where there are no sheathing boards.
Metal profiles are a very fragile material; heavy products and construction tools cannot be placed on them. If scratches occur, you must use the specialized paint that comes with the material. It will hide these defects.
Features of the material
At first glance, all types of metal profiles are the same and differ only in color. However, when purchasing roofing material, several parameters should be taken into account. Of great importance is the slope of the slopes, which determines the pitch of the sheathing and the brand of sheets.
The profile flooring is mounted on slopes with an inclination angle of 12 degrees. It is permissible to lay corrugated sheets on flatter roofs; in this case, you will have to strengthen the rafter structures, sheathing and additionally seal the joints of the sheets.
How to organize roof ventilation
A metal sheet is the boundary between warm and cold air, where condensation occurs when the temperature changes. To prevent moisture from accumulating in the under-roof space, it is necessary to arrange effective ventilation. For this purpose, a gap of at least 40-50 mm is provided between the surface of the roofing material and the waterproofing.
For proper operation of ventilation, supply and exhaust openings must be organized. These are cornice and ridge vents, which can be slot-shaped or point-shaped. Their function is to ensure free circulation of air due to draft. Slots 25-50 mm wide are arranged in the ridge or between the roof and the wall. For point vents, small holes measuring 10-25 mm are made.
To prevent moisture from getting inside through the vents, they are covered with aerators on top. They are a pipe with a visor or an overlay for a ridge strip. Made from metal profiles with polymer coating.
Preparation and important information
The calculations are completed, the material has been calculated, now it is necessary to prepare the roof for laying corrugated sheets.
Any roof, regardless of covering, is a complex structure. Each individual roofing device made of corrugated sheets performs its intended functions, ensuring reliability in operation.
Laying corrugated sheeting on the roof is the final part. Before this, it is necessary to prepare the rafter system, “layer cake” (vapor barrier, waterproofing, thermal insulation, sound insulation) and ventilation.
To install corrugated sheets, you need to purchase a special tool.
Tools for work
During installation, you can get by with a small number of special power tools designed specifically for working with corrugated sheets - cutting (cutting).
It is not advisable to cut sheets with a grinder or a similar machine, since the disk becomes very hot during operation and burns the protective coating. Later, corrosion forms at the cut site, rapidly progressing throughout the entire sheet.
Electrical tools you should have:
- electric nibblers;
- drill or screwdriver.
Various drill attachments:
- for cutting metal;
- for screwing screws (“magnetic bit”).
You should purchase specialized hand tools:
- corrugated pliers;
- hand scissors for metal;
- manual cutting shears for metal.
The rest of the tools (hammers, mallets, measuring devices, markers, knife, stapler, rope, etc.) that are needed when performing roofing work should be prepared at your own discretion and need.
Snowproof
Snow retention devices increase the safety of the roof, as they prevent avalanche-like sliding of snow. Snow guards are installed above doors, windows, and also at the exit points of ventilation pipes or grilles.
The snow guard is installed at a short distance from the cornice. To further strengthen the wave of corrugated sheeting in the place where the snow support is installed, the crests of the wave are additionally secured with self-tapping screws in every second wave.
We select high-quality screws
Approximately 6 screws are required per square meter. For wood, a size of 4.8 by 30-35 mm is used, and for additional elements - 4.8 by 50-60 mm. You need to tighten the screws with a screwdriver or electric drill. Why is it important to buy special products for profiled sheets:
- Provide water resistance;
- Allows for reliable fastening;
- Do not damage the protective coating.
As a rule, you can buy screws for metal profiles in the same place where you can buy sheets for roofing. Preference should be given to products made of carbon or stainless steel with a zinc coating. You need to check the sealing washers - they sometimes have defects.
Protective coatings for corrugated sheets
To increase corrosion resistance, the surface of the sheet is coated with zinc and polymer compounds. The durability of the material and its price largely depend on their type, thickness and quality.
Made of zinc or its alloy with aluminum
It is applied by dipping the workpiece into molten metal, and the layer thickness reaches 30 microns. Galvanized steel is supplied for further processing with polymer compounds or used for the construction of commercial facilities where there are no high requirements for decorativeness and durability.
Polyurethane PURAL
The most durable polymer that retains its properties for up to 70 years. To protect against fading, polyamide or acrylic is added to the composition. A thin film - only 50 microns - has high mechanical and chemical resistance, protects the corrugated sheet from aggressive environmental influences, even in areas with harsh climates.
Polyester
An inexpensive coating with a thickness of 25 microns can last up to 25 years if handled with care. Does not fade for a long time and is not afraid of temperature fluctuations. To obtain a matte surface with a metallic sheen, a Teflon additive is used. Such protection is much stronger and prevents the development of corrosion for up to 40 years.
Corrugated sheeting coated with a polymer protective coating Polyester
Plastisol
The plastisol film is quite thick - 200 microns. It is made with embossing to resemble leather, stone, or wood. It is made on the basis of PVC with the addition of modifiers. The coating is very resistant to mechanical and chemical influences, but is sensitive to ultraviolet radiation and temperature fluctuations.
Appearance of plastisol coating
PVDF
This abbreviation refers to the complex polymer polyvinylidene fluoride with an acrylic additive. The protective layer is only 27 microns thick and is resistant to scratches, UV radiation and critical temperatures. Its service life is 40 years.