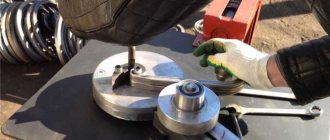
4. Stepladder with a platform - a modification of the stepladder-pedestal, which is convenient to stand on.
Making stepladders is quite accessible to home craftsmen who have at their disposal a standard set of tools and basic skills in assembling wooden structures. A portable folding ladder for the garden, cottage and private home - a self-assembled stepladder is made from readily available wood after simple preparation.
To ensure safety and durability of use, we recommend using ready-made stepladders from the DIRS plant - https://ooodirs.ru/.
Classic ones are structures where there are steps on both sides. In universal ones - only on one side. And telescopic ones are the most complex from a technical point of view, but the most convenient. They fold and transform. That is, you can already understand that the drawing for the mentioned structures will be different.
Required tools and materials
Before we start talking about the necessary tools and materials, let’s say that the list of necessary things will vary depending on which option it was decided to implement. That is, it may happen that the materials needed to create a wooden version will turn out to be completely useless if a steel ladder or stepladder is made from polypropylene elements.
Naturally, we definitely won’t need welding if we decide to make a version made of wood.
And in addition to them, we will need quad washers and nuts. You need 8 of both elements.
Before forming such a thing from wood, you should prepare specially designed chains with a length of at least half a meter, which will then turn out to be a kind of clamp. Each link should be made of 1.5-2 mm thick wire, and the length of the link itself should be no more than a centimeter. And you will also need 4 semicircular staples to secure the chain.
In the case of another design, we will need to have on hand:
- hammer;
- drill;
- tape measure for taking measurements;
- saw.
In addition, you will need wooden blocks and so on. But also when implementing the metal option you will need:
- metal profile;
- metal pipes;
- rubber pads on steps;
- loops;
- shoes;
- rubber feet;
- Bulgarian;
- welding;
- square;
- electric drill;
- marker;
- hardware fasteners;
- belts;
- tray.
In general, it all depends on what kind of project is being implemented, as well as what material it is planned to make the stepladder from.
And you can find out when you have such a thing as drawings on your hands.
- Firstly, by starting to make such a staircase with your own hands, you save on purchasing a ready-made one in the store.
- Secondly, you are unlikely to find a wooden stepladder for sale; you won’t even find a similar photo in catalogues.
What type of professional pipe to choose for the stairs and how many of them will be needed
For the stepladder, which I suggest you make with your own hands, you will need 8 m of profile pipe 60 × 40 mm, 4 of 2 m, 4.9 m of rolled profile 40 × 40 mm. It is better to use the one proposed as support posts, but 80 × 40 mm or 80 × 60 are also possible. You will also need a chain 1.4 m long, 2 pieces of 70 cm each.
The use of a square profile for racks is undesirable, but for steps - vice versa. Although the option of using profile pipes measuring 40 × 30 or even 40 × 20 for steps cannot be excluded. The latter option is suitable if the user’s weight is no more than 120 kg.
Work on the manufacture of wooden stairs
We take a plane in our hands and process all the boards. Next, we cut the racks to lengths of 2.77 and 3 meters. Those bars that are shorter are used to make steps. You will need eight of them of different lengths (0.46 m; 0.49 m; 0.52 m; 0.54 m; 0.57 m; 0.6 m; 0.63 m; 0.66 m). Plus, you need to prepare two crossbars for them, from which you can later make the stepladder stops.
We mark a groove of 2.5x3.5 centimeters for steps 0.2 meters from the top, the next ones every 0.33 meters from the previous one. We also make marks on those bars that will go to the stops, 2.5 and 83 centimeters from the top edge. Then we take a chisel and a hammer and carefully make windows in the intended parts.
On the long and short bars, we make markings for inserting tenons 6 cm long. Using a hacksaw, we make cuts across the cut, retreating from the edge 6 cm. After that, we cut along the lines until they connect with the first ones. Then we place the outer crossbars in their nests and hammer in the nails. Just don’t be zealous – let the hats peek out. We also number all the steps from the end.
We insert two fixing strips into the sockets on the stops. We cut out tenons on the steps, pull out nails from the first and last ones, and then assemble the stepladder from wood. To ensure that the tenons fit into the grooves as tightly as possible, we tap them with a mallet.
Gluing and assembly
After all these procedures, you need to disassemble the ladder and begin priming and painting. We make small holes with a diameter of 7 mm in the stop and racks. You will need special dowels, which we make from boards and round them using a plane or knife, achieving a diameter of 0.8 and a length of 7 cm. We coat them with PVA glue and insert them into the holes.
Using self-tapping screws, metal corners are attached to the top of the wooden ladder, and the iron plates are screwed onto the upper part of the stop. If you don’t have a screwdriver and have to work with a screwdriver, then first make a hole in the board with an awl. You can also use a drill with a 1mm drill bit and then easily screw in the screw.
What are the advantages of a wooden stepladder?
- Firstly, by starting to make such a staircase with your own hands, you save on purchasing a ready-made one in the store.
- Secondly, you are unlikely to find a wooden stepladder for sale; you won’t even find a similar photo in catalogues.
Today, the market has been conquered by aluminum products, which are very lightweight. But, despite the fact that the resulting structure has a lot of weight, it benefits from stability.
You can use a ladder both in your garden and in your home when wallpapering walls. And if it is treated and painted, it is unlikely to deteriorate in the next 10-15 years. By spending a maximum of one day building a stepladder, you will provide yourself with an important and necessary item in your home and household.
If you don’t have one, you can try to bend the required shape from the usual one. The purpose of this corner is to be a hook and cling to the top step of the stairs. It will be attached with a bolt to the platform. Following the principle of fastening the previous corners, we fasten the z-shaped one in the center of the platform so that when it is rotated around the bolt, it clings to the upper step.
This, firstly, will prevent the platform from turning over, and secondly, it will not allow the ladder to move apart; the wooden stepladder is ready.
Homemade stepladder: a few words about components
By making the structure yourself, it can be improved by adding individual elements. For example, metal spokes are designed to provide more reliable fixation of steps.
They are located under the step in special holes and attached with nuts and bolts. The length of these elements directly depends on the size of the tread (the width of the steps) and the degree of thickness of the stringers. However, their diameter should not be less than 8 mm. Otherwise, they will bend under the weight of the load. It is thanks to the spokes that the permissible pressure increases, which the steps of a wooden stepladder can subsequently withstand.
Nylon cords or iron chains serve to connect the supports and the main part on both sides, while simultaneously preventing them from moving apart.
Protective “shoes” for stepladder legs should be made of hard rubber.
Protecting the floor covering from scratches and preventing slipping is the main task of the so-called “shoes”. They are made of rubber, and ideally it should be hard, since soft nozzles have a short service life. In addition, the design can be supplemented with hooks for buckets and other accessories for tools. It all depends on the needs of the user.
Lightweight portable ladder
You cannot make a wooden staircase without knowing its dimensions. We took the tested ones - 150 cm height, 52 cm width of the lower part, 40 cm width of the upper part. To assemble a portable ladder with your own hands you will need:
- Bars size 6x3x150 cm, 2 pcs.
- Boards size 6x2x47, 4 pcs.
- Hand router or chisel
- Self-tapping screws 75mm, 16 pcs.
- Protractor
- Roulette
- Pencil
- Ruler
- Hacksaw for metal
- Kiyanka
Marking the space for the grooves of the steps
The beams will serve as the supporting part of our stairs and the first thing to do is to mark the grooves on them for the steps. The step size (distance between steps) is chosen to be 35 cm, and the step angle is 105 degrees.
To do this, take a tape measure and a pencil, apply the tape measure to the wide part of the block (6cm) and measure 35 centimeters from the bottom. We put a mark “A” on the edge of the block, this will be the beginning of the groove for the step. From the mark set, we measure another 2 cm and put a new mark “B”, this will be the width of the step. See Fig.1.
It is not necessary to use a protractor to mark subsequent steps. It’s enough just to measure 35 centimeters up from each of the previous points and put new 4 points, and then connect them with lines in the same way.
We do the same with the second supporting part. Or, in order to save time, after taking measurements on the first block, you can place two supports end-to-end and move the marks on one side. Afterwards, attach the second support to the other side of the first support and copy the marks from there. All that remains is to draw lines between the points.
Cutting grooves for steps
If after difficult measurements you haven’t given up and given up the idea of making a stepladder with your own hands, let’s continue. Using a hacksaw for metal, along the drawn lines on the bars, we make light cuts, thereby creating a kind of guides. Then we set the depth to 5mm on the router and make a selection along our guides. If you don’t have a hand router, you can use a chisel, remember that the groove depth should be 5mm.
We measure the first and last step
We do preliminary assembly
We lay one of the supports on a hard surface so that the grooves for the steps are on top. We take the first step, insert it into the first groove and hammer it in with a mallet until it stops, then do the same with the last step, but hammer it into the last groove.
At the place where the step will be inserted into the groove, you can remove the edge with a chisel, this will make it easier to install the steps.
We take the second support and place it on top of the protruding steps, observing the grooves. All that remains is to nail the support beam with a mallet to secure the structure. To prevent the steps from moving out, we secure them to the outside of the supports with self-tapping screws. 4 screws for each step, 2 on one side and two on the other. Part of our staircase is ready, all that remains is to measure and install the second and third steps.
We measure out the remaining steps
Final assembly
To complete the structure, all that remains is to mount the remaining 2 steps. To do this, we place our structure on a hard surface with the front side facing us. We install the steps into the grooves and carefully hammer them in with a mallet. We also secure it on the sides with self-tapping screws. Our portable wooden ladder is ready.
If the steps become loose during operation or you simply want to strengthen the structure, you can install corners under the steps on both sides and place them on 4 self-tapping screws, 2 in the step and 2 in the supporting structure.
Application of portable ladder
Most often, a wooden staircase is used in a country house or country house. For example, a stepladder for wells will help carry out repair work in hard-to-reach places. But garden ladders of this subspecies are used for pruning trees.
The whole process takes place in several stages:
Stages of work and their features
DIY folding chairs made of wood: drawings and job description
Scheme of a wooden stepladder.
Before you start making a stepladder, you should sketch out a rough sketch for its manufacture. You need to put all the dimensions on it at once. Only a highly qualified master can afford to work without a sketch. You should not think that a stepladder with your own hands is an object that requires a superficial attitude. Firstly, the safety of those working at height depends on it, and secondly, it is very convenient when you don’t need to constantly measure workpieces, you just need to look at the sketch.
Next, the wood is cut. You will need 4 pieces, each 175 cm long. Basically, the length is determined by the height of the work being done: if a stepladder is needed in the garden, then you should proceed from the size of the trees, but you can’t climb it too high either, other means will be needed. To work on the roof, a type of ladder called a ridge stepladder is used. It is distinguished by the fact that the second half of the folding bed is thrown over the roof, and bars are nailed to the tops for stability.
Then the stair blanks are cut with a grinder. It is better to use a metal profile for this rather than round elements, again for the safety of the worker. A foot on a flat profile will be much more stable than on a narrow cylinder. The blanks should be in the same quantity for both sides of the stepladder - factory ones are made only on one side, but this model will have two working ladders. This is convenient if the work requires two people or hard-to-reach places need immediate access.
Drawing of a stepladder with dimensions.
The length of such elements depends on the distance between the long side bars. The upper ends should be 40 cm apart from each other, and the lower ends should be 60 cm apart. You should get two pieces 57, 52, 47, 42, and 37 cm long. That is, the distance between the steps is approximately 27 cm.
Then holes are drilled in the long elements according to the diameter of the steps if the elements are round, and metal corners are attached for flat ones. The drilling depth should not be less than 2 cm. In the same way, holes for the knitting needles are made slightly lower. Then the structure is assembled without the use of bolts in order to see all the flaws and correct them immediately. All elements are processed, because the material may be damaged by mold or mildew.
Assembling stairs. To do this, epoxy glue is poured into the recesses, and round steps are driven in with a wooden hammer. Then, using fasteners, the spokes are mounted, which are tightened with nuts on both sides. The profile steps are secured with a wrench. After assembly, the glue takes time, so the blanks are put aside for a day. If the installation went without it, then it’s time to start working on the plates.
One part of the elements is attached to the tree, and then the metal ears of the structure are fastened together so that it can freely fold or open. Plates from the mechanism of an old sofa are perfect for this task.
Types of stepladders.
Next, you need to take care of your own safety - the metal chain is cut into two parts with scissors and screwed at the ends to opposite elements. It will prevent the stepladder from unfolding completely if the legs begin to slide along the surface. Naturally, this is done at the bottom of the stairs. The owner will decide at what distance, but usually this is the length of the entire chain, that is, when unfolded, the legs form a regular square with a side of 60 cm. It is advisable to “put shoes on” the legs, otherwise there is a risk that the ladder will slip on a particularly slippery or wet surface. Installation is complete.
For storage, you can soak it with used machine oil so that the ladder intended for garden work can stand all winter untouched by mold or mildew.
DIY wooden stepladder
Before you begin manufacturing parts and installation, you need to select a staircase model and prepare a drawing.
We offer you a standard option for manufacturing such a staircase.
The whole process takes place in several stages:
When you have bought everything you need to make a stepladder with your own hands and prepared the drawings, you can proceed directly to the production process. To make the simplest wooden stepladder you will need a saw (hacksaw), nails, a tape measure, a carpenter's corner, a hammer and hinges (hinges for stairs).
Typical drawings of various stepladders
The examples discussed above and the recommendations outlined will allow you to independently calculate the dimensions of a stepladder and understand the technology of its production according to any scheme.
Material of manufacture
When buying blanks for a stepladder, pay attention to the quality of the wood - it is advisable that there are no knots, cracks, dark spots (rotting processes), and also ask the seller about such a parameter as wood moisture content. Humidity is considered normal: 8-12%. Without a special device, it is difficult to determine humidity accurately enough, but visually you can filter out excessively wet or overdried wood.
Materials and products
Drawings and dimensions of parts
Before constructing a step-stool with your own hands, you need to study in detail the drawings and dimensions of the future craft. There are several types of this design:
- transformable chair;
- high step stool;
- ladder chair;
- step stool with a spiral module.
The first model is a transforming chair. When it is folded, it cannot be distinguished from a simple chair with a backrest. To make a stepladder, you just need to lay out the elements of the product. If this chair is well designed, it will look beautiful in different interior designs. If the stepladder has an unfolded or folding appearance, then it will consist of three steps.
The second model is a high step stool. In its design, it has a high chair and a retractable module, which, if possible, can be pushed under the seat of the stool. A variation of the step stool is the ladder chair. It comes with or without a back.
There is another type of step stool - a stool that has standard dimensions. From under the seat of this stool, steps can be pulled out in a spiral. This chair has many functions; it is unusual in its appearance both when unfolded and when folded. If you need to make a transforming chair, you must first develop a diagram. It is possible to use prepared drawings with dimensions or to make drawings yourself, having examples of constructing a suitable model.
If you rely on the standards, then the seat should be located no less than 41 centimeters from the floor. The base of the stepladder chair should be at least 41 centimeters deep. Now you need to decide on the height of the structure. You can use the standard characteristics or add 11-16 centimeters on top. To make the product more stable, you can use a wide base.
All drawings of a step-chair indicate the dimensions of the following parts:
- front and rear sides;
- strips for the back of a chair, seat, steps, etc.;
- supports that fold either sequentially or smoothly.
The future design must have at least 3 steps. The dimensions of the legs should guarantee the quality of the product in various positions. The shape of the supports is similar to the letter “A”, since the planks should be located in an inclined position and connected by a crossbar. In order for the structure to be stable, you need to know that the angle of inclination of the frame and legs is 80 degrees. The steps should have a distance between each other of no more than 21 centimeters so that the stepladder chair can be used comfortably. The design has a seat that should be divided into 2 parts, the division is based on the placement of the central supports.
Once the dimensions of the model and methods of fastening the parts have been determined, the diagram must be transferred to a piece of paper with millimeter markings. It is necessary to carefully draw all parts of the product and follow the order of installation of the parts. Having all the relevant sketches, you need to prepare a pattern for the blanks. Using carbon paper, you can transfer the image of the future structure onto a piece of plywood or wood.
General principles for making wooden stepladders
A wooden stepladder is a simple and convenient design that includes a ladder and a support leg. The dimensions of the structure are selected based on the assigned tasks, common sense and ease of use.
When posing the question of how to make a stepladder from wood yourself, the options for fastening the steps are of great importance.
- The racks, otherwise called stringers or bowstrings, are laid on the ribs, after which the crossbars are attached to them using nails or self-tapping screws. The result is a dilapidated structure that holds a moderately well-fed teenager.
- Grooves are cut into the bowstrings, the structure is connected with the same parts - the stepladder becomes stronger due to the redistribution of loads. Such a stepladder can support a 100-kilogram child.
- Through grooves are cut into the stringer racks, a rigid structure is assembled - a tightly built specialist with a heavy suitcase filled with tools can work on it.
Advice! When making a stepladder, you need to take into account the type of wood, because solid or glued beams of alder, oak or ash prepared for further use manifest themselves differently over time and in different weather conditions.
If you did everything correctly, then as a result of this work you will have half a stepladder that looks something like this:
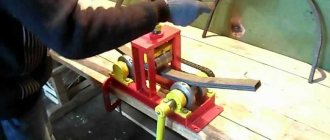
How to assemble a garden stepladder
When the supports for the steps are ready, they are laid parallel to each other and markings are made for future crossbars. It is worth using a square at this stage to maintain an angle of 90 degrees. Steps are cut from the same profile or corner. When the crossbars are ready, first the lower and upper parts are fixed by spot welding, and then all other elements. If all components are correctly connected and there is no need for correction, welding seams can be made. If the support section is planned without steps, two horizontally located crossbars are welded, and an additional one diagonally. This is necessary to secure the supports relative to each other. All that remains is to fix the limiting cable in the middle of the flight and weld a fragment of a profile or corner to the ends of the supports in the lower part. At the end, the garden structure is primed, then a layer of paint is applied.
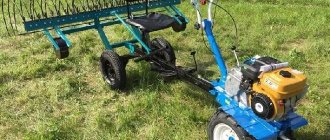
An electrician made a reliable assistant with his own hands - watch the video
Like, a steel structure is quite easy to assemble. Leave a comment and share your own ideas on how to make a simple stepladder with your own hands.
103583
Self-assembly of a stepladder made of wood
First, let's prepare the main details of the future stepladder. First of all, these are the main posts, as shown in this picture.
Screw the screws in as tightly as possible so that the structure gains sufficient strength.
If you did everything correctly, then as a result of this work you will have half a stepladder that looks something like this:
Assembling the second half of the stepladder will be even easier. These are two long bars connected to each other by a set of slats. You don't have to step on the slats - they should just connect the bars. So they don't have to be fat. A thickness of several tens of millimeters is sufficient, as can be seen in the following figure. For greater aesthetics, you can make longitudinal grooves in the bars, or find ready-made parts of this shape.
Now all that remains is to connect the two halves of the stepladder into a single whole. But you shouldn’t relax - this is a very responsible and important moment.
We take a suitable hinge and install it at the junction of the two halves. Now you need to use the longest screws you have on hand. The hinge will bear a fairly large load, so it is necessary to ensure its strongest possible connection with the bars.
In addition, after installing the hinge, you need to select a small but strong enough board to install on the first half of the stepladder - you will place the tool on it and lean on it while working.
Now you have a full-fledged stepladder that will be really convenient to work with - in the garden, in the garage or at home during renovations.
Next comes the manufacture of the crossbars, that is, you need to cut the boards for the steps. Their number is calculated based on the total length of the staircase and the optimal distance between the elements. The standard is considered to be a step of 35 cm. The length of the lower step must be at least 65 cm, and the upper step - 35 cm.
Design Features
The peculiarity of this version of the stool is that it combines two objects at once: a regular piece of furniture for sitting and a small stepladder. Of course, this is a huge advantage of this product. It is especially useful around the house when you need to reach the top shelves in closets or wipe the top of furniture, replace a light bulb or hang curtains.
The stool can be easily transformed into the desired configuration
What is the essence of such a stool? The fact is that steps are attached to its legs, so an ordinary stool turns into a miniature and fairly compact staircase. Such a chair can be:
- stationary;
- foldable;
- transformer.
The first option is a high stool with inclined legs and additional transverse slats, each of which is a step. The folding version is more convenient to use, since if necessary, you can take it out and unfold it, and then fold it and put it in the pantry so that it does not take up space. The transformer is a chair that, with one movement, turns into a full-fledged household stepladder with support on the back.
Wooden staircase
The most affordable and easy-to-work option is to make a wooden stepladder with your own hands. First you need to make drawings. To do this, you need to determine the configuration of the future product and its main parameters.
An example diagram of a simple version of a wooden stepladder
For standard stepladders, beams are used for strings and boards for arranging stable steps. First, determine the height of the structure, taking into account its change in the unfolded state. Cut the wooden beams to the appropriate length. The lower ends of the bowstring are cut at an angle of approximately 80 degrees so that the ladder is sufficiently stable.
Next comes the manufacture of the crossbars, that is, you need to cut the boards for the steps. Their number is calculated based on the total length of the staircase and the optimal distance between the elements. The standard is considered to be a step of 35 cm. The length of the lower step must be at least 65 cm, and the upper step - 35 cm.
Please note that a stepladder, regardless of whether it is a transformer or not, has a narrowing distance in width from bottom to top, so the dimensions of the steps will need to be adjusted as the stairs are assembled.
How to make a platform for a wooden stepladder? If you want to make a convenient transformer, use the same boards as for the steps to make a stable platform out of them.
To assemble a wooden staircase, metal bolts, spacer axles and hinge elements are used. First of all, you need to connect the strings to the steps. To do this, nails or screws are driven into the ends, and the joints are additionally treated with glue. The rungs should be perpendicular to the floor, taking into account the unfolded position of the stepladder. If it is a transformer, additional support for the platform is provided.
Assembling a wooden staircase is done using metal bolts
Hinges are attached to move the halves. They are connected on the side by a travel stop, and the strings are tightened with metal rods in at least three places: above, below and in the middle behind the steps. The second half can be made in the same way or you can use boards nailed across and diagonally to tie it together.
- Saw off 4 strings from the timber. They must be the same size, since the steps will be attached to them.
- Holes for steps are made in the beams. It is also necessary to round off the upper ends of the beams, and put “shoes” on the lower ones.
- Next, the steps are cut and installed. They are secured with bolts and reinforced with spokes.
- Next, using hinges and brackets, the parts of the stepladder are assembled together.
Transformable ladder chair: instructions for self-construction
When designing a transformable step stool with your own hands, drawings are the first thing you need to arm yourself with. Not only the final appearance of the product, but also its most important characteristics: convenience, strength and stability depend on how correct the calculations are.
Since such a chair serves primarily as a piece of furniture, it should become a successful addition to the interior. In addition, such a stool serves as a miniature staircase structure. It will help you easily reach shelves located at height, and will also become a very valuable assistant in the process of replacing light bulbs in a chandelier.
This is interesting! What distinguishes a wooden transforming chair from a stepladder is that in order to use the steps you will need to turn the product over, or rather, install one half of it on the opposite one.
The transformable ladder chair is not only a functional product, but also an interesting interior detail.
You can design such a chair with at least minimal woodworking skills. This is due to the fact that some of its elements are processed using a milling machine or drill with specific attachments. In this case, it is much more important to calculate the necessary indicators so that after assembly everything fits down to the millimeter.
A transformable wooden step stool planned for making with your own hands can be characterized by an arbitrary configuration. However, it is necessary to calculate the following indicators:
Related article:
Telescopic stepladder: the best solution for comfortable and safe work
Areas of application. Product advantages. Types of structures. Features of telescopic stairs. Rating of transformable products.
- length of support legs;
- back height;
- number of steps;
- dimensions of steps;
- seat size.
When forming a drawing of a stepladder chair, it should be taken into account that the degree of height of the product during its operation depends on the length of the support legs. Additionally, longer legs can be installed, which are placed at an angle to increase the stability of the structure.
Drawing up a detailed drawing is the first stage in the manufacture of a product
As for the backrest, it should be positioned in such a way that in the position when the product turns into a stepladder, it is on the floor level with the base support, at right angles to the surface.
The seat is divided into several parts to allow the structure to be folded. In this case, the best option for connecting the halves of the seat are piano hinges. The number of steps depends on the final height of the product. Often there are no more than 5 pieces.
In order not to worry about the fact that the chair legs may simply come out of the grooves, unable to withstand the load, it is recommended to additionally use metal rods equipped with nuts, tightening the parts on the sides.
Do-it-yourself step stool: step-by-step instructions
First of all, to complete the work you need to stock up on certain materials. The list includes the following titles:
An important step in the manufacture of a stepladder is marking the parts
- boards or plywood 2 cm thick;
- paint and varnish compositions;
- jigsaw equipped with an electric drive;
- drill;
- screwdriver;
- mallet;
- PVA glue;
- sandpaper;
- brush;
- self-tapping screws;
- loops;
- wood dowels.
First of all, using pre-prepared paper patterns, you should cut out blanks from boards or plywood in which you will make holes for dowels or cut out grooves, notches and tenons.
Important! The surface must be sanded and impregnated with compounds that have a moisture-proof function.
Then you need to apply glue to the wood dowels, and then use a mallet to hammer them into the prepared holes on the seat, back and steps. If you want to add strength to the structure, it is better to use self-tapping screws. It is necessary to install loops in the pre-created recesses and secure them. The next step is to re-sand the surfaces of the stepladder, especially in the secondary finishing areas. After this, you have to apply stain and varnish or drying oil and paint.
Details of the finished structure should not interfere with each other during transformation
When making a ladder stool with your own hands, you should take into account that the elements of the product should not interfere with each other during movement. The two steps at the bottom, which resemble a compact chair, rotate using pins. During folding, they are placed inside the product. In this case, you can consider additional fasteners. The best solution would be a lock, which serves to secure the structure when unfolded.
The compactness of the product requires careful attention to both the manufacture of elements and the assembly itself. The drawings include information on dimensions, compliance with which is mandatory. Otherwise, the process of unfolding and folding the structure may become difficult or even impossible.
Although ladders, like any other folding structures, do not cause trouble during storage, they still require a certain amount of space. Chairs that can serve as a ladder are so compact that they do not require additional space at all. The request “how to design a transformable step-stool with your own hands” comes up quite often, which confirms the enormous popularity of such products.
How to make a stepladder from wood with your own hands
A wooden stepladder is quite simple to make. We will give you a general description of the assembly of the simplest stepladder, according to which you can make a structure according to your plan.
How to assemble a stepladder:
- Saw off 4 strings from the timber. They must be the same size, since the steps will be attached to them.
- Holes for steps are made in the beams. It is also necessary to round off the upper ends of the beams, and put “shoes” on the lower ones.
- Next, the steps are cut and installed. They are secured with bolts and reinforced with spokes.
- Next, using hinges and brackets, the parts of the stepladder are assembled together.
When the stepladder is ready, you can also attach the restraining chain. This element will prevent the legs from spreading too wide.
Types of stairs made of profile pipes
Stairs can be stationary; they are installed outdoors or indoors. Portable ones, which can be folding or attached, are easier to make with your own hands. A stepladder is a mobile structure often used on the farm. A good material for it is a profile pipe, from which you can make a ladder with your own hands. The design diversity is great.
Marching
This is a staircase that contains one or more parts called flights. It can be straight or rotary. A straight march is a step that is wider than the main ones. The turning one is wider on one side and narrower on the other, which forms the turn of the staircase.
Screw
The steps in a spiral staircase are arranged in an ascending direction around an axis - a pipe or column. In rare cases, the ends of the steps form an empty cylindrical space, from which the staircase is protected by railings. The rest have railings only on the side opposite the axis. The helical design occupies a minimal footprint, providing greater lift steepness.
Ladder
These are portable ladders, usually collapsible, designed for temporary use at a specific location. Stepladders are used very widely; they are easy to make with your own hands.
Types of children's high chairs
What chairs are available for children? Modern manufacturers offer a wide range of chairs for children of all ages.
They may differ in purpose, design, material and other criteria.
Many models can be produced independently of each other.
The most common and practical types of high chairs are the following:
- A simple high chair is a regular high chair with a backrest, as described in this article.
- The reclining chair is a versatile chair with rich functionality. It should be possible to change the angle of the backrest, adjust the steps, attach the tabletop, etc.
- Rocking chair - the name of the chair speaks for itself. All children, without exception, love to swing on such a chair. Modern models offer the possibility of using the rocking chair as a rocking chair.
- The Transformer is a set of chairs and tables that can be set up and used in a variety of ways. When assembled, the transformer serves as a comfortable high chair; when disassembled, it serves as a simple high chair and table, standing separately.
Some models have adjustable leg height and backrest position, and the high chair “grows” with the child.
If you have little experience in carpentry, it is better to limit yourself to making a regular high chair without additional functions. The main thing is to understand the basics and operating principle, and in the future you will be able to create more complex models of chairs.
When making a chair, it is recommended to use environmentally friendly materials with high strength. In most cases, the following materials are used:
- Natural wood;
- Plywood;
- Chipboard.
The production of children's furniture (chairs, beds, tables, etc.) from plastic pipes is very common. After assembly and decoration, you get very attractive and unusual designs, but their reliability and durability are very questionable.
It is recommended to choose wood, plywood or wood. Chipboard Since these materials are absolutely safe for children, they have a long service life and other positive characteristics. With the help of this article you can make a high chair out of wood.
The following structural elements must be prepared for the construction of the chair in accordance with this drawing:
- 1 - top rod (1.9 x 4.1 x 16.5 cm);
- 2 — two rear legs (3 x 3 x 55 cm);
- 3 - carved beam (1.4 x 4.1 x 16.5 cm);
- 4, 6 — stripes in the middle and bottom (1.4 x 2.9 x 16.5 cm);
- 5 - Double-sided seat (1.4 x 10.5 x 26.3 cm);
- 7 - two kings and two slats on the sides (1.4 x 2.9 x 17.7 cm);
- 8 - two front legs (3 x 3 x 30.5 cm);
- 9 - two handles and two front stripes (1.4 x 2.9 x 19.5 cm).
For the feet, it is recommended to use pine stones with a cross-section of 3 x 3 cm.
The legs of the chair should gradually be as follows: The back legs should be up to 1.9 cm from the center of the chair, and the front legs should be up to 2.4 cm from the center of the chair.
Tip: To make assembling the bands and kings as easy as possible, only reduce the outer edges of the pieces. This ensures that the inner edges are parallel to each other.
High step stool
To obtain a high chair, separate chairs and steps are required.
The design of the chair consists of the following elements:
- 4 large legs (1.9 x 10 x 72.5 cm);
- 2 cross beams for the lower part (1.9 x 10 x 42 cm);
- 2 cross beams for the top (1.9 x 3.8 x 18 cm);
- Kings: 2 top (1.9 x 12.5 x 34.5 cm), bottom (1.9 x 10.5 x 34.5 cm);
- 2 plywood side covers (30.5 x 17 x 25 cm);
- Top step (1.9 x 27 x 44.5 cm).
To perform operations, prepare workpieces with these parameters:
- 4 medium legs (1.9 x 10 x 47 cm);
- 2 cross beams (1.9 x 10 x 40 cm);
- 2 small legs (1.9 x 10 x 21.5 cm);
- 3 front pins (1.9 x 9 x 22 cm);
- 1 rear Zarga (1.9 x 10.5 x 30 cm);
- 2 steps (1.9 x 18 x 29.8 cm)
Working steps:
- For a high chair, all parts must be properly sawed and prepared; each part must be sanded to perfect smoothness.
- To maintain the stability of the chair, your legs should be parallel to each other at an angle of 10 degrees to each other. Make sure the ends of the crossbars and the plywood sheathing are separated.
- If wrenches are chosen as fastenings for the central legs, make grooves for them (scales are inserted into the holes).
- The ends of the stems should be cut at an angle of 80°.
- When cutting the bottom step, make two 3.8 x 3.8 cm cuts so that it will line up properly with the smallest legs.
- The large legs and top bars are connected with screws, as are the royal gas and the top step.
- The middle legs are mounted using weights, the rods are fixed. All these parts are attached together with the rear and front bolts.
- Using screws, connect the small legs and crossbars, attach the front Zarga, steps.
- Place the stool and steps so that they are ready, unscrew the guide. If there are no errors during installation, dismantle the structure in the reverse order and connect all the parts with glue. Collet clamps are used to hold workpieces.
Additional amenities
Assembly diagram for a wooden stepladder.
To make working with a stepladder convenient, you can make additional structural parts of the wooden stairs. For example, several hooks nailed to the ends of long elements will allow you not to hold the bucket in your hands, but to hang it nearby, thereby freeing yourself from heaviness and increasing the speed of work.
Next, you can make a wide step at the top to place this bucket or stand with both feet, reaching especially high places. Then a handle should be attached to the stepladder for greater safety.
Building a classic version of a step stool
In order to make a transformable stepladder chair with your own hands exactly according to the drawings, you will need a minimum set of power tools:
- Jigsaw with a set of saws for wood;
- Manual electric router with 25 mm and 30 mm end mills;
- Drilling machine or drill with a device for precise vertical drilling;
- Polishing machine with wood attachment;
- Screwdriver;
- Set of carpentry clamps.
Since this design, in addition to the functions of a staircase, will also be used as a piece of furniture, it is best to choose a design with elements of carving and decor.
For the most part, a step stool will be used as a piece of furniture, so it makes sense to make it as beautiful and attractive as possible. In this case, decorative elements are practically not used; windows are made on the sidewalls in order to make the structure lighter and give it a more elegant look.
Structurally, each part of the step-chair consists of two sidewalls, between which four transverse steps are glued. One of the steps serves as a seat, the rest are used only for climbing stairs.
Initially, you will need to transfer the contours of the side posts of the stepladder chair to the boards. This can be done in two ways. In the first case, the contours are transferred by drawing lines using carbon paper. The second method allows you to do the work much faster - you can simply print out the outlines of the parts of the future step-chair and stick the paper on a wooden blank.
At the first stage, you need to make longitudinal grooves or cuts on each side of the large and small parts of the step stool, as in the photo. The grooves must be made for two reasons: firstly, they will be necessary for further processing of the workpieces. Secondly, the step boards will be inserted into the grooves. If you fasten the steps only with self-tapping screws, the rigidity of the step-chair will be very small, and the entire structure will quickly fall apart under the weight of a person.
Next, you need to make several through holes with a drill and cutter, preferably at the corner points of the internal contours. This must be done in order to be able to cut out selections along the openwork thread with a jigsaw.
Following the inner contours, we cut out the outer lines of the sidewalls in the same way. After all four sidewalls have been cut out, two for the larger part of the stepladder chair and two blanks for the smaller one, you will need to calibrate the dimensions, as in the video
https://youtube.com/watch?v=oQq1OMXHA1Q
To do this, two side blanks are folded in pairs and cut on a router. This allows you to make both elements of the step-chair absolutely identical in shape and size. At the same time, we remove chamfers and burrs, and treat the surface with a grinding and polishing attachment.
The steps for a stepladder chair are best made from oak boards, 15-20 mm thick. For the large swivel part of the chair, you will need to make three steps, all three of different sizes. For the smaller stationary part, you will need to cut two steps, also of different sizes. The step blanks, cut to size, are carefully glued to the sidewalls. To do this, you need to coat the gluing areas with wood glue or epoxy glue and insert the blanks into the grooves. To maintain the geometry of the step-chair, gluing is best done with fixation in carpentry clamps.
After the glue has dried, the steps of the step stool must be reinforced with carpentry screws. At this stage we have two small structures, one looks like a short chair, the second looks like a stool. To make a full-fledged folding stepladder out of them, you need to connect the two parts with a furniture or piano hinge.
Attention! To ensure that during use the vertical load on the step-chair does not deform or tear off the hinge fastening, special stop pins are used in the design.
The last element of the chair is the back. It must be made and a stepladder installed on the chair without fail. Otherwise, the front supports of the ladder will be unstable and will quickly fail.
The step-chair is almost ready for use; you need to finish the exterior with stain or varnish.
The result is a nice design that can not be hidden, but rather installed in the kitchen or hallway, where there is always work for such devices.