Making a scoop with your own hands
Manufacturing stages:
- Take a steel rectangle measuring approximately 300x50 mm.
- Cut corners at approximately 45 degrees. Where the working part will be, the cut should be somewhat deeper.
- Having retreated about 10 mm from the pointed end, drill a hole with a diameter of 3 mm, after 25 mm - another one.
- At a distance of 150 mm from the end of the plate, a mark is made and the plate is bent at a right angle.
- Cut a steel circle about 400 mm long or any other convenient one. An M10 type thread is applied to one end to a depth of 10-15 mm, and two holes with a diameter of 3 mm are drilled at the other end: one at a distance of 12.5 mm from the edge, the second after another 25 mm.
- The metal plate is fixed with rivets on the circle.
- The handle is turned hollow, and a thread is applied inside to a depth of 10-15 mm. The handle is then screwed onto the threads on the circle.
Making a scoop
- The base for the bucket is made from a steel sheet measuring 22x28 cm.
- An indent of 50 and 100 mm is made from the short side, then parallel lines are drawn through the marks made.
- On the line closest to the edge, 3 cm from the other edge, two more marks are made. The next two are placed on the edge of the sheet opposite them, and the marks are connected.
- An angle is cut along the two intersecting lines.
- Steps 1-4 are repeated on the other side.
- On an anvil or other sufficiently hard and stable surface, using planks, the rear part of the future bucket is bent.
- The protrusions on the sides are bent in the same way.
- A square rod is heated in a flame until red hot, then allowed to cool slowly.
- One of the ends of the rod is firmly clamped in a vice, and a tube slightly shorter than the rod itself is put on it.
- A collar is put on the unclamped end, and several revolutions are made around the axis.
- The ends are sharpened to form cones 6-8 cm long on one and 15-20 cm long on the other.
- The long cone is bent parallel to the main handle.
- The other end is flattened on the anvil.
- Holes are drilled in the flattened end and it is bent at the desired angle.
- It is connected to the bucket using rivets.
How to do
There is nothing easier than making a grill poker yourself, especially since there are currently no problems with the material for manufacturing. There are several options for using material for making barbecue fixtures:
- fittings,
- rod,
- metal plates.
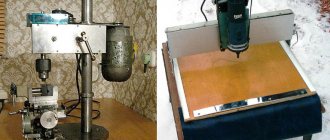
There are two manufacturing methods:
- forged in a forge;
- made by electric welding.
A novice blacksmith will be able to forge a poker for a barbecue, and at the same time he will have the opportunity to practice before performing more complex work in the forge. Equipment you will need is a blacksmith's forge, a small anvil and a hammer.
What is a grill poker made from? Most often this can be a metal rod with a diameter of 8-12 mm. The rod is heated in a forge, the tip of the workpiece is flattened on an anvil with a hammer, then bent to the desired shape. If it is not possible to do this in a forge, then you can freely heat the metal in a fire until red-hot and also bend it with a hammer to the required result.
Making a poker using welding is not at all difficult; for this you need:
- take a metal square with a diameter of also 8-12 mm;
- bend and weld the handle to the desired shape;
- beat with a hammer on an anvil and cool in water;
- then clamp it in a vice and rotate it several times.
That's what came out of it:
Using one of the methods described above, you can make the simplest poker for a fireplace using ordinary fittings with a diameter of 10 mm. If you have the simplest tools, this will be very easy to do. For almost any man who is familiar with metal, it will not be difficult to make a poker with your own hands
All barbecue accessories that you make with your own hands will delight you and your loved ones for many years, thanks to the fact that a lot of positive energy and emotions are invested in them.
Eh... How many of them my father remade in his time! For every taste and for any purpose. Both for raking out ash and for grain and flour. I remember he did it without welding and without a drill and without bolts. Hands grew from that place...
I would like to offer several of the most popular options.
Option for a scoop for removing ash. Any metal with a thickness of about 2 mm is taken as the starting material. It can be galvanized or simple wire rod and aluminum. What is at hand in one word. The picture shows approximate calculations. Typically the size of the scoop should fit in the furnace vent.
We cut the metal according to the template, bend it and secure it with rivets. The handle is made from the same material. We bend it for greater stability, as shown in the figure, and at the place of attachment to the scoop, we rivet it a little - to capture most of the scoop. We attach either with rivets or bolts.
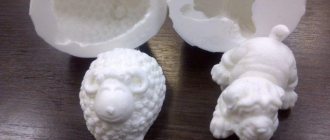
Option two is a grain scoop.
Typically, scoops for grain, flour and other bulk products are made in this form. That is, rounded. It's easier to make them.
But again, metal is needed. Although nowadays it can be replaced with plastic, in those days it was not.
So, use a jigsaw to cut out a semicircle from the board. As a handle, you can choose either wood or any other material, such as a PVC pipe of a suitable size. We attach the handle to the base, and cut out the scoop itself from metal, which we nail or take with screws to a semicircle from the board. That's it - the scoop is ready.
Well, another option is modern.
It can be used everywhere, except at elevated temperatures and various chemicals. And you can make it from plastic canisters with a similar configuration.
Using a Poker and Scoop
- A poker shorter than 40 cm is inconvenient, as there is a risk of burns from the heat of the flame or coals.
- A poker longer than 75 cm is inconvenient for stirring firewood or coals.
- The poker should be light enough not to tire your hand and fit comfortably in your hand.
- The scoop is used to remove ash, wood chips or shavings from the grill.
- The handle of the scoop should be at such an angle that it is convenient to use.
- After use, the poker and scoop need to be hung on a special mount - it is usually located at the bottom of the barbecue.
- The end of the poker beak is better pointed - this will make it more convenient to chop charred logs.
- It is better if the poker has an additional spur - this will create additional convenience when pulling out extra logs or coals from the fire.
- If there are too large fragments among the coals or logs in the fire, then it is better to break them with a poker - this way they will smolder evenly, which will get rid of uncooked pieces of meat due to uneven heat.
- A poker will also come in handy if the pieces of coal are lying unevenly. This creates a temperature difference, and the meat lying closer to the top of the mound will be fried more deeply, but what is further away will not be fried.
Check out the video on the topic
Criterias of choice
- Material. Bronze and steel lead in this criterion. They are durable enough to ensure a long service life. But metals like aluminum or cast iron cannot boast of a long service life.
- Length. The optimal length is considered to be selected according to the height of the owner. As a rule, there are special tables or relationships between height and hand sizes.
- Weight. The poker should be heavy enough to move or split wood, but light enough so that your hands don't get tired when using it.
- Manufacturing. Products forged by hand are considered good. As a rule, with this manufacturing method, the metal is felt well and there are no kinks or breaks.
Also, when making a poker by hand, you can carefully follow the forging technology, which is why the metal does not come out overheated, which makes it brittle, or underheated, which makes the bends weak and easy to unbend.
Unusual options
- The corners of the scoop can be made rounded rather than straight.
- A poker or scoop with a twisted handle also looks unusual.
- The head of the poker may not be at a strictly right angle, but in the shape of a crescent.
- Also, the poker head can be flattened in the plane of the handle, and not perpendicular to it.
- The scoop scoop can have a design engraved on it.
- The poker can also be made from a solid rod, then not only the handle, but also the head will be curled.
Accessories for fireplaces make it easier to control the fire and make the use of this heating device safe, because thanks to them, your hands do not come into contact with the fire, and also, for example, you can quickly remove rolled out coal from the floor.
Beautiful examples
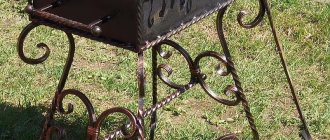
An original stationary metal grill made with forged elements. In this case, the forged parts are a table-stand for a brazier. There is a space under the table for storing firewood or coals, so you don’t have to run far for them. Such a barbecue will not be light, but quite mobile. That is, moving it to a convenient place or storing it in a shed for the winter will not be difficult. Forged products o
A metal grill with a roof allows you to cook over a fire even in bad weather. If you don’t have a canopy or gazebo in your yard, but want meat or vegetables fried over a fire, this option is an excellent solution. In addition, the design is equipped with a stand for installing a cauldron and also a convenient place for placing fuel.
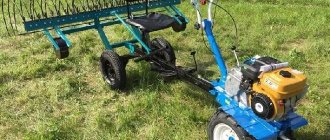
Unusual models are also found among stationary barbecues. Two large wheels are very successfully attached to the legs of this design. Imitating a garden wheelbarrow, the device easily moves around your site and stands firmly and steadily where you need it.
This configuration of metal barbecues in the shape of a boot is quite common. It combines a kebab maker, a barbecue maker and even the ability to cook meat on a spit. A convenient grid table allows you to optimally place all the necessary tools and ingredients at hand.
A folding metal grill when packed resembles a suitcase. This allows you to take it with you wherever and whenever you want. If necessary, you can put skewers and other necessary items inside. The only disadvantage of this design is the height. It is as compact as possible, and therefore you will only have to cook on it while sitting.
Another example of a suitcase barbecue, which is already equipped with legs. These additional spare parts are conveniently folded inside the box, which is closed with a special clasp so that nothing falls apart. The photo also shows other models of folding barbecues, which are also compact in size and easy to use.
A spacious stationary grill made of sheet metal with the addition of forged patterns. It is also equipped with a device for cooking in a cauldron, has a convenient mini side table and space for firewood or dishes under the box itself.
An original way to install a hood over a barbecue. Suitable for those who do not want to fix the kebab maker in one place and install a bulky exhaust structure in the gazebo or on the veranda. All the nuances have already been taken into account here. Some manufacturers even offer benches and chairs in the same style.
A fabulous barbecue in the form of a carriage with a roof will not leave even the most skeptical buyer indifferent. However, the price of such a forged model may not be the most pleasant value. One of the features of this design is the presence of a lid on the kebab grill.
The original hearth comes from the front of the car. This allows you not only to surprise your guests and get a convenient device for cooking over a fire. Thanks to this non-standard approach, you also get rid of an unnecessary vehicle that was just taking up space.
A chic wrought iron grill in the form of a house on wheels, equipped with a roof and a chimney, will become a true decoration of your site. The design is bulky, but it allows you to cook for a large group at once, both on skewers and on a barbecue grid.
You can find a lot of beautiful and practical examples of metal barbecues. It is important to remember all the important safety features when using them so that the external aesthetics do not turn into trouble. Making metal barbecues for your own use with your own strength and hands is a responsible and creative process that requires concentration, caution and an individual approach.
To learn how to make a metal grill with your own hands, watch the video below.
Accessories for fireplaces make it easier to control the fire and make the use of this heating device safe, because thanks to them, your hands do not come into contact with the fire, and also, for example, you can quickly remove rolled out coal from the floor.
Accessories overview
List of accessories for the fireplace
big enough. The most popular of them are included in the standard fireplace set. It always consists of:
- Pokers.
- Shchiptsov.
- Scoop.
- Panicles.
A poker for a Russian stove and fireplace allows you to change the position of burning wood
. It may look like a simple metal stick with a thick end or a stick with a hook. It is also given the appearance of a spear with a hook.
Using forceps, perform similar actions. However, they are the best “jeweler” because they allow you to pick up and rearrange a log or coal
. Most often they are used to pick up those coals that have rolled out of the fireplace or stove fireboxes.
Use a scoop to remove ashes from a brick fireplace and
, and also
pick up coals from the floor
. True, in the second case they always use a broom. It is also used to clean the floor around the fireplace.
This standard fireplace set is always hung on the wall or mounted on a special stand
. In the first case, it looks like a horizontal bar with hooks. In the second - a view of the base with a stand attached to it. The latter may have hooks or two arches, into the middle of which each element included in the fireplace set is inserted and on which rests.
Also in demand are such fireplace accessories as:
- Firewood stand.
- A container or stand on which fireplace matches or a fireplace lighter are placed.
- Fireplace lighter or special matches (the first is better because it speeds up ignition).
- Mesh or protective screen.
Almost all of these fireplace accessories can be made with your own hands. The exception is lighters and matches. As for the material, the fireplace set can be made of steel, brass, copper and cast iron.
Brass and copper fireplace accessories are best suited for electric fireplaces. In this case, they perform only a decorative function and become covered with soot and soot. If you use brass and copper accessories in the fireplace
made of brick, they need to be cleaned constantly.
Forceps
You can make fireplace tongs with your own hands in the form:
- Scissors.
- Tweezers.
The second version of the element included in the fireplace set is simpler. To do this, you need to take one long or two short metal strips with your own hands. Further actions are as follows:
- The strip is heated in an oven until reddened and left to cool.
- The long strip is folded in half. The fold should resemble a circle, from which two straight lines extend in one place. If there are two strips, then they are fastened with a rivet and then bent. The curve should resemble a heart.
- Twist both ends around the axis as described above.
- Chop again and cool in oil.
- Apply a layer of black paint.
Hand fan
Even easier. But when I went through the sketches of the options, I discovered one unpleasant trend: all the options had a sticking out handle:
It looks like some kind of ping pong racket, only plastic. But I know from experience that it is wildly uncomfortable and tends to break if the fan is used too intensively. This means that, using the slogan of all car tuners in the world “if you can’t buy it, build it (in my case, do it) yourself,” I used it as a guide to action.
I also wanted to make it metal, perhaps with plastic elements. But the eldest son suggested: you recently bought an orange (loves this color) hair dryer, and I haven’t done anything with it yet. Let's fix this.
Great idea, said and done, let's get started. To implement it it was necessary:
• a piece of thick plastic, 3-5 thick and measuring 100x140 (with a margin) millimeters;
• a fragment of thin plastic, I had 150 by 200 mm - you can easily take more;
• three rivets of sizes M4-M6 and the same number of washers of the corresponding diameter.
Heat a thick piece, bend it in half roughly:
After leveling and processing, it becomes approximately 40x130 mm: optimal for an average hand.
We cut out thin plastic arbitrarily, but there should be no sharp corners left: if the coals are intensively fanned, the fan may simply break.
Now we heat the thick fragment again, insert the thin one, clamp it in a vice (just don’t overdo it, it might inadvertently burst), and leave it to cool.
It turned out well, but still the thin part does not hold securely.
There are two options: put it on glue or firmly fix it. We chose the second one.
We drill holes and place them on the rivets, be sure to go through the washer on the other side, so that the plastic does not burst under any circumstances.
That's all the wisdom, a compact, light fan, ready. They also wanted to drill holes for the fingers with a feather drill,
and then changed their mind: there is no need. And so convenient.
For me, it turned out quite well. But how it will show itself in practice will be shown by the first outdoor cooking in the new season. So we'll have to wait.
Poker and broom
The metal for the poker included in the forged set for a brick fireplace or Russian stove is processed with your own hands in the same sequence as tongs. Features of the manufacturing process:
- First, one end of the round rod is pulled onto the rectangle and a small curl is made on it. Afterwards, the handle is bent on the fork (a special device for the anvil).
- A similar curl is made at the other end. Next, the workpiece is bent so that the plane of the curved end is perpendicular to the main part of the poker included in the fireplace set. The fold is also made on the fork.
- Perform twisting.
The poker itself should be such that its length is 50-70 cm. If it is shorter, moving coals in the firebox of a brick fireplace or Russian stove will be dangerous
Regarding this element of accessories for stoves and fireplaces
made of brick, like a broom, then you can make it with your own hands almost like a dustpan. More precisely, you only have to make the handle. It is better to look for the main part with pile in the store. A brush with long bristles may be suitable. True, the pile must be fire-resistant. After purchasing the brush, the handle is attached to its base.
If you don’t want to make a broom yourself, you can use a fireplace vacuum cleaner instead.
. This option is better, because cleaning will not be accompanied by the release of dust. Today, many people include it in their fireplace set.
Firewood stand
Firewood stands can be made from pine boards, plywood, metal strips and rods. Also, such fireplace accessories can be made from other materials.
Many of us associate cozy gatherings in nature with a fire and aromatic barbecue. The process of cooking meat over hot coals creates a soulful, but at the same time solemn atmosphere. A high-quality grill makes it easier to prepare a delicious dish.
Several types of materials are used to make this structure. This is mainly: brick or metal. How to make a barbecue with your own hands? You will find the answer to this question in our article. Here are detailed diagrams and drawings of homemade structures.
Cooking accessories
To cook on a barbecue, in addition to the device itself, additional accessories are needed, including a grill and skewers.
Lattice
Meat, fish and vegetables are cooked on a
. Manufacturers suggest using nickel-plated and cast iron products.
Nickel plated gratings
They are inexpensive and perform their function, but during use
they bend, the coating cracks, and crumbles.
In damaged areas, the metal corrodes and the grille becomes unusable.
Cast iron grate
- a strong and durable accessory. Cast iron does not oxidize. These grates have a non-stick coating. They are expensive, but they will last a long time.
Photo 2. The process of cooking fish and meat on a barbecue using a cast iron grate.
A grate can be used for cooking on a barbecue.
.
Before placing food on it, grease the grate with oil
.
Homemade grilles can be made from stainless wire
.
When making an accessory, wire with a diameter of 5 mm
is welded with argon.
The master chooses the size and shape of the cells, as well as the size of the grid itself, at his own discretion. Stainless steel products are not subject to damage at high temperatures, do not deform or oxidize
. To prepare dishes, such a grate is greased with oil and cleaned after use.
Skewers
Meat and vegetables can be cooked on a barbecue by threading them onto skewers. The products are on sale, but you can also make them yourself.
To make skewers you will need stainless steel wire 60 mm thick.
The wire is cut into pieces
80 cm long
, heated on fire and cooled.
After these procedures, the steel becomes pliable and suitable for giving it the required shape. Next, using a hammer, the wire is given the intended shape. Ten centimeters
of one edge are left untouched; they are bent into a ring to form the handle of the skewer.
There are craftsmen who make wooden decorative handles. The second end of the skewer is sharpened
for easily threading pieces of meat.
Sharpening is carried out on a grinding machine or an emery wheel. To give strength, products are hardened
. To do this, they are heated over a fire and cooled in cold water.
Bags for skewers are made from very dense material, in which it is convenient to store products and take them with you outdoors.
Model project
Before you start making a barbecue, you need to decide what material this product will be made from. Experienced craftsmen suggest making an additional system of protection against climatic conditions.
A cozy gazebo with a barbecue in the country adds a piece of warmth and comfort during friendly gatherings. Here you can also hide from rain, wind and scorching sun. A partially open veranda or terrace is ideal for solving this problem.
More experienced craftsmen prefer complex barbecue instructions. Here, in addition to barbecue, you can bake bread, cook food and much more. The standard parameters of such structures are:
- height 1.5m;
- width 1.6 m;
- The oven depth is from 0.6 to 0.8 m.
Before you begin building such a structure, you must first make a strip foundation. There may be additional niches and a spacious storage system.
Making a barbecue out of brick with your own hands is quite simple. The initial stage will be drawing up a detailed project. Next, we proceed to arranging the zero base. The size of the foundation must correspond to the dimensions of the structure.
If the fire area will be located on the street, then it is not recommended to make complex structures here. The optimal solution would be parameters of 0.5 x 0.8 m. Here you can place from 5 to 10 skewers with meat.
There are hundreds of drawings of barbecues on the Internet, each of which has its own characteristics and appearance. Designs differ in type of material and size.
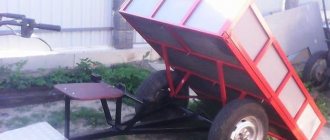
Metal grill
Products made of iron are especially popular. They are distinguished by their durability and aesthetic appearance.
As a rule, they are a complex two-tier composition. In the upper part there are hot coals, and in the lower part there is an ash removal system.
A simpler option is a barbecue made from a cylinder. The finished product is roomy and spacious. In addition to barbecue, you can cook vegetables and a lot of other food here. On one side of the cylinder, thin rods are welded using an electric welding machine. In the future they will act as a grill.
To build a metal barbecue, we will need the following materials and equipment:
- Bulgarian;
- thin metal rods;
- semi-automatic welding;
- electrodes;
- metal supports;
- powder paint;
- sprayer for pigment compositions.
The process of making an iron barbecue is divided into several stages:
- We mark the future hole on the surface of the barrel or cylinder.
- Next, along the contour, we begin to cut out the upper part of the metal base. We make shallow notches on the sides. This is where the skewers with meat will be located in the future.
- To make a lid, we attach hinges to the cut part. Next, we fix the other end of the mechanism to the side of the grill. This will help to easily open and close the structure during operation.
- At the bottom we begin to attach the support legs. The height of the base ranges from 0.5 to 1 m.
- When the product is almost assembled, you can proceed to making the grill. To do this, we weld thin metal rods to one of the side parts of the cylinder.
- We make a handle on the lid. The thicker the metal, the less it heats up.
- The finished product is coated with black powder paint. During operation, it does not burn out and does not emit harmful toxic compounds. The photo of the barbecue shows the entire sequence of the work process.
Peculiarities
The most common barbecue device is a metal grill.
Here are its main advantages.
- Simplicity.
Most often, a barbecue is a box with legs, into which firewood or coals are poured, a fire is built, and skewers with meat or a grill with vegetables are placed on top. - Mobility.
Some metal models can be used anywhere: on the ground, on a concrete platform, on a terrace and even on a sandy beach. - Functionality.
Even the simplest inventions can be decorated with ornate forging, which can serve as additional hooks for hanging skewers or a net. You can build a structure with a roof or with additional shelves.
- Safety.
The metal does not burn, does not melt and does not create fires. And this is a big plus. - Economical.
Even if you don’t have the necessary material and desire to make a metal grill yourself, you will spend a small amount of money on its purchase.
The disadvantages include the not always aesthetic appearance and fragility of some models. However, all these nuances are eliminated and adjusted individually for each user and for each case.
The unique feature of metal barbecues is that you can easily make them yourself.
To do this you do not need to have any special knowledge or skills.
You just need to decide on the model and materials, listen to the advice of professionals or simply knowledgeable people, and also be sure that your plan will be realized 100%.
Kinds
The following types of standard accessories are distinguished:
- poker;
- broom;
- scoop;
- forceps.
The poker is designed to change the position of firewood in a fireplace or stove. It can have different appearances. The simplest option is a regular stick made of metal with a thickening at the end. A more modern look is a detail with a hook, and for special aesthetes I make it in the shape of a spear.
Tongs are the most advanced analogue of a poker.
This device allows you to carry firewood or coal. Most often they are used when cleaning fireplace waste located near it. Under standard conditions, tongs are also used when transferring fallen coals that for some reason have left the fireplace.
A dustpan is used in conjunction with a broom when cleaning the area around the fireplace.
There are two ways to store such a set:
- placement on the wall;
- placement on a special stand.
In the first option, a plank with hooks is attached to the wall, and in the second, a base is placed on the floor to which the stand is attached. Hooks or several arcs are attached to it, with the help of which each of the elements of the set takes its place.
There are also additional fireplace decor items. These include:
- a stand on which firewood is stored;
- a container in which matches or a fireplace lighter are stored;
- security elements (screen or mesh);
- means of starting a fire (lighter and fireplace matches).
The lighter is considered more reliable and speeds up the ignition process.
DIY making
Of course, we won’t make the lighter and matches ourselves, but it’s quite possible to make the rest of the decorative elements yourself.
Most often, the following types of material are used for their manufacture:
- copper;
- brass;
- steel;
- cast iron.
The most common are cast iron and steel options.
There are two types of accessories:
- electrical;
- fiery.
When creating electrical items, brass and copper are commonly used. It is worth noting that such accessories will only serve a decorative function. In addition, they will become covered with soot and soot. So, when using brass and copper accessories in a brick fireplace, they will require constant cleaning.
You don't have to spend a lot of time choosing a scoop. As a rule, conventional devices are used.
Let's look at the process of making a scoop:
- When creating it, it is customary to use sheet steel, which has a thickness of 0.5 mm. It is used to make the main part of the scoop.
- Next, take a steel sheet 220x280 mm. From the side with a size of 220 mm we retreat (from the edge) 50 and 100 mm, and then draw two parallel lines on our sheet.
- After this, we make marks on the first line at a distance of 30 mm from the edge.
- We apply the same markings along the edge of the sheet, and then connect them together. Corners are cut along the intersecting lines.
- Let's move on to working with our second line. We also apply markings on it (as on the first line). It should be noted that all marking lines are applied with a metal rod that must be sharpened.
- Let's move on directly to making the scoop. Take the anvil and planks. With their help, we bend the back of the sheet from metal along the second of the lines we drew.
- Lines should be counted from the edge of the side where the corners were made. The side parts of the sheet must be bent, and the upper part of the back wall must be bent so that it fits snugly against the back wall.
Start by making a paper version of your scoop. This will help you understand how convenient the design will be to use, and will also allow you to take into account all the shortcomings.
Let's move on to working with the pen. The length of the handle must be at least 40 cm.
There are two ways to make this device:
- by forging;
- production using sheet metal.
If you do not want to spend a lot of time and effort, then the second method will suit you much better.
Forging
Let's look at the step-by-step process of forging a handle for a fireplace.
- First you need to take a metal rod with a square cross-section, and then heat it in a furnace until it turns red.
- Leave the heated rod for a while to cool down.
- Then we place the end of the rod in a vice, put a pipe on it, which is shorter than the end clamped in the vice.
- After this, using a winch, the workpiece is twisted several times around its axis.
- After this, it is necessary to sharpen one end of the cone with a height of 6 to 8 cm and the other end with a size of up to 15-20 cm.
- The end that has the greatest length is bent until an absolutely exact parallel is achieved with the main part of the handle.
- After this, work is done with the second end of the structure, placing it on the anvil and flattening it so that the shape of a leaf is achieved.
- Then we make holes and also bend the part until it reaches the contours of the scoop.
- At the end of the work, the handle is placed in oil, after splitting it. Next, simply connect both parts, obtaining the desired result.
Sheet metal
The second method looks like this:
- The handle is made in the form of an ellipse by bending two longitudinal edges of the sheet. The second end is not bent - two holes are made on it. Having done them, we bend them, reaching an angle of 70 to 90 degrees.
- The same holes are made on the back of the scoop. After all the manipulations have been completed, both parts are fastened together, for example, with rivets.
Scoop
Over the years, I have made more than one of them, so I draw the pattern “practically with my eyes closed.” But you can simply print this drawing by reducing it, enlarging it, stretching it or compressing it: it all depends on your wishes and the original piece of tin. I had a fragment of 120 by 240 mm on hand.
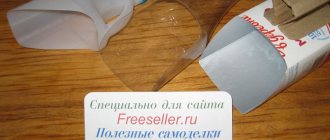
For many years I have been using the same material used by metal-plastic window installers to make external window sills. And all because, despite a very decent appearance, they are thin,
and cutting and bending is incredibly easy. Which is exactly what my middle son did.
But if he cut it with simple metal scissors, then he bent it in a small vise with an excellent fit of the jaws: honestly, it would never even have occurred to me to use them in this way.
I started with the handle: first one side,
then another,
and then a bend for attaching to the scoop itself.
Now the response part. In the first drawing-scheme, I circled two fragments with red ovals: I always prefer to trim them in place: consider that this is just my “trick”.
We bend one power part of the future scoop,
then the second one,
sidewalls,
back part. It will consist of two layers plus “ears” hidden between them, so it will also become a strength one.
We use the smallest, short rivets (I had 2.8 mm in diameter on hand) to fasten everything together,
remove the outer protective film from the white side,
and we are really glad that the newly-minted master,
This turned out to be such a good, functional scoop.
Making forceps
The forceps may look like scissors or tweezers.
Let's look at an example of making tweezers:
- A strip of metal is taken and heated in an oven until it turns red. After this, it is left for some time to cool completely.
- If the strip is long, it is folded in the middle. The bend itself should look like a circle, with two straight lines on either side of it. If you have several short strips, then they are connected to each other using special elements, for example, rivets.
- Only after fastening are they bent. Next you need to twist each end. Having re-heated, we leave our structure to cool.
- Finally, we paint the item in the color we need.
Poker and broom
To create a poker, metal is processed in the same way as to make tongs.
However, this work has a number of distinctive features:
- We take one end of the rod, which has the shape of a circle, and then, stretching it across the rectangle, you need to make a small curl there. Next, you need to bend the handle on a special device - a fork.
- A similar curl is created at the other end. After that, it is necessary to make a bend on the pre-prepared part so that it is located perpendicular to the main part of the poker, which is already in our set. A similar bend is made on the fork.
- We do a twist.
To work safely with a poker, its size should be from 50 to 70 cm.
We won’t be able to make the broom completely. It will be possible to make only its handle, and the soft part will have to be purchased. It should be taken into account that the pile must be purchased with fire-resistant properties. A special vacuum cleaner for the fireplace can be an excellent replacement for a broom.
What length should I take the workpiece?
Focus on the source of fire: forge, fireplace, stove for which you are making a poker. For example, if it is a stove. Take a tape measure and extend it to the far wall of the oven, add some distance to the heat of the oven. Let's say 20 centimeters. Add another 10 cm to the lower end and 15-20 to the handle, depending on what kind of handle you plan.
This is how you get the size of the workpiece.
The following video, among other things, shows the forging of a poker, the whole process is posted.
Firewood stand
The main materials for making fireplace stands are:
- pine boards;
- plywood;
- metal strips;
- metal rods.
Let's look at an example of making a wooden stand:
- An arc with a size of 50 to 60 cm is made from pine boards. It is necessary that one of the ends be wider. It needs to be positioned over the narrower end.
- It is necessary to apply five holes (evenly along the length) to each arc. They are placed on the side.
- Next, we make four cross members. Two with dimensions from 50 to 60 cm, and the remaining two - from 35 to 45 cm. At the same time, grooves and holes are made in the crossbars we made at the ends of the narrow arcs.
- After this, the crossbars must be fixed in the holes made at the ends of the arc, and metal rods should be placed on the holes made on the sides.
- Next, we make the back part of the stand from the rods. Plywood sheets are placed in the grooves.
- Ten holes are made evenly along the entire length of our strip. Next, we should bend our metal strip into the shape of the letter “P”. It is necessary to take into account that the ends should look in the form of arcs. Using screws, we fix the strip between the walls.