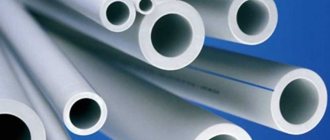
Recently, pipelines made of polymer materials are everywhere replacing metal ones from use. There are many reasons for this: they are more durable, easier to install and operate, and do not require anti-corrosion treatment. For the installation of heating and hot water supply systems, the most suitable are polypropylene pipes, mounted by welding.
By design, polypropylene pipes can be conventional or reinforced with aluminum foil. Aluminum significantly increases the reliability of the system and reduces the coefficient of thermal expansion of the material. Depending on the conditions under which polypropylene pipes are welded, the instructions for performing the work may differ in some details, but its main essence remains the same.
Welding machines for polypropylene pipes
Let's start by preparing the installation tool.
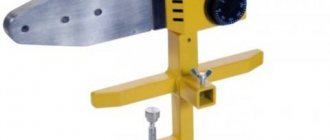
Since all connections of PPR pipes and fittings are made by soldering, you will need a special soldering iron for this purpose. The welding machine used for polypropylene pipes is offered on the market in two types:
- with a round heater;
- flat heating element.
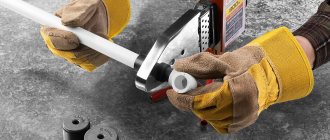
The latter was popularly nicknamed “iron” due to some external resemblance to this household appliance. Different welding machines have no fundamental differences, only structural differences. In the first case, nozzles for Teflon pipes are put on and attached to the heater like clamps, and in the second case they are screwed to it on both sides. Otherwise, there is not much difference, and the device has one function - soldering polypropylene.
Soldering machines are usually sold complete with attachments. The cheapest and minimal kit made in China is a soldering iron with a power of up to 800 W, a stand for it and nozzles for 3 sizes of the most common pipes - 20, 25 and 32 mm. If your heating scheme contains only such diameters and you do not plan to solder polypropylene pipes anywhere other than your home, or do it professionally, then a budget set will be quite enough.
If, in accordance with the calculation and diagram, you need to join pipes of sizes 40, 50 and 63 mm, then you will have to spend money and purchase another soldering kit, which contains the corresponding parts. Well, the most expensive kits are produced in European countries and are distinguished by their reliability and durability. Similar kits include the following tools:
- soldering iron with stand;
- Teflon nozzles for soldering iron of all the above diameters;
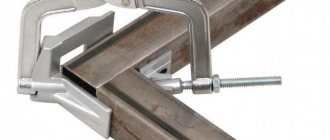
- scissors for cutting pipes at a precise angle of 90º;
- hex wrench;
- Phillips screwdriver;
- roulette;
- gloves.
The working part of a soldering iron (heater) of any design is designed in such a way that 2-3 nozzles for small-diameter pipes can be installed on it. This allows you to save a lot of time when working with lines ranging in size from 20 to 40 mm.
A little about the power of the soldering machine. High power is necessary for quick and uniform heating of large diameter parts, which are considered to be sizes 63 mm or more. For home purposes, it is enough to have an iron with a power of 0.7-1 kW. Soldering irons with heaters above 1 kW are considered professional, and accordingly, they are more expensive than regular ones.
Stage three. Pipeline installation
When laying the highway you will need:
- pipes;
- tees;
- Ball Valves;
- plugs;
- adapters;
- bends;
- couplings;
- detachable connecting elements;
- threaded fittings;
- plastic clamps.
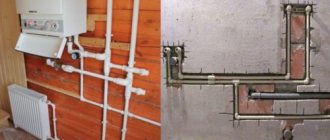
First of all, the installation of the main elements of the system (plumbing, radiators, boilers, etc.) is carried out, after which the future highway is marked in accordance with the drawn up project. Pipeline elements are connected to each other using couplings.
When it comes to heating or hot water supply, thermal expansion is taken into account. To compensate for the latter, it is advisable to use movable connections. When installing a closed pipeline, the walls are first grooved (a groove with a width of two pipe diameters is made in appropriate places).
Filling the pipeline with liquid is permissible only after one hour from the end of installation. Hydraulic testing can be carried out only after 24 hours.
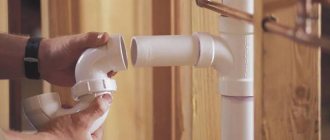
How to connect a metal-plastic pipe with a polypropylene pipe
Due to various circumstances, it happens that it is necessary to connect different types of pipes, for example, PPR and steel, metal-plastic with polypropylene, and so on. Such situations happen in apartments where it is difficult to change a section of a common water supply or heating riser laid with a steel or metal-plastic pipe, but you need to connect to it. This is not a big problem, you just need to take into account that all such connections are made through threaded fittings.
Since metal-plastic pipes can be connected using press and dismountable fittings, for joining with polypropylene it is more convenient to use a detachable fitting with an external thread. In turn, a fitting with an external thread is soldered to the end of the polypropylene pipe, after which the connection is twisted in the traditional way, with flax or fum tape wound up.
Detachable fitting for connecting pipes
When you need to cut into metal-plastic pipes, it is most convenient to install a tee with a threaded outlet, where you can subsequently screw the fitting, and then solder the polypropylene pipe to it. True, you will have to tinker with the installation of the tee: you need to turn off the water or empty the heating system, and then cut the metal-plastic and carry out the installation.
Why polypropylene
Today, pipe manufacturers provide a huge range of products for laying water pipes, sewerage or installing heating systems. You can purchase metal-plastic, metal, or polypropylene pipes. Today, an increasing number of consumers prefer to choose polypropylene pipes, which have many advantages:
- do not corrode;
- easy to install;
- do not require constant repairs;
- durable and reliable in operation;
- can be laid inside a wall or floor;
- are significantly cheaper than metal pipes.
Polypropylene pipes can be used for installing heating systems, for water pipes and for sewerage.
Socket welding of polypropylene pipes
The main method of installing plastic, when it is necessary to connect small cylindrical products of different sections, is the use of a socket. When welding a PP structure, additional parts must be used:
- corners;
- tees;
- bends.
They are all made from the same material from which the pipes were made. The use of additional elements to create a high-quality connection is not considered a disadvantage of this method. The parts in question, in addition to the connecting function, help change the direction of the pipeline.
This process consists of several operations:
- the mating surfaces are melted: the outer wall of the cylindrical product with the inner part of the fitting;
- special heating parts are used;
- The assembled elements are cooled.
According to professionals, socket joints are considered much more reliable than butt welding. Due to the fact that when combined, the pipe enters the fitting with force, high strength is created. In this case, alignment does not require the use of a special tool. Even a beginner can combine cylindrical structures in this way.
Other methods for soldering PP pipes
In addition to classical soldering, several additional connection options are known. They all differ in their characteristic features. Each method has both positive and negative sides. Let's get to know them in more detail.
Application of electrical fittings
The installation of such a pipeline is simplified if you use couplings that are equipped with special heating coils.
The welding machine is connected to the contacts coming out of the coupling. Voltage is applied to them and maintained for a certain time.
How to use
- the surface is thoroughly cleaned, then degreased;
- the pipe is inserted into the connecting element and tightly fixed;
- the welding machine is connected to the electrical contacts of the electrical fitting;
- after turning on the device, it will be possible to observe through special holes in the fitting how the volume of plastic melts and increases; the device will turn off automatically; the welding time is regulated by the device itself, which takes into account the ambient temperature;
- the tool is disconnected from the contacts.
The main advantage of this method is its speed.
Soldering takes a second, and cooling lasts one minute. You can forget about hard-to-reach areas. The fact is that the soldering itself is performed on a specific place of previously assembled parts. This is very convenient when you need to install a closed heating system. Such work can be carried out even in mild frosts, but the temperature should not be lower than -15 °C. At lower values, it is prohibited to use a soldering iron. The use of electrical fittings allows construction companies to speed up work on large sites.
The private sector rarely uses this method, since the cost of this equipment is very high. The price of an electrofusion device is in the range of 80-100 thousand rubles.
Cold welding
To use this technique, you must have a special glue designed to soften the top layer of the product. This is one of the ways to connect polypropylene pipes without a soldering iron.
How to use
- parts are adjusted;
- a suitable set of fittings is purchased;
- the surfaces to be joined are well degreased;
- a layer of glue is applied to each plane;
- the inserted parts are tightly fixed for 20 seconds;
- It is prohibited to move elements within one hour.
As a result, the connection becomes strong and reliable, similar to soldering.
Do not heat glued seams. Cold welding can only be used to install cold water pipes!
Another way to join PP products without a soldering iron is to use a torch. You cannot set the temperature on this device, so you have to do everything by eye.
Stage one. Drafting
Installation work should begin with drawing up a project for the future highway. An important criterion in this case is ergonomics, as a result of which the number of turns and connecting elements should be minimal.
When arranging a heating system, a well-designed project is especially important, in which you should indicate the location of such elements as:
- couplings;
- adapters;
- fasteners;
- corners;
- heating equipment.
The line is connected to the radiators in a one- or two-pipe way, from the side or from the bottom.
Plumbing
Here the main line is connected to a centralized system for the purpose of water supply to the necessary plumbing fixtures - toilet, sinks, boiler, etc. There are two ways to do the wiring.
Method number 1. Open option. Horizontal pipes are installed slightly above floor level, and vertical pipes are installed exclusively in the corners. All this allows you to make the pipeline less noticeable.
Method number 2. Closed option. It is extremely difficult to implement, since it involves preliminary carrying out the most accurate calculations. Pipes (necessarily solid) are walled up in the walls, and there must be free access to each joint.
In addition, the water supply layout can be:
- sequential type (the most budget-friendly and easiest-to-implement option);
- collector type (a collector is used when supplying water);
- with pass-through sockets (not very popular).
Welding instructions
In domestic conditions, soldering of polypropylene fittings and pipes into a single structure is most often performed using the thermal polyfusion method. After heating with a special device, the pipes are quickly connected. The work, in accordance with the technology, is carried out in stages.
Preparation
At the preparatory stage, design documentation is developed, which must indicate the selected pipeline diagram. The places where the system is fixed to the walls are correctly determined, and if necessary, the required number of mounting holes is punched using a construction tool.
Polypropylene pipes must be marked and then cut into individual elements in strict accordance with a pre-prepared diagram, as well as field measurements. Such a simple event will allow you to verify the accuracy of the markings.
The pipe sections laid out on the most even surface should follow the correct sequence of connections. The foil parts are removed from the ends with a trimmer, after which the depth of insertion into the fitting is marked at the selected ends with a marker.
Heat
The operating temperature of the heater on the soldering device must be selected depending on the technical characteristics of the pipes. The process of soldering pipelines with aluminum reinforcement should be carried out at nozzle temperatures within the range of 260-300°C.
The soldering equipment used in the work must reach the required temperature before welding, so the thermostat is set to the appropriate position, and the plug of the device itself is plugged into the electrical outlet.
The readiness of the welding machine for welding polypropylene is signaled by the switching of a special backlight on the device. The alarm options vary on different equipment models. In order not to make mistakes in the operating rules of the device, you should carefully study the instructions supplied by the manufacturer.
Welding
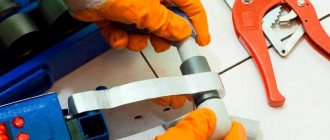
Correct operation means simultaneous heating of the end of the polypropylene pipe and the fitting by the soldering device. In this case, the fitting used is located on a special mandrel, and the pipe is inserted into the sleeve with little physical effort. The insertion depth must be monitored in accordance with the marker markings applied to the PPR pipe.
| Diameter (mm.) | Welding depth (mm.) |
| 20 | 14,0 |
| 25 | 16,0 |
| 32 | 20,0 |
| 40 | 21,0 |
| 50 | 22,5 |
| 63 | 24,0 |
| 75 | 28,5 |
| 90 | 33,0 |
| 110 | 39,0 |
The standard heating time for all connected elements is selected depending on their diameter. It is necessary to combine polypropylene pipes and fittings quickly enough, thereby preventing temperature losses of the heated material. The joining of elements is carried out through a smooth translational movement without rotation.
The connected structure of the pipeline section should be securely fixed until the joined polymer elements reach maximum strength values. As practice shows, the system sets within 10-20 seconds (depending on the D of the pipe). The ideal option is to maintain the fixed position until the connection area has completely cooled.
| Diameter (mm.) | Cooling time (sec.) |
| 20 | 3 |
| 25 | 3 |
| 32 | 4 |
| 40 | 4 |
| 50 | 5 |
| 63 | 6 |
| 75 | 8 |
| 90 | 10 |
| 110 | 10 |
Stripping
After all welding work is completed and the material in the joints has completely cooled, the joining areas are carefully cleaned of natural plastic deposits. This event allows you to give welded structures a neat and aesthetic appearance.
A sharp knife can be used for this purpose, but stripping must be done very carefully. It should be remembered that an excessive amount of sagging of polymer material may well prevent the pipeline elements from fitting tightly into the fastening clips.
Important Additions
Of course, to weld polypropylene pipes you need to use only special equipment, and in domestic conditions the best option would be simple hand-held equipment with a minimum number of standard attachments.
Some manufacturers install two heaters in one device, which are equipped with separate switches. There is no need to use both heaters at the same time, because the plastic may overheat and the electrical network may be overloaded.
Today, the best, well-proven brands of devices for welding polypropylene pipes (according to experts and users) include: Candan Cm-03, Elitech SPT-1000 and Elitech SPT-800, Wester DWM-1500, Prorab 6405-K, BRIMA TG-171 and Gerat Weld 75-110.
Required soldering equipment
To create strong permanent connections, modern welding machines of various designs are used. Reliable seams on welded polypropylene pipes are obtained as a result of increasing the temperature to melting levels. The simplest household set consists of a device and an installation key for changing attachments. This device can weld polypropylene pipes of small diameter. A slightly more expanded (in terms of the number of attachments) configuration is designed to work with D 20-40 mm.
Welding PPR pipes of the largest size or performing soldering on a regular basis should be carried out with professional (complete) equipment. The set of additional accessories for such devices directly depends not only on the manufacturer, but can also be focused on the technical features of a particular model. When choosing the necessary equipment for soldering polypropylene pipes, you need to take into account all the requirements for prefabricated structures.
To install polypropylene pipes and obtain maximum reliability and tightness of the joints, in addition to a soldering iron (welding machine) and a set of attachments of different sizes (a mandrel for a fitting and a sleeve for a pipe), you need to take care of the availability of scissors for cutting individual elements. Among other things, you should use a trimmer that processes the edges of the pipes immediately before soldering. This tool easily removes aluminum foil from the end parts.
Step-by-step instructions for welding plastic pipes
The device must be installed on a flat surface. You should select the correct diameters of the nozzles, for this purpose using the internal diameter of the pipes being connected, which will allow you to correctly select the nozzle sleeves you need.
Preparing tools and material for work
The sleeves are fixed on the device before the device begins to warm up.
Such attachments are fixed using special keys, which you can find included with the equipment you use. Next, depending on the thickness of the product, the power and temperature of the device are set. For welding household plastic pipelines, you can set the temperature to 260 degrees, which will allow you to quickly melt the plastic and perform a high-quality connection of materials. Medium-power soldering machines heat up to operating temperature in 10 minutes. While our apparatus is heating up to the required temperature, the pipes used should be properly prepared. The ends of the parts are cut at right angles using special scissors. Clean off the burrs with sandpaper, then degrease the fitting and the cut area using an alcohol solution. The parts are thoroughly dried, after which you can begin soldering the plastic.
Warming up parts
As soon as the device heats up to the required temperature and the corresponding indicator lights up, the prepared pipes and fittings must be put on the hot nozzles. The plastic must be inserted into the sleeve up to the limiter, which indicates the welding depth. The fitting is also installed on a heated mandrel. In each specific case, the heating and soldering time of the material will vary. On the Internet you can easily find a table of soldering temperatures for polypropylene pipes, which will ensure strict adherence to the operating technology.
Connecting elements
With quick and confident movements, remove the heated parts from the device and connect them to each other. The connection must be made in compliance with the alignment of the fitting. Remember that when connecting such parts, they must not be bent or rotated along their axis. The pipe must enter the fitting to a depth determined by the boundary of the socket.
Seam cooling
You need to wait about 5 minutes for the plastic to cool. The polymers are tightly connected to each other on a molecular structure, which will result in a permanent and completely sealed connection. After the parts have cooled, it is recommended to blow them out or pass water through them under low pressure, which will ensure that there are no leaks and that they are completely passable.
At this point, all work is completed and you can use the finished plastic pipeline, and high-quality soldering will be durable and completely sealed.
Connecting polypropylene pipes is not difficult. Every beginner can handle this kind of work; you just need to choose the right soldering iron and determine the number of the attachments you need, which are installed on the welding machine
It is important to find out at what temperature to solder polypropylene pipes and what equipment to use. Try to be as careful as possible, which will ensure a high-quality and durable connection of polypropylene products
Soldering iron for polypropylene pipes
It is not recommended for a beginner to purchase such a device. It can be made from iron and appropriate materials, saving a significant amount.
Method one
To make a homemade soldering iron you will need:
- a broken old iron that still has a heating element;
- children's metal construction set;
- rubber handle;
- toggle switch;
- asbestos cord;
- duralumin;
- insulating tape.
Manufacturing technology
use a grinder to cut off all unnecessary parts from the bottom of the iron;
- an aluminum cover is made;
- a box is assembled from the construction kit; a light bulb and a rubber handle are installed in it;
- a toggle switch and a soldering iron regulator are connected to the wire;
- all parts are combined into one whole;
- cables are soldered;
- The heating element is bolted to the body, having previously placed an asbestos gasket.
Thus, after spending a little time using available material, you become the owner of a homemade soldering iron for welding PP pipes.
Method two
To make the tool you will need a pair of attachments costing 215 rubles. and a discarded, set fire iron. It takes approximately two hours to assemble.
First, the heating device is installed vertically. The fitting is placed on the heating nozzles simultaneously with the pipe. To make it possible to carry out operations on the wall, the iron needs to be slightly modernized: cut off the “sting” of the sole and slightly round it. It would be a good idea to use thermal paste.
It is known that several pipelines were welded with such a homemade apparatus. The quality of work turned out to be quite high.
After heating the iron, holding it by the handle, remove the pipe first. There is no need to remove the fitting immediately, since its thickness prevents it from melting quickly. All that remains is to hold the pipe with the iron with your hand and remove the fitting.
To connect the products, you need to apply little force until an even flash is formed around the entire perimeter of the fastener.
You need to hold the connection in this position for about 15-20 seconds until polymerization begins. Welding on the wall is simple: hold the heating device with one hand, and the pipe with the other.
Method three
We manufacture an iron equipped with a temperature controller, which will act as a special power control device assembled on a thyristor. For soldering work, a voltage of 170V is supplied. Aluminum or copper plates are used to create the device. The photograph shows a part with a thickness of 0.8 mm, but the value of this value may vary upward.
Flat elements are needed so that the heater does not begin to cool the moment the pipe is put on. For operation, a heating element (1 kW) from an outdated Mechta stove is used. Since the radiator hardly heats up, it can be reduced. No spacers are required to install the thyristor and diode. The design of the iron itself can have any shape, it all depends on your imagination.
Below is a diagram of the power regulator.
On each side of the spiral you can install aluminum spacers in the form of round pancakes. A handle with a regulator and a fixed toggle switch is attached to the body. In other words, you can do tuning.
The principle of all devices is always the same: to solder PP pipes, you need to maintain a certain temperature.
Required Tools
Before starting work, it is important to prepare all the necessary tools. Here's what you'll need:
Welding machine is a heating element with nozzles for different pipe diameters. Some models have a thermostat to maintain a set temperature; working with these devices is much easier.
Pay attention to the number of holes for nozzles. Optimal – 2-3 pcs . This will speed up the process of welding pipes of different diameters.
If you do not plan to use this device in the future, then there are many services where you can rent a welding machine for the duration of the repair. So you don't have to buy it.
Scissors. You can cut the pipe with a hacksaw, saw or even a grinder, but the quality of the resulting surface will be unsatisfactory. It is much more convenient and practical to purchase special scissors for these purposes.
Gloves to protect your hands - choose thick ones that do not conduct heat well. This will protect you from getting burned.
Shaver. The device removes the outer aluminum layer when working with reinforced pipes. The tool may not be useful, depending on the type of material
Trimmer. The device is designed to remove part of the internal reinforcement. This is necessary to avoid water getting between the layers of the pipe.
Degreasing agent. Necessary for cleaning the pipe from dirt and grease. You can use ethyl or isopropyl alcohol. It is not recommended to use acetone; it can soften polyvinyl chloride.
Soldering iron temperature and welding time
The soldering temperature of PPR pipes is the same for all types of reinforcement and all diameters, and is 260
℃. This temperature should be set on the soldering iron thermostat and always adhere to it. During work, you can accidentally turn the thermostat, so I recommend looking at it sometimes. Two hundred and sixty degrees Celsius, plus or minus a few degrees - no need to make the temperature higher than expected!
Some “hobbies” set the temperature to 300℃ (usually the maximum for a soldering iron) to increase speed. The soldering speed certainly increases, but the quality deteriorates and the likelihood of defects increases significantly! Elementary overheating worsens the strength of the weld, increases the likelihood of contaminated areas (polypropylene sticks to the nozzle and burns out), and cases of sealing of the internal passage of the pipe often occur.
The so-called “butt” in plumbers’ jargon is the end of a pipe sealed in a fitting, tightly or with a small capacity. Often such defects cause catastrophically low water pressure or poor heating of heating devices. “Butts” appear as a result of exceeding the temperature and soldering time - the temperature on the soldering iron was set high or the parts were heated for too long, or sometimes both.
Another reason for the increase in temperature on the soldering iron is the reluctance to strain the pectoral muscles - normal soldering temperatures and high-quality polypropylene make you strain a little!
Therefore, to carry out the process correctly, it is necessary to observe both the temperature and the heating time of the parts being soldered.
The heating time of the pipe and fitting depends on the diameter. The data is given in the table below and is valid for all types of polypropylene pipes. Table of heating, welding and cooling times for polypropylene pipes and fittings
| Time | Pipe diameter (outer), mm | ||||||
| 20 | 25 | 32 | 40 | 50 | 63 | 75 | |
| Heating time, sec | 5 | 7 | 8 | 12 | 18 | 24 | 30 |
| Welding time, sec | 4 | 4 | 6 | 6 | 6 | 8 | 8 |
| Cooling time, sec | 120 | 120 | 220 | 240 | 250 | 360 | 400 |
Try turning your phone to landscape position or changing the browser zoom. To display the table, you need a screen resolution of at least 601 pixels in width!
The data in the table is valid for an ambient temperature of 20℃. In general, the soldering temperature can vary depending on the ambient temperature; in fact, there is a regulator on the soldering iron for this purpose. However, at the initial stage, you should not bother yourself with various coefficients, but learn a simple truth - soldering must be done in a warm place!
Experienced craftsmen regulate the temperature within small limits depending on the quality of the pipes, and the heating time depends on the environment. In other words, at an air temperature of only 5℃, the heating time is increased, for example from 5 seconds (for a 20 mm pipe) to 7-8, the temperature on the soldering iron does not change.
After some experience in soldering high-quality pipes according to the table above, a “feeling” of the material appears, a feeling of an underheated or overheated soldering iron. Only then can you start experimenting with welding temperature, naturally within small limits.
Why is polypropylene better for welding than metal?
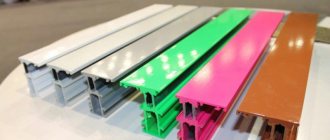
A variety of elbows and fittings, as well as profile and round bends made of polypropylene are deservedly popular because:
- After properly welded, they form monolithic parts that can last more than fifty years.
- During operation they do not reduce their throughput.
- They have very high resistance to various household chemicals.
- The cost of such products is several times lower than the cost of similar products made from metal.
In addition, if the product is selected correctly and the welding is done with high quality, then we can say that polypropylene pipes in many cases are simply an ideal element of the corresponding system, including.
PPR connection without welding
The technology for connecting PPR without a soldering iron is called “cold” welding. This method is based on the use of a strong organic solvent. The surface of the pipe treated with this composition becomes sticky, soft and easily joins with another part. The solvent is highly volatile and evaporates in a few seconds, so the process of gluing parts takes place in a short period.
To connect PPR without welding, soldering machines and electricity are not needed. Therefore, this method has become widespread among professional installers and is used when laying or repairing trunk lines. In everyday life, this method is extremely rare.
Heating instructions, exposure time value
When deciding on the heating parameters of the polypropylene pipes being connected, you need to pay attention to the diameters of the parts, which can be found in the corresponding table. Moreover, depending on the dimensions of the polypropylene pipe, it is necessary to change the heating duration, leaving unchanged the pre-selected temperature on the heating element
To ensure high reliability of the coupling joint, the following criteria must be met:
- heating duration;
- the time during which the joint must be fixed;
- the duration of the pause, after which it is allowed to continue the welding operation of the elements being connected.
Factors that can affect the quality of work
Among the nuances that must be taken into account when creating a welded joint of polypropylene pipes, one should highlight the need to manufacture a welding belt, which must have an optimal length. Most often it is the same size as the depth of the cylindrical attachments that are used on the heating element of the welding equipment. To ensure the required size of the joint, it is necessary to firmly fasten the polypropylene pipe to the body of the element.
In cases where welding is performed at subzero temperatures, it is advisable to use warm material, for which purpose it should be kept in a warm room for some time before carrying out the work.
Before carrying out work, the welding unit must be heated to a temperature of 283 degrees Celsius, and the exact mode is determined taking into account the ambient temperature. By acting in this way, it is possible to prevent the occurrence of significant heat losses at the moment when the element to be connected is delivered from the apparatus to the area where the connection is to be made. To determine the optimal heating value and its duration, preheating is carried out, each time adjusting the indicated indicators by one to two seconds.
Which pipes are right for you?
To choose polypropylene pipes you need to know:
- conditions under which the pipes will be operated;
- fluid pressure in the system and its temperature;
- the required throughput of the product, which determines the working diameter.
Polypropylene pipes have special markings, depending on the purpose of the product.
- PPH – ventilation, cold water supply.
- PPB – cold water supply systems, heating.
- PPR – hot and cold water supply systems, heating.
Pipes marked PPR are universal. Therefore, they are most in demand. They are highly resistant to both high and negative temperatures.
Impact of errors on welding quality
Neglecting the rules for performing welding work leads to errors that affect the final quality and reliability of structures. Before starting welding work, it will be useful for beginners to conduct training to gain experience.
The most common errors in operation:
- Welding parts that have not been treated with a cleaning or degreasing agent.
- Overheating or underheating of welded parts.
- The reinforcing layer has not been completely removed.
- Rotation of parts when warming up or joining parts.
- Failure to comply with welding depth.
- Uneven pipe cut.
The nuances of maintaining the desired thermal regime
When designing a piping system, you should strive to ensure that the joints of pipes, fittings and fittings are in accessible places. The overall dimensions of the joint locations should make it possible to install a welding machine and place their ends onto the heater sleeves without significant bending of the pipes.
The closer to the joint the welding equipment can be placed, the less time the heated edge will have time to cool before welding. Such cooling during transportation leads to a significant decrease in the strength and durability of the joint.
It is also necessary to consider the sequence of installation of joints. It is not uncommon for inexperienced designers to find it impossible to install the last joint because the soldering iron simply does not fit into the remaining gap. You have to either strongly bend the pipes, creating residual stresses in them, or cut them and add another joint. Both solutions reduce the overall reliability and longevity of the system.
Experienced shareholders formulated the following recommendations:
- welding equipment must have a high-quality thermostat that ensures accurate setting and stability of maintaining the heating temperature;
- the distance from the welding point to the apparatus should be no more than 1 meter;
- welding should be carried out at room temperature;
- Before connecting, you need to check the temperature equality of both parts.
Following these simple rules will help you solder pipes efficiently.
Peculiarities
Unfortunately, budget soldering irons are not always equipped with thermostats, and this is a big minus. After all, it is difficult for beginners to determine when the temperature is insufficient or excessive. In addition, not all home craftsmen will use the purchased soldering iron often. And spending a couple of thousand rubles on a device that will gather dust on a shelf for years is not the most rational decision.
Read also: Rating of the best soldering irons for polypropylene pipes
There is also another drawback of budget soldering irons - their unsatisfactory workmanship and sometimes poor-quality finished seam. So why buy a low-quality item and then use it a couple of times and throw it into the far corner? It is better to make a soldering iron with your own hands from improvised materials and a couple of resistors.
Of course, a homemade tool won't be as good as a $200 soldering iron, but it will definitely help you with one-time minor repairs. In addition, you yourself will know what it is made of and will be able to choose better materials. Instead of cheap plastic (which can be found in all Chinese soldering irons), take aluminum. Then your device will be head and shoulders above budget store-bought soldering irons. It is enough to apply minimal knowledge of electrical engineering.
The most common mistakes
Beginning solders often make such typical mistakes when soldering PP pipes, such as:
- Trying to weld dirty edges. Poor cleaning and degreasing will not allow you to create a strong and durable connection.
- Incorrect calculation of wall thickness. It leads to insufficiently deep heating and the creation of a joint of reduced strength.
- Failure to comply with the time parameters for warming up, soldering and cooling. Both underheating and overheating are harmful. Failure to comply with the pressing time prevents the formation of a strong and durable welding layer. Excessively rapid cooling of the joint causes thermal deformation.
- When inserting a piece of pipe into the fitting hole, you should not do it completely, but leaving a gap of one or two millimeters. It will be filled with suture material, otherwise the excess will form an internal bead.
- Exceeding the clamping force also leads to squeezing out excess burr inside the pipe and reducing the effective cross-section.
- Incorrectly prepared connection. It only takes a few seconds to join the edges. If they are connected incorrectly, violating the overall geometry of the pipeline and the orientation of fittings and fittings, it will not be possible to correct the error.
- Pipe quality. You should not skimp on material or buy different brands. They can have different chemical compositions and different heating temperatures. Apparent savings will result in a reduction in the service life of the system and significantly higher additional costs.
Content:
Today, more and more practical owners, accustomed to doing everything in the house with their own hands, are mastering plumbing work. Indeed, why call a plumber, wait for him all day, monitor his work and pay a lot of money for it. For example, installing plastic pipes in the bathroom and kitchen in an ordinary apartment can cost more than 3,000 - 4,000 rubles, and this does not take into account the cost of materials. You can save a lot of money if you do the installation yourself. There would be a desire and a tool suitable for the job - a special soldering iron and several auxiliary devices. We'll tell you which ones exactly.
Main mistakes when welding and soldering polypropylene pipes
And now the system is ready. Pressure testing is done, and the joints leak. It seems that everything was done using technology, but such a nuisance came out. What could be the problem:
- The pipes were not warmed up enough. As a result, the seam turned out to be leaky.
- Poor connection. When connecting the pipe and fitting, a tight connection did not take place. Work must be carried out with pressure and inserted until it stops.
- The edges are not deburred. As a result, a gap may form.
- The fitting or end of the pipe was wet. Water will not give a complete seal.
- Pipe and fitting from different manufacturers. Poor soldering may also occur due to differences in chemical components.
Or the opposite effect may occur - water does not flow through the pipes.