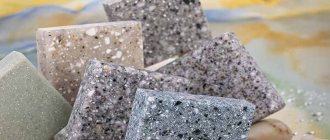
These dry slabs are usually gray-green in color. Less common is red, yellow or white. The thickness of the tiles varies from 10 to 50 mm, however, it is not recommended to use material thinner than 20 mm for paving due to the insufficient strength of the resulting paving surface.
The popularity of plaster is easily explained by its affordable price and original appearance, which can emphasize the natural design of garden paths, as well as small areas. This natural stone is sold in both processed and unprocessed forms, but, in any case, it is easily adjusted to the required size and configuration using a grinder with a diamond wheel.
Plaster laying options
To emphasize the natural beauty of the landscape in the yard, they use plastic. The material is a tile of the same thickness with various geometries. The stone is gray-green in color, but may be yellow or reddish. Untreated plastic has a lower cost than polished one.
You can place stones in the yard in the following ways:
- In rows. The flatbed in the yard is laid out “in a running start”. The gaps between the stones are filled with crushed stone or soil. In between, you can sow grass seeds.
- The material is laid out in scaly-arc-shaped or segment-arc-shaped patterns. To make the yard look nice, it is important to ensure that you get full-fledged pictures on the surface when laying.
- Arbitrary arrangement of stones in the yard. To obtain a beautiful coating, it is recommended to invite professionals who specialize in paving yards with plastic.
The composition of the plaster includes sandstone, quartzite, dolomite, shale, shungite. For installation, it is recommended to choose stones with a thickness of 3–5 cm.
What tools and materials will be needed
To properly place a plasterboard in the yard, you need to have the following tools:
- grinder;
- rubber mallet;
- rule;
- several shovels;
- cords and stakes;
- level;
- spatulas.
The materials you will need are the stone itself - clay, cement with sand and glue.
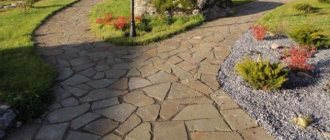
By laying plasterboard in the courtyard of a private house (pictured) you can decorate and improve the area
Greenery grown in the form of a border will help to emphasize the naturalness of the stone.
Stonework will protect the yard from dirt
Using a plaster, you can equip a terrace, a place to relax, or a parking lot.
The seams between the stones can be filled with cement or left free
Conclusion
Plastushka is an original, natural finishing material. It is durable, looks good, and goes with any decor. If the technology is followed, the facade will serve for decades without needing renovation or restoration.
Forum members share the secrets of the technology in the topic of natural stone on the facade, and cladding with Dagestan stone is now at the peak of popularity. For fans of siding - a video about the features of selection and installation.
Subscribe to our Telegram channelExclusive posts every week
How to lay plastushka on the ground
If the thickness of the plaster for laying paths in the yard is from 5 to 7 cm, then you can do without a concrete base. In this case, the material is laid on the ground, gravel or sand.
First you need to choose a thick stone of the right size. The path should be slightly higher than the soil level so that rainwater has somewhere to go.
A plastik path without a concrete base is built as follows:
- First, markings are made using pegs, rope and tape measure.
- Then they dig a trench 25–30 cm deep along the marked boundaries.
- Install a fence or border along the paths.
- The ground in the drainage trench is covered with gravel 15 cm thick.
- Compacted by hand.
- A 10 cm layer of sand is also laid on top.
- Compact the sand cushion.
- Stones are laid on top. Compact them into the soil with a rubber mallet.
At the end of construction work, a level is used to check the correct placement of the stone. Detected irregularities, bevels or broken geometry are eliminated. At the end, the result is secured by filling the seams between the masonry elements with fine gravel and sand.
How to lay plastushka stone in the yard on sand
If the stones are no more than 3 cm thick, laying the plaster on the dry mixture is done in a slightly different way:
- At the first stage, the site is prepared by removing the top layer of soil. If heavy vehicles will drive into the yard, the depth of the trench should be about 50 cm, with 30 cm covered with sand.
- If the soil is stable, dig a trench 30 cm deep and fill it with sand. Each 5 cm layer must be watered and compacted.
- To ensure that water quickly drains from paths in your yard, it is important to use gravel between layers of sand. It must be poured onto waterproof geotextiles.
- Stones are placed on top of the sand, leaving a gap of about 3 mm between them. The gaps between the sheets laid out in the yard are filled with a dry mixture, watered and compacted.
Advice! Geotextiles under gravel and sand when laying paths in the yard prevent the germination of weeds.
Preparing the base
Regardless of whether it is a wall or a plinth, the base must be strong, clean, and always primed.
Some recommend mixtures such as “Concrete-Contact” containing abrasive, but this is a waste of money. What is important is the adhesion of the glue to the surface, that is, its penetration, and not the roughness that such a primer gives. It is worth choosing a concentrate with antiseptic additives, deep penetration.
Under a sheet thicker than 3 cm, a reinforced layer is made - a mesh, on dowels. It can be mounted directly on brick, without plaster. When the base is plastered and the sheet is thinner than 3 cm, you can do without a mesh, but the wall should be as smooth as possible. If the base is a layer of insulation or an OSB board, reinforcement is required.
How to lay and glue plasterboard on concrete
You can lay garden paths made of plastic on concrete with your own hands. The technology for laying stone paths in the yard is as follows:
- A drawing of future paths is drawn on the sheet.
- At the beginning and end of the paths, stakes are driven in on both sides and the cord is pulled. Thus, a guideline for work is obtained.
- A trench up to 35 cm deep is dug inside the marked area. The bottom is covered with crushed stone and sand and compacted well.
- Concrete solution is poured on top and allowed to harden for three days.
- Before laying, natural stone is cleaned of sand and debris and dried. In some places, the building material is processed with a grinder so that it can be tightly placed when laying paths in the yard.
- After the cement has completely dried, the material is laid out on the prepared base without using glue. Work begins from the center of the path. The largest stone is placed in the center, then the remaining elements are adjusted to it.
- Glue intended for laying stones in the yard is diluted with water to the desired consistency, then mixed with cement and sand.
- The adhesive solution is applied evenly to the material, which is lightly pressed into the soil. The glue that comes out is removed with a spatula.
- To make adjacent stones fit closer to each other, when laying them, tap them with a rubber hammer.
After finishing the procedure of covering the paths in the yard with plastic, they are allowed to dry for two days so that the glue sets well. After a while, the paths can be washed or treated with special products.
Advice! When laying stones dry, it is recommended to number them so as not to get confused about where each element should be located. It is better to write the numbering together with the number of the adjacent tile with which the stone will be joined: for example, 5/6 or 3/7.
You can evaluate the paths laid from plastic in the video.
How to cover the plastushka after installation
After the yard has been lined with plaster, it is advisable to treat the natural stone with impregnation. The protection will highlight the natural color and structure of the material, and will also prevent the negative effects of water and dirt.
Natural stone can be protected:
- impregnation that does not change the appearance of the material or highlight the color;
- varnish that adds matte or shine;
- a detergent that removes dirt and greasy stains;
- special glue, polish.
Protected from dirt, stains and other defects, paths made of plastic can last a long time. They are not afraid of moisture, loads, wear.
Protection
After laying, sandstone must be treated with a protective agent. This can be a shiny or glossy varnish, stone impregnation or water repellent. The treated stone becomes moisture resistant, will not become covered with fungus or mold, and dirt will be easy to wash off. And the resulting “wet stone” effect significantly increases decorativeness.
Bosy047FORUMHOUSE Member
I decided to see what it would look like. I wetted one half with water and left the other half dry. There is no doubt left: in a week, as soon as it dries, I will treat everything with a water repellent.
How to make a flowerbed from plastic with your own hands
Before making a stone flowerbed, it is important to first mark the area. If the flower garden is planned to be of a simple shape (in the form of a square or rectangle), the layout is done immediately on the ground. A more complex configuration is drawn on a sheet of paper, and only then is the plan transferred to the ground. Boundaries are marked with stakes and rope or sand.
Technology for laying plasters for flower beds:
- Large, stable stones are chosen for the flower garden. Remove moss, plaque, dirt. The material is washed well.
- The top layer of soil is removed along the perimeter of the flowerbed and a ditch is compacted. The ditch is half filled with sand and a layer of clay is laid out in several rows. When laying boulders, it is important to ensure that they are in reliable contact with each other.
If you plan to make a high fencing of plastic around a flower bed, the stones are bonded together using cement mortar.
Advice! Cleaning elements using chemicals should be done away from the future flower bed so that the chemicals do not get into the soil. After cleaning, the boulders are washed under running water.
Methods for laying stone on mortar when constructing a flowerbed fencing in the yard:
- Seams and empty spaces are filled on both sides with cement composition. The masonry will be durable.
- With the second method, the solution only fills the voids inside the masonry. The front side is not touched. With this method, water will get into the cracks, which is why the flowerbed fence can quickly collapse.
Advice! When stones constantly touch the ground, they get dirty and don’t look very attractive. Contamination can be prevented by treating the material with hydrophobic impregnation. Also, such a product can harmoniously emphasize the texture of the paste.
Recommendations and common mistakes
To avoid mistakes when laying stones in the yard, you need to listen to the following tips and warnings from experienced builders:
- To save money, it is important to correctly calculate the required amount of material for laying paths in the yard.
- When choosing a stone, it is important to take into account the nature and intensity of use of the paths. For surfaces on which cars will drive, it is better to buy slabs 6 cm thick. For pedestrian paths, slabs 3 cm thick are suitable.
- It is also important to properly make the base for the path. Before paving stones, it is recommended to cover too soft ground with crushed stone and sand.
- The plastushka should be laid out mixed with white cement.
- The voids are filled with cement composition. This is necessary for the strength of the path.
- When purchasing, it is important to look at the quality of the stone.
- When laying, it is important to immediately remove any exposed glue with a spatula so that after drying it does not distort the external beauty of the paved path.
- To save time when selecting stones for laying paths in the yard, it is important to number them. The numbered elements are quickly lubricated with glue and attached to the base. This makes the paving process much faster.
- It is recommended to first press the side of the stone adjacent to the already laid element to the ground.
- When paving, it is important to ensure that all the sheets are located on the same level. The thickness can be adjusted using glue. It is laid out on the stone with a trowel. At the same time, make sure that there are no air bubbles.
The edges of plastered paved paths in the yard can be decorated with borders. Stones are laid along the perimeter of the paths and leveled to the desired shape with a grinder. To make the stones neat, they are coated with polyurethane varnish or another product.
Final stage
After the paths are made, you need to let them dry. It should take 1-2 days before you start walking on them. The next day, the finished path can be washed. Do not worry that the glue will not dry due to water. It will not happen. After a couple of days, a hollow will form between the stones, and the sandbox tiles will darken. You can achieve a “wet” effect by covering the road surface with polyurethane varnish. Finally, the resulting sidewalk is decorated with curbs and curbs from the remaining material. You shouldn’t make them very high; the optimal size is 4 cm.