If, instead of the expensive, labor-intensive construction of capital concrete paths in the garden, you pave neat paths from plastic with your own hands, you will not only save time and money, but also give the landscape of the area a harmonious natural look. Unlike concrete, brick and ceramic tiles, plastic is a material of natural origin that will best fit into the garden landscape, and paths made from it will look as natural as if they have decorated your garden since the moment it was laid.
What are the specific features of garden paths made of flat stones?
The idea of building a stylish and original path made of plastic in the garden is to the liking of land owners who prefer natural landscape designs. Besides their aesthetic appearance, these trails have other positive qualities. Among them:
— the need for small capital costs for construction; — durability guaranteed by the excellent strength characteristics of the stone; - texture and unusual texture of the paste; — minimal labor intensity of work due to the ease of processing and cutting stone with an ordinary grinder; — resistance of the path to environmental influences, temperature changes and humidity; - excellent functionality and practicality.
When to start finishing the basement
It is best to finish the base after the blind area around the house has been made. In this case, the finishing material will hang over the path. As a result, even the most slanting rain or streams of water flowing down the walls will not be able to get between the wall and the blind area - the water hits the path at a distance of several centimeters from the joint. It is through this joint that water penetrates to the foundation, bringing dampness and other problems.
You need to start cladding the basement of the house after the blind area around the house has been made
One more thing. Many people are thinking about whether to insulate the basement or not. If you want to save on heating, the answer is to insulate it, just like the blind area. The unit for insulation and cladding of the base - one of the options - is shown in the photo below.
When installing an insulated base, EPS boards are laid under the finishing
When using the basement as a residential floor, there are no questions regarding insulation, since the answer is clear - insulate it, of course. But even if you don’t have a subfloor, heating costs will be much lower, and the floor in the house will become much warmer.
Garden path made of plastic: requirements for the choice of material
Before you make a path out of plastic with your own hands, you need to take care of preparing the material. Not only the type of path, but also its durability depends on the quality of the prepared stone, so the criteria for choosing the material are quite strict. The stone must be sorted by thickness and size, cleaned of dirt and well dried.
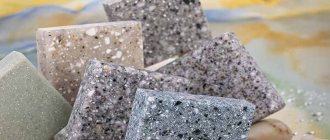
In work, it is allowed to use plastic of various configurations - it may differ in color and density, but at the same time it must meet the main requirement - to be durable and of high quality. Thus, the garden can be decorated with a path made of plastic, which has a chocolate, gray or ash tint. Also, the owner of the site can choose a stone of more intense and original shades, namely a burgundy, green or white plaster. Considering that the material consumption for paving one square meter of a garden path is relatively small, the costs for purchasing raw materials will be corresponding.
What set of tools will the master need to implement the idea?
In order for the paths in the country house made of plastushki stone to please your eyes and reliably fulfill their functional purpose, they need to be properly paved, using simple construction equipment during the work. This:
- capacious construction trough; - Master OK; - level; - roulette; - hammer; - marker or pencil for marking; - pegs and twine rope to delimit the garden area; - shovel; — manual rammer; - rubber mallet; — personal protective equipment (work gloves, shoes with thick soles); - Bulgarian, etc.
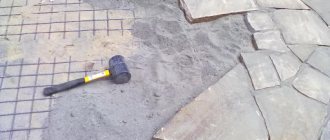
Technology for paving a path from plastic clay without a concrete base
If the construction of a permanent concrete foundation for a path is not included in the plans of an individual developer, then he can pave the plastushka on a bed of gravel and sand. This laying technology is acceptable if a fairly thick stone is prepared for the path. The optimal thickness of the plaster, according to experts, is from 5 to 7 centimeters.
When the thick stone is prepared, they begin to build the path. It is built a few centimeters above ground level. This requirement must be observed in order to ensure the outflow of storm and melt water and thereby extend the life of the path in the garden.
The scheme of work is as follows:
- Marking the boundaries of the path using twine, pegs and tape measure
- Creating a drainage trench 25-30 centimeters deep along the marked boundaries
- Installation of a fence or border along paved paths
- Creating a gravel embankment 15 centimeters thick in a prepared drainage trench
- Compacting gravel with a hand tamper
- A sand embankment is created on top of the soil layer, its height should be at least 10 centimeters
- Compacting a cushion of crushed stone and sand
- Laying stones on a cushion and then driving them into the embankment using a rubber mallet
At this stage, the main work on the construction of the path without a concrete base is considered completed. The home craftsman can only use a building level to check the correctness of the stone laying and, if necessary, eliminate any detected defects in the form of unevenness, bevels or irregularities in geometry. When everything is corrected, you need to consolidate the result and fill the seams between the flagstones with a mixture of fine gravel and sand.
What is the difference between the technology of laying on a concrete base: pros and cons?
Having free time, the owner of the site can use a more complex technology - paving a plaster on a concrete pad. In this case, he does not need to focus on the thickness of the stone, because this technology provides for the use of the cheapest thin flagstone, which is given additional strength by a strong concrete base. The concrete pad is constructed in several steps:
How to put a plastushka in the yard
Many owners of summer cottages lay out paths in their yard with natural or decorative stone. The ideal material for this is plastic. Or, as experienced builders call it, “savage stone.” Thanks to him, the area looks natural and harmonious. Not everyone knows how to place a plasterboard correctly. This will be discussed in this article.
Types of stone
Externally, the stone looks like some kind of unprocessed tile of irregular geometric shape. They usually have the same thickness but different sizes. This stone is one of the cheapest in its segment. It is easy to care for. In addition, anyone can lay out paths in the yard with them, since laying the sheet is very easy.
There are several types of natural stone. The most popular is sandstone. It got its name due to its composition. It comes in different thicknesses. For those who don’t know how to lay plasterboard in the yard and what size to use, we’ll tell you - for paths in the garden and summer cottage it is better to take sandstone with a thickness of 3 to 5 cm.
The stones come in different shades, the most common being gray stones. When moisture gets on the tiles, they may turn dark green. Less common are stones of red or yellow shades.
How to place a plastic sheet correctly? You can use both polished tiles and wild stones. Another advantage of this material is that it is the most durable compared to its analogues. However, the technology for laying the “savage” is a little more complex than that of paving stones or concrete, but this does not prevent the paving stone from taking a leadership position.
Advantages of flat tiles
This finishing material is in great demand among owners of personal plots. The advantages of this stone include:
— ease of processing (if you use a grinder);
- low cost;
— natural and environmentally friendly material;
— practicality;
— resistance to influences (mechanical, chemical, etc.)
- high strength.
How to unload stone without pallets?
When purchasing sandstone, they usually ask if you have special pallets for unloading. If there are none, don't be upset. You need to follow the instructions:
— choose a place to unload the stone;
- level it out;
- draw the boundaries of the future pack;
- start laying stones strictly along the perimeter of the designated area;
— it is better to lay large tiles in the middle, and then fill in the voids.
A pack of stones should be no more than 1.5 meters in height.
Tools for laying out sheets yourself
Since you need to lay the sheet carefully and beautifully, it is advisable to use the following tools:
- a pickaxe and a rubber mallet;
- level and tape measure;
- grinder;
- a shovel;
— pegs for marking and cord;
- spatula and glue brush.
To prepare the solution, you will need cement and sand, as well as glue for laying natural stone.
Laying technology
Every specialist knows how to lay a plastic sheet. However, ordinary summer residents or owners of country real estate do not know all the secrets of the technology for working with this stone.
You need to start laying tiles from the middle of the path, in this case we are talking about a trench with concrete mortar. The largest stone is placed in the center, along which the rest will be “fitted”. It is desirable that it be the thickest and most beautiful.
Subsequent slabs will be raised to its level using glue.
Select stones with a minimum distance and gap in relation to the main one. For convenience, you can label the tiles with chalk so as not to get confused. Some advise indicating the number of the adjacent stone in order to understand which one it borders on, for example 1/5, 2/3, etc. During the work, you can cut the tiles to the desired size.
Experts call this installation method “dry”. First, the tiles are simply laid out on the dried mortar and, if necessary, glued.
To do this, you will need a special mixture for working with natural stone, which is not cheap. But experienced builders have learned to save money. First, mix the glue to the consistency of liquid sour cream, then add sand and cement. Then the solution is thoroughly mixed and placed on the prepared surface. The installation site must be thoroughly cleaned; you can even vacuum the working foundation.
In order for the paste to look beautiful and even, the mixture must be applied evenly, without lumps or air cushions. The presence of the latter is unacceptable, since frozen water that gets there can easily split the stone.
Once the adhesive has been applied, the tiles can be laid. You need to press hard on it so that all the excess glue comes out. They can be removed with a spatula. First you need to press on the edge of the tile that is closer to the adjacent one. Using the adhesive mixture, adjust the height of the stones so that the path is level. Since the tiles are numbered, the installation process will not take much time.
Final stage
After the paths are made, you need to let them dry. It should take 1-2 days before you start walking on them. The next day, the finished path can be washed. Do not worry that the glue will not dry due to water. It will not happen.
After a couple of days, a hollow will form between the stones, and the sandbox tiles will darken. You can achieve a “wet” effect by covering the road surface with polyurethane varnish. Finally, the resulting sidewalk is decorated with curbs and curbs from the remaining material.
You shouldn’t make them very high; the optimal size is 4 cm.
Tips and Cautions
After reading the instructions described above, you learned how to lay a flat stone correctly. However, advice from experienced builders will not be superfluous:
— Correctly calculate the amount of material so as not to spend extra money.
— The thickness of the stone depends on the nature and intensity of use; for a car path it is better to use 5-6 cm slabs, for pedestrians - 2-3 cm.
— Pay special attention to preparing the base. If the soil is too soft, it is better to replace it with a layer of crushed stone. Everything is sprinkled with sand on top and leveled.
— Place the sheet as close to the installation site as possible.
- Use white cement for contrast.
— Be sure to fill the voids with cement mortar.
— Be careful when purchasing: the seller must add you a certain amount of stone, the so-called “void factor.” Usually it is equal to 0.9-1% of the total number of slabs.
Having made garden paths from plastic with your own hands, you will definitely be satisfied with the result.
Source: https://fb.ru/article/154171/kak-klast-plastushku-vo-dvore
Advantages and disadvantages of the material
The positive qualities of sandstone tiles include:
- sufficient strength for arranging paths;
- original appearance of the paved surface;
- environmental safety;
- long service life;
- high levels of frost resistance and resistance to changes in outside temperature.
The main disadvantages of the plasterboard are the need to use more complex laying technology and the impossibility of using it in places with increased weight load. For example, in parking areas or for paving the driveway to the house.
Advantages of flat tiles
This finishing material is in great demand among owners of personal plots. The advantages of this stone include:
— ease of processing (if you use a grinder);
- low cost;
— natural and environmentally friendly material;
— practicality;
— resistance to influences (mechanical, chemical, etc.)
- high strength.
Materials and tools
To pave a walkway covered with natural stone, you will need the following materials:
- plasticine;
- cement grade PC400;
- river or washed sand;
- fine gravel or crushed stone;
- geotextiles;
- adhesive mixture for tiles.
Tools required to complete the work:
- tape measure 5 meters long;
- cord;
- building level;
- bayonet and shovel shovels;
- plaster rule;
- rubber hammer;
- set of spatulas.
For large volumes of work, it is recommended to use a concrete mixer to prepare concrete and mortars. A small path of plastic can be paved using a tub for manually preparing mixtures.
In addition, a vibrating plate or manual tamper will be required to compact the soil and bulk materials.
How to fix porcelain tiles or clinker tiles
If heavy materials such as porcelain tiles or clinker bricks are simply placed on glue, on a plastered surface with grooves, perhaps they will stick normally. And they can even stand for some time. Even several years. But then they will begin to fall off along with the solution. Especially in places where there are no grooves or they are of insufficient depth. To improve adhesion, you can apply a layer of impregnation that improves adhesion (grip), but this is not a guarantee, especially if the material is heavy.
The same picture will happen if you glue the materials directly onto the insulation. The surface is smooth, easy to glue. But after a while the finish will fall off. Faster than with a plastered surface. There is a video about this.
To prevent this from happening, it is necessary to secure a metal painting mesh, preferably galvanized. It is secured with dowels, placing a piece of galvanized steel on the dowel-nail, the size of which is larger than the size of the cell. They are attached at the top, bottom and in a checkerboard pattern in the middle. This creates a reliable basis for material of any weight.
Glue is applied to the base and to the tiles. On the tile, remove it with a notched trowel, put it in place, tap the trowel handle and put it in place, leveling the plane. The distance between the tiles is maintained using crosses, only their thickness is taken to be significant 3-5 mm.
In general, the installation technology is similar to laying tiles. The only difference is that the glue must be special for outdoor use. The second difference: finishing materials for the plinth begin to be laid from below: they are heavy and need support. You rest the bottom row on the blind area, the second row on it, etc.
Drainage layer arrangement
The drainage layer of garden paths is necessary to remove moisture coming from rain, melt and groundwater. To install it, a trench 30-35 cm deep is dug across the entire width of the future covering. The bottom of the trench must be compacted and lined with geotextiles. This is necessary in order to prevent the germination of weeds and to ensure the possibility of reliable drainage of moisture into the soil.
Scheme of a plastic track.
On top of the canvas is sprinkled with a small amount of sand and a layer of crushed stone 15-20 cm thick. The crushed stone is covered with another layer of non-woven textile so that the concrete does not mix with the drainage layer when pouring.
Creation of a site drainage system
The drainage system of the site is designed to lower the level of groundwater in the yard and facilitates the complete drainage of surface water. To create surface drainage, plastic systems are most often used, which can be purchased at many hardware stores. They should be installed on the site as described in the instructions included with the kit.
Thanks to the drainage system of the site, excess moisture from the soil enters the pipes through holes and is then discharged into special wells.
Usually, to install surface drainage, grooves are dug in the area, the bottoms of which are filled with sand and, optionally, crushed brick, crushed granite or rubble stone. After laying special drainage pipes, the grooves are filled with sand and crushed stone, covered with turf and the whole thing is covered with earth.
Deep drainage copes with the decline in groundwater levels. To install it, deep trenches are usually dug into which drainage pipes are placed. After this, they are also buried, as described above. Surface and ground water are usually directed through pipes to a collection point. Most often it turns out to be a well, which is located at the lowest point of the site.
The drainage pipe is usually a plastic pipe with many holes, the diameter of which can range from 1.5 to 5 millimeters. It collects surface or groundwater. You can use a plastic well. This design is not at all expensive, but it can provide for many years complete drainage of the entire area lined with wild stone.
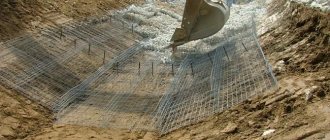
Preparing the concrete base
Since the plasterboard is laid with your own hands on tile adhesive, a reliable solid base is required, which in this case is made of concrete. Its thickness is 7-10 cm and depends on the thickness of the plaster, the surface of which should ultimately lie 3-5 cm above ground level. Reinforcement of such a layer is not necessary for a pedestrian path.
The concrete mixture is prepared on the basis of PC400 cement with such a ratio of components to obtain concrete grade M250. After pouring, the solution must harden for at least 72 hours.
Paving the yard with granite paving stones
The usual version of row masonry of granite paving stones implies tolerances on linear dimensions, while the seams are smooth and located in the same direction. First, the outer stones are installed so that they can be used to guide the height of the entire site. Usually they are laid on a prepared surface covered with a dry mixture. This involves using rubber hammers to drive each stone to a depth of at least one third of its height.
When the entire area is paved, it should be covered with sand and swept at least four times. If it seems unreliable that the stones are compacted in sand and dry mixture, then you can fill the seams in this way: first, clean the space between the stones with a scraper to a depth of about 3 cm and then fill it with a solution of a two-component binder emulsion mixed with quartz sand. After which you need to leave the yard paved with paving stones to dry.
Paving a yard with stone can be done by almost anyone who knows how to properly handle construction tools and who has the slightest understanding of building materials. However, before you begin installation, you should consult with a specialist.
Tiling and finishing work
While the concrete base is curing, the natural stone can be prepared for installation. To do this, the plaster is laid out near the trench and the individual elements are adjusted to each other. Cutting sandstone is done with a grinder and a diamond wheel.
Thicker and larger stones are placed closer to the middle of the garden path, and thin and small stones are placed along the edges. This will provide better coating strength and the ability to install small slopes for rain and melt water drainage. To avoid errors, it is recommended to number the tiles after preliminary adjustment.
After the concrete mixture has set, the plaster is glued to the base. This is done using a special tile adhesive. Considering the high cost of the material, cement and sand can be added to it when mixing. A layer of adhesive is applied to the surface in an even layer, and when laying tiles, the surface level is leveled by tapping with a rubber hammer. Protruding excess adhesive mixture is removed with a spatula.
After laying the path with your own hands, all seams must be filled with a cement-sand mixture and watered. After 3-4 days this operation must be repeated.
Natural stone is often used to design garden paths. Another, more popular name for this material is “plastic” (see photo).
The stone has the appearance of untreated tiles, which can be of various shapes. Folding like a mosaic, these tiles make the design of the path in the garden unique.
The advantages of plasterboard include its availability, strength and ease of installation.
Work order
The technology for laying plastic on a path with your own hands involves several stages:
- planning and marking;
- installation of a drainage layer;
- preparation of the concrete base;
- laying tiles;
- finishing works.
Before laying the plasterboard, it is recommended to draw the planned location of the path on the site plan. It should be taken into account that the distance to garden trees should be at least 1.5-2 meters to prevent damage to the base due to roots.
Marking with pegs.
The width of the path should be at least 0.8-1.2 meters in order to provide opportunities for two people to separate on it. The direction of the slopes should exclude the direction of water flow towards buildings.
After drawing up a situational plan, marking is carried out. To do this, use pegs, a cord and a measuring tape.
Material Information
Before laying down the sheet, let’s find out all the information about the material. This natural stone consists mainly of sandstone with the addition of slate, dolomite and quartzite. The average thickness of the tiles is from 5-8 cm. As a rule, the stone has a pleasant neutral gray-green color (see photo). In the rain, the tiles will take on a dark gray hue.
The plastic can be polished or untreated, depending on the needs and preferences of the buyer. In any case, just a little work with the grinder is enough and you can become the owner of a neat, durable and reliable garden path.
How to cover the basement of a house
There are a lot of materials for finishing the base. Main requirements: moisture resistance, frost resistance, strength. The following materials satisfy these requirements:
- Natural stones sawn into plates (flagstone) or chipped, so-called “torn stone”: sandstone (flagstone);
- granite;
- marble;
- slate;
- dolomite;
- shugnit.
Some of them cost a lot, some are insignificant, but all of them can be used. The material is chosen based on financial capabilities and previously used finishing materials - the aesthetic component also plays an important role. The technologies for finishing plinths with different materials will be discussed.
Tools for self-installation of plasters
To properly lay a stone plaster, you need to prepare some tools.
The arsenal should include:
- shovel;
- rubber hammer;
- mason's pick;
- roulette;
- rule;
- cords and pegs to create markings;
- putty knife;
- stone cutting wheels;
- hard glue brush.
It will be necessary to cut with a grinder, which means that it also needs to be prepared. In addition, you will need to purchase cement, sand and glue.
Facing with boulders or small cobblestones
It is not necessary to buy a boulder or cobblestone. You can collect it on a river or on a pebble beach at sea. Rolled stones are chosen to be flatter - round ones are more difficult to “mount”. The procedure and all other subtleties are almost the same as in the case of finishing with natural stone. The only difference is that these stones must be washed in water and detergent before use. Firstly, the water in our ponds may have oils in it and need to be removed, and secondly, there may be clay or algae in it which can cause the finish to fall off.
To make everything look organic, you can first lay out a “picture” of cobblestone cladding on the path next to the place where you will cladding the base. They have different shades and their random combinations are not always attractive. By laying everything out side by side you will have an idea of what the end result will be.
Watch the video about the features of finishing the plinth with cobblestones.
Laying the base of the garden path
Before you begin installing a garden path, you need to decide on its shape and location on the site. Straight classic paths made of plastic will add rigor to the landscape design of the garden. Straight paths intersecting each other can divide a plot of land (or garden) into several zones. Winding paths look more interesting than straight paths and suit almost any landscape design style. In order to make a garden path strong and durable, you will need to lay a solid base underneath it.
Application options
Although many people believe that only the base is finished with plastic, this is wrong. This decorative and durable material is universal.
- Facade decoration is rare, but it looks amazing.
- Zonal finishing - window and door openings, corners. A common option, the main thing is to choose the right basic finish.
- Formwork and walkways look nicer than bare cement and will last longer.
- Columns - under a canopy, in a gazebo.
- A patio is a popular element of modern yard design.
- Barbecue area - decorative elements are also lined when the fireplace is large, and the area in front of the grill is lined. If the barbecue is combined with a covered gazebo, the plastushka is placed on racks and along the fence.
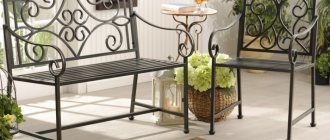
- Elements of landscape design - flower beds, alpine slides, pavements, benches.
- Fences – both posts and main fences.
The stone goes well with brickwork and wood, with decorative plasters and clinker. A typical siding facade, shaded with a stone plinth, will look more advantageous.
Forum member Candy, from Moscow, combined a plastic sheet with a brick.
CandyFORUMHOUSE participant
The walls are made of facing bricks, golden-straw color. The sandstone on the base is light green. So that there is no upper edge - the base will merge in level with the wall - they were removed with a plastic sheet. We chose a stone with a torn edge; it looks better than edged stone with brick.
The process of laying plasterboard
Before placing the plaster, it needs to be sorted and prepared. You should get rid of clay, sand, debris, and dry the stone. Individual parts will need to be cut or grooved with a grinder. This will allow the tiles to fit together.
Next, we choose the most successful (beautiful) stone and install it right in the center of the future path. It is from this that all other elements of the mosaic path will diverge. Make sure that the gap between them is as small as possible.
To make the task easier, write on each tile with chalk its number and the number of the adjacent stone. Then there will be no confusion at the gluing stage.
Painting, plastering and “fur coat”
In principle, if the plaster is well leveled, after the solution has dried, the surface can be painted and stop there. This is an inexpensive but viable option. If you used façade paint that is intended for outdoor use, the base will look good for a couple of years. Then you will have to remove the old paint and paint it again to maintain the appearance.
The next method is to apply a layer of decorative plaster on top of ordinary plaster. And again, choose those formulations that are intended for external use. They can be tinted in the desired color or taken colored ones. The only negative is that plasters are often porous and splashes of dirt that fall on the walls during bad weather have to be cleaned off with a brush and sometimes with detergent.
Types of decorative plaster for finishing the base: beautiful and relatively inexpensive
The method of finishing the base “like a fur coat” is still popular in some areas. This is when the solution is not applied in an even layer, but in small fragments. Previously, they did this with a broom made of twigs. They dipped it into a liquid solution and hit the stick with the handle so that the splashes flew onto the wall. This is how they made “fur coat” - a finish with a torn surface. Today there are special devices for applying plaster, powered by a compressor. With their help, it is easier to make such a finish.
Finishing the basement of a house using materials in the form of slabs or tiles is technologically more difficult. To prevent it from falling off, you need to know some subtleties.
With concrete base
To properly lay the sheet, you can use a special glue designed for natural stone. But first, we need to thoroughly clean our concrete driveway base. It must be perfectly clean.
The glue should be applied to the sheet using a trowel, making sure that there are no air bubbles. You can start laying track elements on top of the glue. Press them carefully to release excess glue. You can remove the excess with a spatula. All tiles must be on the same level. You can adjust the height using the same glue (see video).
The path should be given at least a day to dry. Then you should rinse it with plenty of water. The edges of the path can be emphasized using borders made of the same material. To do this, you need to shape them with a grinder. And in order to make the stone look more neat, you can coat it with polyurethane varnish.
So, laying the path yourself is not at all difficult. The main thing is to have the necessary tools, patience and the desire to create.
What to plant on
In order to obtain sufficient adhesion to the base, and after several cycles the cladding does not crumble, it is better not to skimp on the solution. An ordinary sand-cement mixture will not hold the stone; glue is specially produced for it. Different manufacturers have their own numbering, but the general category of such tile adhesive is “Granite”. It is designed for increased load, frost-resistant, and has greater permeability. It is more convenient to work with glue: the layer is thinner, the solution is more elastic and does not shrink for a long time. During the time before setting, it is possible to adjust the position of the stone.
However, you should prepare in advance for high consumption, the plastic literally sucks up the composition. The consumption indicated on the bags can be safely multiplied by two, or even three, depending on the basis. This is confirmed by forum users.
TatianaCherFORUMHOUSE participant
The glue consumption was monstrous; 15 bags were needed for 30 squares. But the result pleased me more than the costs upset me. Everything is fine, not a single stone has fallen off in two winters. I don’t regret that we didn’t mix the glue with the cement.
How to install plastic (PVC) plinth panels
This type of finishing is called differently: basement or facade panels, basement siding. They have a varied appearance: to match different types of stone, tile, brick.
To install PVC panels on the base, you need to assemble a frame. It is made from wooden beams 50*50 mm. Since the finishing will be outdoors, the wood must be protected with impregnations that prevent rotting and protect against pests.
The sequence of actions is as follows:
- Using a level (laser or hydraulic level), the required finishing height is marked at all corners of the house.
- Nails are nailed in these places (screws are screwed in), a marker (string) is pulled between them, which marks the height of the base finish.
- A beam is nailed along this cord around the entire perimeter of the house. Its top edge should be precisely directed along the cord.
- If the height of one panel is not enough, you will need to make another row of timber on which two sheets will be joined, and you will also need the same strapping for the lower end of the panel.
Another finishing material for the plinth is PVC panels, which are also called “basement siding”
- After about 50-60 cm, short transverse bars are packed in - they will prevent the PVC panels from sagging.
- Start installation from one of the corners. There are special elements to decorate the corner. They are secured to the sheathing with wood screws.
- The edges of the sheets of plastic facade panels are uneven - with protrusions. The edge of the first from the corner must be cut off evenly. This can be done with a jigsaw or grinder, a hand saw with a metal blade (fewer teeth, you get a smoother edge).
- The cut edge is inserted into the corner element. At the top and bottom of each panel there is perforation for fasteners. This is where the self-tapping screws are secured. But they don’t need to be tightened all the way: there needs to be some play for thermal changes in size. That's why the perforation is made of an oblong shape, and it is better to install the self-tapping screw in the middle: when changing sizes, the panel will move freely and will not burst.
- The next element is joined with a special lock and secured in exactly the same way.
Assembly is easy. Only after fastening will it be necessary to make ebbs on top: the sheathing and panels have a fairly decent volume and a gap remains at the top. You can cover it with roofing iron, as in this video. Immediately look at the technology of finishing the base with plastic panels.
In the same way, the base can be finished with corrugated board. There is only one note: it is advisable to lay insulation in the voids between the sheathing. The house will be much warmer.
Mining and stone processing
The main deposits were found in the steppe and mountainous zones of Russia, Kazakhstan, Ukraine, Dagestan, Poland, and Bulgaria. The Donbass field is considered the largest in Europe. Lugansk and Donetsk sandstone is formed from spar and quartz. The color is gray-green, beige, brown, dark gray, yellow.
Crimean savage – gray-green. Mined in mountainous areas. Used for millstones, grinding wheels, sidewalks, plinth cladding.
In Ukraine there are also deposits of decorative sandstones:
- Ternopil (fine-grained gray-red, gray, scarlet stones);
- Yampolskoe (light gray and white savages).
Dagestan sandstone has warm shades of white, beige, gray or red. They are mined near the villages of Akusha and Chiri. Suitable for the construction of walls, garden decoration, interior design.
In Russia sandstone is mined:
- in Kemerovo, Rostov, Moscow regions;
- in the Volga region;
- Ural;
- Far East.
Chelyabinsk region famous for the Karabash deposit of mica and quartz flagstone. It produces golden, silver, gray, green, and brown types of stone. The remaining deposits contain black, gray, and beige sandstone.
Methods of extraction and processing:
- siliceous and quartz rocks are blasted, blocks are sawed into slabs (slabs);
- Clay or calcareous layers are chopped off and removed from the soil with buckets.
In production, sandstone is cleaned and cut into standard size stones. Then the savage is ground to remove burrs and polished (the treatment is called tumbling). The pattern and texture are emphasized with impregnation or matte varnish.
View this post on Instagram
Publication from DAGESTAN STONE Peter (@dagestkamen) July 19, 2019 at 4:01 PDT
Video about stone mining:
Sandstone tiles
Flat stone tiles are gray-green in color and dark gray when wet. Sometimes you can find yellow and red tints.
Today, several varieties of plastushka are used. The most famous of them is sandstone. Its thickness varies from 1 to 5 cm, it consists of a mixture of sandstone, quartzite, dolomite, slate and shungite. It is better to lay paths in the garden with stones 3 to 5 cm thick.
Flat stone tiles are gray-green in color and dark gray when wet. Sometimes you can find yellow and red tints.
Savage is sold both raw and polished. The technology for laying it is a little more complicated than paving slabs or concrete. But the result is worth it. In addition, plastic sheeting is more durable than other types of coatings and will serve for several generations.
Finishing the base of a pile foundation
As you know, a pile foundation does not have a base. But if you don’t block off the space, there will be drafts under the house, the floor will always be cold, and all kinds of living creatures like to live under the house. Therefore, the base, although decorative, is necessary. It can be done in two ways.
- A trench is dug along the perimeter between the supports, removing the fertile layer of soil and going 10 cm deep into the soil, the bottom of the trench is compacted, gravel is laid, and compacted again if possible. Then 2-3 rods of longitudinal reinforcement (10-12 mm) are placed and everything is filled with concrete. After 10-14 days, a half-brick wall is placed on the concrete base. You can use finishing bricks right away, or you can make them from used ones, and then finish them using any of the methods described above.
- This method is suitable for finishing the base with facade panels (basement siding) or corrugated sheeting. A frame made of impregnated timber is attached to the piles. The rest of the finishing process is no different from the standard. Except that it is very desirable to insulate this option.
The easiest way to finish a pile foundation is to attach some slab finishing material to the frame.
There is one subtlety if the house is installed on screw piles or TISE piles. Such foundations are often placed on highly heaving soils. To prevent the finishing from being destroyed when the soil is raised, it is not brought to a certain distance to the ground. To prevent animals from crawling into the gap, a metal mesh is fixed at the bottom.
Properties and applications of sandstone
Stone is used as reservoirs for water, oil products or gas in the interior. Flagstone is used for garden paths or wall cladding. Sidewalks and courtyards are made from rubble blocks. Quartz rocks are used to line the inner walls of furnaces for metal smelting and glass production.
Sandstone is made from:
- beads, bracelets;
- children's orthopedic mats;
- decorations for ponds, aquariums, fountains, containers for underwater plants;
- fireplaces;
- window sills;
- fencing, fences;
- facade and facing tiles;
- paving stones;
- laying out pools and fountains;
- strengthening the banks of ponds and springs;
- steps;
- cascades in waterfalls;
- fillers for plasters, cement mortars, concrete;
- foundations;
- walls;
- alpine slides;
- panel;
- wallpaper.
Sandstone products include tabletops and garden sculptures. For an aquarium or hybrid terrarium, pots are cut out to plant plants, mini-palaces, figurines, and bottom relief are made.
To watch a video about using the stone:
Watch a video tutorial on how to lay stone yourself:
Physicochemical characteristics
On maps, the symbol for a savage looks like a rectangle. Inside the figure is a brickwork with dots and rounded corners. The main rock-forming substance is one quartz, mica, feldspar, glauconite or more than two minerals. Among the impurities are garnet, magnetite, zircon, ilmenite, tourmaline, and rutile.
Cementing agent:
- mixed;
- sulfate;
- siliceous;
- zeolite;
- limestone;
- phosphate;
- carbonate;
- clayey;
- chlorite;
- glandular.
Therefore, different species of savage have different chemical formulas and properties. The composition is supplemented by organic fossils. The structure contains remains and imprints of flora and fauna.
Physical characteristics of sandstone:
- true density – 2.2–2.68 g/cm3 (the indicator coincides with the specific gravity);
- sand grain size – from 0.05 mm to 2 mm;
- water absorption – 0.63–1.57% (low);
- hardness – 1600–2700 kg/cube, stronger than limestone, quartzite-sandstone is equal to granite;
- frost resistance – F=50 (50 frosts + 50 defrosts), stone grade is F75;
- structure – granular;
- background radiation – class 1: Aef ≤ 370 Bq/kg (absent);
- abrasion – quartz and siliceous sandstone is resistant to friction;
- fire resistance – 1690 ºC for quartz and siliceous rocks;
- strength of dry savage – 1300 kgf/cm2;
- wet stone strength indicator – 1150 kgf/cm2;
- strength indicator after testing for frost resistance is 596 kgf/cm2.
The degree of moisture absorption is determined by porosity. The lower it is, the better the stone repels water and becomes less damp. In quartz savages, the cellularity is 0.63–1%. In clayey sandstones, the looseness is 1.5–2.73%. All types of sandstone are not compatible with urethane mixtures.
Medicinal properties
Lithotherapists associate many grains of stone sand with the cells of the human body.
Sandstone is often recommended for use in diseases of the musculoskeletal system and the musculoskeletal system. The stone can be applied to sore spots, warmed up and used for relaxation.
Acupressures are often given to savages. By influencing acupuncture points, sandstone activates metabolism, the functioning of organs, glands, brain, and hematopoiesis. Periodic pressure accelerates cell regeneration and stimulates the immune system.
Laying sandstone with your own hands
Sandstone is a natural stone created by nature. Compressed sand is the main component of sandstone, hence its name.
What is sandstone and what types does it come in?
Sandstone may contain small shells, chemical and organic compounds, and clay.
Durability and beautiful appearance make it possible to use sandstone when laying foundations, erecting walls, finishing houses, building fences and landscaping for laying paths and paving areas.
When cladding the facades or the plinth of the building, natural sandstone is used. Laying sandstone in compliance with technology protects the foundation from environmental influences and gives the building a beautiful appearance.
When constructing fences, brick pillars, concrete spans, foundations are lined with sandstone, or pillars and spans are laid out completely from sandstone.
Depending on the place where sandstone is mined and the processing method, the stone has a different color. Sandstone can be light gray, gray-green, tiger, or have various tones of yellow-brown.
Burnt sandstone has red and brown shades. This sandstone is called “fried”. Fried sandstone has a higher cost, but has a beautiful appearance and increased strength due to firing.
Yellow sandstone is beautiful, but not of the highest quality. This sandstone is not suitable for facade work. The yellow color of sandstone indicates that it has not yet been sufficiently compressed and has low density, as a result of which it will begin to delaminate in a couple of years.
The use of sandstone in various colors for cladding makes the finish especially interesting.
How to lay sandstone correctly
Laying sandstone on a horizontal and vertical plane differs in surface preparation. Regardless of where you plan to use sandstone - for paving paths, or for cladding a building, the principles of preparing the stone for work are the same.
Sandstone laying technology includes cleaning the stone. It is enough to clean the fried sandstone from dust - it can be washed with running water. Sandstone that has not been subjected to heat treatment must first be soaked.
After soaking, the stones are cleaned with a metal or plastic brush. Using a brush, you will remove grains of sand, silt and moss from the surface of the stone. In addition, when soaked, excess salt is removed from the sandstone - this prevents the formation of efflorescence on the stone after installation.
Do not forget that the dusty, dirty base of the stone is the key to the fact that over time it will move away from the wall.
After the sandstone has been washed, lay it out on a clean film, selecting the edges so that you have an idea of how the stone will be positioned on the wall or on the path.
Laying sandstone on vertical surfaces
It is rare that the entire façade of a building is covered with sandstone. Usually the base is tiled and sandstone is laid out with decorative elements along the wall.
Sandstone is laid on concrete or brick. Laying sandstone on wood is not practiced. Even if you treat a wooden surface with a special solution, sandstone will not last long there. Wood and stone have different expansion coefficients. When temperature changes occur, a gap forms between the wood and the stone, which will increase over time. As a result, the sandstone slabs will completely move away from the surface.
Surface preparation
- Clean the wall on which the sandstone will be laid from dirt.
- If the wall has loose plaster, treat it with a deep penetration primer. The primer will strengthen the plaster layer. But when it comes to facade work, loose and crumbling plaster must be removed. The surface must be strong and level.
- Moisten the surface. There is no need to apply a regular primer to the surface. Sandstone is laid on cement mixtures - for better adhesion, the surface must be wet. After treatment with a primer, practically no moisture is absorbed into the surface.
- Using dowels, secure the reinforcing mesh.
- Dilute the cement mixture for spraying. To prepare the solution, use a ready-made mixture, or mix sifted sand with cement. For 1 part cement, take 3 parts sand. The spray solution should be thin enough, but not so thin that it slides down the wall. Apply the mixture with a trowel so that it fills the joints of the brickwork, irregularities, and completely covers the surface with a thin layer.
- Prepare a solution for laying sandstone. For the solution, take 2 parts of Ceresit 117 glue, 1 part sand and 1 part cement. There is no exact recipe here for the reason that sandstone can be laid on an adhesive solution. But experts believe that sandstone holds up worse with a purely adhesive solution.
- Start laying sandstone from bottom to top. You can start laying after the spray layer has dried - after 2-6 hours, depending on the layer and weather conditions.
- Apply the solution to the surface. The layer of mortar depends on the thickness of the stone. Level with a notched spatula. The heavier the stone, the larger the spatula teeth should be - up to 10 mm.
- Position the stone in the wall and press it into the mortar. There should be no air voids left under the stone.
- Immediately remove any solution that gets on the front of the stone with a damp sponge, without allowing it to set.
- After the solution has dried, the seams are rubbed down and the sandstone is varnished.
- If trimming is necessary, the flagstone is cut with a grinder.
Description of the stone
Sandstone, or wild stone, is a naturally cemented granular sedimentary rock. The main component is sand made from spar, glauconite, mica, quartz, and other minerals of various origins. Strength depends on the binder.
Cementes grains:
- alumina;
- kaolin;
- calcite;
- opal;
- iron oxides;
- chalcedony;
- carbonate;
- zeolite;
- dolomite;
- chlorite;
- phosphate;
- gypsum;
- other minerals.
Clay rocks are classified as low-quality stones because they deteriorate faster. Silicon or quartz sandstone has maximum resistance to atmospheric conditions and fire.
According to the fraction of individual grains of sand, stone is divided into:
- fine-grained – size from 0.05 to 0.1 mm;
- fine-grained – 0.2–1 mm;
- coarse-grained – 1.1–2 mm.
Sandstone deposits are found in rocks in areas where in ancient times there were seas, lakes, and oceans.
Under water pressure, the particles and small minerals that settled to the bottom were mixed and compressed. The stone is presented in thin layers or thick layers.
Sand stone:
- retains quality for up to 50 years of operation;
- does not react to building materials, acids, alkalis (inert);
- environmentally friendly;
- does not accumulate radiation;
- permeable to air;
- delays heat and frost (keeps the room cool and warm);
- easily tolerates frost, rain, sudden temperature changes from + 50 to - 30 ºC.
The pattern on its chips is never repeated due to the variety of overlay of minerals. The color of the stone is yellow, gray, red, green and blue. In decorative finishing, natural sandstone with evenly distributed color is more valued.
View this publication on Instagram
Publication from Natural Stone (@imperiakamney.ru) Jun 2, 2022 at 12:10 PDT
Varieties and colors
According to the size of the layers, the savage is of two types. Plastushka stone is a sandy rock that splits into thin plates. Their surface is uneven.
The second type is flagstone. It is more durable and smooth. The pattern is ring-shaped, reminiscent of a pattern on a cut tree. Under pressure it also splits into layers 1.5–10 cm thick.
The structure of sandstone can be:
- lithographic;
- shell;
- pisolite;
- oolitic.
There are also quartzite-sandstones and calcareous savage. The first group of stones is close to granites in strength. The second type crumbles easily, since cementing limestone rocks are destroyed under low pressure.
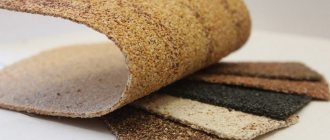
A flexible stone made of sandstone appeared on the list of finishing materials. Thin sections of savage are applied to textiles and formed into thermal panels, tiles or wallpaper.
According to their composition, there are six types of stone:
| Main substance | Name after sandstone rock | Subspecies |
| Glauconite | Glauconite | ― |
| Volcanic rock | Tuffaceous | ― |
| Contains more than two minerals | Polymictic | Arkose, greywacke |
| Quartz + feldspar or quartz + mica | Oligomictaceae | ― |
| Quartz (90% mineral) | Monomyctaceae | ― |
| Rich in copper | Cuprous | Udokan, Dzhezkazgan |
According to the type of processing, tumbled (polished) and natural stone (divided into plates without subsequent elimination of irregularities and burrs) are distinguished.
Based on color, sandstone is divided into decorative and construction rocks. Stone colors:
- red;
- beige;
- woody (yellow + beige + brown stains);
- pink (arkose appearance);
- yellow;
- amber;
- white;
- brown with yellowness;
- gray-green (ruble);
- brindle (the color scheme and pattern resemble the color of a tiger);
- gray, black (greywacke, tuffaceous variety);
- gray-blue;
- gold (containing chalcopyrite);
- grey-mustard;
- blue, light blue (copper).
According to the form of formation of the rock, savage is divided into tiled type, crushed stone, rubble (rubble stones made of sandstone). Sand does not belong to this group because these mineral fragments are not cemented. Slate is not one of them: it contains little quartz.