A balancing machine is equipment necessary for any tire service. The wheel is mounted on a special axle and rotates at a certain speed to determine if there are any imbalances. The device will also help correct identified errors.
If the wheel balance is disturbed, this can lead to a variety of consequences: from accelerated tire wear and vibration of the car body to deterioration in handling and unpredictable behavior of the car at high speed. Therefore, wheel balancing must be carried out after each intervention in the chassis.
Do-it-yourself calibration of a balancing machine - Metals, equipment, instructions
A balancing machine is a special measuring equipment used to equalize the imbalance of the static and dynamic indicators of rotating machine parts.
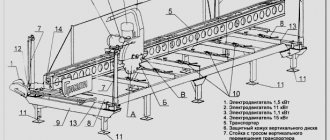
The unit consists of one or a pair of supports where the workpieces are placed, a rotary drive and an indicator measuring device.
The information obtained as a result of processing allows us to identify the location and magnitude of the imbalance of the part.
Balancing machine: operating instructions
Below is a quick overview of the RAV models. The units belong to the category of automatic professional balancing devices.
They are easy to use and have microprocessor control.
After mounting the wheel and entering data about it, the protective casing closes and automatic rotation of the element begins, which continues until the required weight of the weight and its location are determined.
Among the reasons for the imbalance, there are several main aspects:
- Asymmetrical distribution of materials.
- Improper tire alignment.
- Poor alignment of the wheel on the hub.
The RAV balancing machine is designed to eliminate or minimize existing faults. The unit is suitable for all types of wheels of cars, cars and commercial vehicles (minibuses, minivans and others).
Preparing for work
The device should be installed in the place where it will be used. When installing, do not lift the equipment by the shaft. The machine must be placed in a dry, closed and well-lit room on a flat, hard surface. As a result, you need to fix the unit with bolts to the floor.
Then you need to do the following operations:
- Install and secure the shaft to the flange using a wrench.
- Install the protective cover with the spring.
- Install an automatic rim width measuring device.
- Some modifications will require the installation of an electronic device for calculating radial runouts.
- Connect the power supply according to the rules specified in the instructions.
- Connect the pneumatic supply, if provided.
Before installing the wheel on the balancing machine shaft, you should remove debris and foreign objects, and also make sure that the shaft and rim centering sphere are clean.
Further manipulations are performed as follows:
- The cone that is optimally suitable for the element being processed is selected.
- The wheel is carefully positioned to its fixed position on the support flange.
- The wheel is turned with the inside of the rim towards the machine opposite the cone.
- The protective cap is mounted and secured.
- Some aluminum variations need to be mounted with a cone on the outside of the wheel. The remaining operations are identical to the above methods.
Turning the unit on and off
The balancing machine is equipped with a main switch, which is located at the rear of the equipment. To activate the device, you must enter the program and turn on the system by moving the main toggle switch to the ON position. When performing this operation, do not get close to the rotating elements.
Wait a while for the operating system to load. The first program page will then appear on the display. Several options will be presented on the screen. The remaining functions of the technology in question are controlled by five keys located at the bottom of the monitor.
Balancing machine "Civic": description
Let's look at the features of this unit. The model is equipped with an automatic internal lever, a modern liquid crystal display, and an improved housing.
This design allows for comfortable access to the inside of the wheel, which is important when servicing alloy wheels. There is a wide protective casing and an increased shaft overhang.
The accuracy of installation is guaranteed by an electronic ruler; upon completion of work, automatic braking is carried out.
Among other features, we can note the direct measurement of corrective indicators, starting the electric motor with one press of a button or lowering the casing.
It is possible to operate three operators without additional configuration of parameters. There is a split installation system, a counter of processed wheels and protection against voltage surges.
Thanks to the use of modern technologies, energy savings and reduced noise of the electric motor are guaranteed.
Calibration
Over time, the unit used begins to give inaccurate readings. You can check its operation as follows:
- Take a wheel, for example, 16th radius.
- Install it on the machine and enter the required parameters manually.
- Activate the start button.
- After processing, the result is 25-30. We fill the weights and put the unit back into operation. The result may be 05-10.
- If after the third launch the program asks to add another load parameter, you need to check the cones for any play and their fit on the shaft.
If these problems exist, mandatory calibration of balancing machines will be required. This can be done as follows:
- After bringing the program parameters to 00-00, fill a hundred-gram weight and start the machine. During normal operation, the parameters should become 00-100.
- You should think about calibration if there are differences of 5 units (for example, 05-95). You can still work on such a unit, but you will need to check the play and fastening.
- If the final value after starting the shaft with the control weight exceeds 15 units, urgent calibration of the device is necessary.
- If the steps taken to set the parameters do not lead to parameters 00-100, you will need to carry out maintenance of the equipment, clean it of contamination, and measure the mains voltage. Then recalibration is carried out.
Errors
Balancing machine errors and possible solutions are given below:
- When starting, the device gives an error and does not start the shaft - you need to check the housing latch. If this does not help, clean the dirt from the corresponding internal sensor.
- When turned on, the machine does not start - check the socket and switch. If necessary, replace elements.
- Line malfunction. To check, you need to install the stamped wheel and pull out the measuring device. If discrepancies with the ruler readings are noticeable, calibrate it according to the instructions.
- During operation, the device turns itself off - most likely, a microcrack has appeared in the board. The part needs to be replaced.
We make the unit ourselves
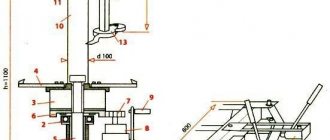
Below is a method for making a simple balancing machine with your own hands:
- A motorcycle wheel is installed between a pair of identical posts. The structure will require wooden blocks, a brace, a section of a T-bar, a central panel, a ball bearing and a socket for it, a support, a base, and a wing-type locking nut.
- The main racks are made of steel; a 32 mm semicircle is cut out in the upper part, where a ball bearing is mounted. It is secured by two plates with semicircular cutouts and secured with three screws and nuts. The center panel is supported by a pair of braces.
The base is a five-millimeter steel sheet 30x50 cm, screwed to wooden blocks (3x4 cm). The entire structure is held together with T-sections 135 mm long. The operating principle is identical to the alignment of bicycle wheels.
DION | balancing machine calibration
Calibration of a balancing machine, why it is needed and why it is better to finish weights on the floor rather than on the machine.
Calibration of AE&T balancing machines
The process of setting up equipment differs depending on the type of device (automatic, manual, semi-automatic), as well as the manufacturer and model. The given algorithm of actions will help you set up AE&T equipment, as well as similar ones.
To self-calibrate, perform the following sequence of actions:
- Place the balanced wheel on the axle and secure it.
- Using the buttons, set the distance to the wheel, its width and diameter. If the instrument does not detect this automatically, the values can be measured using a sliding ruler and calipers.
- If the device itself determines the wheel parameters, be sure to double-check the values - you may need additional calibration of the ruler.
Important note: be sure to make sure that the stand correctly determines the width and diameter of the wheel, otherwise all further manipulations are meaningless - the calibration will be inaccurate. In addition, you should also ensure that the weights used weigh 100 grams. To do this, you just need to weigh them on an electronic scale. An error of up to 1 gram is allowed.
We continue setting up the calibration stand:
- On the control panel, press the keyboard shortcut "F" + "C". Keep them pressed until “CAL” lights up on the display, indicating that calibration has begun.
- Be sure to hold down the keys until “CAL” stops flashing, otherwise the setup process will not begin. When the display stops flashing, you need to lower the cover and press “Start”.
- After the wheel has finished rotating, the inscription “ADD 100” will appear on the display on the right. After this, you need to attach a 100 gram weight to the outside of the wheel at the 12 o’clock position. Lower the protective cover and press “Start”.
- The machine will carry out a calibration cycle, after which the message “END CAL” will appear, indicating that everything has been successfully completed. After this, remove the weight from the wheel.
- The data will be automatically saved in the device’s memory, and from that moment on it can be used for work.
Repair and self-production of a balancing machine
Balancing machines detect irregularities on parts during rotation and help eliminate them. Most often, devices with this operating principle are used in tire shops. In addition, these devices have found application in the mechanical engineering industry, where they help balance propellers, turbines and other parts.
Such devices may be equipped with equipment to automatically correct irregularities. In this article we will talk about calibrating a balancing machine with our own hands and describe its structure.
Structure of the apparatus
The basis of a balancing machine is the supports on which the workpieces and sensors are installed to determine their balance. During testing, the level of imbalance is determined, and based on this information, further actions are taken.
Depending on the type of support, balancing machines are divided into soft and hard. The first measure the parameters of the wheel, taking into account the vibrations of the supports. At the same time, the device is additionally configured for each detail, which allows for fairly accurate testing.
Rigid wheel balancing machines are capable of testing different types of parts with the same equipment. This is very convenient, but the quality of measurements can be seriously affected.
In both the first and second versions of the device, the speed sensor plays a special role. No less important for such a machine is the sensor that measures the rotation angles. Depending on the information input option, balancing devices can be manual or automatic.
Principle of operation
The main task of the balancing machine is to determine the balance of the geometric center of the wheel with its mass. An unbalanced part makes any job difficult and can lead to serious damage. Eliminating imbalance allows you to:
- Increase the service life of bearings.
- Prevent premature wear of tires.
- Increase the service life of suspensions.
Most often, such machines are in demand during the period when drivers change the type of tire. Balancing of out-of-tune parts can only be done using special equipment. There are machines at service stations that can work with a wide variety of discs in different modes.
There are several options by which you can correct imbalance of wheels or other parts:
- Balancing rings - used in the process of repairing metalworking machines.
- Adjusting screws - special pins are screwed into the unbalanced part, through which it is adjusted.
- Drilling is the most popular balancing option. This is done by creating holes that change the weight of the parts being processed.
Balancing machine repair
After prolonged use, individual parts of the device may malfunction. Conventionally, the origin of the breakdown can be divided into mechanical disorders and problems with electrical components. In the latter case, problems with the sensors are detected. Mechanical problems most often occur after falls or strong impacts.
Problems with the machine can be detected by the following signs:
- Normal balancing requires several cycles of operation.
- The parameters of the tested disks are determined incorrectly.
To repair a balancing machine, the type of failure is first determined by calibration. After this, the faulty part is replaced. Repairing a damaged part is more difficult than buying a new one. In addition, repaired structural elements most often break again after a relatively short period of time.
It is possible to make a calibrating machine at home, but only the mechanical part. Electrical equipment and measurement sensors should be purchased ready-made. The device drawings should be selected in accordance with the features of the future use of the machine. The best option for creating a balancing machine is presented in these step-by-step instructions:
- We create a shaft. It should be turned so that at one end there is a ready-made place for mounting bearings, and at the other there is a thread for installing a washer.
- We install bearings. It is best to use those that have already been used, but have not yet used up the main resource. Such parts will create minimal resistance.
- We form the apparatus stand. For these purposes, it is best to use a pipe with a diameter of 5.2 centimeters. At the upper end of the support we mount it from above and from the side.
- For convenient placement of the part, we recommend creating a support platform.
: DIY wheel balancing machine.
Nuances of operation
To start working with the machine, you need to fix the disk. This can be done using a nut and a cone. After checking the reliability of the fastening, you can begin measuring procedures. The disk is spun up, and then its performance is compared with the reference ones. Deviations should be in the range of 2 and 1.5 g. The first indicator is horizontal, the second is radial.
After the initial testing, all weights should be removed and repeated measurements should be taken. The disc under test stops at the heaviest point downwards. Be sure to take this information into account when measuring disk parameters.
After this, the wheel must be twisted 90 degrees and a load is hung on the opposite side. If the wheel stops rotating when turned 45 degrees, it means that the do-it-yourself calibration was done successfully.
Is it possible to calibrate the equipment yourself?
You won’t be able to calibrate expensive automatic balancing machines yourself. The fact is that this requires special devices, as well as program codes, which only specialists who deal with this have. But such equipment is installed, as a rule, only by large service centers, for which calling a calibrator is not a problem.
Budget segment equipment can be calibrated on your own - detailed instructions on how to do this are in the accompanying documentation. The procedure is carried out using a stamped wheel and a set of calibration weights weighing 50-100 grams.
Service Information
Note:
When balancing a wheel with a tire installed, you should use a working, recently calibrated machine to balance the wheels removed from the vehicle in two planes.
- Raise and support the vehicle.
- Mark the position of the wheels relative to the wheel studs, and also indicate on each wheel where it is installed on the car: left front, left rear, right front, right rear.
- Remove the wheels with the tires installed one at a time and check them on a balancing machine. See Tire and Wheel Removal and Installation.
- Strictly follow the machine manufacturer's instructions regarding mounting different types of wheels.
- For each type of rim, you must use the appropriate type of balancing weight. Only weights with a protective coating should be installed on aluminum wheels. See Using Weights to Balance Wheels.
- Balance all four wheels and tires as accurately as possible.
- Install the wheels with the tires installed on the car according to the previously made marks. See Tire and Wheel Removal and Installation.
- Lower the car.
Wheels that are not included with the vehicle from the factory, especially those that use universal mounting hole patterns, are especially susceptible to runout and installation problems.
Wheel balancing with tires installed is carried out to eliminate static or dynamic imbalance.
Weights with bracket
Note:
When balancing factory wheels with aluminum rims, you should use weights with a special polyester coating. The coating protects the discs from corrosion and possible damage.
The coating protects the discs from corrosion and possible damage.
| • | The MC (1) and AW (2) series weights are approved for use on aluminum wheels. |
| • | P Series weights (3) are approved for use on steel wheels only. |
| • | P Series (4) coated weights are approved for use on both steel and aluminum rims. |
Note:
When installing coated weights, use a soft-faced hammer to reduce the chance of damaging the coating.
The profile and type of rim of the disc determines what type of weight (1) should be installed. The shape of the weight should follow the shape of the disc rim. The bracket must fit firmly around the rim.
Placing balancing weights with bracket
When carrying out static balancing, if no more than 28 g (1 oz) is required, the weight should be installed on the inside of the rim (2). If you want to install more than 28 g (1 oz), you should install two weights, distributing the weight as evenly as possible between them. One weight should be installed on the inside of the rim (2), and the other on the outside (1).
When performing dynamic balancing, weights should be installed on the inner (2) or outer (1) side of the rim, depending on the measurement results on the machine.
Self-adhesive weights
Note:
When installing self-adhesive balance weights on rims without a lip, DO NOT apply the weights to the outside surface of the rim.
Self-adhesive weights can be used on factory aluminum wheels. To install a self-adhesive weight, you must perform the following steps.
- Determine where the weight needs to be installed.
- Make sure that there is enough free space between the weights and the brake mechanisms.
- Using a clean rag soaked in a regular cleaning product, thoroughly clean the area where the weight will be installed from corrosion and dirt.
- To completely remove contaminants, wipe the area where the weight is installed again with a clean rag soaked in a fifty percent aqueous solution of isopropyl alcohol.
- Dry the installation area with a blast of warm air (the surface should be warm to the touch).
- Warm the protective film on the adhesive layer of the weight to room temperature.
- Remove the film from the adhesive layer on the back of the weight. DO NOT touch the adhesive surface.
- Glue the weight onto the disk, pressing it lightly with your hand.
- For best fit, roll the weight with a 90 N (21 lb) force.
| • | When carrying out static balancing, if no more than 28 g (1 oz) is required, the weight should be installed on the inside of the rim along the center line (1). If you need to install more than 28 g (1 oz), you should install two weights, distributing the weight as evenly as possible between them. One weight should be installed on the center line and the other on the inside of the rim (2). |
| • | When carrying out dynamic balancing, weights should be installed on the center line and on the inside of the rim (2), depending on the measurement results on the machine. |
Note:
Do not use abrasive materials to clean discs.
| © All rights reserved by Chevrolet. All rights reserved |
Conditions for equipment calibration
Before setting up the machine, it must first be installed correctly. To do this, the following conditions must be met:
- The equipment is installed on a concrete floor and securely screwed to it to eliminate shocks and vibrations that could disrupt the operation of the device.
- The unit should not be placed on a wooden floor or other flooring that transmits vibrations well, otherwise vibration from the operation of other devices or personnel steps will be transmitted to the body of the device.
- Voltage drops are also unacceptable, so it is worth installing a stabilizer suitable for power to prevent sudden surges in current in the network.
Before setting up the equipment, be sure to ensure that all conditions are met. Without this, the equipment will not work correctly.
DIY wheel balancing machine
Readers asked to tell us about the device that was used in the USSR to balance wheels during self-balancing.
Everything ingenious is simple! This is how you can describe the principle on which the operation of the device is based.
It consisted of two parts - a support and a “top”, which was installed on the hub in the area of the central hole.
Next, the wheel is mounted horizontally on the support. If there is an imbalance, it will tilt towards the heavier part. The task is to place the weights on the rim so that the wheel takes a horizontal position (parallel to the surface on which the support stands). That's all!
In practice, such a simple device provided a completely acceptable level of balancing - at least the wheels did not subjectively “beat”.
This was the so-called static balancing.
But there were also devices for dynamic balancing!
Our car needs harmony and balance not only in the figurative sense, but also in the direct sense.
Without balancing, not a single rotating part will work correctly, and in the worst case, it will simply smash the entire assembly or assembly into pieces when the vibration frequency enters into resonance with the vibrations of other parts.
Therefore, designers try their best to balance all rotating parts. This applies to driveshafts, crankshafts, flywheels, axle shafts and, of course, wheels.
What is wheel balancing
If all the other shafts and rotating parts work in a closed volume and they absolutely do not care what happens outside the crankcase, block or housing, then the wheels have a hard time.
Even if the tire and disk assembly are perfectly balanced, during operation anything can happen to them, from deformation to the accumulation of dirt. All this affects the balancing of the wheel.
What is this, balancing?
Balancing a car wheel is all about eliminating radial mass differences. That is, if the wheel is lighter on one side and heavier on the other, then it will vibrate when rotating. The higher the rotation speed, the greater the vibration.
Why and how often to do balancing
Needless to say, constant vibration on the steering wheel even at the lowest speeds is simply unacceptable. Wheel imbalance leads to:
- deterioration of wheel adhesion to the road;
- rapid wear of tires, chassis and car suspension;
- a sharp deterioration in controllability;
- deterioration of the brake system.
Read also: 220V electric motor speed controller without loss of power
Wheels are balanced if necessary, when vibrations occur, as well as after replacing tires, after repairing them and vulcanizing the tubes, after straightening or rolling out steel wheels.
In addition to safety, reduced service life and high fuel consumption, wheel imbalance does not bring much comfort to the car interior. Therefore, balancing wheels with your own hands should become a habitual procedure for every motorist. At least in order to understand how and how this is done.
Types of imbalance
And in order to understand the methods of balancing, you need to know the enemy in person, that is, imbalance. Taking into account the simple laws of physics, one can guess that imbalance can be of two types - dynamic and static.
- Static imbalance occurs when the wheel's center of gravity moves away from the axis of rotation. The simplest type of imbalance and do-it-yourself wheel balancing is most often aimed at eliminating static imbalance. The wheel vibrates up/down.
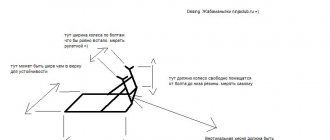
- Dynamic imbalance is the case when it can only be caught when the wheel rotates, and at fairly high speeds, close to operating conditions. This type of imbalance is characterized by a displacement of the center of gravity of the wheel not only beyond the axis of rotation, but also by an uneven displacement of several centers of gravity relative to each other in a perpendicular plane. The wheel wobbles and vibrates. The diagram will explain this more simply.
It turns out that it is not for nothing that every tire shop has stands for wheel balancing, since any vulcanization is, although minimal, a shift in the center of gravity of the entire wheel, which must be balanced. The cost of balancing wheels on a machine is pennies, but if it is not done, the consequences can be the most depressing.
DIY wheel balancing technology
The simplest and most accessible method of static balancing is available to anyone who is able to hang a car on a jack. Moreover, it is recommended to check wheel balancing after each wheel replacement, regardless of whether it has been balanced before or not. And it couldn’t be easier to do this.
- The car is hung on a jack, after which one of the wheels should rotate freely on the hub.
- The wheel spins slightly, if the brake pads are in the way, you need to negotiate with them so that they do not prevent the wheel from rotating completely freely.
The same goes for the wheel bearing. Sometimes it becomes necessary to let it go, and after balancing, do not forget to tighten it again. - The wheel rotates freely in one direction, and the place that will be at the bottom is marked with chalk.
The wheel spins in the other direction. The corresponding mark is placed again. And so - several times. If the marks never coincide, the wheel does not need static balancing. - Otherwise, a weight is installed on the side of the wheel diametrically opposite the mark.
The mass of the weight is selected empirically, since the exact weight of the weight cannot be determined by eye. Only a tire balancing stand can do this.
Read also: Wood rasp for drill
Congratulations. The static balancing of one of the wheels is completed, now you can begin balancing the rest. Upon completion, sea trials must be carried out. As a rule, an unbalanced wheel begins to vibrate at a speed of about 70-90 km/h.
By the way, the simplest balancing machine can be assembled around an old hub in which the bearing has not yet died. You just have to install the homemade stand perfectly evenly in all planes. Balanced wheels for all and a pleasant driving experience!
Balancing machines detect irregularities on parts during rotation and help eliminate them. Most often, devices with this operating principle are used in tire shops. In addition, these devices have found application in the mechanical engineering industry, where they help balance propellers, turbines and other parts.
Such devices may be equipped with equipment to automatically correct irregularities. In this article we will talk about calibrating a balancing machine with our own hands and describe its structure.
Homemade device
It is possible to make a calibrating machine at home, but only the mechanical part. Electrical equipment and measurement sensors should be purchased ready-made. The device drawings should be selected in accordance with the features of the future use of the machine. The best option for creating a balancing machine is presented in these step-by-step instructions:
- We create a shaft. It should be turned so that at one end there is a ready-made place for mounting bearings, and at the other there is a thread for installing a washer.
- We install bearings. It is best to use those that have already been used, but have not yet used up the main resource. Such parts will create minimal resistance.
- We form the apparatus stand. For these purposes, it is best to use a pipe with a diameter of 5.2 centimeters. At the upper end of the support we mount it from above and from the side.
- For convenient placement of the part, we recommend creating a support platform.
: DIY wheel balancing machine.
Preparing for work
The device should be installed in the place where it will be used. When installing, do not lift the equipment by the shaft. The machine must be placed in a dry, closed and well-lit room on a flat, hard surface. As a result, you need to fix the unit with bolts to the floor.
Then you need to do the following operations:
- Install and secure the shaft to the flange using a wrench.
- Install the protective cover with the spring.
- Install an automatic rim width measuring device.
- Some modifications will require the installation of an electronic device for calculating radial runouts.
- Connect the power supply according to the rules specified in the instructions.
- Connect the pneumatic supply, if provided.
Balancing machine: instructions for use. Balancing machine errors
A balancing machine is a special measuring equipment used to equalize the imbalance of the static and dynamic indicators of rotating machine parts.
The unit consists of one or a pair of supports where the workpieces are placed, a rotary drive and an indicator measuring device.
The information obtained as a result of processing allows us to identify the location and magnitude of the imbalance of the part.
Characteristics
For each machine, the characteristics will be individual, but their set is all the same. You can consider the most important parameters based on the B-500 AE&T brand equipment.
- One of the important parameters is entering information. In this case it is manual.
- The next important characteristic is the diameter of the disk, which can be checked. For this unit, the diameter is in the range of 10-24.
- The maximum wheel weight is 65 kg.
- Since machines are also used for balancing wheels, their diameter also plays an important role. In this case, the maximum value is 960 mm.
- Another characteristic that is not decisive, but quite important, is the time required to carry out measurements. In this case it is 8 seconds.
- Power consumption is 200 W. In this case, the unit is connected to a regular network of 220 V and 50 Hz.
- The rotation speed of the disc or tire is 200 rpm.
Equipment supports
In order to make accurate measurements, the machine must be stable. Depending on the supports of this device, there are two main types:
- The supports can be soft. In this case, the unit is used to test the unbalanced wheel through the amplitude and frequency of movement of these supports. One of the important characteristics for a machine is the accuracy with which it makes these measurements. Therefore, for each element there are separate types of machines with soft supports.
- Rigid supports involve measuring pressure and rotor phase. Such devices are considered universal and can be used for various types of parts. For example, a balancing machine for cardan shafts also has rigid supports.
When to calibrate a balancing machine
There are several cases when equipment necessarily needs adjustment and precise calibration:
- After purchasing a new machine. You must set up your device immediately after you purchase and install it. Even if the equipment was calibrated at the factory, it will have to be done again after transportation.
- After moving the balancing equipment to a new location. If you had to move the unit, even within the premises, you still need to set it up again for proper operation.
- Before the start of the season. Drivers en masse change their shoes to summer or winter tires twice a year: in spring and autumn. You should calibrate before you have a line of customers.
In addition, you definitely need to set up the device if you begin to notice any inaccuracies in its measurements or operation. For example, the device began to incorrectly display the wheel diameter.
Unit malfunctions
How to calibrate a balancing machine? How to reduce the error? These and other questions will inevitably arise after long-term operation of the machine, since over time its individual parts become unusable. Conventionally, all breakdowns of such units are divided into two groups - mechanical breakdown and breakdown of electrical components.
In the latter case, most often the problem is associated with the failure of one of any sensors. As for mechanical breakdowns, they usually occur due to shocks, falls or any other external influences on the equipment. Typically, you should start looking in the machine after the following signs appear:
- several inspection cycles are required to obtain a correctly balanced wheel instead of one;
- The parameters of the tested disks are determined incorrectly.
Calibrating the machine, which was mentioned earlier, is necessary in order to determine the type of failure. Once the cause is found, the faulty part is usually simply replaced with a new one. This is due to the fact that repairing a broken part is much more difficult than buying a new one, which makes repairing the machine impractical. In addition, even if you repair any element, it is most likely that it will fail again in the near future.