When purchasing a sink made of artificial stone, the buyer often faces a problem such as the lack of a hole for the faucet. Of course, you should turn to professionals, but you can solve this issue yourself. In order to understand how to drill a sink made of artificial stone , you must first understand what it is made of. There is no clear definition of “artificial stone”, so different manufacturers use this term for various materials that differ in density and properties.
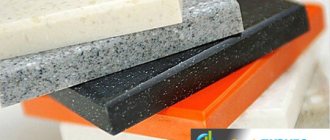
The most common are:
- porcelain stoneware;
- agglomerate (fragranite, silgranite and their analogues);
- acrylic stone.
Working with any of these materials has its own characteristics. To decide which drill to use to drill a stone sink, you must first understand what exactly was purchased.
The photo shows a porcelain stoneware countertop
Porcelain tiles are the strongest and most durable of the above materials. It is not afraid of temperature and chemical influences, and is resistant to mechanical damage. It stands out due to its ringing “glass” sound.
Other types of artificial stone produce a duller sound due to the addition of plastic and polymer materials. Despite the fact that making a hole in other materials is easier than drilling a porcelain stoneware sink , very often the choice of clients falls on it. Given the extraordinary density of the material, ordinary drills will be powerless here.
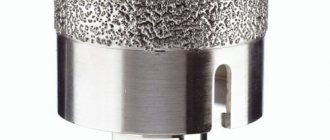
Only a crown or a carbide-tipped drill, preferably diamond, can handle porcelain stoneware. Sintered ring drills will also be able to work with it, but their cost is much higher, so they are rarely chosen only if there is a need for a large amount of work. Due to its high strength, when working with this material it is necessary to cool the drill and working surface with water. You need to work with porcelain stoneware at minimum speed (300-400 no more).
Drilling Precautions
The ratio of resin to stone chips can be very different. Regardless of the proportions, this material lends itself better to a drill than stone. However, you should still be careful and cautious. A sink made of artificial stone requires careful handling: it is not recommended to carry out any work until its temperature reaches room temperature.
Features of working with acrylic and plaster
All methods mentioned above are suitable for working with any artificial stone. However, acrylic stone has a more plastic structure and allows the use of tools of less high hardness. Drilling into acrylic stone is more like working into hardwood or aluminum.
Therefore, it can be drilled using ordinary metal drills; even a wood spade drill or a Forstner cutter will do. Large holes are drilled using a crown or tubular drill. Can be drilled dry.
Artificial stone cast using gypsum as a binder also does not require the use of tools of increased hardness. Sometimes to work with it they use a regular hacksaw for metal, or even wood, a mounting knife, an abrasive mesh or sandpaper. You can drill it with a simple metal drill if there are few holes. But for clean work, it is better to use drills or crowns with carbide tips.
Drilling can be done using a cordless screwdriver, selecting drills of the required diameter.
You can easily process a hole using a hand-held wood router by changing the shape of the hole or its size.
How to avoid mistakes
Let's say you decide to make a hole using a drill with a cutter.
Often, experts make a hole when the sink is already installed in the countertop. This solution has only one advantage - the edge on the front side will be smooth. But it has many more disadvantages: you can scratch the stone, damage the sink, chip the edge, and so on.
Therefore, it is better to drill a hole from the back. But there is a possibility that the hole will have an uneven appearance from the outside. However, a mixer will be located in this place, which will cover the uneven edges. There is no risk of damaging the front side of the sink.
There are two fundamentally different methods of work. The first involves working with a drill, and the second involves knocking out the weakened cast plugs provided for by the design. Let's consider each of them in order.
Conclusion
Anyone can drill a ceramic sink, but any mistake leads to damage and destruction of the product, remember this. The video in this article will clearly show some important features of the workflow.
Sources:
- https://santech-info.ru/santexnika/prosverlit-otverstie-v-rakovine.html
- https://124prm.ru/santehnika/kak-prosverlit-rakovinu.html
- https://stroypomochnik.ru/kak-prorezat-otverstie-v-mojke-iz-nerzhavejki-iskusstvennogo-kamnya-pod-smesitel-video-i-foto/
- https://septik.guru
- https://remontstroimat.com/kak-prosverlit-mojku-iz-iskusstvennogo-kamnya-v-domashnix-usloviyax/
- https://gs16.ru/santehnika/kak-prosverlit-keramicheskuyu-mojku.html
- https://gidroguru.com/vnutrennyaya-kanal/santeh-pribory/mojki/1791-otverstie-v-rakovine-pod-smesitel
- 1
Drilling a hole
We make a hole in the artificial stone sink using a drill step by step:
- To work, you will need a regular drill and a cutter with a diameter of 35 mm. As mentioned above, you need to place the sink on the back side and place a board and newspaper under it.
- Next, mark the location of the mixer so that you can make a hole on the right side and avoid accidentally making a mistake.
- To mark the center of the hole, you need to attach the nut from the mixer and mark its center. Try to keep the hole further away from the edges without touching the bowl.
- Before starting work, make sure that the hammer on the drill is turned off. Begin to work carefully with the drill at medium speeds, avoiding allowing the cutter to move.
- Prepare a small box for the shavings that are generated in sufficient quantities during the process. Passing through the plastic, the cutter heats it up and it emits an unpleasant odor.
- When you finish drilling, clean the resulting hole from dust and chips. The size of the irregularities on the edge will not exceed a couple of millimeters: but they will not be visible under the mixer.
How to work with different types of artificial stone
Porcelain stoneware is the most durable of all, not afraid of high and low temperatures, as well as minor mechanical damage. An ordinary drill “will not take it”: only a crown (Forstner cutter) or a drill with a diamond tip (or another carbide) can cope with its density.
During operation, it is necessary to periodically “cool” the surface with water, and the drill should operate at low speeds - 250-350 rpm.
Acrylic is the easiest material to work with, since its density is minimal compared to others. You can use regular drills for metal or wood with it, for example, a feather type or the same Forstner cutter. A standard 35 mm hole for the mixer must be drilled at low-medium speed (the material is indeed very pliable, and can even be cut with a jigsaw, but it is difficult for them to achieve an accurate result). A large amount of “plastic” shavings and a characteristic smell are consequences of the high plastic content.
Agglomerate is a material with medium density. It is not as difficult to work as porcelain stoneware, but requires more care than acrylic. In order to drill holes in it, it is best to take the same cutters as in the case of porcelain stoneware.
Where to cut the hole?
Another important question that will arise regardless of what material the sink was purchased from: should I cut a hole in it from the front after installation? Or should I do this before installation and from the back?
Each method has a number of pros and cons:
- In the first case, the edges on the front side will be much smoother, but there is a possibility of damaging the front side of the sink with a drill, and if it has a narrow side, then splitting the edge.
- In the second option, the risk of damaging the bowl is much lower, but there is a possibility of getting a sloppy edge of the hole on the front side. In most cases, this is not critical, since the edges of the hole are closed by the mixer. When turning over, there is a possibility of unintentionally making a hole on the wrong side, so it is advisable to mark the side on which you want to install the faucet.
In any of the methods, it is advisable to place the hole away from the edge of the product, but without touching the bowl. To do this, before starting work, you need to attach the lower nut of the mixer to the sink and mark its center .
Porcelain tiles
The strongest and most durable of the entire group is porcelain stoneware. It serves for a long time and is durable, tolerates temperature and chemical influences well, so it is in great demand. But it is also the most complex material; it is most difficult to make a hole in it than in other types of artificial stone.
The best option for carrying out the work is to choose a crown for porcelain stoneware. It can be supplied as a set with or without a centering drill.
When working with porcelain stoneware, the drilling site should be constantly cooled, and the drill speed should be at the lowest possible speed.
You need to understand which side to drill from and when. If from the front side, after installation, the edges of the hole will be smooth and neat, but there is a danger that the drill will slip and spoil the appearance, for example, scratch or damage the edge.
If from the back, before installation, you are unlikely to damage the bowl, but perhaps the hole will have uneven edges. Basically it's not a big deal because they will be covered by the faucet.
Remember - the further the hole is from the edge of the product, the better. Don’t forget about the bowl so as not to get another, completely unnecessary hole - porcelain stoneware is both a durable and very fragile material. Therefore, the following rules must be observed:
- Before carrying out the process, fix the sink, put chipboard under the bottom, this will protect the work surface.
- Drill exactly perpendicularly, otherwise the drill may damage the glaze.
- To prevent the drill from moving, cover the area where you will drill with masking tape.
- Before work, wet the drill; while drilling, spray the work area with water, for example, from a plastic bottle.
Agglomerate
Milling cutter for working with artificial stone
Agglomerate is a softer material. Usually the sink already has a hole almost drilled. It must be knocked out with a core or drilled with the cutter included with the sink. If the kit does not include a cutter or core, then it is necessary to perform the work with a diamond-coated crown. The instructions are completely identical to the process of drilling porcelain tiles.
Acrylic
The third option is acrylic.
If your sink and countertop have color cohesion and create a cohesive space, then it's acrylic stone. This option is not difficult to work with. Ordinary drills are suitable for working with metal or wood. The diameter of the hole for the mixer is 32-35 mm. It can be drilled with a feather drill for working on wood products. The drill speed should be at medium or low speed. When working with acrylic stone, a lot of chips are formed, and a rather unpleasant odor appears from the plastic heated by the drill.
Punching a hole in the sink
Some artificial stone sinks have cast plugs that are knocked out during installation. They are usually color coded on the front. First of all, the sink is installed in place in the countertop, but is not fixed.
Then you need to choose the right tool and beat off the plugs with a strong blow with a hammer. A punch with a diameter of 8 mm is suitable for this role, but not a screwdriver. You only need to knock out the cork from the top: that is, from the front side. Use a rasp to smooth out the uneven edges of the hole.
Using this method, you can make a hole for the mixer.
- The center is outlined and the circle is drawn.
- Using a drill, holes are drilled along the circumference, the distance between which is 4 mm.
- To prevent cracks from appearing when knocked out, firmly fix the sink.
If there is a need to increase the radius of the hole, you need to draw another circle of the required size. All cuts are made from the same front side along the circumference at a distance of 4 mm. Using a punch or chisel, remove unnecessary parts.
How to defeat porcelain tiles
For drilling porcelain stoneware, because it is very hard, use a drill with a special attachment.
Drilling porcelain stoneware is not easy; it is one of the hardest materials to process. To get smooth edges of the hole, you should always start from the front side. At the exit, the drill can make a chip, but in this case it will remain invisible. If the slab you are going to drill is not yet secured to the floor or wall, you should place a flat board or piece of fiberboard underneath it.
Read also: Stove made from two long-burning gas cylinders
If the diameter of the proposed hole is more than 6-8 mm, you must first drill it with a tool with a smaller diameter. To work with porcelain stoneware, it is better to use a hammer drill or a fairly powerful drill.
The drilling speed is low or medium, it depends on the diameter of the drill. The larger the diameter, the lower the speed. It is better not to use a hammer; there is a risk of splitting the slab. In some cases, especially with a large thickness of material, a striker is used at low speeds if there are no voids under the slab, but everyone does this at their own peril and risk. When drilling, you must use water for cooling.
The best results are achieved when using diamond tools. In practice, different drills are used: carbide tips for tiles, a stylus with a diamond tip, diamond-coated tubes, and diamond bits.
Good results are obtained with thin-walled monolithic diamond-metal tubes made in China, and they are inexpensive, about a dollar per piece.
The drill wears less if you drill perpendicular to the plane of the material. To do this, a drill or hammer drill can be mounted on a vertical stand. In this case, the drill resource almost doubles.
It can be very difficult to start drilling with a crown on a smooth surface; it constantly tries to move to the side, scratching the surface. Therefore, to obtain a high-quality result, you can make a template in advance for holes of different diameters. The template is firmly clamped with clamps and prevents the crown from moving from the drilling point. You can also add water here for cooling.
You can start drilling at an angle to the plane if a template is not used: then the crown cuts into the stone with one side and then is leveled. But this method is better used on softer materials.
You can drill holes in stone using concrete and agglomerates in the same way.
Forstner drill
A kind of chisel, with pieces of “pobedit” (strong steel), both in the center and in a circle. This drill will be able to cut stone or artificial stone. And it crumbles it into small pieces. Read in detail in the article - WHAT IS A FORSTNER DRILL (click opens in a new window).
— Now we apply the mixer, which we will embed.
— We outline the mixer and determine the mounting location.
— Next, we determine the center for drilling.
— Install the forstner drill into the drill.
- We're drilling. Moreover, you need to drill slowly, not at high speeds. The main thing is not to damage the sink.
— After drilling, a smooth hole is obtained. You can install a mixer.
This way we get a smooth hole in the sink. I hope my article was useful to you. After we have made the hole, you can INSTALL THE MIXER, be sure to read.
Sinks made of artificial stone do not always have a special cutout, so there is a need to make a hole in the sink yourself. A common obstacle is the fear of damaging or crumbling the sink. Although artificial stone is close in properties to natural stone, in essence it is more like plastic: or, better said, like a polymer mass mixed with stone chips.