How to make a wooden hay rake with your own hands?
You will need : wood, a plane and an axe.
- As a rule, several types of wood are used in the manufacture of wooden rakes. For example, it is better to make a handle from a coniferous tree, but for the teeth you need something harder. You can use birch, rowan or elm for these purposes.
- We make a block from a pine block with a length of 60 cm, a width of 5 cm and a height of 3 cm.
- Next, we plan the block smoothly with a plane, after which we drill holes in it for the teeth, with a diameter of approximately 15 mm and in increments of 40 mm.
- After this, use an ax to split the birch wood into small squares. From the squares, in turn, using a knife, we cut out the required number of teeth with a length of 10 - 12 cm. But the shape depends on your fantasies.
- Particular attention must also be paid to the neck of the teeth. Namely, we make them with a diameter several millimeters larger than the hole. In this case, the teeth will fit into the holes of the block more tightly. We make the ends of the teeth sharp.
- The next step will be to make the cutting. To do this, take a straight round pine branch and plan out the cutting. In this case, we need to make one of its ends sharp. We go over the entire cutting with sandpaper.
- At the non-pointed end of the cutting we make a cut of 20–25 cm. We secure the end of this cut with nails and a metal coupling. We move the sawn parts apart by about 10 cm and make them sharp.
- That's all the wooden hay rakes are ready.
Description of the tool
Windrowing is one of the main stages of hay harvesting. Therefore, the demand for tedder rakes that effectively carry out this operation is constantly growing. To date, several types and modifications of similar equipment for tractors have been developed. The most popular types are rotary and wheeled mounted models.
Tractor rotary tedders are a wheel-finger structure, the basis of which is thickened rotor pipes. The hay raking fingers are attached to these horizontally rotating rotors using springs with several teeth. This ensures uniform load on the device and good reproduction of the topography of the treated area.
Torque is transmitted to the rotors through cardan-type joints like car joints, which ensures equality of angular velocities. The drive is smooth and has protection against spontaneous starting during transportation. This type of tractor tedders has the ability to adjust the tedding height and angle of attack. They do not have their own power and are mounted on a wheeled tractor, working through a hydraulic system and a power take-off shaft.
Wheel rakes are a tractor-mounted structure made of floating wheels mounted on a console. They are equipped with bent wire fingers-springs for turning hay. Since outwardly such a device resembles a sun drawn by a child’s hand, this is the popular name these tractor tedders received.
The efficiency of their operation is increased due to the fact that the wheels are located at an angle relative to the direction of movement of the tractor and somewhat overlap each other’s rotation zones. The floating suspension provides excellent shock absorption, so the tedder copes well with uneven terrain, easily overcoming irrigation canals and embankments. Its wheels are interchangeable and each of them is mounted on two bearings, which increases the service life of the device and facilitates repairs. The wheels rotate independently and are carried out through a cardan, chain or belt drive. Therefore, such tedder rakes can be used as attachments for a tractor, mini tractor or walk-behind tractor.
Depending on the tractor model, devices with four and five wheels are available. The only difference between them is the working width, which determines the speed and productivity of tedding and raking the mown vegetation into windrows on a field of the same size. Also, such rake tedders are often made by hand. As a rule, these homemade devices are designed to be mounted on a small tractor or walk-behind tractor used on the farm.
How to make a work surface
Now in specialized stores and on the market you can easily find different types of rakes, but wooden ones are quite rare, so you can easily make them with your own hands. They consist of a handle, a main part with teeth and a coupling. To make a wooden rake, you should take several types of wood: a lighter one (pine or spruce) is suitable for the handle, and a hard one (elm, oak, rowan, etc.) is suitable for the bar and teeth.
Make a block up to 60 cm long, 5 cm wide, 3 cm high from a block. Plan it using a plane. Then use a drill to make holes in the block for the teeth (10–15 mm) at a distance of 40 mm from each other. Make square tooth blanks from your chosen material. Then use a knife to cut out the required number of teeth. Their length should be 10–12 cm.
Please note that the head of the teeth must be made 1–2 mm larger than the holes made in the block. The shape of the teeth can be arbitrary, but must have pointed ends. Plane a cutting from a straight branch, sharpen one end, and sand the surface with sandpaper. Make a 25 cm cut at the other end of the cutting and secure it with a coupling and nails. Then move the sawn parts apart by 15 cm and also sharpen them. Your DIY rake is ready!
Drawings and assembly instructions
Assembling the device with your own hands is a doable task even without special knowledge.
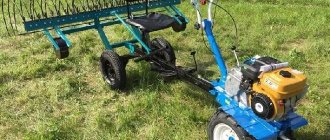
Mounted wheeled
We are talking about “sun” type rakes, which are so called because of the tedder wheels located on both sides of the mini tractor. The advantages of the design are the speed of raking and turning hay, as well as a long service life. In total, 3-5 wheels are placed on the “sun”.
For assembly you will need:
- grinder, drill, wrenches, welding and other tools;
- metal pipe (you can use a motorcycle frame);
- thick wire to form the fingers of the instrument;
- brackets;
- sheets of metal, such as steel, to make discs;
- bearings: 2 per wheel;
- spare parts for the fastening device to attach the tedders to the tractor (for example, car hubs).
According to the drawing, you need to assemble the parts into one structure, then attach the “sun” to the tractor.
Tape design
This tool is suitable for collecting and tedding freshly cut grass and hay.
A distinctive feature of tedders is the extensive coverage of the treated area with a low weight of the implement.
Since there are no wheels in the design, the rake is considered to be mounted.
Rotary rake
Farmers use them to collect and form windrows of fragile types of hay. The “fingers” gently beat and turn the crops, maintaining the quality of the grass without loss of mass.
For assembly you will need:
- metal pipes with a diameter of about 5 cm and rods - 1 cm;
- metal for frame;
- chain and gears;
- metal sheet for strengthening;
- cardan shaft
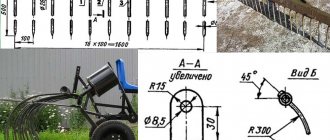
Build process:
- Preparing the frame. Its width should be suitable for the mount, and its length should be suitable for the grip radius. For example, with a span of 3.5 m, the length of the frame will be 2.5 m. The shape that works best is a crane boom, i.e. at one end it is wide, and at the other it narrows.
- Preparing the rotor. It will be driven by a cardan shaft, which is used as the rear axles of cars (since they have the necessary gears).
- Attach pipes about 40 cm long to the rotor. To do this, you need to drill holes for them at equal distances in diameter.
- Make rake “fingers” from rods, secure them to the pipes with bolts or weld them.
- Attach the rotor to the frame. In order for the design to work correctly, you need to adjust the gears for raking and tedding. The shaft must be divided in half and the parts placed on opposite sides so that the rotation speed is reduced to 80 and 20 rpm, respectively.
- Attach one part to the frame using plates with bearings.
- The second one is to be attached to the bottom with springs. Place the gears on the shaft and connect them with a chain.
To change gears, the worker will need to change the gear and chain length.
Device and purpose
The device of the rake is very simple. The design is a handle with a transverse rail with teeth mounted on it, which perform the function intended for the rake. Garden rakes are used for a wide variety of jobs. Using them you can:
- clear the area of dry leaves;
- rake grass clippings;
- remove plant roots from the ground;
- rake hay;
- loosen the soil;
- level out uneven ground.
What are the advantages
Both rotary and wheeled tractor tedder rakes rake the crop into windrows, making it easier for the baler to bale later. With their help, layers of hay are turned over, exposing the desired side of the windrow to drying under the sun's rays and wind blowing, thereby speeding up the process of drying the hay. Tractor rotary models have good speed and are the optimal tool for working with crops that require careful handling (for example, alfalfa). Also, a tractor with this type of tedder can easily handle wet or heavy hay.
Wheeled tractor tedder rakes are characterized by the highest productivity and work well at high speeds. Their effectiveness is maximum over a long straight distance, but deteriorates in corner areas of the cultivated area. They are easily mounted on the tractor, without requiring the connection of a power take-off shaft for operation.
The fingers on the wheels of such a tedder not only turn over the mown vegetation, but fluff it up, thereby increasing ventilation in the hay windrows. A tractor with a similar attachment processes the field with minimal loss of mown leaves when harvesting hay for forage crops. In addition, such a sun-type design for a small tractor or walk-behind tractor can be made with your own hands.
Types of rakes
When selecting a tool, it is important to focus on the quality of materials, strength and functionality of the rake. The product must have a certificate. It is worth paying attention to how the fastening mechanism is made and whether its design is reliable enough. Take a closer look at the handle to see if it will be convenient to work with such a tool.
To decide which rake is best suited for a particular job, you need to note their varieties:
- universal (straight);
- fan;
- highly specialized.
Please note that each site requires garden lamps.
Installing the rake bar
Axle mount. 1.5 m is cut from the pipe and a working grip is made. The axle is then placed horizontally against the posts. The result is a pipe that rotates freely at the attachment point.
An ear is made. We weld a rod to the upper corner of the pipe, install the lower one with an eccentric - it should reach the center of the drawbar. By pressing the pipe, the rake can be raised or lowered.
At the end, lubricate the rake with grease for proper operation. After watching the video, you will get acquainted with detailed recommendations on how to create a rake for work on the site.
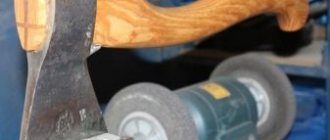
Making a cutting
In order to get a reliable and convenient handle for a rake, made by yourself, it is best to start with the choice of wood:
- pine - not afraid of moisture, quite light, but fragile;
- birch is the best option, combining sufficient strength and light weight, easy to process;
- beech – its qualities are as close as possible to birch, but requires additional processing;
- poplar - also refers to the optimal options for quality, weight and ease of processing;
- oak is the most durable material, but it is heavy and difficult to process.
To make your own cuttings, you can take a non-standard material - the trunk of a young tree (the best are considered to be: hazel, aspen or maple). Select the required length of the workpiece and check that it is free of defects (knots, cracks). Additionally, there is no need to sand or paint the finished cutting, since the very smooth surface of the cutting will turn and rub dropsy and calluses. It is very important to fit the finished cutting well and securely fasten it in the rake holder. You should also trim the cutting so that it does not extend beyond the planting nest.
Manufacturing of attachments
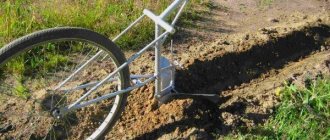
DIY tedder rake
Buying canopies for a walk-behind tractor will be very inconvenient for a small summer resident. A summer resident or farmer can make all the equipment himself at home, using a little ingenuity. Most of the equipment is quite simple and can be made from almost whatever is on hand.
Before you make a plow for a mini tractor with your own hands, you need to carefully study the drawings and dimensions and choose the most optimal one. It will be easier to make equipment if you have a ready-made factory circuit.
Features of equipment designs
According to the model type, tedder rakes can be used on tractors, mini tractors and walk-behind tractors. During operation they are operated by one person. According to their technical characteristics, they are classified according to the following parameters:
- By type of traction they are divided into tractor (for tractors) and horse-drawn (for walk-behind tractors);
- according to the method of collecting hay in windrows - transverse and lateral;
- by design (geared, wheel-finger and drum);
- according to the method of attachment to the equipment.
Due to its shape and appearance, the structure is called the “sun” due to the similarity of the rotor tubes to the sun’s rays. There are many models of tedder rakes in factory production, but the most popular are rotary and wheeled.
Rake tedder 5 wheels
Rotary rakes are designed in such a way that their basis is one wheel with rotor pipes, on which pin tubes are secured with springs. With the help of these devices, types of work such as tedding and drying grass are carried out. But they are not suitable for windrow collection. The rake is mounted on wheeled tractors and operates using the machine's hydraulic system.
Wheeled tractor tedders are a model consisting of several (4-5) “floating” wheels mounted on a suspension. This type of design makes it possible to work on fields with different terrain. Rotary and wheeled tedders can be used on all types of agricultural machines. Therefore, they often make roller rakes with their own hands.
Interesting. Replacing manual labor using simple rakes with mechanical tedders allows you to increase efficiency tenfold.
FAN RAKE
The fundamental difference between fan rakes is the V-shaped working part, made up of numerous wire or plate teeth bent at the ends. This tool is ideal for removing plant debris and small debris.
Wire fan rakes, made of strong wire with a diameter of at least 3 mm, have greater rigidity in comparison with plate tools, the working part of which consists of thin elastic plates (metal or plastic) that spring back when colliding with small obstacles. Therefore, a wire device is better suited for clearing a flat area with sparse and low vegetation cover, and the plate variety will be useful for combing out small, light debris on relief terrain. Wire fan rakes can be used for thinning and shallow aeration of the lawn; and lamellar ones, on the contrary, will protect young shoots of the grass cover from damage.
Installing the rake bar
Axle mount. 1.5 m is cut from the pipe and a working grip is made. The axle is then placed horizontally against the posts. The result is a pipe that rotates freely at the attachment point.
An ear is made. We weld a rod to the upper corner of the pipe, install the lower one with an eccentric - it should reach the center of the drawbar. By pressing the pipe, the rake can be raised or lowered.
At the end, lubricate the rake with grease for proper operation. After watching the video, you will get acquainted with detailed recommendations on how to create a rake for work on the site.
Fan
A fan rake for the garden is the best option when you need to collect fallen leaves and tidy up the lawn without damaging the turf. They have the appearance of a broom and, due to their thin, elastic teeth, are easy to use. However, do not rake or turn over heavy grass or debris with the fan rake to avoid damaging the teeth.
They are well suited for surface aeration. Some fan rakes have adjustable working width and a telescopic handle, the height of which can be changed to suit your height.
Specifications
Equipment for mini-tractor KMZ-012
| Options | Meaning |
| Working width, cm, no more | 280 |
| Design capacity, ha/h. | 1,14 |
| Operating speed of the unit, km/h, no more | 5 |
| Weight, kg, no more | 74,65 |
| Working width, cm, no more | 280 |
Brief characteristics of the tedder:
- – model – tedder HR-250
- — width for grip, m — 1.8
- — overall size, 2.1 m; 2.0 m; 0.95 m
- – weight – 160 kg
- — total arrows — 8
- — total teeth — 4
- — tractor operating speed 4/8 km/h
- — base tractor PTO speed – 540 per minute
- — number of pneumatic wheels — 2
A tedder is a technique for making hay. Forage procurement activities such as harvesting grass for hay, including straw for feeding livestock, is a complex process that involves, in addition to mowers, reapers, and feed harvesters, various highly specialized equipment.
We make a holder with our own hands
It is best to use pine to make this tool. The main task is to make a lightweight tool, the weight of which will not cause the death of ornamental plants. The only option when you can use an oak handle or a larch holder is a reinforced metal fan rake. Their wire has a diameter of 0.6 mm, and the metal strip and pipe are much more massive than before. The main task of such a tool is to comb out thick lawns and remove debris from the area. They will be only 2 times lighter than conventional rakes.
Varieties
In practice, different types of rakes are used both at home and for industrial purposes. Conventionally, they can be divided into several types:
The berry rake is designed in a special way. They are best suited for collecting lingonberries. The product is a cross between a rake and a scoop. The teeth in them are thin and set close to each other. This device makes it possible to harvest berries from bushes with convenience and with virtually no losses.
We make a work surface from scrap materials
In order to make a good tool, it is necessary to find material of similar quality.
Secondly, you need to fasten it correctly in order to guess the weight as accurately as possible. Ease of use and beauty are also important, because, despite the fact that we make the thing with our own hands, it should not be inferior in any way to its factory counterpart. Let's move on to step-by-step instructions. Step 1
Making the teeth.
First you need to find the right material.
Stainless steel wire that can be bent with considerable physical effort will work best. It does not burst, has excellent flexibility, due to this it can absorb shocks perfectly. The easiest way is to buy 15 meters of 0.4 mm wire at the base or on the market, but it will cost about 250 rubles. To save money, you can go to a scrap metal collection point. There is a lot of such goodness out there, and 1 kg of wire of the required quality will cost no more than 20 rubles. 1 kg is enough for us to make several rakes. We cut the wire into 50 centimeters. We clamp it with a vice, insert it so that a piece of no more than 5 centimeters peeks out. We hammer it into the lips of the vice with a hammer. We will get a 90 angle, exactly what we need. Leave the second end of the wire as is. Step 2
Set the distance between the teeth.
For this we need 2 metal strips about 1.5 mm thick and 15-20 millimeters wide.
Their length should be about 50 centimeters. We take an electric drill and a 5 mm drill, drill 2 through holes. We insert a 5 mm bolt into them, tighten the nut, and cut off the rest with a grinder. We get 2 metal strips, between which the fan will be placed. Now we take a hammer and punch it so that we have something to “compact” it. We place the twisted fan on the anvil, place the breakdown between 2 steel wires and hit the breakdown with a sharp movement with a hammer. Do this after each “knitting needle”. We get something like funnels - deflections that will limit the movement of steel wires left and right. Step 3
Attach the wire to the pipe.
In order to secure a chaotic bud in a pipe, you need to insert all the ends of the wires 5-8 centimeters inside the pipe (it is best to take a pipe diameter of 30 mm), and then hammer in this edge. With this action you will securely fasten the fan in the pipe, and simply insert a wooden handle into its other edge.
If everything is done correctly, the work area should not wobble. If there are any squeaks or gaps, you can pour a little epoxy resin into the pipe or “beat” the metal with a hammer so that the fan is clamped more tightly.
How to make a rake for collecting leaves and grass at the dacha
Very – this is a wonderful time of year, when nature transforms and begins to prepare for the coming winter. The trees begin to change the color of their foliage, creating bizarre and amazing landscapes, and the grass turns yellow and becomes dry.
When autumn comes, it is very difficult to avoid fallen leaves. It will not exist only if there are no trees nearby. But this is unrealistic when it comes to a summer cottage. It’s not surprising, there are usually a large number of fruit-bearing trees here.
A fan rake will come to the rescue; it can easily collect all the fallen leaves and rake up dry grass. They will become a faithful friend and the most important tool at the dacha in the autumn. You can purchase them at any store that sells garden products. If you don’t want to overpay, you can try making a rake yourself.
Advantages of fan rakes
A fan-type rake is similar in appearance to a broom. This type allows you to cope with the task with ease, as the thin teeth instantly rake up fallen leaves and dry grass. The working area is made of metal teeth, quite thin and slightly curved at the end. Such rakes are not suitable for preparing mail for planting crops. But in other cases they have the following clear advantages:
- To remove small and small debris, you can choose a plastic option. This is due to the fact that its teeth are more elastic and allow you to rake debris from uneven surfaces without much difficulty;
- allow you to remove leaves from hard-to-reach places, for example, from under bushes;
- can be used to “comb” the lawn before cutting it a little;
- with their help it is possible to carry out surface aeration of the soil;
- are good if you need to facilitate the germination of the lawn or thin it out.
If you need to clean a garden area or a summer cottage, then you need to use a nozzle with straight teeth. This will prevent damage to the seeded lawn or young shoots. The nozzle is best made of plastic. A rake with a triangular fan can easily cope not only with flat areas, but also with corners and hard-to-reach ones.
Important! A special lock located on the tool allows you to independently adjust the width of the grip itself, the pressing force, and the area to be processed.
How to make a fan rake yourself?
To make a rake for cleaning dry grass and fallen leaves, you can use simple recommendations from experienced gardeners. Making a tool is quite feasible from available tools and materials. The only thing is that several conditions must be met for a quality result:
- the material should resemble the factory one;
- correctly fix all parts so that the load is distributed evenly;
- aesthetic side.
You can use stainless steel wires as teeth for future rakes. You will need about 15 meters of material. After purchasing, it is cut into even pieces, about 50 centimeters long. Using a vice, clamp the ends exactly 5 centimeters; you need to make a right angle.
Then you need to set the pitch of the teeth. The distance between them should be the same. Metal strips are taken, holes are made in them and a bolt is inserted. The teeth are fixed to these strips. The fan is placed on the anvil and clamped between two plates.
The last step is to connect the fan into a ring. To assemble all the parts, you need to take a pipe with a diameter of 30 millimeters. All ends of the wire are inserted into it by 5-8 centimeters. After which the edge is clogged. A wooden handle is inserted into the resulting hole on the other side of the fan.
LAWN RAKE
When cleaning a lawn area from mown grass, special lawn rakes will be more productive and ergonomic compared to a fan tool. They have a wide working part (its width is more than 0.6 m) and closely spaced teeth that fit tightly to the grass and efficiently comb out debris from it.
The working part of such an interesting piece of equipment is supplemented with limiting rods, which allow you to capture a very large portion of mowed grass and move it to the right place without loss.
As you can see, such a familiar garden tool as a rake is not as simple as it seems at first glance. Therefore, pedantry when choosing such toothy helpers is completely justified - properly selected and high-quality equipment will save you from disappointment and turn your summer cottage activity from a tedious task into a pleasant pastime in the fresh air.
When choosing a rake for your farm, avoid nameless models: if the manufacturer wishes to remain unnoticed, then the quality of its products is unlikely to be up to par. A better decision would be to purchase tools from well-known companies that have managed to earn a reliable reputation.
The higher price of branded rakes compared to those purchased on a neighboring market will be paid off by the long service life of the former - and the pleasure from work that you will certainly experience while holding a convenient, lightweight and effective tool in your hands.
Purpose of tedder rake
This is a special tool that farmers use when preparing livestock feed, drying hay, and harvesting it.
The devices are installed on:
- tractors;
- mini tractors;
- monoblocks.
When the tractor drives across the field, the tedders rake up the grass, collecting it almost completely.
The technology saves farms time spent on work and also increases the amount of hay harvested.
Since the structure's capture area is large, the loss of mown grass is minimal.
Work for a month
Works in November
- The last month of autumn is good for transplanting medicinal plants such as hawthorn and viburnum.
- Prepare cuttings for spring grafting in the first days of the month.
- In November, pay attention to your lawn. Particular emphasis is placed on mulching the area with a suitable organic composition.
- To prevent mice infestation in winter, before the cold season, clear your garden plot of weeds that are attractive to rodents.
- After the November harvest, the “houses” of pests like goldentails are clearly visible in the garden. Burn their nests immediately upon discovery.
- November is optimal for creating a classic compost heap from plant waste collected over the summer.
- One of the most important points of November preparation is cleaning and storing gardening equipment until spring.