Hands from the right place | 01/28/2017
Every master knows that before installing plasterboard slabs, you must first make a steel frame. Traditionally, self-tapping screws are used as fasteners. However, in this case, you cannot do without a screwdriver and a strictly defined amount of fasteners (purchased, moreover, with a reserve). An alternative technology is cutting a steel profile with a special tool. This is what they call it - a cutter for a metal profile for drywall - although a similar method of fastening can be used in other situations.
What is a cutter
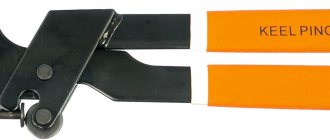
A cutter is a hand-held tool that is used in installation work to connect metal profiles into frames, as well as for fixing sheet products.
This technology involves making holes in materials superimposed on each other. In this case, the ends of the holes on the reverse side are formed with rolling, which ensures a strong connection.
The area of use of the cutter began to expand rapidly after the spread of profile systems for plasterboard in repair and construction work.
The formal purpose of the tool is to quickly install metal frames of suspended ceilings and plasterboard partitions.
The design of the cutter is quite simple, including several elements:
- a movable handle connected to a lever and a punch;
- a bracket having two legs and a stop with a recess;
- fixed handle fixed to the bracket.
For convenient storage of the tool in a suspended position, a loop is provided. The movement of working elements is carried out using movable axes.
The operating principle of different types of cutters remains unchanged:
- the operator applies force to the movable lever;
- translational movements of the punch are formed;
- The punch, resting against the profile, makes holes in its plane until it stops.
The edges of the holes are bent, thanks to which it is possible to create a reliable and durable connection.
The degree of impact on the tool depends on the force applied. The punch easily passes through the entire thickness of the plasterboard sheet due to the length of the lever and additional attachment mechanisms.
Advantages and disadvantages
Using a cutter during installation of a metal profile for plasterboard has a number of advantages:
- Speed . If you make holes with a drill or by screwing screws into the profile, it takes quite a lot of time. Using a cutter reduces the time it takes to make one hole to a fraction of a second.
- Accuracy . The tool allows you to make a neat, even hole without deforming the profile. Often this cannot be achieved when using a drill or screw. The hole deviates from the required position and becomes slightly inclined. Metal often wrinkles (especially true for soft aluminum profiles).
- Evenness . The front side of the metal profile frame remains absolutely flat. When connecting with screws or bolts, this cannot be achieved - the head always remains on the surface.
- Economical . Using a drill or screwdriver involves the consumption of electrical energy. The cutter is a completely mechanical tool. This allows you to save on electricity. There is also a saving in the absence of the need to purchase additional fasteners (for example, screws).
- There is no need to hire an assistant . Often, when assembling large structures made of metal profiles, a second person is needed to hold the material while drilling. When using a cutter, the need for it practically disappears - all the necessary actions can be performed alone.
Despite the large number of advantages, the tool has one significant drawback. The connection made using it is not as reliable as installation using screws. The fact is that the thread of the screws better resists the tensile load. An absolutely smooth connection made by a cutter is much less reliable.
Due to insufficient fastening reliability, the cutter is used as a temporary solution or in combination with screws. Especially if the drywall will experience significant loads. For example, when covering a wall, it is recommended to fasten the main connections with screws, and use the cutter only on the transverse ones.
Advantages disadvantages of work
Using a cutter in the installation of a frame made of profiles has a number of advantages.
- There is no need to purchase and use other fasteners. Taking into account the purpose of the tool, we are talking about self-tapping screws and self-tapping screws.
- The device does not leave any dents on the surface after passing through the profiles.
- Save working time and labor costs on marking. When creating connections using clamps, there is no need to mark control points and lines.
- The holes are formed smooth, which eliminates subsequent processing.
- Installation work is completed faster than when using hardware.
- There are no protruding heads from self-tapping screws that prevent the sheet material from tightly adhering to the surface of the frame.
To construct a frame from profiles, self-tapping screws or a cutter are used. Each option has its own advantages and disadvantages. It is inappropriate to compare them, since prerequisites have been derived for them that predetermine the appropriateness of a particular method.
To create frame structures of increased strength, it is recommended to choose the method of creating connections using hardware. This gives additional durability and rigidity under heavy loads. To eliminate the problem with protruding caps, use flat self-tapping screws with a press washer.
Connections using a cutter are quite reliable, but stability is observed only in certain directions. When a load is created at an unnatural angle, the profiles may become detached from the frame.
This method is not suitable for installing ceiling structures. And using a tool to form the sheathing is a completely reasonable solution. The method is also suitable for temporary fastening of materials. To further strengthen the support, you need to add screws. There will be no excess consumption of material, since the combined option involves increasing the interval between hardware.
The following factors stand out among the disadvantages of using a cutter:
- inability to withstand heavy loads;
- the difficulty of operating the tool with one hand (especially for inexperienced craftsmen);
- difficulties in disassembling the frame during dismantling, when it is planned to reuse the material (the whiskers on the reverse side are not easily unclenched, and it is important not to deform the profile itself).
Varieties
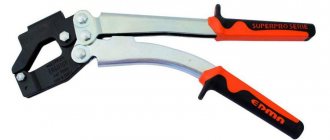
There are three main types of cutters:
- manual;
- reinforced (pneumatic);
- professional.
The manual cutter has a convenient lightweight design, fits in one hand, is inexpensive and can withstand the stress of home repairs. The reinforced, or pneumatic, cutter is popular among users. It is made of tool steel and often has a removable cutting structure. Its service life increases significantly thanks to replaceable parts. Professional tools are larger in size, more difficult to operate and are suitable for large repair projects.
Conventionally, according to their functionality, cutters are divided into the following types:
- small-sized types of cutters are more popular because they are cheaper in cost and more convenient to use when talking about repairs that are carried out occasionally;
- the enhanced version of the flasher is convenient for the work of small teams of repairmen, if they mean work in domestic and utility premises;
- A professional cutter should be used when implementing large-scale projects, large volumes of capital construction, and when installing partitions in premises.
The first two types of such instruments are attractive due to their low cost and relatively small size. The third type of cutter also has its advantages - it can be used for a long time, it can perform more functions. There are also flexible cassette cutters that use a needle roller.
It is necessary to make a small remark: some dividers are used to work with profiles from the same manufacturer, therefore, they cannot be called universal. Therefore, before purchasing it, it is necessary to determine the types of profile that are going to be used, as well as the company that produces the tools and consumables.
Criterias of choice
In the absence of experience in using a cutter, it is difficult to choose a tool among a huge assortment. Therefore, it is recommended to take into account the advice of experts.
The first step is to decide for what purpose you are purchasing:
- volume and nature of work;
- duration of the planned installation.
The answers to these questions allow you to find out whether it is worth spending money on a hinge mechanism, or whether you can get by with a classic type design.
For wall coverings in several rooms, you should consider models from well-known manufacturers. A professional tool can withstand long-term installation. When choosing it, attention is paid to such parameters.
Type of cutter
Pliers for fixing profiles are available in different versions.
- Manual - completely cope with the operation, but have limited capabilities. Such models are called amateur. They are used for periodic work with light loads.
- Reinforced - with such a tool you can safely work with thick metal. Cutters are used primarily by repair teams. Some models have removable elements, which expands their range of capabilities.
- Professional - in such designs there are multi-stage levers that transmit mechanical reinforcement to the punch. This is generally a heavy tool, suitable for large-scale construction work. They are not easy to operate; they require experience and skill. After flashing it leaves neat and even holes.
One-handed and two-handed . Designs can be one-handed or two-handed. The first option is equipped with a spring that opens the handles after squeezing them is completed. It is easier to work with such a tool, especially if the profiles are made of high-quality metal. Two-handed pliers can handle thicker profiles. However, it will not be possible to operate them with one hand due to the large distance between the handles.
Handle coating . The tool is made of durable alloys. Most models on the market are made of tool steel. The handles may or may not have anti-slip coating. Rubber, heat-resistant plastic and other polymer materials are used as protective materials.
Profile properties . In this case, the type of materials being joined is taken into account. Hand tools are capable of making holes in guides with a thickness of 0.55 mm. When installing ceiling frames and thick profiles, it is recommended to choose a tool with a reinforced mechanism. An option such as replacing the cutting punch is also welcome. These models easily make holes in metal 1.5 mm thick.
Hole diameter . Making large diameter holes will require a lot of effort. A set of bits is included with the tool. Their parameters determine the range of capabilities of the cutter. For example, the set includes bits from 2 to 5 mm. These will be the minimum and maximum diameters of the holes.
Weight . Another important criterion is the weight of the ticks. Hand tool work is performed with one hand. A structure that is too heavy will complicate an already difficult task. Therefore, when choosing a model, it is important to try on the cutter in your moving hand (move it to the sides, raise and lower the product). If your hand gets tired from primitive manipulations, it’s better to look at other options.
What else should be taken into account when choosing pliers:
- maximum thickness of connected profiles;
- length of the handles (the model is selected taking into account physiological abilities);
- build quality;
- presence of backlash;
- comfortable grip of the handles;
- durability of the coating;
- user reviews regarding products of a particular brand.
Tips for use
A cutter is a very simple and undemanding tool, however, it also requires proper care and compliance with certain rules:
- most cutters are designed for a total profile thickness of no more than 1.5 mm;
- you can’t make breakthrough breakthroughs;
- hitting is also prohibited;
- The cutter must be placed strictly perpendicular to the plane of the profiles being pierced;
- you cannot make a breakdown in the place where the profile is built up or joined;
- The hinges need to be lubricated periodically.
A profile cutter for drywall is a simple and convenient tool. Even a beginner can assemble a frame with its help.
How to use the cutter
Installation work can be completed efficiently by adhering to the following rules for using pliers.
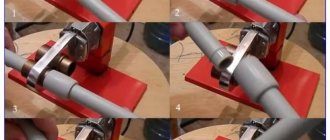
How to fasten a ceiling profile (PP) with a guide profile (PPN) using a conventional cutter
- You should start by checking the functionality of the tool. To do this, it is suggested to make several test connections. Based on the nature of the passage of working elements into the plane of the profiles and the quality of the holes, appropriate conclusions are drawn.
- The next step is to check the strength of the connections. Under the influence of forces, the reliability of the frame is controlled. A negative result may indicate low quality of the metal from which the profiles are made. In this case, it is better to make connections with self-tapping screws or replace weak material. Professional flaring does not guarantee a long service life of the frame structure when connected with a cutter.
- Installation work begins with installing the profile. To do this, make markings by placing two parts overlapping.
- The junction is grabbed with pliers. Next, the steel sheet is slightly split.
- The junction of the steel elements is fixed by squeezing the handle. The grip is weakened when using a mechanism with a return spring.
- After releasing the tool, check the strength of the connection.
The quality of the equipment directly influences the result of the connection. If, after fixing the joint, the antennae do not unbend completely, the problem lies in the pliers themselves. When working with a professional device, you should focus on the grip strength of the handle. Heavy pushing is often caused by insufficient impact, so the attempt should simply be repeated (passing through the same holes).
What does the price depend on?
The price for log fences is determined based on the specific parameters of the material and its type. In addition, it depends on the demand for perforated mesh when performing such types of work as reinforcement and enhancing the adhesion of the mortar to materials.
However, the main factor influencing pricing remains the thickness of the die cutting itself, which can range from 0.5 to 4 mm. Obviously, the price for products with a thicker metal thickness will be slightly higher, but the service life of fences made from sheets of such thickness is much longer.
Need to know: Thanks to the ideal price-quality ratio, consumers can purchase high-quality equipment for assembling fences at a very affordable price. And since the material is initially waste material, its cost will not rise as quickly as, for example, a chain-link mesh or corrugated sheeting.
Where can I buy?
The cutter for drywall profiles is sold in large construction chain supermarkets, on online sites, in stores selling repair products and on the market. A wide selection of cutters, clear terms of warranty and service are offered by such flagships of the building materials and tools market as:
- "Obi";
- "Maxidom";
- "Leroy Merlin";
- "220 volt".
In offline stores you have the opportunity to touch the instrument, evaluate the quality of its workmanship, weigh it in your hand and get a quick consultation. When buying a cutter on online sites, rely on reviews and choose reputable suppliers.
Of course, no one is stopping you from purchasing a tool on the market, but in this case, all possible risks are placed on you.