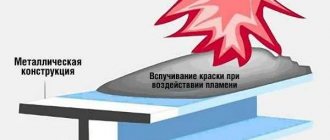
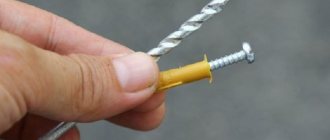
Galvanized corner for plasterboard 25x25 mm is one of the types of material that is used to level parts of walls. As you know, drywall is popular in construction and is easy to work with. However, prefabricated interior partitions made of plasterboard have problem areas - corners, which are most often subject to mechanical stress. This is where the different types of existing corners come to the rescue.
Existing types of corners for drywall
They perform the protective function of parts of the walls and will help to build even corners. Knowing their classification, you can choose a suitable specimen.
Types of corners and features of their use
The most common product options are:
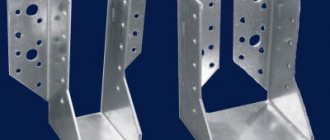
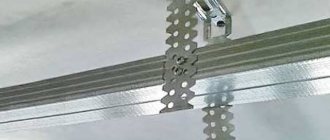
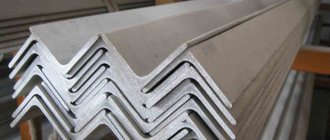
Metal perforated corner
This type is a thin sample made of a profile with perforation and a rigid edge along the edge. There are basically 2 types of similar corners for drywall:
- straight;
- arched.
These representatives have many subspecies. The corners are not glued, they are practically “slung” onto the structure and secured with putty or gypsum plaster.
Straight perforated corner is used for processing the inside and outside of corners.
It is a V-shaped profile with many holes - perforations.
Options for metal perforated corner for drywall
Actually, with their help, a high-quality connection with the processed corners occurs, and the top, located at the internal corners - inside, and at the external corners - outside, is a guide for the spatula. Excess air also escapes through the holes. Straight perforated corners are made of plastic, aluminum, and galvanized. The latter is tougher than the others, and the wide one can generally be used as a plaster beacon.
Plastic corner
This sample is more resistant to moisture than the profile, but its resistance to mechanical damage is lower. Among the advantages are the low price and the absence of corrosion of the material. There is also a type of plastic corner, for example, AquaBead, which has special paper with glue applied in the inside. Putty is not required for fixing here; just moisten the adhesive surface with water and simply glue the corner to the desired place.
Arched
When installing a gypsum plasterboard arch in the opening, various finishing materials are used, such as plaster, wallpaper, panels and others. But in order to preserve the transition points between planes, an arched corner, which has great capabilities, is used. Arched corners are divided into the following types:
- Installed under plaster, perforated. They have separate petals on one side of the corner, allowing you to place a sufficient strip on any arched curve. There are plastic and profile ones;
- Decorative, which are glued to the plaster.
Characteristics of profiles for slopes
Decorative corners for slopes will help hide small unevenness or other wall defects. Construction stores offer profile shelves that come in various sizes. In most cases, the angle between them is at least 90 degrees.
Main types:
Less popular are designs that are equipped with asymmetrical shelves. Some people prefer to install arched openings on windows, so you need to buy a special profile.
It is incredibly flexible and comes in standard shelf widths. They converge with each other at an angle of 90 degrees, and the total length does not exceed three meters.
If preference is given to the L-shaped profile, then it should be installed last.
If we are talking about an F-shaped corner, then it needs to be glued only to the end of the PVC panel. In most cases, on the internal and external structures it is necessary to additionally install an overlay that has increased rigidity. In this case, craftsmen offer their clients to buy materials made from aluminum.
The presented design has the appearance of a narrow long corner, with a shelf width of 2.5 centimeters. There are several varieties of this profile - decorative and perforated.
Experts recommend drilling holes in a checkerboard pattern to strengthen and firmly fix the structure in the putty layer.
Installation of corners on drywall using corners
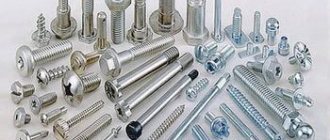
When starting to install a corner on drywall, you need to have tools and material on hand.
Required material
- the selected type of corner will need to be purchased with some reserve;
- using a primer, the surface of the drywall is strengthened;
- It is best to buy Vetonit putty, which is of high quality.
Tools
- metal scissors will help you cut out the necessary parts correctly and quickly;
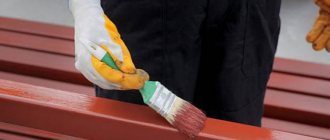
- a brush that will be needed to apply the primer;
- wide and narrow spatulas will be needed for puttying drywall;
- The sanding block will remove all unevenness on the plane, while the angle will be perfectly even.
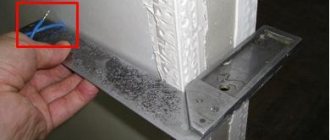
This is what mounted corners on drywall look like.
When starting installation, you need to familiarize yourself with the sequence of leveling the corners with putty so as not to damage this fragile material.
Stages of work
- First, the surface must be thoroughly cleaned and treated with a primer. You need to proceed to the next stage only after it has completely dried.
- Measurements are taken and the required length of the corners is cut. They are applied to the drywall as a sample.
- For further work, you will need non-woven tape, serpyanka mesh for the internal corners, one of the types of perforated corners: plastic, adhesive, rounded, either made of a metal profile or paper-based.
- Before you putty the gypsum plasterboard corners, you should select a putty for the gypsum plasterboard. To form internal and external corners, it is better to buy a dry gypsum mixture. It has a reasonable price, good quality and can securely fasten elements to the structure.
- The putty is prepared following all the steps: poured, poured, stirred, allowed to settle, kneaded again.
- When working with external corners, you need to remember that they are most often subject to mechanical stress; it is better to mount metal samples, in some cases having a rounded shape.
- Check the flatness of the end.
- Putty is applied to the area to be treated with smooth movements. Without allowing the composition to dry, you need to secure the corner with pressure, check the accuracy with a level, and if necessary, you can tap with a rubber mallet.
- Sometimes the corner is attached to the drywall with a stapler or glued with glue, and then covered with putty.
- Another layer of the mixture is applied to the installed element and now alignment occurs with the general plane of the wall.
Applying a second layer of putty - After thorough drying, the slope corner is polished.
- Installing corners inside the structure looks similar, even a little easier. Carefully coat the adjacent sides and the gap between the corners with a spatula, and remove excess mixture. A reinforced tape having the desired shape is glued onto the dry, sanded surface. You can also buy a serpyanka mesh, just apply it to wet putty.
- Using a building level, check the fastening of the corner on the plasterboard, then use the next layer to hide the unevenness.
- After thorough drying, the surface is finished with sandpaper or a sanded block, forming a perfect angle.
- To facilitate the leveling process, so-called beacons are used, attached to the surface with a plaster solution; here you can do without fastening parts.
- Separately, I would like to mention the semicircular plastic corner, used in rooms with the maximum possible impact on the corners. It is made of flexible plastic and has a semicircular angle rather than an acute one. Its price is quite reasonable, and its durability is beyond doubt. It differs in some features at the installation stage, namely cutting the end by 1.5-2 cm with an angle of 45 ͦ . A corner is pressed into the applied initial putty, fixed with a stapler, and the edges are treated with the mixture.
A video of arranging corners will help you see how parts of drywall are reinforced, and will also allow you to select and buy the necessary elements.
Finishing internal and external corners will not seem difficult with the right approach and the necessary training. The main thing is that during installation, smooth walls of plasterboard without a frame must be made, requiring minimal finishing.
Can you show us clearly how to install a perforated corner?
A perforated profile (perforated corner) is installed to protect and align external corners.
Most often, such protection is installed on the outer corners of slopes, columns, openings, niches, arches.
Some craftsmen don’t bother fixing the perforated corner dry using a mounting stapler, and then apply putty on top, but I think that this is not entirely correct. The perforated profile, regardless of the material - metal or plastic, primarily serves to protect and strengthen the corner, which means the internal cavity under it should not be empty, but completely filled with strong putty, for example CE 78, FUGENFULLER, UNIFLOTT.
I’ll tell you step by step how I install a perforated profile on the corners of an arched opening. Installing an arched profile on both sides along the thickness of the arch is more complex and has its own nuances, unlike fastening the profile, for example, to a window slope. It is this option with an opening that we will consider.
First, we decide on which side of the opening we need to start installing the protection. To do this, use a plumber's angle to check whether the end of the opening is turned around. As a rule, this is a plasterboard partition and the plasterboarder does not always pay attention to this nuance. We start installation from the corner that protrudes the most (acute corner). If both angles are 90 degrees, it makes no difference which side to start framing from.
So, use a spatula to apply putty to the outer corner of the opening:
Carefully install the perforated corner, pressing it into the putty:
In our case, the first profile has already been set. Now we have to set the second profile in such a way that the framed end of the opening is not turned around, but has a 90 degree angle.
The difficulty lies in the fact that the installed perforated profile protrudes beyond the plane of the wall by 3 millimeters. If we apply the plumbing angle close to the plane of the wall, we will not get an angle of 90 degrees. To compensate for the thickness of the perforated profile, you can use, for example, cutting a wire of the required thickness:
On the curved part of the arch we set the profile with the same bench angle with a “device” to maintain a right angle. To fix the arched corner in the design position, you can use self-tapping screws, screwing them into the holes of the individual segments.
To make the plane of the wall near the opening look more or less even, you need to make a “guy” along the installed perforated corners 35-40 centimeters wide:
After “bracing” the perimeter of the openings and niches framed by a perforated corner,
Photo selection of installation of corners on drywall
Necessary tool
The plastic corner for the interior arch must be properly secured. For this purpose, a list of such tools is prepared in advance:
- Plastic element to match the style of the room.
- Assembly adhesive.
- Liquid nails will help attach the element.
- Rubber mallet.
Important! Gluing decor using liquid nails is simple, but risky. Firstly, the plastic can be damaged, and secondly, a large amount of material used leaves greasy marks on the finish.
It is best to attach a bent corner using assembly glue or liquid nails, since installation with metal nails or screws looks awkward and also increases the chances of cracks and chips.
Drywall is one of the most common materials for creating interior portals. It is lightweight, attached to the frame and makes it possible to draw internal and external radius corners. Since the material requires subsequent cladding, corners are used for ease of design. Glue for installation - putty.
Finishing an arch with a plastic corner (video)
Mounting options
The method of fastening sheets when covering with plasterboard follows from the type of angle (external, internal, straight, acute or obtuse).
For example, if you sew the frame into one sheet, then adjacent elements at the outer corner will overlap one on one - in this case, the end of the sheet must be cleared of the cardboard layer all the way to the gypsum surface.
If the plasterboard corner is internal, it is also advisable to remove the cardboard layer. And when making a T-shaped joint, it is advisable to cut the ends at an angle of 45 degrees, which will make puttying easier in the future.
You should be especially careful when sheathing in two sheets - here the displacement of parts is almost inevitable.