Fishermen, hunters and winter sports enthusiasts use snowmobiles to travel to the best vacation spots. Even inexpensive models of such equipment cost about a hundred thousand rubles, often more. Those who want to save money can assemble a homemade snowmobile on tracks in a regular garage workshop. The cost of parts for construction does not exceed 40 thousand rubles.
Snowmobile device
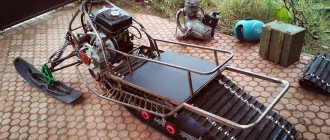
Homemade snowmobiles are built on caterpillar tracks. The tracks are driven by an internal combustion engine mounted on a rigid metal frame. They are supported in working position by wheels and special rollers. Main options:
- With a solid or fracture frame.
- With rigid or shock-absorbed suspension.
- With an engine from a walk-behind tractor or from a stroller.
Short skis are used for steering. Light snowmobiles (weighing up to 100 kg), designed to travel at a maximum speed of up to 15 km/h, do not necessarily require a braking system. They stop easily when engine speed drops. make a homemade snowmobile on tracks using the following algorithm:
- Selection of engine, calculation of frame and chassis.
- Frame assembly by spot welding.
- Steering device.
- Installing the engine in the design position on a temporary mount.
- Checking the structure for resistance to capsizing.
- If the test is successful, the frame is completely welded and the engine is installed.
- Installation of drive system, axles.
- Assembly and installation of tracks.
- Installation of body parts.
After this, final tests are carried out. If the snowmobile drives normally and does not tip over, then it is driven into the garage and disassembled. The frame is cleaned of rust, painted in 2 layers, the remaining elements are finished, and then a homemade snowmobile on tracks is assembled with your own hands.
Making caterpillars from car tires
You can make your own caterpillar using car tires. To carry out the work, you need to select tires borrowed from trucks; it is recommended to use a suitable tread pattern, and you will spend less effort when working with the tire. The manufacture of such a caterpillar must be done by cutting out the sides from the tire, while leaving space for a treadmill.
It is worth considering that this work is quite labor-intensive and requires the application of a lot of patience and effort; in this case, it is necessary to use only a well-sharpened shoe knife.
In order to spend less effort when making a caterpillar for a car with your own hands, you can wet the blade from time to time using a soap solution. As an alternative solution, you can use a device designed for cutting; it is also possible to use an electric jigsaw. On the latter you first need to attach a file with small teeth, the file must also be pre-moistened with water, during the work such manipulations must be done periodically.
Engine selection
Gasoline engines are used for walk-behind tractors or strollers. Engine speed is controlled by a throttle handle located on the steering wheel. To make a homemade tracked snowmobile with your own hands, the easiest way is to use ready-made small-volume engines for walk-behind tractors with pre-installed:
- Fuel tank.
- Ignition system.
- Reduction gearbox with a ratio of 1:2.
- Centrifugal clutch, automatically activated when the speed increases.
The power of these engines does not exceed 10 horsepower, but they are easy to install: the technician does not need to separately assemble the ignition system, connect fuel pipes, adjust the clutch, etc. There are different options on the market:
| Brand | Model | Power, l. With. | Volume, cm3 | Weight, kg | Approximate price, thousand rubles. |
| Kipor | KG160S | 4,1 | 163 | 15,5 | 20−25 |
| Sadko | GE-200R | 6,5 | 196 | 15,7 | 15−20 |
| Lifan | 168 FD-R | 5,5 | 196 | 18,0 | 15−20 |
| Zongshen | ZS168FB4 | 6,5 | 196 | 16,0 | 10−15 |
| Nomad | NT200R | 6,5 | 196 | 20,1 | 10−15 |
| Brait | BR-177F-2R | 9,0 | 270 | 30,0 | 10−15 |
| Honda | GX - 270 | 9,0 | 270 | 25,0 | 45−50 |
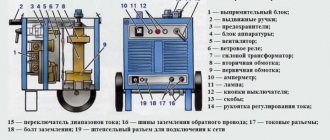
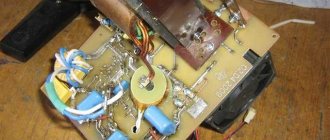
If it is not possible to purchase a ready-made engine from a walk-behind tractor, then you can use an engine from a stroller. Such engines are 10-15 horsepower more powerful, but require self-assembly. The system includes:
- Engine.
- Clutch.
- Gearbox.
- Gas tank (volume 5-10 liters).
- Muffler.
- Generator.
- Electronic ignition switch and coil.
Some of the elements will come from old motorcycles (“Minsk”, “Vostok”, “Java”, “Ural”). The gas tank is located as close as possible to the carburetor to reduce the length of the pipes.
How to make a snowmobile with your own hands - detailed instructions
During cold weather, transport on two wheels becomes irrelevant, and sometimes it is impossible to drive through snowy expanses even by car. What to do in a situation where there is no money to buy a vehicle more adapted to the harsh winter?
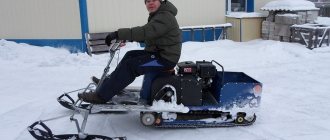
In this case, you can make a homemade snowmobile. Winter vehicles are most often equipped with a tracked drive and steering skis are installed at the front.
The snowmobile has high cross-country ability, light weight (70-80 kg), which allows it to drive both on valuable snow and on hard-packed snow-covered roads. Driving this vehicle is easy and the speed is low.
So riding a snowmobile in the countryside in winter is not only convenient, but also safe.
Features of homemade snowmobiles
A huge number of companies sell snowmobiles in the CIS. But their prices are high even for families with decent incomes. If you don’t want to overpay for advertising and are a hardworking and creative person, then try making a homemade snowmobile.
- A self-propelled gun made by yourself costs 7-10 times less than the cheapest factory-made models.
- The success of making a snowmobile yourself depends on several factors:
- your personal skill;
- your engineering and design thinking;
- availability of parts and assemblies from other snowmobiles, motorcycles and other things.
It should be kept in mind that riding a snowmobile, like riding any vehicle, is associated with increased danger.
Despite the fact that homemade devices, as a rule, are not capable of reaching speeds of more than 15 km/h, the quality of parts, welding, and bolting of elements should be approached with the utmost seriousness.
The issue of operational safety and reliability of the final unit should be the main one for any person who intends to make a snowmobile with his own hands.
Preparation
Before you start making a snowmobile, you need to calculate the basic parameters of the device. If you are a bit of a design engineer, then it is appropriate to make a drawing of the unit. In principle, all snowmobiles are designed the same and simply. Your task is to make a reliable device modeled after all other variants of this class of vehicle.
What you will need for production:
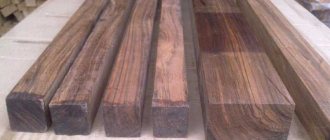
- Pipe for the frame, for pendants and other frame elements.
It was experimentally found that the optimal pipe diameter is 40 mm. If you are using a profile, then 25 x 25 mm will be enough. Wall thickness – 2 mm. With smaller parameters, the resistance of the device to deformation will be reduced. If they are large, the car will become heavier, which, accordingly, will affect the already not brilliant driving characteristics.
Wheels from ATVs (small models with a wheel diameter of 30-40 cm), some carts, etc. are suitable. A total of 2 axles with 2 wheels on each are required.
- V-belts or conveyor belt.
The main element of the "caterpillars". The optimal thickness is 3 mm. This is enough for stability and wear resistance.
They are used to make lugs - the second element of the “caterpillars”. The optimal diameter is 40 mm with a wall thickness of 5 mm.
As a rule, they use an engine, a carburetor, or a fuel tank from a motorcycle.
As a rule, they use sprockets and a chain from a motorcycle, and sprockets from snowmobiles. Drive shaft from any unit, suitable in size.
It is optimal to take skis from another snowmobile. Since this element must be as reliable as possible, designed for the load of the unit itself, plus the driver and possible passengers.
As a rule, they use a motorcycle handlebar, respectively, with a gas handle and a cable.
- Platform, seat, body.
In principle, you can do without a platform by attaching the seat(s) and the body (optional) directly to the frame. But sometimes an additional platform is constructed on the frame, for example, from wooden boards, which provide slight cushioning, allow you to place several seats, and at the same time lightly weight the structure.
This element adds additional complexity to the design. Therefore, they often do without it, especially if they plan to drive on uncompacted snow. Shock absorption is installed on the front suspension and driver's seat. You can take it from an old snowmobile or motorcycle.
In addition to those listed above, other standard parts will be required to make a snowmobile: bolts, studs, nuts, hinges.
How to make: instructions
First, the frame is welded. Obviously, the larger the frame, the heavier the device will be and the slower it will move. The optimal frame length is 2 m plus/minus.
The following are sequentially fixed on the frame:
- drive shaft with receiving star;
- power plant with a transmission star and gas tank;
- front wheel axle (fixed fastening to the frame by welding or bolts);
- rear wheel axle (fixed with a movable guide element);
- front suspension with steering structure and guide ski(s);
- seat(s) and body.
Caterpillars are made of drive V-belts or conveyor belts. The optimal track width is from 40 to 50 cm. With a smaller width (40), the snowmobile will be more maneuverable and better controllable. With a higher value (50+), the patency of the device improves.
The function of lugs is performed by PVC pipes of the diameter indicated above, sawn in half lengthwise. They are attached to the rubber base using bolts and nuts. V-belts of insufficient width can be fastened to each other with metal grousers.
In order to be able to adjust the tension of the track, the rear wheel axle is attached using a movable guide element, which allows you to fix the position of the axle in a certain position.
Additional notes:
- The center of gravity should be approximately the center of the structure. Since the power plant is mounted at the front, the driver's seat should be centered over the front axle or slightly offset to the rear.
- The distance between the drive shaft and the power unit should be minimal to minimize losses of energy transmitted to the shaft.
- If you install a shock absorber under the seat, then the front seat support is rigidly mounted on a profile arch, and the rear seat rests on the shock absorber.
- If you are making a snowmobile with a heavy load in mind, then to remove some of the weight from the tracks, it is advisable to install an additional ski in the middle of the base (between two tracks). This ski, 50-70 cm long, is attached directly to the frame. However, this design requires a more accurate preliminary calculation with subsequent leveling of the height of the “leg”, which complicates the manufacture of the snowmobile.
- It is advisable to maintain low pressure in snowmobile tires to avoid rapid wear of parts and high fuel consumption.
The considered version of the snowmobile is the simplest in design. If you have the tools and a welding machine, it can be assembled in the garage without any problems.
Frame and body
Before work, it is recommended to draw up a drawing of the frame. The structure is welded from a square pipe 25 x 25 mm with a wall thickness of 2 mm. For a payload of over 150 kg, the section size is increased to 30 x 25 mm. The loading area and body elements are covered with plywood. The seats are selected with a hydrophobic coating.
In the center of the fracture frame there is a hinge that allows rotation around a vertical axis. The maximum rotation angle is limited by welding metal plates. The front half is used for steering, and the engine is placed on the rear half frame.
The solid frame is welded in the form of a rectangle, inside of which axles and tracks are located. The engine is placed in front on a special platform, rigidly welded to the rest of the frame. In both cases, the motor is installed in the transverse direction (the shaft faces the end).
Another option for making a caterpillar
Before you make a caterpillar with your own hands, you need to choose a technology for carrying out the work. It is also possible to use the method presented below. The propulsion frame can be welded using pipes that have a rectangular cross-section. It is recommended to connect them using a frame, this will make the structure collapsible. The splined part can be borrowed from the Buran, this will make it possible to make drive shafts; the splined part of the shafts, which are borrowed from the Oka, must be welded to them. It will also be necessary to use brake discs. When working on the front shafts, you need to install brake mechanisms on them. Some part of the gearbox housing needs to be cut off.
Making a caterpillar with your own hands will allow you not only to save money, but also to move through snowy areas without any problems. This design can be used for a long time without the need for repairs.
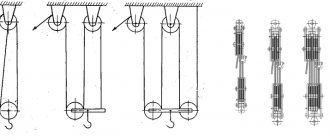
Drive system
A small diameter drive sprocket is installed on the engine output shaft. From it, torque is transmitted through a chain to the driven shaft, located under the engine seat. On the driven shaft there are:
- Large diameter driven sprocket.
- Gear wheels that drive the tracks.
- Guides for tracks.
The driven shaft is mounted on the frame using bearings. Gear wheels push the tracks, causing the tracks to move. The chain and sprockets are removed from one device. Old motorcycles and snowmobiles (Buran) are suitable donors. Gear wheels for tracks can only be removed from other tracked vehicles.
The guide rollers rotate with the shaft, are attached next to the gears and serve to tension the belt. They are made of wood or plastic and have a layer of soft rubber at the ends. Rubber prevents damage to the track. It is easy to make such rollers yourself by securing the edging with a furniture stapler.
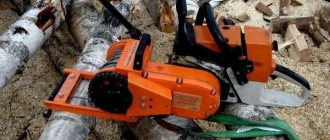
How to make a snowmobile from a chainsaw
The snowmobile is manufactured according to one of 2 schemes:
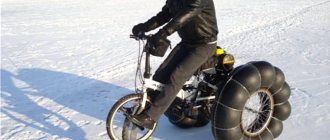
- single-track (2 skis in front, 1 track in back);
- two-track (1 ski in front, 2 tracks in back).
Any snowmobile device has the following design:
- Engine.
- Supply system.
- Oil injection system.
- Transmission.
- Chassis.
- Steering.
- Frame.
- Electrical equipment.
Before you begin making a homemade snowmobile from a chainsaw and its further assembly, you need to design drawings of all working components and the general appearance of the vehicle. It is better to draw each assembly unit separately and take out the dimensions.
During the development process, the brand of gasoline tool is taken into account.
The Druzhba chain saw has a simple design. The disadvantage is the low motor power (1 kW) with a large mass of the tool (12 kg).
The Ural has a weight of 11.7 kg and an engine power of 3.68 kW.
- ability to work at low temperatures;
- high environmental friendliness.
When making a snowmobile from a chainsaw with your own hands, you can choose the Shtil brand. It is characterized by noiselessness during operation, a power of 1.5 kW, and has a nominal weight of only 3.9 kg.
Racks
The initial stage is the manufacture of the base of the frame structure from welded spars. For the middle part, corners 50x63 mm made of hardened steel are used, the front and rear are made of S2 steel with a flange at an angle of 90°. All elements must have holes of the same diameter for mounting with the track wheel and drive shaft. Brackets for road wheels are welded to the bottom of the frame.
The racks are made from 30x30 mm corners and connected by metal crossbars. The result should be a structure in the form of a small portal. A platform is required for the mounting location of the chain saw gearbox and the chain drive shaft. Sheet steel of the required size is selected, usually 2-3 mm thick, and welded to the center of the right side of the module and the portal.
At the back of the portal and at the same time in the middle of the module, a place is formed for the seat, which is subsequently made from boards and fabric or removed ready-made from old equipment, for example, a moped.
The front spar and the drive axle traverse are installed to the beam, which is a standard water pipe with a radius of 0.75 mm. Steering ski bushings are welded at both ends, and a stand for the engine subframe is welded in the center. The mounting points for the supports are reinforced with 2-mm metal gussets for strength and stability of the structure.
Caterpillar
The mechanism from the Buran unit is used as a caterpillar, the belt is shortened by 0.75-1 m. The gears of the gear drive are planted on the transverse shafts, then the web is laid. The caterpillar gear is made from a nylon sheet measuring 15 mm.
Drive shaft
To make the drive shaft, a metal pipe with a diameter of 14 mm is taken, and flanges are installed on top to fix the wheel teeth. At the ends of the mechanism, pin tips are pressed in and welded with space provided for bearings.
Engine
The snowmobile engine is the most important component that affects the operation of all self-propelled equipment. Therefore, experts recommend using a power plant from a Shtil chainsaw with an engine power of 1.5-3 kW. The motor is mounted on a stable support of the cross beam. The gearbox is rotated 180°, fixed on the platform, and the intermediate shaft of the 2-speed transmission is also mounted. The fuel tank is installed on top.
Asterisks
The drive sprocket with an internal key made of St20 is attached to the shaft with an M12 nut and a spring washer. For precise fixation, a thread of the required parameter is cut on the tip. It is taken into account that the 1st transmission stage corresponds to a large sprocket with the maximum gear ratio (on the Ural engine there are 38 teeth), the 2nd stage corresponds to a small drive sprocket with 10 teeth.
The chains are of a standard type, with a pitch of about 16 mm.
Brake system
If the snowmobile is designed to travel at low speeds of up to 30 km/h, then the braking system may not be provided. Vehicles are stopped by friction in the chassis and transmission systems.
Steering
Control - steering on support-steering skis. The support arms are rigidly connected to the steering shaft bipod. The steering wheel is two-handed, with a gas handle mounted on the right side.
Calculation and assembly of caterpillars
The caterpillar is a tape, on the outer surface of which tracks are attached. Tracks are rigid lugs installed along the entire length of the tracks. Track options:
- Made from 3mm thick transport tape.
- From a car tire.
- From V-belts.
- Ready-made factory-made tracks.
The conveyor belt must be looped. Its strength is only sufficient for light snowmobiles with engines no more powerful than 10 liters. With. Car tires are stronger than tape and are suitable for powerful engines. Solid tires do not need to be looped, so the likelihood of a rupture is minimal. It is more difficult to choose a tire of the required length than a tape.
Finished tracks are removed from other similar equipment (snowmobiles “Buran”, “Sherkhan”). They are equipped with lugs from the factory. The products are not suitable for use with low-power motors from walk-behind tractors. Homemade snowmobiles made from Buranovsky tracks must have gears from the same “donor”.
The size of the caterpillar is selected according to the required driving characteristics: the larger the width, the lower the handling, but the higher the maneuverability. The minimum area of the contact patch from the snowmobile (skis and tracks) must be such that the pressure from the equipped vehicle does not exceed 0.4 kg/cm2 of surface. Light snowmobiles use a 300 mm wide conveyor belt, cut lengthwise into 2 strips of 150 mm each.
Preparing the Tape
The tracks are attached to homemade tracks with M6 bolts with a wide head. The bolts are fixed with a nut, a washer and a groover are used. Before fastening, leading holes with a diameter of 6 mm are drilled in the tape and tracks. When drilling, use a jig and wood drills with special sharpening.
The conveyor belt is also looped with M6 bolts. To do this, the edges of the tapes are overlapped with an overlap of 3-5 cm, the connection contains 1-2 rows of bolts. For a 150 mm wide track, the following distances are maintained:
- From the edge of the tape 15-20 mm.
- Between bolts on tracks 100-120 mm.
- Between the bolts when banding 25-30 mm.
In total, one track requires 2 bolts, and one belt connection requires 5-10 bolts, depending on the number of rows. When using car tires, only the tread is left, and the sidewalls are removed with a shoe knife.
Homemade lugs
The tracks are made of polyethylene pipe with a diameter of 40 mm with a wall thickness of 5 mm, sawn in half in the longitudinal direction. The entire section of the lug is adjacent to the tape. In light snowmobiles, one track connects the tracked pair. With a track width of 150 mm, the track length is 450-500 mm.
The lugs are cut using a wood circular saw. They use a special machine with two guides (metal and wood), rigidly fixed on a fixed tabletop. The walls of the pipes are sawed one by one.
The distance between the tracks depends on the parameters of the gears on the drive shaft. Typically 5−7 cm. The specified distance is maintained with an error of no more than 3 mm. Otherwise, the operation of the drive is disrupted: the lugs “run” onto the teeth of the drive wheels, the caterpillar begins to slip and fly off the rollers.
Making tracks from tires
This option for constructing rubber tracks has a number of advantages. There is plenty of material to be found. In case of urgent need, it will not be difficult to carry out repair work in a very short time. To make rubber tracks, you should choose truck tires. In addition, the tread must be identical in pattern to the rest of the tires - this will significantly simplify further work.
Manufacturing process:
- Initially, a tire is taken. A transverse cut is made to create a strip. The sides are cut out of it - a kind of treadmill should be formed. The procedure requires a lot of patience, because cutting out excess parts of the tire is quite labor-intensive. The tools used are a large knife with a good sharp blade.
- Rubber is easy to cut if the knife is soaked in warm, soapy water. Wetting needs to be done periodically. To achieve greater ease of operation, you should use an electric jigsaw with a fine tooth blade. The blade is also soaked in soapy liquid from time to time.
- If the tire hardness is high, it is recommended to remove a couple of layers of rubber from the inside - this is very difficult, so it is easier to find a tire with a soft structure. In case of dissatisfaction with the tread pattern, new cutting of the lugs is allowed at your discretion.
- A rubber track made by yourself has a huge advantage - it is a closed loop. With this advantage, reliability and strength are significantly increased. The only thing you need to pay attention to is securing the individual elements of the tire when creating a track for a snowmobile. Often, some tire options are not suitable in width. In this case, you should find material for specific parameters or tighten individual pieces with a small cable.