At industrial enterprises, when standardizing working hours, calculating optimal volumes of supplies of consumables, and the cost of work, the amount of material deposited during welding work is calculated. The value of this indicator depends on the class of welding, the type of material, its thickness, the type and thickness of the wire (electrode), and the requirements for the parameters of the welded joint. The mass of deposited metal during welding is closely related to the consumption rates of electrodes and wire.
Formulas for calculations
The calculation uses the value of the axial force N, which in turn passes through the conditional center of gravity of the entire connection.
. From this formula it follows:
As a working formula for calculating the cross-sectional area of a weld, the above values are used, and each value has its own data:
- t is the smallest known calculated thickness of the elements being connected;
- Lw is the finished calculated dimensional working length of the seam, which is equal to its full length reduced by 2t, or its full length if the ends of the seam extend beyond the joint
- Rwy – calculated resistance of butt welded joints according to the yield strength (see SNiP II-23-81*, appendix 5);
- Yc – operating condition coefficient.
This is the basic formula used to carry out current calculations.
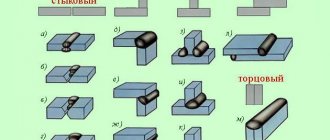
All processed seams can be performed in two modes, both with and without the use of edge grooves, while there is a basic technical regulation that regulates the principle of calculating the area of deposited metal of a weld, with the known ready-made data GOST 5264-80.
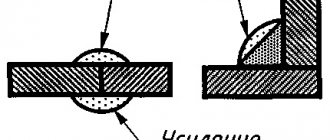
Determination of cross-sectional areas of welds
Rice. 47.
Thick metal is welded in several passes, filling the edges in layers. With a metal thickness of 15 ... 20 mm, welding is performed in sections using the double-layer method (Fig. 47, a). The seam is divided into sections 250...300 mm long and each section is welded in a double layer. The second layer is applied after removing the slag over the uncooled first one. When the metal thickness is 20 ... 25 mm or more, cascade welding (Fig. 47, b) or hill welding (Fig. 47, c) is used. The cascade method is as follows. The entire seam is divided into sections and welding is carried out continuously. Having finished welding the layer in the first section, weld the first layer in the second section and continue welding in the first section, applying the second layer over the uncooled first layer, etc. Slide welding is a type of cascade welding, usually performed by two welders simultaneously and carried out from the middle of the seam to the edges. Such welding methods provide a more uniform temperature distribution and a significant reduction in welding deformations.
Rice. 48.
Methods for making lengthwise welds depend on their length. Conventionally, it is customary to distinguish between: short seams up to 250 mm long, medium seams 250...1000 mm long and long seams over 1000 mm long. Short seams are made by pass welding (Fig. 48, a). Medium-length seams are welded either from the middle to the edges (Fig. 48, b) or in a reverse-step manner (Fig. 48, c). The reverse-step method is that the entire seam is divided into sections and each section is welded in the direction opposite to the general welding direction. The end of each section coincides with the beginning of the previous one. The length of the section is selected within the range of 100... 300 mm, depending on the thickness of the metal and the rigidity of the structure being welded. Long seams are also welded using a reverse-step method.
Welding at low temperatures has the following main features. Steels change their mechanical properties, impact strength decreases and the bend angle decreases, plastic properties deteriorate and fragility slightly increases, and hence the tendency to cracks. This is especially noticeable in steels containing more than 0.3% carbon, as well as in alloy steels prone to hardening. The metal of the weld pool cools much faster, and this leads to an increased content of gases and slag inclusions and, as a consequence, to a decrease in the mechanical properties of the weld metal. In this regard, the following restrictions have been established for welding work at low temperatures. Welding steel with a thickness of more than 40 mm at a temperature of 0°C is allowed only with heating. Heating is necessary for steels with a thickness of 30 ... 40 mm at temperatures below - 10 ° C, for steels with a thickness of 16 ... 30 mm at temperatures below - 20 ° C and for steels with a thickness of less than 16 mm at temperatures below - 30 ° C.
Burners, induction furnaces and other heating devices are used for heating. Welding is carried out using electrodes of the E42A, E46A, E50A types, which ensure high ductility and toughness of the weld metal. Welding current is 15...20% higher than normal. The workplace must be protected from wind and snow.
2.7.6. Measures to combat welding stresses and deformations.
Welding creates its own stresses in products. Self-stresses are stresses that exist in a product without the application of external forces. Depending on the reason that caused the stress, there are:
- Thermal stresses caused by uneven temperature distribution during welding
- Structural stresses arising as a result of structural transformations, accompanied by overcooling of austenite in the heat-affected zone and the formation of martensite hardening products, the volume of which is greater than the volume of the original structure.
Heating during welding leads to changes in both the physical and mechanical characteristics of the metal, which must be taken into account.
The entire range of measures to combat deformations and stresses from welding can be divided into two main groups:
- Measures that prevent the likelihood of deformations and stresses or reduce their impact
- Measures to ensure subsequent correction of deformations and relief of stresses
The first group of measures includes: choosing the correct sequence for welding the product, fastening, preliminary bending, heating, intensive cooling of parts and others.
The most effective way is heating. It can be general and local. Heating reduces the unevenness of temperature distribution and thereby can reduce or eliminate the effect of the main factor causing welding stresses and deformations.
To completely relieve stress, heat treatment is used after welding.
To relieve stress, a high vacation is prescribed. The feasibility of prescribing heat treatment for welded structures in each specific case is determined depending on the materials used, the manufacturing technology of the structures and its operating conditions.
The second group of measures includes mechanical and thermal straightening.
Mechanical straightening involves stretching areas of a deformed part. Thermal straightening, i.e. straightening by heating is achieved due to plastic compressive deformations of the stretched sections.
Certain measures are selected depending on the design of the product, the material being welded and the welding method
2.7.7. Quality control of welded joints
When choosing control methods during the preparation, assembly and welding of welded structures, it is necessary to adopt such methods for monitoring the quality of products that would ensure the requirements of the technical specifications for the manufacture of welded structures.
High quality of welded structures can be ensured subject to strict adherence to operational control. Control operations are divided into three stages:
- preliminary control before welding. It includes checking the raw materials used to manufacture the product, checking welding equipment, fixtures, tools, qualifications of welders, etc.
- control during the production process in order to check the correctness of the workpiece, assembly, compliance with technological conditions, size and quality of welds, the sequence of their application, etc.
- control of finished products - acceptance tests
Control at the first two stages helps prevent defects. Before production of welded structures begins, all materials used must be carefully checked. The finished product is checked in accordance with the technical specifications and drawings, as well as by carrying out the prescribed tests.
Having chosen control methods, you should give a brief description and rationale for them.
2.8.Safety precautions when performing assembly and welding work
When assembling welded structures, the following requirements must be observed:
o all processed products must be installed and securely secured in the fixtures
o use only proven lifting and transport equipment
o when working together with electric welders, you need to use glasses or a mask with dark glasses
o when sharpening a tool on sandpaper without a protective screen and when working with a grinder, work in glasses with transparent lenses
When welding, the following requirements should be followed:
o work should only be carried out with a shield or mask that covers all parts of the worker’s face and is equipped with the necessary light-protective glass
o workwear must meet established standards
o to protect others from the action of an electric arc, the electric welder’s workplace must be fenced
o the connection of wires to the product being welded, the electrode holder and welding installations must be tight and durable
o for welding currents exceeding 600 A, the current-carrying wire must be connected to the electrode holder, bypassing its handle
o the handle of the electrode holder must be made of dielectric and heat-insulating material
o to protect against flux dust released during welding, flux ejectors are used, and the workplace is provided with ventilation
o torches for welding in carbon dioxide must not have exposed live parts, and the handles must be covered with dielectric heat-insulating material
o if sparking occurs between the torch body and the workpiece, welding must be stopped until the problem is resolved
o gas and water communications must be sealed and have no gas or water leaks
The main fire protection measures are: the presence of serviceable electrical wiring, welding wires and other sources, the absence of flammable substances when working on the site, compliance with all requirements of fire safety regulations by all workers on the site.
BIBLIOGRAPHY
1. Kurkin S.A. , Nikolaev G.A. Welded structures - M: Higher School, 1991
2. Ryzhkov N.I. Production of welded structures in heavy engineering - M: 1980
3. Dumov S.I. Electric fusion welding technology - L: Mechanical engineering. Leningrad branch, 1987
4. Welding in mechanical engineering. Handbook ed. V.A. Vinokurova - M, 1978
5. Gitlevich A.D., Etingof L.A. Mechanization and automation of welding production - M: Mechanical Engineering, 1979
6. Maslov B.G., Vybornov A.P. Production of welded structures - M: Academy, 2008
APPLICATION
⇐ Previous3Next ⇒
Recommended pages:
Main calculation criteria
According to the technical regulations, when determining accurate actual data, it is recommended to take into account the following factors that influence the result of calculating the cross-sectional area of the fillet weld:
- Electrode diameter. The recommended diameter parameter ranges from 1.6 to 10 mm, while the thickness of the welded units is in the range of 1.5 - 24 mm.
- Cross-sectional area. In this case, we use the formula for calculation: F1 = 0.75 e · g, mm2 (one-sided joining seam); (F1 + F2) = 0.75 e · g + S · in, mm2 - if there are technological gaps. To cut and weld the working root of the seam, we use the formula to calculate F = F1 + F2 + F3 + 2F4.
- Penetration depth. This parameter has many additional parameters that answer the question of how to calculate the cross-section of a fillet weld, but the basic calculation formula is as follows - h = (S – c), mm.
- Determination of welding current. For this parameter, we also use our own working formula, which looks like this: Isv = Fel · j = (π · del2 / 4) · j, A. Formula values, π = 3.14; j – permissible operating current density according to the main parameters, A/mm2; Fel – computational indicator of the cross-sectional area of the recommended electrode, mm2; del – electrode diameter known for operation, mm. There is a specific database table for calculations.
Calculation of deposited metal during welding
Weld metal is a filler material that is deposited onto the base material or introduced into the pool. This term is used when using thermal types of welding equipment in industry. For automatic and semi-automatic devices, wire of various types is purchased, differing in the design of the rod and composition, the presence/absence of alloying components.
There are 3 groups of steel wire:
- with a large volume of alloying components;
- with a minimum amount of alloying components;
- with carbon, titanium, chromium, nickel, silicon, manganese.
Each group, based on its composition, is divided into many subgroups.
By design, steel wire can be:
- solid;
- powder (in the form of a tube);
- activated (5-7% powder in the form of wicks in a continuous structure).
Aluminum and copper wires and powder additives are available. Each welding method has its own type of additive and its consumption rates, which are developed based on many years of experience.
Calculation of the mass of deposited metal is most often used when determining the time required to carry out a certain amount of work: manufacturing a product, creating a meter of welded joint. Although it is most convenient to express the time in minutes required to create a meter of weld, minutes are sometimes used to deposit a kilogram of additive.
