Everything you need to know about liquid tin, making your own solution
Tin is one of the chemical elements that has found application in various industrial areas and everyday life. It is a light metal, ductile, malleable and fusible. It has a silvery-white tint and shine. One form of the substance is liquid.
Mainly used in radio construction. Liquid tin is ideal for chemical tinning of copper parts, in particular printed circuit boards.
This treatment method significantly increases their service life and prevents the formation of corrosion.
Details about liquid tin
Liquid tin is a solution that is used to coat printed circuit boards. Thus, the part becomes protected from negative influences. In addition, the surface prepared using this method is completely ready for soldering, because The solder adheres to it much better.
If you are interested in the production and installation of printed circuit boards, excellent specialists in this matter are https://a-contract.ru/produkcija/montazh-pechatnykh-plat/poverkhnostnyi-montazh-pechatnykh-plat/
The advantages of liquid tin are obvious:
- with its help you can tin a large board, with a complex circuit or with particularly thin traces and distances. It is sometimes very difficult to do this with a regular soldering iron, and sometimes completely impossible;
- the surface treated with liquid will not melt under the influence of high temperatures, because the melting temperature of tin is 220 degrees;
- The tinning process is safe and quite simple, so even a person who is far from working with chemicals can handle it.
What does liquid tin look like?
Liquid tin can be purchased at any specialized store or made yourself, especially since all components are completely accessible.
Composition and methods of using liquid tin
The chemical is sold in plastic bottles of various sizes. The composition of liquid tin includes: a reducing agent, a stabilizer, deionized water and tin salt.
Tinning is best done immediately before soldering the board. Before the procedure, the part is prepared. It is cleaned and degreased with alcohol. It is not recommended to sand the board, but if necessary, you can sand it with GOI paste and then clean it.
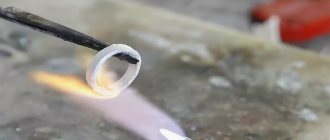
Next, the tinning itself is carried out directly. Tin in a liquid state is shaken well, poured into a prepared plastic container and heated to room temperature in a water bath. The board is immersed in the solution for 20-30 minutes.
The result is a layer of 1 μm. If a thicker layer is needed, the tinning procedure is repeated. After this, the product is washed with running water and wiped dry with a clean cloth.
Before use, the finished board is stored in a stationery file or plastic bag.
Liquid tin is sold in plastic bottles of various sizes
The amount of liquid tin is calculated from the proportion of 1 liter per ½ sq. m. surface. The liquid tin solution can be reused as many times as necessary, until it is exhausted. However, those who have already tested the substance in practice note a decrease in its performance within a couple of months after opening the bottle.
Making liquid tin with your own hands
When making liquid tin at home, you can use both hydrochloric and sulfuric acid. The second is more dangerous, but makes it possible to carry out the tinning procedure at room temperature, because The solution then does not crystallize. Consider a safe recipe using hydrochloric acid.
To prepare a chemical tinning solution, you will need the following components:
- tin chloride or “tin salt” (SnCl2*2H2O) - 14 g;
- hydrochloric acid - 55 ml;
- thiourea - 55 g;
- sodium hypophosphite - 35 g;
- potassium iodide - 15 ml;
- bismuth-iodine complex - 0.6 g;
- any dishwashing detergent - 3-6 ml;
- distilled water - approximately 1-1.5 liters.
The tools and utensils you will need are kitchen scales, a measuring cup, a syringe and a plastic spoon.
The step-by-step process of creating “homemade” liquid tin looks like this.
- In a measuring cup, mix hydrochloric acid, tin chloride and 150 ml of distilled water.
- Thiourea is poured into the resulting mixture, resulting in a white mushy mass.
- Add the full amount of sodium hypophosphite there and mix well.
- Next you need to prepare the components for the bismuth-iodine complex. To do this, in a separate container, 6 g of potassium hydroxide is combined with 30 ml of pharmaceutical iodine. Bismuth nitrate is prepared from 0.6 g of Rose alloy, which is dissolved in 7 ml of nitric acid. The liquid that appears on the surface is collected with a syringe, and the sediment is disposed of. The two resulting substances are mixed and a bismuth-iodine complex is obtained in the precipitate, and potassium iodide in the solution.
- Potassium iodide and approximately the size of a match head of sediment from it is added to the main thiourea composition. Mix everything well.
- Add detergent to the resulting mass and mix.
- Distilled water is heated to 90 degrees and added to the solution, bringing the volume to 1 liter, mix well until all components are dissolved.
To create liquid tin you need hydrochloric acid
If the process of preparing liquid tin was carried out correctly, the result should be a transparent liquid with a yellowish tint. Now you can test the resulting tinning solution.
To do this, any board is degreased and immersed in liquid tin for a minute. The copper surface should be coated with a thin layer of a chemical composition.
It is necessary to ensure that the temperature of the solution is not below 50 degrees, otherwise it may begin to crystallize.
Tags: tinning boards liquid tin
Comments 26
Now I’m trying to tin with just such a drug, from the same company. Rare shit! There are a lot of videos on YouTube where the board was coated instantly, they just dipped it into the solution. And those solutions were transparent. And here the machmala is kind of cloudy, the color of whey.
Eh, we could douse the Lada with this rubbish...
You can douse it, but it’s expensive and useless))) Do you have one T34 or do you have others?
Gentlemen chemists, you better tell me whether this solution can be used without consequences and if there are consequences, what are they? For example, further oxidation and destruction of the copper layer in thin areas or some kind of fumes that are particularly harmful to health. And yet, who knows how the tinning process occurs in an industrial environment? After all, they are not fools there and have long known about all kinds of liquid tin. Therefore, the option that is optimal in all respects is used.
a tinned layer of 1 micron is very little! Ideally, you can achieve 4-5 microns, but this is also very small, you can tear it off with your fingernail. Next, a porous film is obtained, not a solid one. Quote sodium - used in the food industry, so you can breathe over it, but not drink it by itself)) The consequences will be at minus 30-40 degrees, the so-called tin plague)) by the way, it was the cause of the death of one of the expeditions to the pole of the earth, when fuel sealed in cans leaked because the joints were soldered with tin
I couldn’t peel it off with my fingernail, but with a knife it’s immediately removed and the shavings are copper-colored on one side. It was not possible to remove the tin layer with a sharp cutter. I also didn’t like it, compared to tinning using the usual method, because the tin adheres worse when soldering and you have to use flux.
K, Na, Ba, Ca, Mg, Al, Mn, Zn, Fe, Ni, Sn, Pb, H, Cu, Hg, Ag, Au, Pt Electrochemical activity series of metals From the 8th grade: CuSO4 + Fe -> FeSO4 + Cu(precipitate) CuSO4 + Zn ->ZnSO4 + Cu(precipitate)
In the electrochemical series of voltages, tin is to the right of iron, therefore, when an electrochemical pair is formed (when moisture gets on a scratch), the electrochemical reaction will go towards the oxidation of iron (rust = Fe oxides, hydroxides) ... and will eat a hole in the place of the scratch. Therefore, iron is not tinned, but galvanized, zinc - to the left
In order to reduce Tin from salt using Cu, it is first necessary to “make” Cu more electronegative than Sn. When Sn is deposited on Cu in a strongly acidic environment, oxidation of copper by atmospheric oxygen and its subsequent dissolution becomes possible. Those. We have a solution of tin salts and partly dissolved copper. The formation of a tin film occurs on the surface of the substrate (yours is copper), consisting of microcathode and microanode sections. in the areas of the microanodes, the more electronegative metal is dissolved (see the first line), and in the areas of the microcathodes, the more electropositive metal is restored from the solution. Wow. The dissolution-deposition process is in dynamic equilibrium, so the substrate metal (copper) dissolves on the microanode areas of the substrate surface and the base metal (tin) and copper (dissolved on the anode) are restored on the microcathode areas. the reaction lasts 1-2 hours. With the formation of a porous film surface, such as tin grains at the tops and depressions formed on the copper substrate at the edges of the grains.
Do-it-yourself liquid tin - Metalist's Handbook
Tin chloride (SnCl2) is a white powder, a strong reducing agent, a weak oxidizing agent. So, this video shows a method for producing tin chloride at home.
In order to obtain it you will need 1 - laboratory beaker, 2 - a piece of Soviet or modern tin, 3 - pure hydrochloric acid, 4 - electric stove. To begin, place your tin in a bowl, fill it with concentrated hydrochloric acid and place it on the tile.
I don’t recommend adding water, as you will get a weak solution and when it cools, most of your tin will precipitate into white fluffy flakes, so we don’t add water. Next, bring the solution to a gentle boil and boil for 1.5 – 2 hours maximum.
You will notice that your solution will turn black, don’t worry, it’s not dissolved tin, as soon as you remove it from the tile, within five minutes the solution will become transparent. Upon completion, let the solution cool, and then pour it into a glass container for storage along with the dark sediment and white flakes.
These white flakes are nothing more than tin chloride, tin salt SnCl2, and the dark precipitate is undissolved metallic tin, over time it will dissolve in the solution, and only white flakes will remain.
It is important to know that you do not need to make an exact ratio to make tin chloride, just take 200 - 300 milliliters of hydrochloric acid and a piece of tin that will not completely dissolve during the boiling period. Whether your tin is clean or dirty doesn’t matter either, the main thing is that it exists at all.
At the end of the video, I showed the reaction with tin chloride to determine gold in solution. In the presence of gold ions, a purple-brown spot of the adsorption compound of gold and tin acid appears.
Stannic chloride is a very sensitive reagent that can detect the presence of gold in amounts up to 10 parts per billion. Tin chloride also perfectly reduces palladium from a solution of its salt.
The work “Making tin chloride SnCl2” created by the author named Maximov Ro, is published under the terms of the Creative Commons “Attribution” 4.0 International license.Maximov Ro, published under the terms of the Creative Commons “Attribution” 4.0 International license .
Access limited
Access to the requested resource is limited by court decision or for other reasons,
established by the legislation of the Russian Federation
Possible reasons for restricting access
- Access is limited by court decision or on other grounds established by the legislation of the Russian Federation.
- The page index and (or) domain name of the site, network address are included in the Unified Register of domain names, page indexes of Internet sites and network addresses that allow identifying sites on the Internet containing information the distribution of which is prohibited in the Russian Federation.
You can check the availability of a domain name and (or) site page index, network address in the Unified Register in the section
“View the Registry” at https://eais.rkn.gov.
ru/
- The page index and (or) domain name, network address are included in the Register of domain names, page indexes of sites on the Internet and network addresses that allow identifying sites on the Internet containing information distributed in violation of exclusive rights.
- The page index and (or) domain name, network address are included in the Register of domain names, page indexes of sites on the Internet and network addresses that allow identifying sites on the Internet containing calls for mass riots, extremist activities, participation in mass (public) events held in violation of the established order.
- The page index and (or) domain name are included in the Register of organizers of the dissemination of information on the Internet and sites (or) pages of sites on the Internet that host publicly available information and which are accessed daily by more than three thousand network users "Internet".
You can check the availability of a domain name and (or) site page index, network address in the Registry in the section
“View the Registry” at https://nap.rkn.gov.
ru/register/
You can check the availability of a domain name and (or) site page index, network address in the Registry in the section
“View the register” at https://398-fz.rkn.gov.
ru/
You can check the presence of a domain name and (or) site page index in the Registry in the “View Registry” section on
Tin chloride SnCl2 - obtaining How to choose tin Gold test
How and from what to make tin chloride at home with your own hands? Where can I get tin chloride? How to choose tin? In this video, I will first select a suitable solder that has a higher tin content.
Then I will prepare tin chloride by boiling and dissolving tin in hydrochloric acid, then I will test gold-containing solutions with it. Stannic chloride is the most sensitive substance for testing, isolating and identifying gold, palladium and platinum in solution. Hydrochloric acid: https://www..
DIY liquid tin
Are you here
Today, tin is a common metal. However, in the 16th and 17th centuries, it was quite rare and valuable, so Russia bought it from other countries.
Tin was used to coat iron products to protect them from rust.
From this metal, Russian craftsmen created dishes with relief patterns, since soft, pliable tin could easily be processed with a chisel.
After casting the product, the master decorated it with intricate patterns or an engraved inscription. Today, the Moscow Historical Museum has various examples of tin utensils that have been preserved from ancient times.
Briefly about malleable tin
Metal tin has such a crystal structure that when it is bent, the metal crystals crunch as a result of friction against each other. This crunch is a distinctive feature of pure tin from its alloys, which do not emit sounds when bent.
It is possible to apply various decorative coatings based on tin or any alloy made from it at home.
At the same time, the question may arise, how to make tin yourself? It is extracted using electrochemical etching methods using an electrolyte solution, which you will need to make yourself, using pure tin and its salts.
Craftsmen can obtain tin at home in the following ways:
How to get tin chloride at home?
A simpler and cheaper method for producing tin chloride is to use tin-lead solder.
- You need to take concentrated hydrochloric acid, bring it to a boil and dissolve solder in it.
- The next step is to strongly cool the solution, during which lead chloride will precipitate in it.
- The resulting precipitate is filtered with decantation, and an electrolyte (which is practically pure tin chloride with a small amount of impurities) is prepared on the basis of the filtered solution.
- Due to the rapid oxidation of stannous chloride, the resulting solution must be used immediately.
how to make tin chloride at home
How to get pure tin at home?
In order to make an electrolyte, you need to take a small portion of tin chloride as a seed. Later, after isolation, it will be possible to prepare a purer chloride solution.
To do this, you need to take aqua regia or hydrochloric acid and dissolve the metal.
Pour an alkaline solution (9-10%) into a 7% solution of SnCl2 (chloridol), stirring constantly, as a result of which the formation and precipitation of a white precipitate - tin hydroxide - will be observed.
It is necessary to stir the solution until it becomes completely transparent, which will indicate the readiness of the electrolyte.
How to make tin at home? To do this, you will need a fairly large tin can (3-5 liters) and a lid made of dielectric material.
The cans have a tinned inner surface - that is, a layer of tin that protects the iron can itself from oxidation, and the food product contained in it from spoilage.
Therefore, it is possible to extract tin from cans for reuse.
You need to remove the sticker from the jar and remove dirt from it, for which you need to boil it in a strong soda solution for 30 minutes. The following is done:
- A carbon cathode is placed in the center of the jar.
- Connect the anode to the can body.
- Fill the electrolyte and connect the power supply (4V). To do this, you can take several batteries or a battery connected in series.
- To increase the amount of tin produced, cut some old cans into pieces and pour them into the electrolyzer, but you must prevent them from coming into contact with the cathode. One medium-sized tin contains 0.5 g of tin.
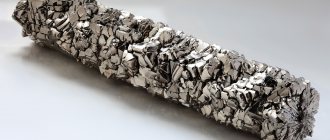
- The result of the experiment is the release of spongy tin at the cathode. It must be collected and melted in a crucible into a metal of a characteristic silver color. Why can tin be melted at home? Because it has a melting point of 239˚C, and iron, for comparison, has a melting point of 1538.85˚C.
Do-it-yourself flux for soldering aluminum, iron, copper, steel - Asutpp
The joining of two or more non-metallic or metallic materials and substances by means of an added metal is called soldering. We propose to consider what soldering flux is, how you can make it yourself, and also consider the characteristics and how to make solder for copper, silver, tin, and stainless steel.
Soldering and its features
To obtain a truly high-quality connection, you need to maintain a special temperature in the seam area. On average, this indicator varies between 50-100 degrees.
It is also taken into account that the temperature threshold required for the solder to melt is much higher than simply for melting the metal being processed.
Positive qualities of soldering:
- complete tightness of the connected parts;
- high strength of connections;
- significant savings in time and effort compared to welding processes;
- At the soldering sites, a special film layer is formed that resists corrosion and oxidation of metals.
Types of solder
Solders are a fairly specific series of substances that must meet the following conditions:
- High thermal conductivity and electrical conductivity;
- Good strength and high elongation coefficient;
- Corrosion resistance;
- Transformation into a liquid medium when exposed to welding temperature;
- Contrasting magnitude of cooling of solder metal and crystallization of solder.
These substances vary depending on the temperature of the soldering process, and are soft and hard.
Flux table
Soft soldering
Soft soldering can only be carried out to temperatures lower than 400 degrees Celsius.
These substances make it possible to ensure the formation of a truly strong and at the same time soft seam, which will not only be relatively flexible but also have good resistance to corrosion and physical influences.
Alex_EXE » Liquid tin - an unpleasant experience
Tin chloride (SnCl2) is a white powder, a strong reducing agent, a weak oxidizing agent. So, this video shows a method for producing tin chloride at home.
In order to obtain it you will need 1 - laboratory beaker, 2 - a piece of Soviet or modern tin, 3 - pure hydrochloric acid, 4 - electric stove. To begin, place your tin in a bowl, fill it with concentrated hydrochloric acid and place it on the tile.
I don’t recommend adding water, as you will get a weak solution and when it cools, most of your tin will precipitate into white fluffy flakes, so we don’t add water. Next, bring the solution to a gentle boil and boil for 1.5 – 2 hours maximum.
You will notice that your solution will turn black, don’t worry, it’s not dissolved tin, as soon as you remove it from the tile, within five minutes the solution will become transparent. Upon completion, let the solution cool, and then pour it into a glass container for storage along with the dark sediment and white flakes.
These white flakes are nothing more than tin chloride, tin salt SnCl2, and the dark precipitate is undissolved metallic tin, over time it will dissolve in the solution, and only white flakes will remain.
It is important to know that you do not need to make an exact ratio to make tin chloride, just take 200 - 300 milliliters of hydrochloric acid and a piece of tin that will not completely dissolve during the boiling period. Whether your tin is clean or dirty doesn’t matter either, the main thing is that it exists at all.
At the end of the video, I showed the reaction with tin chloride to determine gold in solution. In the presence of gold ions, a purple-brown spot of the adsorption compound of gold and tin acid appears.
Stannic chloride is a very sensitive reagent that can detect the presence of gold in amounts up to 10 parts per billion. Tin chloride also perfectly reduces palladium from a solution of its salt.
The work “Making tin chloride SnCl2” created by the author named Maximov Ro, is published under the terms of the Creative Commons “Attribution” 4.0 International license.Maximov Ro, published under the terms of the Creative Commons “Attribution” 4.0 International license .
How to make tin at home? Step by step casting process
Are you here
Today, tin is a common metal. However, in the 16th and 17th centuries, it was quite rare and valuable, so Russia bought it from other countries. Tin was used to coat iron products to protect them from rust.
From this metal, Russian craftsmen created dishes with relief patterns, since soft, pliable tin could easily be processed with a chisel. After casting the product, the master decorated it with intricate patterns or an engraved inscription.
Today, the Moscow Historical Museum has various examples of tin utensils that have been preserved from ancient times.
How to make tin at home? Step by step casting process
The melting point of tin is only 231 °C. But its boiling point is within 2,300 °C. The temperature at which the metal will be melted can be achieved at home.
That is, it is quite possible, of course, subject to certain rules and safety precautions, to perform tin casting at home. In industrial conditions, special centrifugal casting machines are used for tin casting.
To make molds, gypsum, alabaster, epoxy resin, silicone and, of course, metal are used.
Tin casting process in industry
Creating a form is perhaps the most important process. First you need to create a sketch of the future model. After this, the model is made from polymer clay. To apply small parts you must use an awl.
Another, no less important process is the production of injection molds. When manufacturing it, it is necessary to ensure that the correct connector is present.
It is needed so that the finished casting can be removed without causing damage to the product itself.
Silicone tooling for tin casting
Making equipment from silicone will require more material and time. This is because it must be subjected to a vulcanization process.
But as a result of all the hassle, multi-turn equipment for casting tin products will be obtained. If the future part is quite complex, then it will be necessary to provide for the presence of embedded parts.
We must not forget about the air ducts; air must escape through them as the mold is filled with tin.
An important element of the design of the equipment is the hole through which the filling will be performed. If it is small, the metal will flow too slowly and the solidification process may begin before it is completely filled.
Before casting begins, the mold halves must be joined together and placed between a sheet of plywood. The sheet must be at least 12 millimeters thick, and the size must exceed the dimensions of the metal mold.
Upon completion of assembly, the entire structure is tied together with a rope.
Two half-forms between sheets of plywood, tied together with a rope
Casting technology is not very complicated; it makes sense to prepare the metal for pouring after the final assembly of the mold. To do this, it needs to be warmed up well. Once a yellowish film appears on its surface, we can assume that the tin is ready for pouring.
If the metal is overheated, a blue or purple film will float on the surface of the melt. Molten metal is poured in a thin stream. In this case, you can lightly tap the housing to remove air. You can open the mold only after the cast part has completely cooled. To remove the casting, you need to use forceps.
You must be prepared for the fact that the first product received will have some surface defects.
Removing excess tin (burr)
The machining sequence is as follows. First, the flash is removed. So, they call the excess melt that flows into the seam of the mold. A scraper is used for this. Side cutters are used to remove the sprues. For final processing of seams, use abrasive sandpaper with the finest grain (zero).
Everything you need to know about liquid tin, making your own solution
Tin is one of the chemical elements that has found application in various industrial areas and everyday life. It is a light metal, ductile, malleable and fusible. It has a silvery-white tint and shine. One form of the substance is liquid.
Mainly used in radio construction. Liquid tin is ideal for chemical tinning of copper parts, in particular printed circuit boards.
This treatment method significantly increases their service life and prevents the formation of corrosion.
Tools and materials for casting
Tin is almost an ideal material for casting in both domestic and industrial settings. What materials and tools will be needed to produce the mold and perform casting. To make the mold you will need sealant and plaster. The first will be used to make the equipment itself, and gypsum will be needed to make the frame into which the technological equipment will be installed.
Tin Casting Tools
In addition to the materials mentioned above, you will need simple metalworking tools - files with different sections, pliers, a soldering iron, etc.
How to make soldiers with your own hands from different materials
- July 4, 2019
- Crafts
- Natalia Penchkovskaya
Soldiers for boys' games can be made from absolutely different materials - from wood and ice cream sticks, from paper and cardboard, cut out of wood or poured into a mold using tin. In this article we will look at how to make soldiers with your own hands. These are simple options that even schoolchildren can handle making.
You'll learn how to quickly create an army out of cardboard toilet paper rolls and paper straws. We will also consider ways to sculpt soldiers from plasticine or clay, and also tell you how to properly pour tin warriors in self-prepared plaster molds.
To make uniforms for a man with a weapon or simply in military uniform, a variety of materials are used. Then the blank needs to be painted in the chosen colors, be it a modern warrior or a soldier of an ancient army. A child can show his imagination and decorate his uniform with any small details.
Depending on the type of base material, gouache or acrylic paints are chosen; tin men can simply be sanded and rubbed with felt so that the soldier shines like a mirror.
Tin casting molds
For the manufacture of injection molding equipment, materials such as gypsum or silicone are used. It all depends on the part and its purpose. The simplest one is gypsum. To make it you will need a wooden box, some plaster and a piece of metal tube.
Creating a snap-in is performed in several steps:
- Preparation of gypsum mixture. It should resemble thick sour cream in appearance.
- The mixture is poured into a pre-prepared box and leveled.
- To obtain a half-mold, you need to take the part and immerse it halfway in the prepared plaster. A similar operation must be performed with the second half of the part. As a result, 2 half-forms will be obtained.
- The halves must be connected, or fastened with locks, or simply tied together with a tight elastic band. A prepared metal pipe must be inserted into the place through which the molten tin will be poured.
In principle, the injection molding equipment is ready for use. The molten tin can be safely poured into the resulting mold.
What is the difference between gypsum forms and others - the main thing is that they have less durability. If their surface is not prepared, then such equipment can withstand one or two cycles.
Tin products and other applications of pure metal, as well as its various alloys
Despite its name - “resistant”, tin is not a durable metal. It is too light and malleable to be used for the production of any load-bearing structures.
But malleability at relatively low temperatures and plasticity make the substance very popular in the relevant field.
You will learn all this and even more from this article about how you can use tin, where to buy it for soldering, what solders are possible with it.
The Tale of the Alloy Rose and the Fallen Krenka
A long, long time ago, when I was a schoolboy and was extracting radio components mainly from various boards thrown into a landfill, I noticed an unusual phenomenon in the process of soldering another such board: some solders instantly fell off the foil as soon as I poked them with a soldering iron. The pad remained clear of solder, smooth and silver-tinted, and the drop of solder on the part's lead had the same shiny, flat base at the bottom. I noticed and forgot for the time being.
And the year before last, while taking part in a scientific expedition to the Arctic, I unexpectedly encountered an unexpected failure of the device I was working with.
The device was homemade - other people made it, but fortunately, they provided me with a circuit diagram and all the documentation; I took a soldering iron and the necessary equipment with me, just in case.
It didn’t take long to find the fault: inside the case there was an integrated 5 V stabilizer in a D-Pak case, which simply fell off the board.
How to mine tin at home?
Are you here
Today, tin is a common metal. However, in the 16th and 17th centuries, it was quite rare and valuable, so Russia bought it from other countries. Tin was used to coat iron products to protect them from rust.
From this metal, Russian craftsmen created dishes with relief patterns, since soft, pliable tin could easily be processed with a chisel. After casting the product, the master decorated it with intricate patterns or an engraved inscription.
Today, the Moscow Historical Museum has various examples of tin utensils that have been preserved from ancient times.
Tin casting at home
Today, making small figurines and products from tin at home is not only interesting, but also quite profitable.
After all, many collectors are willing to pay a lot of money for a tin soldier, a model of military equipment, or just a souvenir.
Amateur artists who want to learn how to cast parts usually use tin for this, since it has the following positive qualities:
- Attractive beautiful color similar to silver.
- Tin is technologically advanced and has a low melting point.
- Plastic, easy to engrave and mint, “molded” with a soldering iron.
A skilled craftsman, using simple equipment, is able to transform a small silver ingot into a beautiful sculpture, lantern, candlestick, casket, medal, brooch, bracelet, cufflink and much more.
In addition, openwork and relief plates are created from tin to decorate boxes, door hinges, handles, and keyholes.
How is tin casting done at home? This process consists of the following stages and features:
- The production of future products begins with the creation of color sketches on a sheet of paper.
- Afterwards, polymer clay is taken and a figurine is prepared from it to create a shape. In this case, every smallest detail is applied with a stack and a thin awl.
- Making the mold is the most critical stage. It must have the perfect connector. This is necessary for easy and safe removal of the casting. As a rule, casting molds are made collapsible, consisting of 2 parts.
- The most optimal material for the mold is plaster or silicone, but in order to make a silicone mold, you need to spend much more material and time.
- In addition, stores sell special sealants that are poured onto models, they harden and thus become reusable molds for pouring.
- In cases where the future product will contain many small parts, the mold is made with an insert.
- An important role is played by the size of the channel in the mold through which the metal is poured into it. The smaller it is, the slower the mold is filled, and there is a danger of the metal cooling quickly, which can lead to the formation of cavities.
- When casting a part, the two halves of the mold should be folded together and placed between a plywood sheet about 12 millimeters thick. Then you need to tighten them with a tight elastic band.
- After preparing the mold, the metal is heated. The readiness of the alloy for pouring is determined by the formation of a yellowish film. If the metal is overheated, the film will acquire a blue or purple tint.
- Pouring metal into the mold must be done in a thin stream, while tapping the mold a little, thus preventing air retention in it. It is necessary to remember the rules for safe work with heated alloys.
- After the mold is filled with metal, it must be left for some time to cool and harden the alloy inside it.
- Then the mold is opened, and the finished product is carefully removed from it using tongs. As a rule, there are always defects on the first product. Therefore, the figurine is further processed - the flash (metal that has flowed into the seams between the two parts of the form) is removed. They are cleaned using tools such as a scalpel or scraper.
- Next, the seams are sanded with fairly fine sandpaper. When making complex figures and products that are cast in separate parts, these parts are connected with a soldering iron.
- Epoxy glue is used to glue small parts. The places where the parts were soldered and glued are carefully and carefully sanded.
- Then you should prepare a strong solution of soda and wash the finished figurine with a thin brush to remove the flux.
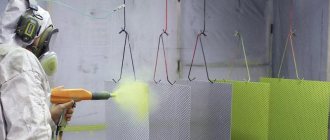
- If necessary, the finished product is painted with acrylic paints.
Where can you find tin at home?
As you know, genuine items are rarely found in good condition, so they almost always need to be restored before being used.
However, competently restoring a rarity often turns out to be much more difficult than simply making a replica of it. Moreover, the slightest inaccuracy can cause irreparable harm to a unique item, often worth a lot of money.
Unlike glass or ceramics, metal utensils, especially copper and iron, have one significant drawback.
Search data for your request:
Schemes, reference books, datasheets: Discussions, articles, manuals:
Wait for the search to complete in all databases. Upon completion, a link will appear to access the found materials.
WATCH THE VIDEO ON THE TOPIC: olovorona collecting tin 6 kg at home
Liquid metal: pitfalls. A look through the eyes of a chemist
I was inspired to write this article by the post NotSlow Liquid metal is not so scary. Everything is simple: protect yourself from short circuits, apply a thin layer, screw it on and enjoy the low temperatures. But is everything really so good? First you need to find out what kind of liquid metal it is. Among the pure metals, the only one that can be liquid at room temperature is mercury. No one in their right mind would now use mercury as a thermal interface due to its extreme toxicity and volatility. The other two become liquid already at human body temperature - cesium and gallium. Cesium is “fluorine in reverse” in its chemical activity; it ignites and explodes from the slightest traces of air and moisture and even destroys glass. What remains is gallium (this is what is used in the CPDV). At room temperature, gallium is still solid, but with some other low-melting metals it forms eutectics that melt at 20.5 ° C (gallium-tin) and even 15.3 ° C (gallium-indium). Even lower - around 5 °C - the gallium-indium-tin ternary eutectic melts (62, 25 and 13%, respectively). Commercially available thermal interfaces of the “liquid metal” type are precisely alloys based on these three elements, possibly with some additional additives. Based on this, the pitfalls are also clear. The first of them is the absolute incompatibility of gallium-containing alloys with aluminum
! At a time when chemistry lessons at school were certainly accompanied by demonstrations of experiments, among them was an experiment on aluminum amalgamation. Aluminum was covered with a layer of mercury and it immediately began to rapidly oxidize, crumbling right before our eyes. Mercury protected aluminum from the formation of an oxide layer and it formed on the surface of the amalgam, but was not able to stop oxidation, since it was not retained on the surface of the liquid in a continuous layer, it cracked, and a fresh, unoxidized surface of the amalgam was revealed in the cracks. Gallium alloy acts in exactly the same way, with the only difference being that it can literally saturate aluminum through and through, penetrating into the intercrystalline spaces. Aluminum impregnated with liquid gallium not only oxidizes before your eyes, but also crumbles in your hands. So LM should be kept away from aluminum. And this applies not only to aluminum radiators: a random drop of “liquid metal” can destroy both the laptop case, if it is made of aluminum alloy, and any other aluminum part. At least the housing of some capacitor. Moreover, this droplet is a classic catalyst - it does its dirty work without being consumed.
But copper is also not indifferent to gallium.
In the figure above, I showed the Tx diagram of the copper-gallium system (from the reference book “State diagrams of binary metallic systems,” edited by Lyakishev), which shows countless intermetallic compounds. As soon as gallium comes into contact with copper, they immediately begin to form. Liquid gallium (this also applies to its alloys) generally very readily wets both metals and non-metals, and the obvious chemical affinity greatly contributes to this. So the “liquid metal” will simply be absorbed into the copper, forming a crust of intermetallic compounds at the interface between the metals. The latter are not metals from a physical point of view, they are refractory, brittle and have poor thermal and electrical conductivity, but the main thing is that the “liquid metal” will be spent on their formation and will simply leave the gap. Many of those who have tried LM report that over time it stops working, and after removing the radiator, they discovered that the liquid metal had “evaporated.” It could not evaporate - noticeable vapor pressure for its components appears only above a thousand degrees - it simply absorbed into the copper and reacted with it. Nickel coating on copper helps eliminate this phenomenon, although it is an additional barrier to heat. By the way, the absorption of gallium and its alloys into metals also concerns solder joints - remember about that small drop that can destroy an aluminum case? So, the same droplet falling on the solder will make it brittle and the soldering unreliable. At some point it will “work.” So personally, I would keep “liquid metal” as far away from any electronics as possible. And the last thing that should be written about: “liquid metal,” alas, is not harmless. Gallium, according to some sources, is comparable in toxicity to arsenic; its second component, indium, is also a toxic heavy metal. Unlike mercury, gallium-based alloys are still completely non-volatile at ordinary temperatures, so you won’t be poisoned by their vapors, but due to their ability to easily stick to everything in the world, these alloys are incredibly oily. It’s easy to stain your hands with them, for example, but it’s very difficult to wash them completely. Then it all goes into your mouth. Therefore, we work with “liquid metal” and everything that came into contact with it only with rubber gloves and separately from food, drinking and smoking
. And yes, never do it like on KPDV!