Original devices
The list of homemade products can be continued endlessly, but we’d rather talk in more detail about some homemade machines that can be made from any model of drill.
Drill
A drill made from a drill is not a fantasy, but a real and fairly universal machine, assembled independently. The main thing is that you need to order from Chinese engineers (if you couldn’t find it in your city) a flexible shaft from a standard medical unit. As a result, a drill appears in your arsenal, which can be used for engraving work or drill holes using special burs in small parts or structures that cannot be reached with a standard drill.
Lathe
A woodworking or lathe for home can easily be made using a drill. The tool must be secured with special clamps quite firmly, and a specially designed holder with several sharp pins must be inserted into the chuck to keep the workpiece from turning. The center of the rear holder (headstock) and the clamp at the front of a homemade lathe should be located on the same axis. Precision is necessary to prevent runout as the workpiece rotates. After installing the part, the tailstock is firmly fixed with a special clamp.
The third element of the machine is a tool rest in the form of a wooden block on which a chisel or other tool for processing the workpiece will rest.
A lathe for processing wooden workpieces will work properly if the drill has a built-in electronic speed controller. Using the trial method, you establish the optimal rotation mode for effective wood processing. Using such a woodworking device, you can make unique products for household needs: for example, a rolling pin or pestle with a mortar, a candlestick or a prefabricated candelabra.
Winch
An original winch based on an old but powerful drill will become an indispensable assistant in the household, especially for those users who live in their own home and have a personal plot. A simple situation: you decided to install a larger container in your summer shower, but raising it to such a height alone is problematic. Using a winch, this can be done in a few minutes. You just need to first calculate the weight of the container and the spindle speed.
According to garage craftsmen, a homemade winch can easily lift the engine from a passenger car. Watch the video if you don't take my word for it:
Experts advise using a homemade device, setting the drill at the lowest speed. This design can move objects with different masses, because craftsmen even make winches based on an ordinary car starter.
Making the adjustment rod handle
Adjustment of the cutting depth or the height of the saw exit above the working plate is adjusted on the frame in two ways:
- creating a lifting mechanism for the working plate; creating an adjusting mechanism for raising and lowering the axis of the circular saw and the motor with a belt drive.
The plate lifting mechanism can be constructed by fixing the metal plate to the machine frame using long bolts. Lifting will be carried out by tightening the locking and fixing nuts on each bolt.
The second type of lifting mechanism can be represented as:
- guides along which the carriage with the shaft and motor moves; an adjusting rod with fixing nuts; handles with an applied adjustment scale.
The adjustment rod itself can be replaced with a standard metal threaded stud. This option is even more profitable than inventing new methods.
The adjustment handle can be made by welding a metal plate to the end of the stud. At a distance of 4-5 mm from the center of the plate, aligned with the center of the stud, holes are drilled for self-tapping screws.
For ease of operation, a rod is welded to the end of the plate in such a way that the entire structure can be rotated using it.
As a scale, you can use a round washer made of multilayer plywood or plastic - it is put on a pin and fixed, on the one hand, with self-tapping screws, on the other hand, it is pressed with a nut.
Having assembled the entire lifting mechanism, a scale corresponding to a certain lifting height of the working plate is applied experimentally to the plywood.
DIY circular grinder at home
A circular grinder is a homemade device for cutting boards, particle boards, plywood and other wood lumber. This mechanism is small in size and is used in home workshops. To make a circular saw from a grinder, you need to study its design and purchase the necessary materials.
Materials and accessories
To create a manual circular saw from an angle grinder, you will need the following equipment:
Bulgarian. It is recommended to use models with a powerful electric motor to cut thick boards. Disk. It must match the diameter of the mounting hole
It is important that the disc has teeth. It is recommended to use discs with an abrasive or diamond coating. Electric drill
It is used for making holes necessary for installing brackets. Welding machine. It connects metal plates. Chipboards. Tools for taking measurements: ruler, caliper. Clamps, bolts, angles, nuts and other fastening connections. Hammer, screwdriver, pliers and wrench.
Steel is used to make the frame. It is recommended to make the working surfaces of the circular saw from plywood or MDF. The thickness of plywood sheets should be 9-12 mm.
Manufacturing instructions
The process of making a manual circular saw from an angle grinder is carried out in several stages:
Assembling the frame in accordance with the drawing. The base for the machine can be made from a corner or a pipe with a rectangular cross-section. The parts of the frame are connected by welding
It is important that the base of the circular is stable. Installation of chipboard or plywood boards on the base surface. A slot is made on the working surface to secure the saw blade. Attaching an angle grinder to a work surface using curved metal plates
Use a drill to make recesses for the bolts. Exiting the wire from the start button to the side edge of the angle grinder using a corner. This allows you to turn off the equipment from any position in emergency situations. For safety reasons, it is recommended to place the button at a far distance from the saw blade. Manufacturing a sliding stop bar designed to adjust the thickness of the cut parts of the workpiece. The stop is secured with clamps.
After completing the installation work, it is necessary to check the functionality of the circular machine. The disk must rotate strictly in 1 direction. Otherwise, the lower edge will move, which will lead to the scattering of sawdust and other industrial debris that occurs during the process of sawing boards. It is recommended to test the homemade device by sawing a thin part
It is important that before starting sawing the machine reaches the operating spindle speed
Construction and materials for a stationary saw
A homemade DIY circular saw can be made by securing a hand tool to a stable base. In the simplest version, the device is installed on wooden trestles or on a table mounted from plywood and boards. The tool is secured to the bottom of the plywood sheet, and a cut is made in the tabletop for the toothed disk.
The design parameters of the machine depend on the size of the material being processed. In accordance with it, the power of the hand tool is selected (800-1200 W or more). To perform a clean cut, it is better to install a model with a rotation speed of 3000-4000 rpm.
To manufacture the machine, you will need wood materials, fasteners and tools:
Tools for making a homemade circular saw.
- plywood with a thickness of 20 mm; board for stiffeners and legs (50×100 mm); sandpaper, wood glue and varnish; bolts, screws, clamps; tape measure, pencil, ruler; jigsaw, drill, screwdriver.
The height of the table is selected according to the height of the master and is usually about 1 m; the length of the tabletop depends on the size of the materials that are planned to be processed.
Circular manufacturing process
In order to construct a circular saw from an angle grinder with your own hands, you need to think about the design of the machine
It is important to determine the tasks for which the homemade device will be used. After this you need to create a drawing
It indicates the main structural elements, their dimensions and performance characteristics.
After creating the drawing, the necessary materials and tools are purchased. The assembly of machine elements is carried out separately.
When making circulars, you must follow safety precautions:
- Installation work is carried out only in special clothing. Eyes should be protected with goggles, hands with gloves.
- All mechanisms of the device must be tightly secured. The angle grinder must not be allowed to move. The power tool must be secured to the base of a table or workbench.
- Only high-speed saw blades may be installed.
The process of making a manual circular saw requires skills in using machine tools
It is also important to know the specifics of the work and functionality of the grinder
Advantages of a portable saw
Hand-held circular saw
There are several very important technical characteristics that make this tool recommended for such purposes.
- The saw can be equipped with a blade with an outer diameter of 350 mm, which allows cutting lumber with a thickness of 70–85 mm. On the machine, this depth decreases slightly; boards with a thickness of 60–75 mm can be cut. This is quite enough for most household wood crafts - from complex furniture to simple toys.
- The engine power is at least 2 kW, it can withstand significant loads, and special effective forced ventilation quickly removes heat, which allows the mechanisms to operate for a long period of time under normal thermal conditions.
- The rotation speed of the saw shaft meets the existing requirements for woodworking cutting tools. This allows you to obtain excellent quality cuts and comply with safety regulations.
- The hand saw can be fixed to the table in such a way that, if necessary, it can be quickly removed and used as usual. At the same time, all initial technical characteristics are completely preserved.
Additional attachments for monitoring cutting accuracy make working with a circular saw easier. The Bosch PKS 16 Multi hand-held mini circular saw is a lightweight and compact tool.
Network circular circular saw Rockwell RK3440K with laser pointer
In connection with such advantages of portable saws, we will not consider dubious options for manufacturing stationary circular saws, but will only dwell on this.
Video - How to choose a circular saw
Why do you need a mini circular saw?
The device of a mini circular saw will be useful for quick and convenient cutting of not very hard material. For example, wood, soft plastic or metal.
A mini saw for wood allows you to work with this material both lengthwise and crosswise. You can use a circular saw at an angle of 45 degrees. The equipment is used for assembling furniture, working in private workshops, etc. With it, it is possible to replace several other tools, because when you manufacture it yourself, the necessary functions are added at the discretion of the master.
Thus, the saw is suitable for working with:
- wooden blocks;
- drywall;
- laminate;
- soft metal.
An example of making a mini circular saw is one of many options for assembling an electric tool, but it is the fastest, most economical and easiest. You can create a circular saw from an engine or an old grinder.
https://youtube.com/watch?v=OqZpyclFhl8
Manual with gauge
A home craftsman rarely has to cut deeply and “long”, and a hand-held circular saw is a useful thing in itself. In addition, with a hand-held circular saw with a guide rail, you can cut wood both across and along the grain, and at any angle. And a cutting length of up to 1.5-2 m is quite enough for almost all finishing works and embodied creativity.
There are enough reisshins for manual circular saws on sale, and they are inexpensive, but there is no universal one. The principle of the construction of a branded rod is illustrated in the figure: the base plate (shoe) of the saw is made with a longitudinal groove, and the rod is stamped accordingly. comb (shown by the arrow in the figure).
Using a hand-held circular saw with a guide rail
It’s convenient to work with: you only need to press the tool from above, and it won’t go sideways or become skewed. And it’s also convenient during competition: we make our saws so that they don’t sit on the guides of our “partners.”
It’s inconvenient for craftsmen - you can’t find a cheaper tire. And a circular saw with a groove for the guide is disproportionately expensive compared to the same one, but with a smooth shoe. Amateurs do the opposite: a crossbar with a groove made of laminated plywood, and a pair of bosses are attached to the shoe (item 2b in the large figure at the beginning). But for this, firstly, you need a wood milling table, which you still need to make (not easy) or buy (expensive). Secondly, the already small cutting depth is reduced by 16-20 mm. Thirdly, if the tool is still under warranty, then drilling holes in the shoe will void the warranty. Fourthly, if the saw is rental, then nothing can be modified in it.
There is another way, but the tool will need to be held in 3 planes during operation: pressing, from moving to the side and from turning. In this case, the plywood base of the guide can be thinner, 6-8 mm. The actual crossbar will be a flat strip (or a piece of steel angle, etc.) attached to it, see next. rice.:
How to make your own guide for a manual circular saw
“Setting up” the device comes down to simply cutting off the excess from the base with a circular saw. This guide is attached to the board/sheet of material with clamps, just like the branded one. When working on a workbench, spacers with a thickness slightly larger than that of the material are placed under the base; depth of cut from this resp. decreases.
Manufacturing stages
As an example of work, we took a case where an old table served as the basis for the machine. If this is not the case, then before the work described below, you need to make another base. Bars of the same length are used for the legs, the structure is reinforced with transverse elements. The base must be strong and stable in order to withstand active use. After this, work begins on the countertop.
Stage one
The working surface is cut out in accordance with the previously prepared dimensions. By the way, you can even use an old countertop from, for example, a kitchen table. The main thing is that the material is durable and can withstand all mechanical loads.
An important characteristic is the thickness of the tabletop. Carpenters say that it is best when the thickness is 2 cm. Such a tabletop will be durable, no matter what material it is made of, and will leave a large working surface for the saw. Simply put, the more the blade “sticks out” from the machine, the deeper it can cut.
If possible, the edges of the board should be milled and sanded.
This is important not only for the beautiful appearance of the structure, but also for its durability and operating comfort. And no one wants splinters
Stage two
A hole is made in the tabletop for a circular saw. Remember that it must match the size of the disk. Also on the surface of the tabletop you need to draw a place for installing and fastening the saw.
Stage three
Holes are made in the working surface to secure it to the base. The tabletop turns over. To firmly connect these two parts of the machine, self-tapping screws and steel angles are used. By the way, to make the process of installing the saw more convenient later, you don’t have to fasten the tabletop right away.
Stage four
The power supply and switching system of the device is being installed. The design provides that the saw will always be on, so clamps are needed to secure the corresponding button. The starting and stopping of the machine will be controlled by turning the power supply on and off. Therefore, you will need a regular switch, cable, and socket.
An outlet is installed inside, from which the power cord for the switch comes out. It is the switch that will start or stop the machine, so it should be at hand so that in the event of an emergency the master can quickly turn off the saw with one click. All this is connected to the nearest outlet in the work area.
Stage five
A frame is made for convenient work with cross cuts. You can make such a carriage from a thin base and two low walls. Wood and plywood are suitable for this. To make the structure movable, guides for the table are prepared. These can be small parts of a steel pipe with a cross-section of 2x1 cm. The pipe sections are mounted in grooves that have been previously cut with a milling cutter. This simple design will significantly increase the capabilities and comfort of the machine.
Stage six
The accuracy of the work is important, so the machine must be equipped with a marking ruler. Using a router, a small groove is made for installing a ruler. If there is no such tool, then the groove can be prepared with a chisel. The surface of the tabletop is carefully processed with a grinding machine and sandpaper. It is most convenient to fix the ruler using self-tapping bolts. This modification will allow you to cut the material with millimeter precision.
Additional design improvements
For convenient use of the machine, design improvements are being made. A container for collecting chips and a stand with a dust extraction are often installed for cleaner work. The working surface can be folding, which saves space, and even liftable, which will provide quick access to the saw.
Some craftsmen remove the casing from the tool, which makes a large working surface of the saw blade available. A special block for pushing boards is also prepared
This is important for safety. In order not to lose this block, a special stand or drawer is made for it
Making a countertop
The working surface is cut out of plywood using a jigsaw according to the accepted dimensions. The workpiece is processed with sandpaper or a sander. The edges of the table top are milled.
On the bottom side of the sheet, markings are made for attaching a hand saw. A sector is outlined for the hole for the disk.
If you plan to cut workpieces at different angles, the slot should have a trapezoidal contour with a downward expansion. The groove is cut with a hand-held circular saw; holes ø10 mm are first drilled at the ends of the intended sector. Holes must also be made in the tool frame and tabletop for bolt-on mounting.
Next, the stiffening frame is marked for the horizontal surface of the table. The edges along the perimeter should deviate from the edge of the tabletop by 5-10 cm. The boards cut to size are applied end-to-end to the markings on the bottom surface of the sheet, and their contours are outlined with a pencil.
Tabletop diagram for a circular saw.
A center line is drawn in the middle of the marked outline of the frame.
It marks places for screws for attaching the ribs. Through holes are drilled for fasteners with a chamfer on top to recess the caps. Self-tapping screws should be screwed in every 10-20 cm, from the corners of the frame - at a distance of 5 cm.
The boards are placed on wood glue along the intended perimeter and clamped with clamps.
After the glue has dried, without removing the clamping devices, screw in the self-tapping screws and screw the heads into the countersunk hole. In the corners, 2 self-tapping screws are screwed into the end of the frame. Then you need to attach stable legs to the finished tabletop.
How to make a permanent stationary circular?
Now let's move on to the simplest part. This possession does not develop in one day, but collecting it is not so easy, and it also requires a large number of elements and parts. With such a stationary workbench, you can cut everything easily: both thin and thick timber. In principle, if you are not a master of wood design, then the tabletop option will be enough for you. If robots are moving frequently and with high intensity, you may want to think about assembling a stationary saw.
Regardless of whether a tabletop or stationary circular saw is made, the table is covered with a thin ball of steel or galvanized steel, which is necessary to increase the value. In addition, without a special coating, after about an hour a small hole will appear in the center of the table, and you will no longer be able to make a deep, straight cut. Let's take a look at how to develop and select the main nodes and what is special about the installation.
How to make mini-drills with your own hands
The main element of a mini-drill is a small but powerful electric motor. The part can be removed from old or broken fixtures:
- children's toys;
- fan;
- hairdryer;
- blender;
- mixer;
- tape recorder.
The second important element is the connecting sleeve between the drill and the motor axis. You can make it yourself or purchase a drill chuck. The second option is more preferable, since the nozzle provides uniform clamping and the holes are even. Such chucks allow you to work with drills with a diameter of 0.7-2.3 mm.
A typical drawing will help you understand the principle of making a mini-drill with your own hands:
Any plastic containers corresponding to the engine dimensions are suitable for the housing:
- water pipe;
- deodorant containers;
- old flashlight.
The electric motor should sit tightly inside so as not to move the drill to the side.
Design features of a circular machine
Circulars of any fixed type consist of main parts.
Table for connecting mechanisms. An assembly combined with higher power engines is preferable to a table made entirely of metal. The surface of the table must be made level with your own hands, for a higher quality product at the end. The engine in most cases is used from what is in stock. Electric motors designed for long-term operation from the network will be preferable to commutator drives. The shaft is the most critical component of the circular. Finished products are used most often; in other cases, the assembly is made on a lathe
It is important to calculate the mounting holes and eliminate runout.
When making a machine with your own hands, you should pay special attention to safety. The main surface of the saw blade should be covered with a protective cover
The moving parts of the drive and motors must be covered. The emergency stop button is built into the electric drive circuit and has a convenient location.
How can you make a circular?
As with reinventing the wheel, there is no definite answer; each individual case has its own path of search and discovery.
But, basically, when asked how to make a circular saw, craftsmen make attempts in several directions:
- improvement of existing hand tools, adapting them as main parts - an electric motor and a circular saw; improvement of an industrially manufactured tool for the specific application; assembly of a machine from individual elements - shaft, motor, bed; independent production of all parts of the structure, well, except for the electric motor .
Advantages of homemade equipment
A homemade circular saw is considered a fairly popular tool. It is easy to manufacture and has a high degree of reliability.
So, a DIY circular saw has the following advantages:
- versatility;
- ease of manufacture;
- cost savings;
- reliability.
Today you can find many drawings that allow you to design stationary or mobile saws of different sizes. For this you can use drills, grinders and other tools.
Some craftsmen combine a circular saw with a jointer, placing them on the same base. These devices can operate from a common engine. With the help of such a machine, it is possible to achieve perfect cleaning of a wooden surface. Therefore, the combination of a jointer with a circular saw is considered a very functional solution.
Construction and materials for a stationary saw
A homemade DIY circular saw can be made by securing a hand tool to a stable base. In the simplest version, the device is installed on wooden trestles or on a table mounted from plywood and boards. The tool is secured to the bottom of the plywood sheet, and a cut is made in the tabletop for the toothed disk.
The design parameters of the machine depend on the size of the material being processed. In accordance with it, the power of the hand tool is selected (800-1200 W or more). To perform a clean cut, it is better to install a model with a rotation speed of 3000-4000 rpm.
To manufacture the machine, you will need wood materials, fasteners and tools:
Tools for making a homemade circular saw.
- plywood with a thickness of 20 mm; board for stiffeners and legs (50×100 mm); sandpaper, wood glue and varnish; bolts, screws, clamps; tape measure, pencil, ruler; jigsaw, drill, screwdriver.
The height of the table is selected according to the height of the master and is usually about 1 m; the length of the tabletop depends on the size of the materials that are planned to be processed.
Design requirements
The duration and safety of working with homemade equipment depends on the types of loads, operating modes and strength of the unit. Knowledge of the features of woodworking devices will make it possible to produce a mechanism that is reliable, but simple and durable.
High disk speeds. Without this condition, high-quality cutting of wood is impossible, but for the master it is more important to guarantee the safety of a homemade circular saw, so the protective devices that are usually equipped with purchased models are a role model
If the future author believes that it is quite possible to do without some of them, then this opinion is erroneous, since one careless movement often leads to injury. Strength of absolutely all components. Not only the ability to withstand large static loads is important, since the table may begin to vibrate due to multidirectional dynamic influences
They are not dangerous for the master, but they affect the quality of the cut: marks from the teeth remain on the surface of the lumber, and difficulties arise in maintaining linear dimensions. Fire safety is the main requirement when working with wood, so compliance with the rules when installing all electrical appliances is a must.
Manual circular design
The simplest and relatively inexpensive way to make a stationary machine for cutting wood using a circular saw is to convert a manual mounting circular saw into a stationary one. The essence of the modification is to create a standard model of a stationary bed and work table for an industrially manufactured sample.
This modification will allow you to attach the saw upwards with the tool frame, secure it to the work table, and thus use it as a small circular saw. The guide for cutting planks is made from a steel angle 25x25 mm, it is attached to the work table.
The frame itself is welded from 25x25 mm corners, taking into account that the largest standard size of a circular saw is 230 mm, then such a frame is sufficient to create a lightweight, portable but stationary saw, the main use of which is small work that does not require long-term electric motor voltage.
This use case is implemented in some models of domestic and foreign manufacturers of power tools, in which any hard surface is used as the base of the machine, and the mounting saw itself is attached to the base using clamps.
Options for making a woodworking machine
Today, there are a large number of ways to make a stationary circular saw. Angle grinders, hand drills, screwdrivers, and many other tools are used as drives for them.
The most common drive options are:
- drive from a hand-held circular saw;
- machine with a motor from a washing machine.
How to make a stationary sawing machine - step by step guide
When manufacturing, you will need a small amount of material and hand tools, which, as a rule, are in everyday use of every owner. This includes:
- wooden blocks;
- OSB or plywood sheet;
- fastening hardware;
- drill with a set of drills;
- hand-held circular saw.
A sheet of plywood or OSB with a thickness of at least 20 mm and dimensions of 1100 x 880 mm will be used as a desktop. To make a stationary machine for cutting wood, you must perform the following steps:
- Place the hand-held circular saw in the intended installation location and trace the outline. After this, make a recess of about 12 mm.
- Drill holes along the contour of the recess for the M8 mounting bolts and use them to fix the hand-held circular saw on the back base of the table.
- Install a socket next to the saw and connect the saw to it, make a groove in which the saw blade will be located.
- Make a frame for the perimeter of the table and legs of the required length from a wooden block. Install a folding box at the place where the saw is attached, constructing it from thin plywood. Install a power button at the end of the table, having previously connected it to a socket.
- Make a hole in one of the corners of the box to connect a vacuum cleaner. To fix the hose, you can use a plastic fitting with a diameter of 50 mm.
- The box is fixed to the table using metal corners and screws.
- Then, across the table it is necessary to cut 2 longitudinal grooves to install a 150x100x10 mm channel. Since the work table will be covered with 4 mm thick PVC sheets, the depth of the grooves under the channel should be 6 mm.
- After this, you can begin making pushers. Hardwood slats are used as guides. The pusher frame can be made of laminated chipboard with a thickness of 16 mm.
After watching the video, you can familiarize yourself with detailed step-by-step instructions for making a stationary circular saw from a hand-held circular saw.
Homemade cutting machine driven by a washing machine
Another common option is to use an asynchronous motor from a washing machine as a saw blade drive. For domestic use, a low-power electric motor is suitable, for example the engine from an old Malyutka washing machine or any modern automatic machine.
Sawing machine from a drill at home
You can also make a good circular saw using a hand drill. The costs for materials are minimal, and almost everyone in the house has a drill. You will find more details about all the nuances and a step-by-step algorithm for making it yourself in our article on how to make a circular saw from a drill.
Miniature machine made from a washing machine engine
The circular is distinguished by its extreme simplicity and availability of materials for its manufacture. Perhaps its only expensive part is the electric motor. Stationary machines are equipped with a powerful asynchronous motor, which ensures cutting of thick wood of any species, but in a home workshop you can limit yourself to less power.
Note! To cut boards of medium thickness, it is enough to make your own circular table driven by a washing machine motor.
This design has a number of advantages. An engine from an old washing machine is inexpensive; moreover, a similar unit can probably be found in a home craftsman’s household. Connecting this motor is not particularly difficult; there is no need to look for circuit diagrams or do soldering. With all this, the power of such a unit is quite sufficient for most types of work.
The machine diagram can be simplified as much as possible by eliminating the belt drive. In this embodiment, the cutting tool will be mounted directly on the motor shaft. The base of the desktop mini-machine will be a frame assembled from a block with a cross-section of 40 x 40 mm. If desired, it can be welded from a corner or profile pipe.
Part of the body of an old TV, coated chipboard, is ideal as a stand (tabletop) for a circular table. As practice shows, this part is quite durable, and thanks to the varnish coating, it does not prevent the workpiece from sliding.
Using a jigsaw, two parallel cuts are made in the tabletop perpendicular to the cutout for the disk. A movable square will slide along them, playing the role of a side stop. It will help you make an even cut, if necessary, at a given angle.
Design elements of a self-made wood sawing machine
Creating a stationary circular saw with your own hands has a number of features that need to be taken into account.
Making a carriage for a circular saw with your own hands
The function and operation of the device may vary depending on the availability of various accessories. One of them is the carriage. To construct it you need to do the following:
- cut the plywood slightly wider than the table;
- Attach guide bars from below - the interval between them should coincide with the width of the table;
- Fix the stop bars on top.
The manufacture of the carriage has a number of features
How to make a shaft for a circular saw with your own hands
The shaft is considered an important element of the circular. It is made from round steel grade 45. In this case, the diameter of the workpiece must match the dimensions of the saw blades. The most commonly used is 32 mm. Saw blades must be installed between the flanges and clamped with a nut.
To use a saw to work with different materials, you need to provide several operating modes. Therefore, it is worth making several grooves on the shaft. This will make it possible to move the pulleys and change the speed.
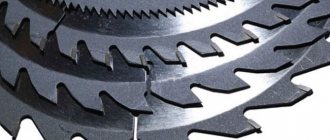
What discs should you use for circular saws?
These elements have a major impact on productivity and quality of work. The discs can be designed for processing metal or wood. In the first case, the circles should have small teeth. There are also universal models.
Disks can be monolithic or carbide. The first type is made from a single piece of high-carbon steel. Such parts have an affordable price, but at the same time they have to be sharpened frequently. Carbide elements have a higher degree of wear resistance, but are much more expensive.
Do-it-yourself parallel fence for a circular saw
This is an important element that is needed for working with large workpieces. The emphasis can be made from different materials - plywood sheets or chipboard. On average, its dimensions are no more than 25 mm. The stop can be fixed with sides or self-tapping screws.
To focus, you need to do the following:
- take 3 strips of laminated chipboard and make a U-shaped profile;
- Make a guide channel from 2 slats and bolt it to the end of the table;
- make an inverted T-shaped structure from MDF - it needs to be screwed to the stop and placed in the channel.
DIY circular table
To make a table, you need the following:
- plywood;
- bars;
- several fragments of chipboard;
- bolts.
To make a tabletop circular you need to do the following:
- Assemble the top of the table from laminated chipboard sheets. It resembles a box without a bottom. The fragments need to be secured with bars. Their length should be greater than the height of the sheets.
- Turn the structure over and fasten the bars with additional jumpers.
- Cut a tabletop from a plywood sheet. Use a jigsaw to make a hole in it lengthwise and place a saw blade there.
To get a reliable stationary structure, you need to make a table
There must be a grid marking on the working surface of the device. It will help make the work more accurate. Also, the use of a protective casing should not be neglected. This element helps protect the device from mechanical influences during operation.
Assembling a table for a circular saw
The boards prepared for the legs are cut to length at a slight angle, tapering downward.
The upper ends are also beveled so that the structure stands with a slight expansion. The legs are attached to the tabletop frame with bolts through drilled holes. For better connection strength, you can include square bars glued into the inner corners of the frame into the screed.
It remains to install the working mechanism in the circular saw. The hand-held circular saw is mounted to the machine tabletop from below. The disk is inserted into the cut-out slot, the device is secured with screws, the heads of which must be flush with the top of the plywood sheet.
As a protective layer for the material and to improve the sliding of workpieces, the tabletop and other wooden parts of the machine are coated with several layers of varnish. Markings can be applied to the surface of the tabletop to trim the ends of the baseboards or trim, which are prepared for miter jointing.
Assembly diagram for a table for a circular saw.
In another embodiment, the working plane of the machine is made of two metal plates.
They are attached to the frame with bolts leaving a gap for the disc. The holes for the bolts are countersunk from above to deepen the heads. The bar for controlling the size of the material being cut can be attached with clamps.
A more convenient stop for the part to be cut is made of a steel angle with shelves of 60 and 80 mm. Its length should be greater than the length of the table.
The ends of the narrow shelf are cut off, and the wide one is bent onto the tabletop. Holes are drilled in the ears and threads are cut for the clamping bolts. The guide strip from the corner is installed according to the workpiece template and fixed with bolts to the end of the tabletop.
If you constantly use the machine, it is better to make the table from steel corners by welding.
The power button can be mounted on the tabletop frame or mounted on the workshop wall using an extended cable to connect the machine. The power key on the saw body can be bypassed or simply secured with a clamp. Access to the machine shutdown device must be safe.
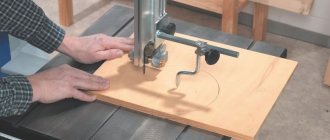
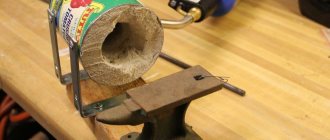
To cut small parts, you can make a mini-machine without a work table.
An old drill can serve as an electric drive for the sawing mechanism. A special shaft for insertion into the drill chuck will have to be ordered from a turner. The toothed disk and 2 bearings must fit firmly onto it.
The frame for installing the shaft is made of two parallel sections of hardwood boards with holes for pressing bearings. The working surface can be made of hardboard or plexiglass. The drill and frame of the device are attached to a board 30-40 mm thick.
The tool, mounted with the handle up, must be securely fastened with a clamp to the base in the cylindrical part of the body near the chuck. The board that serves as the base of the mini-circular is pulled to a regular table with clamps. The body of the inverted drill and the base plate should be at the same level.
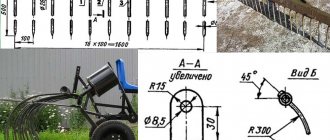
The guide bar for a mini-circular saw can be made from a 50x50 mm block.
At one end of it, a stop cut from a board is rigidly fixed. It should be adjacent to the end of the work surface. A threaded pin is attached to the other end of the guide bar.
A second thrust element (bar) is put on it through a hole drilled in it. The stops are tightened by tightening the wing nut on the stud. The guide stop is installed at the required distance from the disk and secured like a clamp.
A homemade mini circular saw allows you to saw off parts of fairly small thickness.
At your discretion, you can improve a homemade circular saw in a simple design by installing additional elements and using other materials. The functionality of the machine can be improved by equipping it with a carriage for feeding material, changing the fastening of the working mechanism, and installing other additional devices for controlling the saw.
A circular hand saw is a convenient and functional tool for cutting wood blanks. With its help you can cut sheets of plywood, saw boards, trim timber, baseboards, trim, etc.
d. But when there is a large volume of work, for example, when building a house, it is more convenient to use a stationary version of the device. How to make a circular saw with your own hands from a hand tool?
Diagram of a homemade circular saw.
Features of assembling a circular saw with your own hands from a grinder
Before building a machine, it is important to determine its purpose. To prepare firewood and perform simple cutting, a securely fixed table with a slot for saws is sufficient.
But such a machine can hardly be called safe or functional.
To perform more work, it is worth making a circular saw equipped with a coordinate table. It must have guides. This will help change the degree. In this case, it is worth considering the possibility of switching speeds and replacing disks.
You can make a circular saw from different tools. Almost every man has a grinder in his assortment of tools. It is often used at home. To make a stationary installation, you must use a workbench or a special table. The tool must be fixed from below.
So, how to make a circular? To do this you need to do the following:
- Pull the metal band clamp onto the tool. Its screed must be placed at the bottom.
- Fold the metal strip in half and secure it in the area of the holes.
- Make holes in the grinder gearbox.
- Attach the axle handle.
You can make a tool from a grinder
Assembling a table for a circular saw
The boards prepared for the legs are cut to length at a slight angle, tapering downward.
The upper ends are also beveled so that the structure stands with a slight expansion. The legs are attached to the tabletop frame with bolts through drilled holes. For better connection strength, you can include square bars glued into the inner corners of the frame into the screed.
It remains to install the working mechanism in the circular saw. The hand-held circular saw is mounted to the machine tabletop from below. The disk is inserted into the cut-out slot, the device is secured with screws, the heads of which must be flush with the top of the plywood sheet.
As a protective layer for the material and to improve the sliding of workpieces, the tabletop and other wooden parts of the machine are coated with several layers of varnish. Markings can be applied to the surface of the tabletop to trim the ends of the baseboards or trim, which are prepared for miter jointing.
Assembly diagram for a table for a circular saw.
In another embodiment, the working plane of the machine is made of two metal plates.
They are attached to the frame with bolts leaving a gap for the disc. The holes for the bolts are countersunk from above to deepen the heads. The bar for controlling the size of the material being cut can be attached with clamps.
A more convenient stop for the part to be cut is made of a steel angle with shelves of 60 and 80 mm. Its length should be greater than the length of the table.
The ends of the narrow shelf are cut off, and the wide one is bent onto the tabletop. Holes are drilled in the ears and threads are cut for the clamping bolts. The guide strip from the corner is installed according to the workpiece template and fixed with bolts to the end of the tabletop.
If you constantly use the machine, it is better to make the table from steel corners by welding.
The power button can be mounted on the tabletop frame or mounted on the workshop wall using an extended cable to connect the machine. The power key on the saw body can be bypassed or simply secured with a clamp. Access to the machine shutdown device must be safe.
Possible options for small, DIY circular saws
To create a small saw, you should apply the same rules as when creating a device from a grinder. But in this case, it is worth using the frame as a stand, not the sawhorses. You need to install a small table with a fixed tool on it.
When making a tool, it is worth choosing the right height of the structure at which the material to be cut will lie. If you place it too high or too low, there is a risk of discomfort.
If you need to make a very small saw, you can use a PVC pipe. In this case, it is permissible to take the engine from a children's toy. A glue gun is suitable as a connecting material. The circular machine can be powered from the mains or from batteries.
A compact device is made for processing small workpieces
Circular saw device
Being a truly useful tool, the circular saw has a fairly simple design. Its main components:
- bed – frame on which the main units are mounted;
- tabletop with a slot for a disk;
- engine with rotation transmission system;
- cutting tool, disc with teeth.
Optionally, the device can be supplemented with a pusher, which ensures progressive movement of the workpiece towards the disk, and various lifting mechanisms that regulate the cutting depth.
The principle of operation of a circular saw (circular saw) is that the rotation of the electric motor shaft is transmitted to the cutting tool, a disk with sharply sharpened teeth. The center of the disk is located below the level of the tabletop, only a segment of it is removed from it. The workpiece is brought to the rotating disk, the teeth bite into the wood, creating an even cut.
Making a benchtop tool
For comfortable work with machines, it is necessary to provide, in addition to the elements already mentioned, other tools and devices necessary for normal operation:
- on the working plate, for convenience, it is recommended to apply a centimeter jackal, “0” of which corresponds to the side of the saw blade; to protect against accidental chips and splinters, it is recommended to install a protective screen made of transparent plastic above the disk; to facilitate cutting, when additional force is needed to press the board, it is recommended to consider installation of a pressure roller or wooden pressure plates; to facilitate the work and prevent the board from falling back, it is necessary to install thrust plates.
Making a countertop
The working surface is cut out of plywood using a jigsaw according to the accepted dimensions. The workpiece is processed with sandpaper or a sander. The edges of the table top are milled.
On the bottom side of the sheet, markings are made for attaching a hand saw. A sector is outlined for the hole for the disk.
If you plan to cut workpieces at different angles, the slot should have a trapezoidal contour with a downward expansion. The groove is cut with a hand-held circular saw; holes ø10 mm are first drilled at the ends of the intended sector. Holes must also be made in the tool frame and tabletop for bolt-on mounting.
Next, the stiffening frame is marked for the horizontal surface of the table. The edges along the perimeter should deviate from the edge of the tabletop by 5-10 cm. The boards cut to size are applied end-to-end to the markings on the bottom surface of the sheet, and their contours are outlined with a pencil.
Tabletop diagram for a circular saw.
A center line is drawn in the middle of the marked outline of the frame.
It marks places for screws for attaching the ribs. Through holes are drilled for fasteners with a chamfer on top to recess the caps. Self-tapping screws should be screwed in every 10-20 cm, from the corners of the frame - at a distance of 5 cm.
The boards are placed on wood glue along the intended perimeter and clamped with clamps.
After the glue has dried, without removing the clamping devices, screw in the self-tapping screws and screw the heads into the countersunk hole. In the corners, 2 self-tapping screws are screwed into the end of the frame. Then you need to attach stable legs to the finished tabletop.