The process of metal etching has been known to people since the 16th century. The most famous masters lived in Italy and Germany. Today, anyone in the world can do knife etching at home. The availability of reagents and many methods allows you to do this without special experience. But it’s definitely worth studying the topic of knife etching.
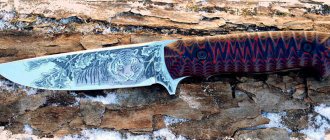
Etching a design on a knife at home.
The essence of the method
The key factor is the effect of acidic environments on the metal. Due to the interaction of the aggressive environment and the product, a chemical process called etching occurs. To apply a pattern to the blade, areas of the surface not intended for etching are covered with a protective layer.
It must be resistant to the etching substance. The depth of metal dissolution depends on the time of exposure to it. Since the 16th century, several effective methods for etching knives have been identified. They will be discussed below.
Metal etching methods
Acids in the etching technique are used depending on the type of metal. A certain alloy requires its own aggressive substances. The speed and quality of the process depends on this. There are several ways:
- a process using an electrolyte with current passing through it. They call it electrochemical. Its features are: precise drawing, saving time and working fluid solution. No harmful fumes;
- a process that does not require complex equipment and is incredibly simple - chemical . But the use of liquid acidic solutions is characterized by emissions of fumes harmful to human health into the air;
- production method requiring expensive equipment - ion plasma method. Used in dry environments in the field of microelectronics.
The first two methods are widely used for etching knives at home. The components are commercially available and do not require complex manipulations.
Rules and safety precautions
Whichever of these methods is chosen, in any case a number of procedures must be performed in the following sequence:
- Cleaning the surface on which steel bluing will take place.
- Sanding the surface to perfection.
- Degreasing (mandatory), after this stage you should only work with rubber gloves.
- Using products for bluing metal at home.
- Finishing the metal surface.
It is quite obvious that blueing steel at home falls into the category of very dangerous work and for this reason, compliance with certain rules is vital. The first thing to understand is that the solutions contain active and aggressive chemicals, so the liquid for bluing steel must be stored in a container specially designated for this purpose, however, the entire process should also be carried out in a container specially prepared for this purpose.
It is very important to remember that many bluing compounds contain acids and for this reason the dishes should be glass, porcelain or earthenware, and it is advisable not to use metal containers.
Secondly, in the process of preparing barrel bluing, there is work involved in mechanical cleaning of the metal, which means that the person performing this work must have means of protection against mechanical damage to the skin and eyes.
Also, such actions require carrying out work in a well-ventilated area, since breathing dust and chemicals is not good for anyone. Recommended products for cleaning and sanding surfaces include pumice, sandpaper and fine sand.
When starting work, you should be clearly aware of the order and sequence of your actions, otherwise the product may be damaged. It should also be remembered that bluing metal means working with very dangerous and aggressive chemicals, contact with the skin can cause serious chemical burns.
Preparing metal for drawing
It is necessary to prepare the blade for drawing and for the etching process itself. If the knife is collapsible, be sure to disassemble it. Freeing the blade will make it easier to work. In a one-piece product, the handle must be insulated.
It doesn’t matter what material it is made of, an acidic environment will harm anyone. Electrical tape as an insulator will work perfectly. The surface of the blade to be treated must be thoroughly wiped with acetone. The intended design will fit well on a degreased surface. We try not to touch the workpiece with our fingers.
Drawing methods
A pattern made from various materials serves as a protective layer; the metal not covered with it will be etched. There is a similarity to a film negative when a photograph is developed. There are plenty of options for protection: electrical tape, stickers, nail polish, vinyl, metal marker and many other polymers.
Nail polish
A popular material among amateurs. But professionals don’t disdain them either. Good resistance to aggressive environments makes it a leader in use. After applying it to the product and letting it dry, it is possible to correct the design with sharp cutting objects. Achieving a clear pattern and smooth lines.
Primer or bitumen varnish
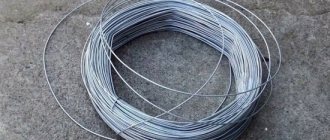
The product is completely covered, then the contours of the design are transferred over the layer with a marker or brush. Having sharpened a thin wire, you need to scratch the sketch down to the metal. The primer is used GF 021 or XB 062. When scratching a sketch, there is a risk of chipping off the dried primer or bitumen varnish. This is a disadvantage of this method.
Glossy paper
It is a good method that is gaining momentum among masters and has many positive aspects. The required sketch is printed in real size on glossy paper using a laser printer. Applying the side with the pattern to the surface of the blade, you need to iron the paper.
After the product has cooled, it is placed in water. Having brought the paper to a soft state, it peels off, and the toner from the printer remains on the product. You just need to treat the surface around the design with nail polish. The method allows you to transfer the smallest details of the image.
The principle of etching using electrolysis
For metal products, two methods are used: acid (liquid) and electrochemical. They are used to remove scale and oxide films. Compliance with the etching rules: holding time and solution concentration are the key to a successful process.
Electrolysis process.
It is important to thoroughly degrease the part. A small greasy stain will render all the work of the master unusable. When working with varnishes, you must be careful; they are highly flammable. This also applies to the process itself. In any form, it is unsafe. It must be treated with caution and care.
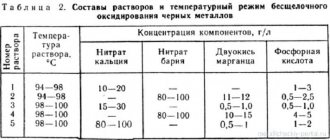
Solutions used for pickling steel
The process for different alloys requires different etchants. Based on the atomic structure of the metal lattice, a specific solution is selected:
- alkaline solutions etch aluminum and its alloys well;
- nitric, sulfuric, hydrochloric and phosphoric acids are used in the etching of copper and its alloys. To increase the reaction rate, chromium and nitrogen are added;
- For durable titanium, a double etching method is used. Initially processed in alkaline solutions, then in high concentration acidic solutions;
- an aqueous solution of hydrogen peroxide and formic acid is ideal for nickel and tungsten;
- for other solid metal compounds, mixtures of nitric and acetic acids are used;
- A mild sulfuric acid solution works well on cast iron.
A favorite for etching a knife at home is nitric acid. Sometimes salt is added. They are highly active and must be handled with care.
Cold bluing: features, advantages, disadvantages
Quite often, when asked how to burnish steel at home, some option is given specifically from the cold method of blueing. As a rule, this method is used in cases where the part does not experience strong mechanical stress. From the name it is clear that this process of bluing barrels at home occurs without thermal effects. In practice, various solutions are used.
Using a solution and a brush
There are several industrial options for ready-made mixtures for applying them to the metal surface with a brush. This is a domestically produced bluing agent “Voron 3”, as well as a well-known bluing agent, the imported mixture “Parisian oxide”.
The benefits are visible to the naked eye. This is the simplicity of the process, as well as the fact that the liquid for bluing steel does not need to be prepared independently, and the safety requirements and conditions for the process are minimal.
But this method also has disadvantages. It is very difficult to penetrate with a brush into all the “cracks” of the part given its complex configuration. To make the product “smooth”, additional polishing will be needed. Well, the worst thing about this type of bluing of barrels is that even slight mechanical damage will leave a mark and the treatment will have to be repeated.
Immersion method
The second option involves immersing the metal of the part in a solution to bluish it. The main advantage of this method is that the liquid penetrates into “all the cracks” of the part and covers it with a uniform protective layer. Secondly, the liquid does not splash, as in the first case when applied with a brush.
Recipes for cold application of protective film can be taken as follows:
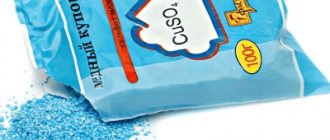
- Ferric chloride (FeCl3) – 75 grams; ethanol (ethyl alcohol, medical alcohol C2H5OH) – 30 grams; copper sulfate (copper sulfate, CuSO4 (anhydrous white) or CuSO4 * 5H2O (blue)), nitric acid (HNO3) - 20 grams each.
- Ferric chloride (FeCl3) – 170 grams; nitric acid (HNO3) – 13.5 grams; hydrochloric acid (HCl) and copper sulfate, copper sulfate, CuSO4 (anhydrous white) or CuSO4 * 5H2O (blue)) - 4 grams each.
This method is not suitable for those who are trying to learn how to coat a knife, since such a coating is not resistant to mechanical stress and will quickly wear off. Quite often, it is recommended to solve the problem of how to blue a gun using rusty varnish, as one of the most effective and least costly methods. The essence of the method is to treat the part with a very active corrosive medium - “rusty varnish”. This mixture should be prepared first.
It is recommended to do everything under a hood or outside on the leeward side, so as not to inhale the very harmful gases formed during the chain of reactions. First, 12 grams of hydrochloric acid (HCl), as well as nitric acid (HNO3) in the amount of 20 grams (attention, we look not by volume, but by weight, acids have different densities) are placed in a glass container (required). Add 30 grams of iron scale (rust) and 5 grams of iron filings to this container with a mixture of acids.
The reaction must be allowed to pass. After this, add 50 grams of distilled water and ethyl alcohol (medicinal alcohol C2H5OH) to the resulting reaction products.
The solution must be left for 12 hours and after that the resulting solution must be separated from the scale and precipitated salts. Now, for bluing at home using this method, you should place the part in the solution and wait until the part turns black. After this, the part must be rinsed with water and the red marks from the solution must be removed with a brush. As a result, we get a very good result of chemical bluing.
As in the first case (with a brush), and in the second (using solutions), after all the procedures, the blued parts must be thoroughly washed using detergents. Unfortunately, this method is not suitable for those who are trying to learn how to coat a knife, since such a coating is not durable and will quickly wear off.
Etching a knife in Coca Cola
The method is unusual in its solution. According to some experts, the following drinking solutions are suitable: Coca Cola, Sprite and Pepsi. The listed drinks contain phosphoric acid. A reasonable question is why not find it in its pure form?
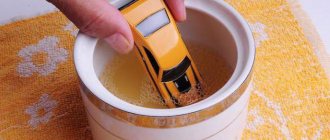
Expected effect of long-term etching in Coca Cola.
If you are engaged in etching blades, the question will not arise. They sell it in canisters of 16 kilograms. Phosphoric acid is an excellent rust inhibitor. Treated metal surfaces are protected from damage for a long time.
The process of etching a knife in Coca-Cola sounds a little incorrect, but bluing a knife in Coca-Cola sounds more accurate. During the process, a layer of iron oxides is formed on the surface of the blade, which gives the product a dark tint and protects it from corrosion.
The acid concentration in Coca-Cola is low. It is easier to buy the drink in small quantities. Controlling the process will be easier than with a strong concentrate. The process of bluing a knife in Coca-Cola looks like this:
- It is necessary to degrease the knife blade well. Otherwise, uneven etching will occur.
- Pour Coca-Cola into a container of a size suitable for immersing the blade.
- The drink should be heated and all carbon dioxide should be thoroughly expelled. Bubbles stuck to the blade will leave an unetched mark.
- Immersion of the blade is recommended every 2-3 hours. When removing it from the solution, the product should be washed with running water, washing off the oxide that forms. The procedure is necessary for uniform coverage.
The whole process takes about a day. If a light gray shade of the blade is enough, 3-4 hours of soaking in the drink will be enough. The reader should be warned that the resulting layer of bluing is not strong enough, as with other methods. But still, there are advantages: the blade is less afraid of water, high humidity, and there are other pleasant little things.
Hot bluing: features, advantages, disadvantages
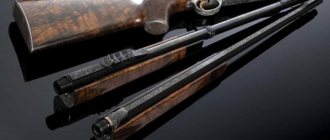
Many people, especially older craftsmen, prefer to blue their guns exclusively using the hot method, considering this method to be the only correct one. The argument is very simple. For a product that has been hot blued, the coating lasts much longer. Another advantage of this method is the absence of harmful fumes.
Quite often this method is called oil bluing, which actually explains the technology of the process. The technology is very simple and blueing steel with your own hands using this method is quite easy.
To begin with, the part is heated, the more, the better. After this, the part is immersed in oil (this is what gave the method its name as bluing steel in oil). It can be linseed, olive, or gun oil. In principle, you can even use regular machine oil.
After the part has been kept in the oil for ten seconds, the part is taken out, and the oil must be allowed to drain on its own, otherwise stains will appear. The next step is to “bake” the butter onto the surface. To do this, it is customary to use a blowtorch. An important point in bluing steel in oil is to determine when the product is ready.
Experienced craftsmen say that you need to stop baking at the moment when the part just begins to change its color from brown to black. Burnishing steel in oil is one of the oldest and most proven methods of protecting metals from corrosion; it has not failed craftsmen for centuries, and it will not fail now.
Instructions for liquid etching of a knife
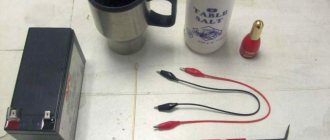
The chemical method is simpler and does not require batteries. A strong aggressive environment is required. It has already been stated that the method is dangerous due to its gaseous emissions. Opening a window or getting a good hood is a must. Safety equipment:
- latex gloves;
- respirator;
- protective glasses;
- smock.
Avoid contact with mucous membranes of the body. Washing with water will not do. A chemical burn is a terrible thing. We've sorted out the equipment, now it's a matter of materials:
- insulating tape;
- nail polish, marker;
- grinding machine;
- distilled water in a container;
- Plastic container;
- solvent, acetone;
- ferric chloride supply;
- cotton swabs and disks, toothpick;
- sandpaper of various grains.
The knife must be prepared in advance. On a solid product, protect the handle with electrical tape; on a collapsible product, disassemble it and work with the blade separately.
Creating a protective layer
The pattern that needs to be transferred to the product must be outlined with a protective layer. Considering that in the coated area, the reaction will not take place, and the metal will remain light. Initially, make a sketch with a marker and then cover it with nail polish. This is the best option. The varnish can then be adjusted to ensure evenness of the lines and the pattern itself.
Patterns for etching on a knife.
Don’t be shy about fantasizing; the uniqueness of the work performed also depends on the personal qualities of the master. Use varnishes of various shades; they are clearly visible on the surface of the product. Drawings and sketches for etching on knives are freely available on thematic Internet resources, or use the pattern from the picture above.
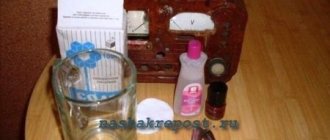
Preparation of the solution
We make sure to use personal protective equipment. When working with acid, you need to have a solution of soda on hand; it will come in handy if an aggressive substance gets on your skin. The rule of all chemists is to pour acid into water, never in the reverse order:
- The ratio of ferric chloride and water should be 50/50. This is the best option, but to speed up the reaction, other proportions can be used.
- The plastic container should not be filled entirely; be careful when placing the product there. After pouring a little distilled water, pour in the same amount of ferric chloride.
- Label the container with the words "Acid" and be careful with it. A metal container is not suitable; there is a possibility of it reacting with the solution.
Please note that the diluted liquid will serve more than once; you can actually process a dozen blades in it. Once dilution of the solution is complete, proceed to the next step.
Etching process
To obtain a high-quality result, it is recommended to make movements in the liquid when immersing the blade. The process will look like gently rinsing the product in a solution. Touching the blade is strictly prohibited. Leaving it in it for a long time is also not recommended.
The process of etching a knife.
Etching professionals argue that repeated, short-term immersion of the product in an aggressive environment is necessary. It looks like this:
- you should immerse the blade for 20 seconds;
- take it out into the air for the same time as the immersion;
- quick rinsing under water from a tap;
- hold in air for 20 seconds;
- and then again immerse in the solution for the same period of time.
This achieves constant control of the etching; the circular process must be performed several times. The total time of holding the blade in acid should not exceed 10 minutes. It should not be forgotten that all time intervals depend on the steel and the composition of the solution.
At the end of the process, it is necessary to rinse the product well with running water and remove the protective layer with acetone or solvent. Walk the blade with sandpaper starting from coarse grain 400 grit. and ending with 2000 or 2500. A felt wheel on a sanding machine will help bring it to a shine.
Features of metal bluing
In large-scale industrial production, burnishing of products occurs due to changes in the structural composition of the top layer of metal. A coating applied in this way provides reliable protection against corrosion for many years. At home, it is almost impossible to repeat the methods that are used in industry, and it is not profitable from an economic point of view. Both hot and cold bluing are done by applying a special chemical solution to the surface of the product, which forms a thin oxide film. You can make a product for bluing at home by purchasing all the necessary components yourself, but you can also purchase a ready-made one at a forging store. For example, sodium nitrate, phosphoric acid, or regular machine oil do a good job. Perhaps the most popular method of blackening metal at home is chemical oxidation. The final result (what color the metal will acquire) largely depends on the choice of method, the quality of all components and how correctly the solution was prepared.