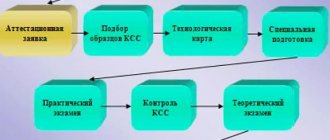
How does the certification process take place and what do you need to take with you to the exam?
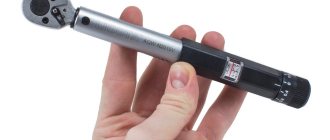
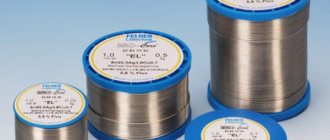
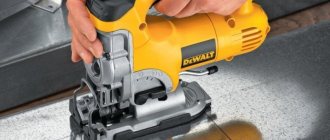
How to get a NAKS welder? One day is allotted for certification. If you are taking the exam not at an enterprise, but at a plant or institute, then come in the morning and start preparing. After preparation, you are given two pieces of pipe (coil) and you cook them to light. You also need to prepare the edges - chamfering up to 45 degrees, joining pipes (for this there must be a special clamp in the booth), tacking them. It is better to come prepared for certification, with your own tools and consumables. It would be nice to buy a bag in which everything can be compactly packed and transported without any problems. You need to take with you: • 2-3 kilograms of LB 52U Kobelco electrodes with a diameter of 2.6, because they are certified. On the spot you will most likely be offered electrodes, but it is unlikely that they will be LB, they will probably give you Merov’s (MP-3), which cannot be used to weld a seam, or SSSI. Those. It's better to come with your electrodes and ask them to put them in the oven while you train; • a square for centering parts so that they do not move; • slag hammer; • grinder (grinder). Grinding wheels, cutting wheels, metal brush. The pipe must be cleaned to a metallic shine from the inside and outside at a distance of 30 mm from the edges to be welded. • a regular metal brush. • your electrode holder. The holder that will be provided to you on site may be loose and may not hold the electrode. • mask (this is the most important thing). It's better to buy an inexpensive Chameleon. You can purchase it for one time only to pass the exam.
| Read the article on the website: Repairing a chameleon mask with your own hands |
Welding of pipes for NAKS certification under defect control (ultrasound or x-ray)
Preparatory work
As blanks, take two pieces of steel pipe with a diameter of 133 mm and a wall thickness of 4 mm, cut evenly (this can be done most effectively on a miter saw). Make sure that the cut is absolutely even. If it is slightly crooked, then you will encounter quite serious difficulties during the welding process. Next, you need to remove the chamfer with a grinder and clean the edges. The chamfer is removed in accordance with GOST 16037-80 “Welded joints” at a certain angle. The angle on each pipe should be 25-30 degrees.
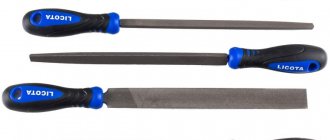
After that. After the chamfer was removed, it is necessary to clean off the burrs so that they do not interfere with the correct formation of the root of the seam. This is done with a file. After you have removed the chamfer and the burrs inside, you need to make the edges blunt, because an angle that is too sharp will quickly melt during the welding process. According to GOST, blunting is made up to 2 mm.
| Read the article on the website: ESAB OK Electrodes |
Assembly
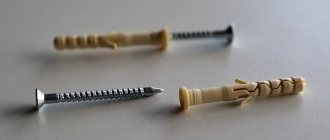
This step is very important, perform it very carefully. The success of the welded joint will entirely depend on the correct assembly. According to the rules, it is necessary to dock the pipe and grab it. This must be done so that there is an appropriate gap for complete penetration, and there is no displacement. I would also like to note that pipes come with eccentricity (not quite round). Even in such a serious organization as NAKS, pipes can be distributed oval, which will ultimately affect the displacement. According to the rules, 1 mm is allowed, but still this is a lot and there may be no fusion at the root of the seam due to the displacement and ellipticity of the pipes.
To join pipes, take a flat corner or channel, on which they are laid and a gap is set, which can be approximately 2 to 3 mm. This is usually provided by the diameter of the electrode, which is simply inserted into the joint between two pipes. If you are welding with a 2.5 mm electrode. then, accordingly, the gap will be the same.
Note. The root passage of pipes of any diameter (if it is not quite a huge size) is welded only with a 2.5 mm electrode. If you try to brew the root in threes, then nothing good will come of it.
The next point I would like to note. When passing the NAKS certification, you may be provided with pipes up to 10 mm thick to complicate the task. With such thicknesses it is necessary to increase the gap to 3 mm. It is also necessary to take into account and make an error in the fact that when tacking, the pipe may be pulled together at the tacking site by stresses in the metal. Make the gap larger by a few tenths of a millimeter so that there are no difficulties in the future. For more reliable docking, you can also use magnets. They can be fixed on both sides.
Surfacing of tacks
To weld a pipe with a diameter of 133 mm and a wall thickness of 4, you will need an approximate current of 50A, which can be adjusted during operation. The tack is placed first on one side of the pipe, then, respectively, on the opposite side. If necessary, the gap between the pipes is adjusted. The third tack is placed 90 degrees from the first, and the fourth opposite the third.
Tack processing
After installing the tacks, you need to clean them well. At their beginning and end, it is necessary to make cuts to eliminate possible defects (lack of fusion and pores).
Root welding
To effectively perform this task, it is enough to learn how to make just one oscillatory movement “back and forth” with a gradual shift from one tack to another. Welding speed depends on the situation. You can light the electrode on a potholder, using a long arc; the root itself is cooked with a short arc. We cook at an angle back, the electrode can be held at an angle from straight to sharp. If you cut the pipe in half, the bead on the reverse side should look like the one shown in the picture after the operation is completed.
It is convenient to cook by hanging the pipe on the device in the “half-ceiling” position. When you approach the next tack, it is advisable to file it so that there is good fusion at the junction of the rollers. If possible, the process should occur without tearing off the electrode. If separation occurs, then you can add a little current at this moment to ensure penetration. The current is adjusted according to the situation to ensure sufficient penetration and avoid burning through the metal. When welding in a vertical position, you can always keep the current at a minimum; when you reach the lower position, you must take into account that it is easier for liquid metal to fall inside the pipe - be careful not to overheat the steel too much at this moment.
Facing seam
• Before proceeding with the facing pass, you need to clean the root of the seam to bare metal (remove lumps, slag, undercuts). A small groove is made. • It is convenient to weld a facing seam in the ceiling position by moving the electrode in a spiral. • Vertical passage – “crescent-herringbone”. • When welding without breakaway, try to find the most comfortable position for your body and arms, make sure that the torch wire is long enough to perform all the necessary manipulations. • when beating off slag, it is advisable to cover your eyes and face with your hand. • when welding the second bead, it is necessary to make a cut.
Node control
The edges of the seam are cleaned to a distance of about 50 mm (splashes, sagging, etc.) The control itself begins with a visual inspection of the quality of the front seam. However, usually no questions arise for him, which cannot be said about the root pass. If the pipe has passed a visual inspection, only then is it allowed to be examined using non-destructive methods (ultrasound, x-ray).
Facial pass requirements:
• The height of the roller is 0.5 – 2 mm • The width of the roller should be equal to the thickness of the pipe multiplied by 2. If the thickness of the pipe is 4 mm, then the width of the roller should be 8-10 mm. • The seam is smooth, straight, the arrangement of scales is dense.
Root Pass:
• The height of the return roller is 0.5-1 mm. • lack of fusion and lack of penetration are not allowed.
Certification levels
Why do you need a NAKS certificate? Today, its presence is a necessary condition for a specialist to perform welding work. The procedure and rules for certification that a welder undergoes are established by documents developed by NAKS. The procedure is carried out by certification centers, which are regional representative offices of NAKS. The certification commission includes certification experts who are certified and included in the NAKS register of experts, as well as representatives of Rostechnadzor. The received certificate confirms the professional level of the welder to perform specific work.
As part of the certification, the welder goes through several levels:
- Welder;
- Master welder;
- Welding technologist;
- Welding engineer.
Specialists of levels 2, 3 and 4, who are part of the management of enterprise divisions, must undergo mandatory certification. Specialists who need permission to work in hazardous or difficult conditions also undergo mandatory certification.
(semi-automatic welding)
Now we will talk about how to make welds using a semi-automatic machine if you are welding critical structures or are going to submit them under control for NAKS certification.
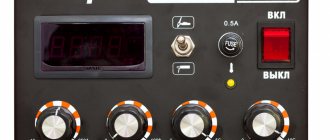
Here's how this is done using the example of two workpieces (plates) 12 mm thick, butt welded in a vertical position using a SKYWAY 330 inverter.
The plates need to be prepared: cut using a plasma cutter or grinder.
Also, for the correct progress of work you will need: • lead strips (2 pcs.) - necessary for starting and finishing welding, since it is difficult to obtain a high-quality seam at these stages. The strips are technological and subsequently cut off;
• devices that prevent reverse bending of our blanks (2 pcs.);
• a template for controlling the gap (any piece of hardware that allows you to set the gap, in our case 2 mm).
In order to properly prepare our connection for further welding work, you need to familiarize yourself with the requirements of GOST 5264-80 (click to download page with text). Look for the compound you will be working with, in our version it is C17. GOST specifies how to prepare this connection: you need to bevel the edges at an angle of 30° and blunt them. The plates must be cleaned of oxides, dirt and rust at a distance of at least 10 mm from the boundaries of the future weld.
For proper assembly, it is convenient to use a magnetic square. It will align the plates relative to each other and prevent them from moving during the process of tack placement.
Magnetic square
We control the two-millimeter gap with a template, the role of which can be played by any suitable piece of metal. Attach the template to the place where you intend to start welding and set the gap exactly according to it. At the end of the weld, the gap needs to be slightly increased, due to the fact that the plates will be pulled together during the crystallization of the deposited metal.
Next, a device is installed to prevent bending and tightening of the workpieces. They grab one device, then control the displacement and set the gap, as was said, a little more than 2 mm, for example, 2.2 ... 2.3 mm. Then they place spot tacks on the second “fixture”.
Prisp-I, preventing deformation of plates, stuck points
After you have installed the tacks, you need to see if the plates have moved. To do this, you can use the same template to set the gap. If it has a smooth edge, it can be used to control how evenly the plates being welded are aligned relative to each other - simply apply the smooth edge to the joint and see that there are no gaps.
Checking the offset with a template
If such are found, at this stage you can always straighten it with a hammer or other special tools. devices.
Now you can weld a continuous seam. We put on gloves, a mask, and arm ourselves with a semi-automatic burner. You don’t need to scald it too much, because the devices against bending of the workpieces perform a technological role and they will need to be knocked out.
Welding lead strips
The preparation of the planks is the same as for the base metal. The edges are beveled; their thickness must also correspond to the thickness of the structure being welded. They are installed on tacks.
Lead strip tacked to the base metal
In order to increase the level of complexity of the task, it is better for the welder to perform a vertical seam of the connection, this will allow him to fully test his skills and abilities. It is also necessary to correctly set the welding parameters on the SKYWAY 330 power source. The parameters can be adjusted through trial and error. In our case, for a workpiece thickness of 12 mm, the following welding mode was selected: U = 17V; Vfeed = 3 meters; Uadjusted=-5; L=0, where L is inductance. Consumables (they are optimal for the given case): Electrode wire Ø1 mm; Gas mixture 82% Ar+18% CO2.
According to the rules, in order to avoid hydrogenation of the weld, which leads to the appearance of pores, the plates must be heated to T = 100 ... 120 °C. Rules are just rules, to be circumvented. Undoubtedly, pores represent seam defects and are a rejection sign. However, it should be assumed that during the passage of the seam, the moisture present on the surface of the metal will immediately evaporate. After all, no one thinks of preheating the wire before welding. However, if you are taking the NAKS certification exam, you should know about the existence of such an operation - this is a mandatory requirement. In industrial conditions, the operation can be performed in an oven, in other cases - using an oxy-acetylene torch or torch.
How to get a certificate
Any specialist who has the appropriate education, qualifications and the necessary professional training can undergo certification.
- The candidate submits an application, documents on education and qualifications, and a certificate of employment to the certification center.
- Within 3 days, makes a decision on approval of the application. If the application is rejected, the certification center will notify you in writing of the reason for rejecting the application.
- Certification of welders consists of testing knowledge of welding theory and practical skills of a specialist. For level 1 certification, the test includes at least 15 theoretical questions; for welders of levels 2, 3 and 4 – at least 20 questions. Theoretical knowledge is tested using a computer or in writing using teaching materials developed by the certification body. An additional interview may also be conducted. The theoretical part is considered passed if the candidate answers 80% of the questions correctly.
- When testing practical skills, they are guided by NAKS and GOST documents, which regulate the conduct of practical tests. The test is passed if the specialist has completed a practical task in accordance with the declared area of certification. A candidate who successfully passes the test is issued a certificate.
- If a candidate fails the theory or practical skills test, he has the right to retake this part within 3 months at the same certification center. A candidate who does not pass the re-test is considered to have failed the certification and receives a written refusal of certification.
- The certificate number of a certified specialist is entered into the NAKS register. Using the registry, you can find out when the certification was carried out, the scope of certification, and the validity period of the document.
For welders the certificate is valid for 2 years, for welding production employees of levels 2 and 3 it is valid for 3 years, for level 4 – 5 years.
Welding methods according to naks
Certification of welders is carried out separately according to the following types (methods) of welding (surfacing):| Russian Far East | — bath manual arc welding with coated electrodes; |
| GLAD | — manual argon arc welding with a non-consumable electrode (141); |
| MADP | — mechanized argon arc welding with a consumable electrode (131); |
| MP | — mechanized welding with a consumable electrode in active gases and mixtures (135); |
| AAD | — automatic argon arc welding with non-consumable electrode; |
| APG | — automatic welding with a consumable electrode in active gases and mixtures; |
| AADP | — automatic argon arc welding with a consumable electrode; |
| AF | — automatic submerged arc welding (12); |
| MF | — mechanized submerged arc welding; |
| IMF | — bath mechanized submerged arc welding; |
| Ministry of Railways | — mechanized welding with self-shielding flux-cored wire (114); |
| MPG | — mechanized welding with flux-cored wire in an active gas environment (136); |
| MRSV | — bathroom mechanized welding with self-shielding flux-cored wire; |
| MSOD | — mechanized open arc welding with alloy wire; |
| P | — plasma welding (15); |
| ES | — electroslag welding; |
| EL | — electron beam welding; |
| G | — gas welding (311); |
| RDN | — manual arc surfacing with coated electrodes; |
| RADN | — manual argon arc surfacing; |
| AADN | — automatic argon arc surfacing; |
| AFLN | — automatic surfacing with a submerged strip electrode; |
| AFPN | — automatic surfacing with submerged arc wire electrode. |
| KTS | – resistance spot welding; |
| KSS | – resistance butt welding; |
| CSR | – flash butt welding; |
| VChS | – high-frequency welding; |
| PACK | – soldering; |
| NI | – welding with a heated tool; |
| ZN | – welding with embedded heaters; |
| NG | – welding with heated gas; |
| E | – extrusion welding; |
Notes:
1. The welding method code according to ISO 4063 classification is indicated in brackets.
2. Certification for the right to perform welding (surfacing, soldering, etc.) by methods for which there are no practical exam programs developed and approved in the established manner, must be carried out according to the programs developed by the Head Certification Centers, agreed with the Gosgortekhnadzor of Russia and approved by the National Certification Committee on welding production.
When certifying for welding of polymer materials, it is necessary to additionally take into account the degree of automation of the welding equipment used:
When welding pipes with a heated tool:
• CP – butt welding with manual control;
• SSA – butt welding with an average degree of automation;
• SWA – butt welding with a high degree of automation.
When welding pipes using parts with embedded heaters:
• ZNR – welding with manual setting of parameters;
• ZNSh – welding in bar code or magnetic card mode;
• ZNA – welding with automatic feedback of the fitting to the welding machine;
For other methods of welding structures, with the exception of pipelines of gas supply systems:
• R&D – manual welding with a heated tool, regardless of the type of connection;
• BAT – mechanized welding with a heated tool, regardless of the type of connection;
• NGR – manual welding with heated gas, regardless of the type of connection;
• NGM – mechanized welding with heated gas, regardless of the type of connection;
• ER – manual extrusion welding, regardless of the type of connection;
• EM – mechanized extrusion welding, regardless of the type of connection.
When certifying for welding elements of reinforced concrete structures, the method and technological features of welding are additionally taken into account with the corresponding recording of the symbol in accordance with GOST 14098.