Three steps to a plaster sculpture (or finishing element)
From concept to finished product there are three stages to go through:
- make a life-size model;
- remove the injection mold from the model;
- prepare a plaster mixture and cast the desired number of copies of the product.
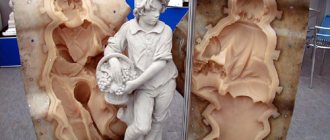
Let's consider these stages using the example of making a small bust (a) and an element of stucco interior decoration (b).
Slip composition
The base of the slip is clay with additives, diluted with water. It is usually diluted to the consistency of sour cream or thick cream.
Casting slip composition
The slip is prepared on the basis of one or several types of clay, adding sand, fireclay, electrolytes and dyes. For different types of products, choose the most suitable composition for them.
Modeling business, we make a model of the product
The first and most difficult step to obtaining a plaster sculpture is the model.
You can make the model yourself, or select a ready-made product. For example, you decide to make 10 copies of figured friezes and stick them around the perimeter of the room, right under the ceiling. We buy one and then cast the rest using it.
If you consider that the cost of one stucco decoration can be from a thousand rubles and more, then the benefit is obvious. In this case, the original form can be slightly modified to suit your taste.
If it is not desirable or impossible to work with the original, then we will make a plaster copy of it (we will look at how exactly to do this later). Then we remove unnecessary details from the copy and (or) supplement it with plasticine parts. It is much easier to do this with a finished product than from scratch.
Making a model yourself is already more difficult. You need to have at least a minimum of spatial thinking and some sculptor skills.
In practical modeling experience, you can use plaster for the base and plasticine for making small parts. This technique is especially good for products that have large rectangular parts, for example, bas-reliefs, tiles, etc.
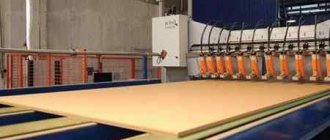
Tiles
Gypsum blanks are cast from inexpensive soft gypsum in the simplest rectangular formwork. When it has set, we disassemble the formwork and, having pulled out the part, we process it with a knife or simple cutters made from a hacksaw blade, or chisels. This is not difficult; cutting wet plaster is a little more difficult than cutting a piece of laundry soap.
We dry the workpiece and coat it with acrylic primer or alcohol varnish, then add plasticine parts. Without a primer, plasticine “clings” to plaster very poorly.
I recommend: How and with what to seal the joints (seams) between panels in an apartment on the ceiling and walls with your own hands
Gypsum casting process
The gypsum casting process consists of several stages. Casting into plaster molds itself takes minutes; much more time is spent on preparatory and final operations. Preparatory ones include:
- Making a product model.
- Design and production of a mold, or flask.
- Preparation of materials for casting and lubrication of the mold.
Gypsum casting process
Check that all necessary materials, equipment and tools are at hand, washed and cleaned from the last time. When casting, minutes count.
Immediately before casting into plaster, the molding box should be lubricated and the casting solution should be mixed. The raster should be poured into the hole in a thin stream, making sure to allow the air to escape. After pouring, the mold must be rotated and shaken slightly to achieve maximum adherence of the solution to the small details of the relief.
The final steps are no less important. They also determine the quality of the product. These include
- Drying (at natural temperature or on a radiator). Drying too quickly can cause the casting to crack.
- Disassembling the form. If it does not come away from the product well, you can lightly tap it with a wooden or rubber mallet.
- Removing sprues and reworking parts of the finished product.
- Cleaning the flask (if one or more castings are planned).
Casting in plaster molds is slightly different from casting in silicone molds. Silicone does not require lubrication, it is elastic and it is easier to remove the casting from it, and it also gives more opportunities for working out details.
What is a sculpture mold
The form is a cast of the model, its “volumetric negative”. About fifteen years ago, the main material for removing molds was plaster. And even nowadays it is used quite often, especially for “one-time” fillings of simple but large products.
Gypsum molds are durable, accurately reflect the smallest details of the model and, importantly, they are inexpensive.
Alas, it is precisely the strength of the hardened plaster that sometimes leads to the fact that the form clings to the protrusions on the model and forms a kind of “castle” with it. An attempt to separate them by force results in breakage of the model or mold.
Since a more or less complex product necessarily forms locks when poured, either the model is cut into simple elements, cast separately and then glued, or the shape is filled in separate sections that do not form locks.
From practice.
At the beginning of the two thousandth, creating a form based on the model of the famous monument “Oath” (Museum of the “Young Guard”, Krasnodon), the author of these lines filled in 14 fragments.
Silicone does not have these disadvantages. It copies the details of the model no worse than plaster, and its strength is sufficient for casting dozens of copies. At the same time, the silicone is flexible enough that you don’t have to worry about it catching on the protrusion or depression of the model.
The disadvantage of silicone molds is that they are much more expensive than plaster molds.
Important!
Regular silicone mold sealant will not work. A special molding compound is required. The most popular is a two-component one consisting of a base resin and a catalyst. Moreover, the latter requires only about 1.5-2%.
Application area of gypsum casting
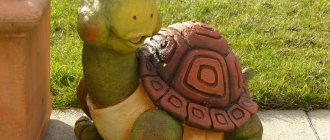
Gypsum casting is used both at industrial enterprises for the manufacture of interior decoration parts, and in designer workshops. Craftsmen cast a very wide range of plaster
- Author's interior decor elements
- Figurines and even large statues, up to models for subsequent metal casting
- Small decorations
- Toys
- Parts for scale models of equipment
The scope of application is not limited to this list. Craftsmen are coming up with more and more new areas of application for gypsum casting - wherever it is necessary to create parts with complex surfaces and relief, and the requirements for strength and wear resistance are not critical.
Preparing the silicone mixture for the mold
We measure out the components of the silicone mixture (hardener and silicone) and mix them thoroughly.
To do this, pour the main component into the container and begin to actively stir it with rotational movements, like sugar in a glass. When the mass begins to move, without stopping stirring, gradually pour in the catalyst.
It takes 1-1.5 minutes to completely mix the ingredients. You should not stir for more than 2 minutes; the mixture will begin to lose its quality.
After mixing the composition, we immediately begin pouring.
Important.
When preparing the mixture, maintain the ratio and temperature recommended in the instructions. The harder the silicone, and the faster it sets, the more hardener and the higher the temperature. And by reducing the amount of catalyst below the norm, polymerization may not be achieved.
To prevent the silicone from sticking to the model, we coat it with a release agent. The composition is sold ready-made and, if there is a lot of work, it is worth purchasing a jar. For small home crafts, paraffin, petroleum jelly and even ordinary soap are suitable for this purpose.
Making a single mold
First, let's figure out how to remove the mold from an element of stucco decor.
We place the model in a box (formwork) made of planks, securing it to the bottom with plasticine or a wire clamp. We select the dimensions of the box so that the silicone layer between the walls and the model is at least 10-15 mm. The highest part of the model should be covered with silicone for the same amount (Fig. 1). We will approximately mark this level on the wall of the box.
I recommend: How to lay porcelain tiles on wooden floors
Now let's estimate how much silicone mixture we need. Fill the model with clean sand or simple salt according to the silicone filling level. At the same time, tap and shake the box, compacting the filling. Pour the sand into a measuring container. What is the volume of sand, so much silicone will be needed.
Pour the silicone in a thin stream, trying to prevent the formation of air bubbles. We “help” him fill particularly difficult places with a thin flexible spatula.
Usually, after 5-6 hours, the impression can be carefully removed, but you should not fill it with plaster before complete polymerization occurs. As a rule, this is from 16 hours to 24 hours.
Making split molds
If to make a decorative element it is enough to fill the mold at one time, then for the bust you will need a detachable mold of two parts or, otherwise, a split mold.
You can do it in two ways:
- Immediately fill the model completely, and then cut the mold.
- Fill in two or three steps.
The first option, we think, is clear. The model is filled completely, ending up inside a solid silicone block. After the silicone has set, cut the block directly on the model, approximately in half. Then we remove the model and connect the parts of the cast along the cut, fastening with a cord or even just tape. The form is ready to be filled.
The second method is noticeably more complicated. Essentially, we remove at least two molds from the model, one on each side.
We start by marking the interface. We draw the dividing line directly on the model with a pencil or felt-tip pen, trying to ensure that it runs through the middle of the protruding elements of the product. This will make it easier to remove the finished form.
Now we have to close part of the model, leaving only the side from which we will take a cast. To do this, we use plasticine, or even better, sculpture clay.
The model is placed in a formwork box. Fill the box with clay or plasticine to the intended dividing line. As a result, we should get a continuous surface from which half of the model protrudes in bas-relief.
Some try to keep the section as flat as possible. This is not required at all. The dividing line is unlikely to be located strictly in one plane, which means that the entire boundary of the division of the form will be in relief.
Fill the model with silicone. Let's wait until it gains sufficient strength (usually from 3 to 6 hours). Now without taking off
(!) form from the model, disassemble the formwork, remove the clay (plasticine) and turn the form over with the filled side down. In front of us will be a bas-relief of the second part of the model, protruding from the silicone block.
We frame the model with formwork, lubricate the surface of both the model and the silicone “cage” with release agent. Pour in another portion of liquid silicone and wait until it sets.
I recommend: How to hang a chandelier (on a hook or on a bar)
We disassemble the form and remove the model. We get two halves, in one of which the front side of the model is printed, and in the other, the back side. All that remains is to connect them, fasten them and pour the plaster.
Advice.
To ensure that the parts of the mold match exactly, press several balls, for example, from a bearing, into the dividing surface. When pouring, they form corresponding depressions and convexities on the cast, allowing the parts of the mold to be accurately aligned for pouring plaster.
Replication of products
Having a durable and flexible silicone mold, you can begin to replicate products.
Our crafts are unlikely to be subjected to serious stress. We use G5 or G6 gypsum for them, which can be purchased at any hardware store. But, nevertheless, before mixing it, add 6-8% PVA emulsion to the water. It will reduce the fragility of finished products, add strength to them, and also increase the “fluidity” of the gypsum mixture.
Mix plaster with water in a ratio of 55:45 or even 60x40. More information about the types of gypsum and methods for mixing it can be found in the article on the production of gypsum tiles.
Pour liquid plaster in a confident, uniform, neat stream. After the mold is filled, let the plaster harden thoroughly. For quick-setting varieties this is 20-25 minutes.
We remove the product from the mold, clean off the burrs and set it to dry. The finished sculpture can be varnished or painted.
Advice.
Although plaster does not stick to silicone, after every two or three casts, lubricate the mold with release agent, this will extend its life.
Features of choosing material for the production of garden decorations
Figures for the garden can be cast from plaster, concrete and polystone. Products made from gypsum sell out faster. They have the lowest price. Therefore, organizing the production of such products is a very simple process that does not require large material investments. A kilogram of gypsum costs from 40 rubles. It produces very fragile products that are not resistant to any mechanical loads. They absorb moisture. The service life of such a garden decoration is one season, but consumer demand for such products is still quite high, so you can safely work in the designated direction.
Garden figurines made of plaster Source svarka-doka.ru
What do we get
The gypsum casting technique described in the article is intended to create many identical products.
Of course, you can cast only one, unique sculpture. Let's say you made a sculpture of your beloved girl out of plasticine and want to “translate” it into durable plaster to present to your friend.
However, it is worth remembering that for one-time, “piece” items, there are other manufacturing methods.
For example, a sculpture can be sculpted from a concrete mixture. Or cut from a gypsum block, soft natural stone. But we will talk about this in other articles. Leave your tips and comments below. Subscribe to our newsletter. Good luck to you and good luck to your family!