We will not prove to you that twisting wires is a good connection method. Yes, it can be done well and insulated. It is also perfect as a temporary option. But according to the rules of electrical installations (PUE) in order to connect a wire or cable, ordinary twists are not recommended. Nevertheless, we will talk about it, and in very detail. Firstly, because, contrary to the PUE, most connections are made using this ancient “old-fashioned” method. Secondly, because correct twisting is the main stage of the most reliable methods of connecting wires - welding and soldering.
Where is electric twisting used?
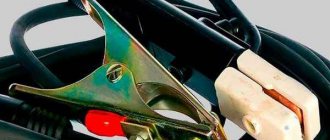
Twisting of wires is performed to connect them electrically and mechanically. This connection method does not imply the transmission of high power. Therefore, they try to use twists only in low-current circuits and rooms without high humidity.
Connecting cables using twisting
Reliable twisting has the following properties:
- Low contact resistance. Otherwise the contact will burn out.
- High mechanical strength. Especially for wires suspended in the air.
- Tightness of the connection. When exposed to water, the twist oxidizes and burns.
- Conformity of metals of current-carrying conductors. Contact between copper and aluminum wires is not allowed.
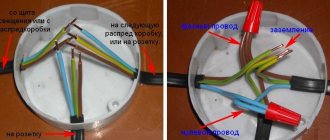
Important! When installing electrical wiring in an apartment, the twists should be placed in junction boxes. This measure will protect the contact from dust and moisture and make it more accessible for maintenance.
Splicing stranded wires without twisting
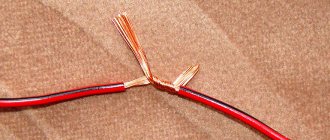
Stranded wires can be spliced in the same way as single-core wires. But there is a more advanced method, in which the connection is more accurate. First you need to adjust the lengths of the wires with a shift of a couple of centimeters and strip the ends to a length of 5-8 mm.
Fluff the slightly cleaned areas of the pair to be joined and insert the resulting “panicles” into each other. In order for the conductors to take a neat shape, they need to be tied together with a thin wire before soldering. Then lubricate with soldering varnish and solder with solder.
All conductors are soldered. We clean the soldering areas with sandpaper and insulate them. We attach one strip of electrical tape on both sides along the conductors and wind a couple more layers.
This is what the connection looks like after covering it with insulating tape. You can further improve the appearance if you use a file to sharpen the solder joints on the insulation side of adjacent conductors.
The strength of connected stranded wires without twisting by soldering is very high, as the video clearly demonstrates. As you can see, the connection can withstand the weight of the monitor 15 kg without deformation.
Connecting wires with a diameter of less than 1 mm by twisting
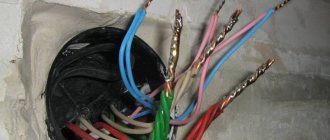
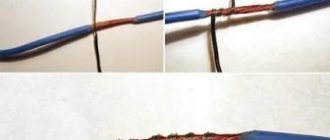
Let's consider twisting thin conductors using the example of splicing twisted pair cables for computer networks. For twisting, thin conductors are stripped of insulation for a length of thirty diameters with a shift relative to adjacent conductors and then twisted in the same way as thick ones. The conductors must wrap each other at least 5 times. Then the twists are bent in half with tweezers. This technique increases mechanical strength and reduces the physical size of the twist.
As you can see, all eight conductors are connected by twisting with a shift, which makes it possible to do without isolating each of them separately.
All that remains is to tuck the conductors into the cable sheath. Before refueling, to make it more convenient, you can tighten the conductors with a roll of insulating tape.
All that remains is to secure the cable sheath with insulating tape and the twist connection is complete.
The technology of splicing twisted pair cables is discussed in a separate article, “Lengthening twisted pair cables.”
Connecting copper wires in any combination by soldering
When connecting and repairing electrical appliances, you have to lengthen and connect wires with different cross-sections in almost any combination. Let's consider the case of connecting two stranded conductors with different cross-sections and number of cores. One wire has 6 conductors with a diameter of 0.1 mm, and the second has 12 conductors with a diameter of 0.3 mm. Such thin wires cannot be reliably connected with simple twisting.
With the shift, you need to remove the insulation from the conductors. The wires are tinned with solder, and then the smaller gauge wire is wound around the larger gauge wire. It is enough to wind a few turns. The twisting area is soldered with solder. If a direct connection of wires is required, the thinner wire is bent and then the connection is insulated.
Using the same technology, a thin stranded wire is connected to a single-core wire with a larger cross-section.
As is obvious, using the technology described above, you can connect any copper wires of any electrical circuits. At the same time, we must not forget that the permissible current strength will be determined by the cross-section of the thinnest wire.
Why is twisting dangerous?
The main danger is high resistance. In addition, if the connection is poorly tightened or gets hot, then this indicator becomes even worse.
The twisting point acts as a low-resistance resistor. Under the influence of current, thermal energy is released on it. It promotes oxidation of the twist and further deterioration of the contact. As a result, the wires connected in this way simply burn out. Often this is what causes device breakdowns and wiring short circuits.
Burnt twist
Pros and cons of using twists
Despite the risk of fire, twisting is very often used by electricians. This is explained by the advantages that this type of connection has:
- this is the cheapest way to connect wires;
- All you need is a knife and insulating tape;
- ease of manufacture;
- takes up minimal space.
Twisting is the easiest way to connect wires.
There are also disadvantages:
- such a connection is prohibited by the rules of the PUE;
- risk of fire;
- Twisted wires are difficult to separate.
How to make a wiring connection correctly
Connecting wires is required everywhere in rooms, in cars, devices and mechanisms, wherever there are wires. Today the following methods are used:
- Twisting;
- Welding;
- Soldering;
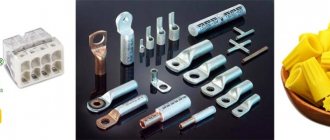
- Using special blocks, terminal blocks;
- Using self-clamping terminal blocks;
- Using PPE caps.
Further in the article we will talk about the simplest way to connect wires - twisting; any home craftsman will be able to put it into practice, for example, when installing temporary wiring is required.
Types of twists
There are dozens of twist options. They differ in the structure of current-carrying conductors, material and complexity of manufacture. If we consider from the point of view of purpose, twists are divided into 2 categories:
- Branch. The 1st wire remains intact. Only a piece of insulation is removed from it. Another wire is wound onto the bare current-carrying wire.
- Extension. Used to connect the free ends of 2 wires of the same cross-section. Cables are lengthened in this way.
Stranded wire branch
How to connect headphone wires
It is recommended to repair broken cables by soldering. To do this, perform the following steps:
- Cut off the damaged piece. Remove the braid by 2-3 cm. The number of cores depends on the type of headphones. The simple device has 4 wires insulated with multi-colored rubber. A twisted pair cable consisting of grounding and signal cables is connected to the microphone. The first one is covered with yellow insulation.
- After stripping all the conductors, twist the copper hairs. Burn the contacts with a lighter, removing the varnish coating. It not only prevents soldering, but also impairs current conduction.
- Treat bare areas with tin. Heat shrink tubing is placed over the wire braid. The same material is used to insulate each core.
- Tinned sections are twisted taking into account the color of the insulation. The connections are heated with a soldering iron until the tin is evenly distributed.
- Check that the work is being done correctly. When sound appears in the speakers, a bandage is applied to the repaired area. To do this, put heat-shrinkable tubes on the twists and heat them with fire. Insulation prevents short circuits.
- Tie the wiring harness together with a thread and slide the thick heat-shrinkable tube that was put on earlier.
Wiring connection tool
Twisting requires a minimal set of tools. First, you need to remove the insulating layer from the cable. A knife or wire cutters are suitable for this. It is most convenient to use a special tool - a stripper. Next, the stripped wires are twisted. If the wire is single-wire, it is advisable to tighten them with pliers. The last stage is sealing the connection. To do this, you should use insulating heat-shrinkable tubes or PVC tape.
Wire Stripper
Advantages and disadvantages
The twisting of wires in the junction box, reinforced by soldering, has high reliability and quality of the fixation point. But this technique also has certain disadvantages. You need to know about them before starting work.
The disadvantage of soldering is the need to purchase a special tool, which you need to be able to handle correctly. The fixation process in this case turns out to be very labor-intensive. The end result ends up being one-piece. To disconnect the wires, you will need to cut them. The conductors will be shortened.
EMPs also limit the use of this approach for residential premises. The use of this type of connection in flammable materials is unacceptable. Over time, the soldering area loses voltage and the electrical conductivity decreases.
Preparing for twisting
Before twisting, it is necessary to remove the layer of protective insulation from the current-carrying conductors. Usually this operation is performed using a knife. During operation, you should try not to damage the metal current conductor with the tool blade. Otherwise, it is capable of breaking in a weak spot. This is especially true for soft stranded cable cores.
If you are going to remove the insulation from an aluminum cable, you must avoid kinking it. This metal does not cope well with frequent deformations. Therefore, an aluminum cable can break during stripping.
Removing the insulation from the cable
Note! Aluminum wire can break even under insulation. This usually happens within 20 cm of the connection. This problem cannot be identified visually. The break is looked for by touch.
Options for twisting stranded wires
In practice, 3 methods of twisting flexible stranded wires are used. The choice of method is made according to the situation and based on the preferences of the master. The methods are:
- serial connection;
- parallel connection;
- thin wire bandage;
Serial twisting
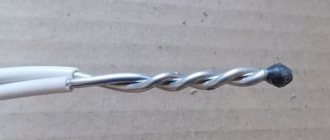
The stripped wires are applied to each other so that they form a crosshair. Then the conductors are twisted together. The connection made is symmetrical relative to the crosshairs. The ends of the wires stick out in opposite directions. After twisting, it is advisable to slightly tighten it so that it tightens.
The method is good due to the compactness of the resulting connection. Its thickness does not exceed 3 diameters of the insulated wire. Care must be taken. If the twist is protected from moisture by a heat-shrinkable tube, then the insulation is put on the core before making the connection.
Parallel
The insulation is removed from the ends of the wires. The cores should be connected so that the stripped sections are parallel. The ends of the wires point in the same direction. The current conductors are then wound onto each other in the shape of a spiral. It is important to make the connection as tight as possible, but not to break the conductors with excessive force.
This twist can be found in the junction box. To protect the contact, electrical tape or heat shrink is used. For temporary and non-essential connections, it is allowed to use a PVC pipe (cambric) for insulation.
Bandage twist
The banded connection of cores is suitable for connecting thick wires that are difficult to bend with your hands or pliers. Current-carrying conductors are laid next to each other. They must first be properly cleaned on all sides using a needle file or file. Then the bare wires are tightly wrapped in a circle with the maximum number of thinner wires. A similar connection is used on power transmission towers.
Important! Do not connect the cable cores in a knot. The contact will be as tensile as possible, but extremely unreliable from the point of view of electrical conductivity.
A common method is groove twisting
First, familiarize yourself with the sequence of steps on how to twist wires with your own hands. Bend the ends of the wire into small hooks, hook them together, and wind one wire around the other.
Insulate the resulting twist to ensure human safety, reliable contact, prevent current leakage and prevent short circuits.
Professionals say that these types of wire twisting can be made more durable by using the following recommendations:
Twisted contacts are additionally connected by soldering or welding, as a result the contact acquires maximum reliability and is almost impossible to break. It is preferable to use soldering when both wires of the connection have a large cross-section.
WAGO terminals greatly facilitate connection, making it more efficient; they are needed when you have to figure out how to twist copper wires with aluminum ones. The whole procedure will take place quite quickly, while the “vags” allow you to connect wires of different cross-sections, the contact will be reliable and durable.
If a home handyman is faced with the task of connecting wires in an electrical outlet or lamp, use WAGO terminal blocks.
Thanks to PPE clamps, the reliability of the connection increases significantly, making it as safe as possible. These products have a low price, so they are available at any electrical store.
- SIP wires: types, differences from cable, features and advantages
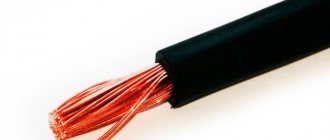
What is a Power Cable?
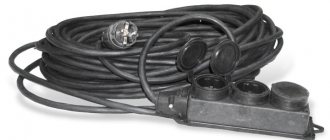
- How to conveniently unwind a cable coil on site during electrical installation
Wires twisted together should not be immediately closed using a junction box. It is better to observe how the electrical network works for several hours, after which it is recommended to check the temperature at the mounting location. If the connection gets very hot, you need to do everything again: most likely, the contacts are unreliable.
The twist itself is not waterproof, so it is better to take a box to connect the wires inside the wall; if without it, then the twist wires will need to be insulated using cambrics.
All you have to do is determine for yourself which twisting method is better and consider methods for isolating nodes.
Features of twisting single-wire wires
Single-core wiring is more difficult to twist than multi-core wiring. There are a number of reasons for this:
- The current-carrying core is made of a rigid metal rod. If the cross-section is large enough, then it will not be possible to bend it with your hands.
- The wire has low ductility. It is susceptible to kinks, so you need to work with it with extreme caution.
- When stripping insulation, the knife blade must be held at an angle of less than 30° to the axis of the wire. Otherwise, the tip will cut into the current-carrying core and damage it.
- Strippings are carried out no shorter than 50 mm. This is the only way to ensure a good connection.
- It is advisable to check the finished twist under load. During operation, it should not heat up more than a solid wire without a connection.
Soldering or welding
The twisting of wires in the junction box will be reliable if it is soldered or welded. To do this you will need to use special tools and materials. After stripping the ends, they are twisted. The actions are similar to a simple twist. But after creating such a connection, the twisted ends are dipped into pre-molten solder. The cores are then lowered into the soldering bath. When the material has cooled, the attachment point needs to be additionally protected with cambric. You can also use electrical tape.
It is also permissible to use a soldering iron. But this method is almost impossible to use if you need to solder 3-4 cores with a standard cross-section (2.5 mm²). In this case, soldering can only be done if the tool has a thick copper tip. It must be characterized by high heat capacity. The power of the soldering iron must be at least 40 W (preferably 60 W).
It is worth noting that cooling the fixation area when using the soldering method in cold water is strictly prohibited. In this case, the fastening will be of poor quality. Microcracks appear in the material due to a sharp temperature change.
Connection of copper and aluminum conductors
The rules prohibit twisting copper and aluminum wires. However, in reality it is not always possible to follow such norms. If you decide to twist copper with aluminum, then you need to consider the following:
- The connecting twist must be easily accessible. Avoid touching the connection with flammable materials.
- Humidity increases the risk of curling. Water will accelerate oxidation, overheating and poor contact.
- The connection is not suitable for power circuits. You should not load it with more than 500 W.
- The resulting contact requires tightness. Moisture in the air will damage the twist.
- It is necessary to periodically monitor the connection status. It is better to replace the aluminum wire with a new one made of copper.
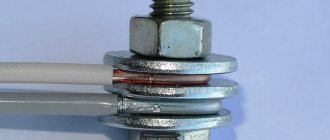
Bolted connection of copper and aluminum wires
Method of connection with the bandage
You need to know how to twist the wires correctly in this case: you will also need to prepare a bare piece of wire.
Before connecting, the wires are stripped and placed side by side so that the stripped ends touch. Use the prepared additional piece for a bandage - use it to wrap the wires.
Connecting wires of different cross-sections
Correct twisting is done with wires of equal thickness. In reality, this is not always possible. From time to time it is necessary to connect wires of different sections. Due to the different sizes of the wires, they will not be able to press properly. Therefore, it is advisable to solder the connection or use some type of terminal block or crimp sleeves.
A common case of such twisting is a branch in the electrical panel of a phase wire to an apartment. To increase reliability, the contact is improved with a “walnut” type connector. Its more professional, but less common name is branch compression.
Twisting method with winding
Strip the wires at the ends and bend them slightly in the middle, hooking the wires together at the bend. Next, alternately wrap the ends of one wire around the other.
To fix the windings and make the connection more reliable, use pliers, tighten everything and carefully insulate it.
Errors when making twists
Most errors are related to the shape, size and tension of the twist. To properly connect two wires, they should be wound evenly around each other. Between the current conductors there should be a maximum contact patch area. It is considered incorrect to wind one core onto another if they have a different cross-section.
Another mistake is twisting it too short. The longer it is, the larger the contact area. This means lower resistance and possible heating. The length of a good twist is at least 5 cm.
When making a connection, it is necessary to select the correct tension. Too much force can break the twist, and too little will lead to poor electrical contact.
When installing wiring, electricians often use various tightening devices. They are a bit with a special attachment for wires, which is inserted into any drill. This device turns the power tool into a semi-automatic wiring installation machine. It is possible to do it yourself. But it’s much easier to buy ready-made ones. For example, the screwdriver attachment from Tundra, in addition to connecting wires, is capable of removing insulation.
Method - twisting wiring with protected ends
Expose the wires by at least 5 cm, cross the ends not protected by insulation, clamp the resulting cross with pliers and twist them together using a rotational movement.
Bend the resulting twist so as to direct it parallel to the wire, and insulate everything.
Insulation methods
Cable connections without insulation are unsuitable for operation. To complete the twisting, it must be protected from the external environment. To do this, you need to select one of the insulating materials:
- rag or PVC electrical tape;
- heat-shrinkable tubes;
- connecting insulating clamp (PPE).
Insulation using PPE caps
Insulating tape is the oldest and most familiar option to every installer. Heat shrink tubing is convenient. Their main advantage is compactness. PPE is the fastest method of isolation. They are made in the form of caps placed on the bare ends of the wires.
Note! There are 2 types of electrical tape: PVC-based and rag. What to choose should be determined based on the situation. PVC tape is more airtight and easier to work with. But it does not stick well in the cold and is capable of unwinding itself from the twist. Cloth tape performs better in the cold. But it is easily soiled and can become saturated with water.
The PUE does not consider twisting as a permitted method of connecting wires. However, such a connection is extremely common in low-current circuits. Without knowing how to twist correctly, you will not be able to connect the cable securely.
Insulating twists with electrical tape
A good twist has minimal contact resistance. The contact should be as strong and tight as possible. If you twist the wires in compliance with these rules and no large current flows through the contact, then it will last for decades.
Additional technological operations
Since the PUE prohibits twisting alone, and it is impossible to connect different materials, the twisting process must end with a terminal block or soldering. To make the connection reliable, the following technological operations are used:
- soldering;
- welding;
- screw terminals;
- crimping in special spring devices;
- crimping.
Soldering and welding when connecting
The only drawback of this operation is the labor intensity of the work. To perform soldering you will need tin and flux. When working with copper, rosin is used as a flux, while for aluminum, highly active fluxes containing oleic acid and lithium iodide are used. If a soldering iron with a power of up to 100 W is enough for soldering copper, then aluminum is welded using a gas heater, the heating temperature should be 400-500 degrees. Solder for copper is lead-tin. And for aluminum containing zinc.
The technology itself is simple, since the thermal conductivity of twisting is greater than that of solder, when melted it transfers to the joint, creating a thin layer. When soldering, large amounts of solder are not allowed; it should be distributed evenly over the entire surface.
Application of screw terminals
Screw clamps, in their operating principle, involve mechanical compression of twisted surfaces using a bolted connection. For this, steel pads are used. The finished twist or individual wire strands are placed under a steel washer and compressed by screwing in a screw. In this case, the clamping is carried out both by the washer itself and only by the screw. The first method is better, since the contact surface is larger.
The terminal block itself looks like a plate on an insulator with a group of contacts. Using terminal blocks, both copper and aluminum wires of different sections are connected.
Using spring devices
Allows for the fastest connections without the use of tools. Wago terminal blocks are widely used. They are produced not only in different sizes, but also for different numbers of connected wires. With their help, single-core and multi-core wires of different sections and types are connected. The wires are combined both individually and with each other. For this purpose, the terminal blocks have a latch-flag, which allows you to lay the wire and clamp it inside after latching. Or use a device in the form of clips.
Using the Wago terminal, you can connect aluminum and copper to each other. But for this, a special paste is used to prevent air from entering, and the wire strands are separated into separate cells.
Crimping of connected cords
If it is necessary to connect large cross-section wires, lugs (sleeves) are used. The wires are stripped and inserted into the sleeves, then the sleeve is compressed using press pliers and the wire is crimped. This connection is considered reliable, but requires specialized tools.
Connecting insulating clamps (PPE) are also considered a kind of crimping. After twisting the wire, depending on the diameter, the caps are screwed on top of the connection, pressing the contact and insulating it.
The last final step after making the connection is to carefully isolate it. Dielectric tape or thermal tube is used as an insulator. The insulation should be 2-3 cm larger than the junction itself. The insulation must be carried out efficiently, otherwise there is a possibility of a breakdown between the wires, which will lead to a short circuit.