Every day, people use phones, tablets, remote controls, and dozens of other electronic devices, usually operating independently from a battery. Gradually, used batteries accumulate at home; some of them are still suitable for use. At the same time, spent disposable sources cannot be stored at home - an electrolyte leak may occur at any time, which can damage furniture and equipment. There are several ways to test a battery for functionality, but each requires the use of a tester.
Testing the battery with a multimeter is necessary to determine its performance.
Content:
These designations for cylindrical batteries are as follows: D, C, AA, AAA.
This order corresponds to a decrease in size. * Another international designation standard has also become widespread: LR20, LR14, LR6, LR03, 6F22. It contains two main parameters that describe the size and shape of the battery, as well as the electrochemical system on which the cell is built.
The first letter in the designation contains information about the chemical structure of the element. If this is the letter “L”, then you have an alkaline battery, if “S” then it is a silver-zinc battery, if it is “C” then it is a lithium battery, if this letter is not there then it is a salt battery.
Battery classification
Portable power supplies are distinguished by shape, size, content and operating principle.
Primary and secondary batteries
Primary batteries, or galvanic cells, are intended for one-time use. Secondary, rechargeable batteries can be returned to service many times with the help of a charger. They are, accordingly, more expensive, but this is more than compensated by the number of recharge cycles. The batteries are marked Rechargeable.
Types of batteries by filling
Batteries are distinguished depending on the composition of the electrolyte and the active metal used in the design:
- lithium is the lightest, most capacious and expensive energy carrier, and has the longest shelf life;
- batteries made with silver work for a long time under heavy loads and are expensive;
- the most popular elements are alkaline (alkaline), they can operate in a wide range of temperatures and under heavy loads, but they discharge quite quickly;
- carbon-zinc, “salt” - the most affordable, quickly fail and do not tolerate cold well;
- The characteristics of zinc chloride batteries are similar to those of salt batteries, but have a higher capacity.
Types of elements by appearance
The most common drives are cylindrical. They come in several types in size: the smallest are pinky, the most popular are finger, as well as medium and large. All cylindrical batteries have a voltage of 1.6 volts.
There are flat batteries with a voltage of 4.5 volts and Krona-type cells, which are shaped like a parallelepiped and have an operating voltage of 9 volts.
The performance of power supplies directly depends on the power consumed by the device. For example, in electric motors and video cameras, even a slight decrease in voltage will disrupt operation. While in devices with low energy consumption, watches and flashlights, a decrease in voltage may not be noticed for a long time.
Reference! Batteries discharge unevenly. If the equipment does not work well, do not throw away all the batteries at once. They need to be checked by a tester, working ones should be selected and used.
How to make a device with your own hands
When the necessary equipment is not available, you can make the device yourself by watching the video. It is necessary to take a voltmeter from ready-made instruments, and the remaining parts are constructed from improvised means. Difficulties will arise when calculating and creating internal resistance, which requires current.
A suitable material is nichrome wire, used to create heating coils in electric stoves. Nichrome elements can be replaced with a metal strip from other heating devices.
For a voltage of 12 V, the current indicator should be within 80-120 Amperes, and the resistance should be 0.1-0.15 Ohms. A device for measuring such resistance is difficult to find. For this reason, the length of one element is selected and the current that it passes is measured. After this, several similar parts are combined.
A homemade device is made sequentially:
- Select a nichrome wire or heating strip and measure the current up to 15 A with a multimeter. The element should pass 10-12 A.
- 10 such parts are connected, receiving a load of 100-120 A. The wire must be twisted securely.
- The resulting element is placed in a suitable housing and fixed in it. If the box is small, then the wire is bent several times so that the turns do not touch each other. The parallel connection must be reliable, which is ensured by insulating cylinders that are installed on the bends.
- The ends of the twist are soldered to the output contacts, and from the outside to the connecting wires.
- Connect a voltmeter.
- Clamps are attached to the ends of the connecting cable, which are then connected to the battery.
When the device is ready, you can take measurements at home.
Safety precautions
It's easy to check the current strength. It is enough to connect the multimeter in accordance with the operating rules. It is necessary to follow the instructions in order not to violate safety precautions:
- The device is connected in a de-energized state.
- Pre-inspect the insulation on the wires. With a long service life, its integrity is compromised. There is a possibility of receiving an electric shock.
- You only need to measure amperes while wearing rubber gloves.
- Measurements are prohibited in rooms with high humidity. Moisture has high electrical conductivity. The risk of injury increases several times.
- Anyone who has suffered an electric shock, regardless of its power, must be urgently taken to the nearest medical center. It is forbidden to work with electricity alone. In an emergency, your partner can call an ambulance.
- It is strictly forbidden to work with devices that spark or are broken when connected to analog power sources, for example, to a battery, batteries or power supply. All this can lead to electric shock. Not too strong, but capable of harming the human nervous system and heart.
- It is forbidden to use a multimeter after an impact, just as it is forbidden to glue it with tape or insulating tape. It is better to use a new device or entrust it to a specialist for repair and testing for suitability.
After using the multimeter device, the cables that were cut are connected with the circuit de-energized.
Damage is corrected with electrical tape
A multimeter is a device that is simply impossible to do without in everyday life and other areas. Having even the most minimal knowledge of its operation, you can repair the devices. Knowing the indications, it is easy to determine their unsuitability.
Checking electric batteries with a multimeter under load
The remaining elements are retested. Let's now figure out how to check the battery capacity under load. To do this you need to proceed as follows:
- Connect the multimeter probes to the contacts of the battery being tested.
- Connect the load element in parallel and wait 30-40 seconds.
- Take the result.
Depending on the readings of the device, the measured elements need to be sorted. Batteries with a remainder of 1.1V or less can be safely scrapped. Products, when tested by the device, showed up to 1.3V, can be used in remote controls. If the element under load shows 1.35V or more, it is fully operational.
Capacity Definition
The capacity of a battery is a value that determines how long it can work as an energy carrier for a circuit at a certain current. It is expressed in ampere-hours for powerful batteries and milliamp-hours for small ones. For example: if the AA battery says 1000 mA ⋅ h, then, with an output current of 1000 mA, it will be discharged in an hour.
It is possible to determine how to measure the battery capacity with a multimeter only if you have a rechargeable battery, since to measure it you will need to completely discharge it. After this it will be impossible to use a galvanic cell. To determine the battery capacity using the test discharge method, you need to:
- Select a load resistance that provides a battery discharge current of 100 - 200 mA;
- Connect the battery, load, and multimeter in series in DC measurement mode. The battery must be fully charged;
- Connect a second multimeter in parallel to the battery terminals in DC voltage measurement mode;
- Immediately after connection, start timing;
- Determine how long it takes for the battery voltage to decrease by half. This will be considered its full discharge;
- Multiply the discharge time by the current during the experiment. If the current has changed, you need to determine the average current. The resulting value of the product will be the value of the battery capacity.
Voltage
Before checking your battery with a multimeter, it is advisable to choose a high-quality model from a trusted manufacturer.
Unfortunately, there are also cheap devices and Chinese counterfeits on the market, for which you cannot count on high measurement accuracy or long service life.
If you do not know how to check the current battery charge with a conventional multimeter, the instructions below will help you with this.
There is nothing complicated about measuring voltage. You can handle this task yourself.
There are literally a few steps to understand how to properly check the battery charge, that is, the voltage in it, using a multimeter.
- Switch the device to DC voltage measurement mode.
- Set the threshold value to 20 V, since a regular car battery cannot have more.
- To measure the voltage of your battery, you need to use a multimeter, or rather its probes, to connect to the terminals of the same name on the battery.
- After a few seconds the display will show the value. Normally it should be around 12.7 V if there is no load.
It also happens that you cannot check the current charge of your battery with a universal tester, since the - sign is displayed on the display.
This is a common mistake among beginners. The user simply connected the probes incorrectly. That is, the plus went to the minus, and the minus was connected to the plus. Hence the data on the display.
There is nothing to worry about if the probes are out of place when measuring voltage. But it’s better not to make such mistakes.
If you were able to measure the voltage of the car battery, you can move on. After all, with a multimeter you will be able to obtain a number of useful information about the condition of the battery.
Factory and homemade battery testers: review of models
Chinese industry has launched a mass production of cheap electronic devices that make it possible to quickly assess the real condition of any galvanic element. It is enough to insert it into a stationary socket and the test result will immediately be displayed on the display.
The cost of such testers does not exceed a few dollars, and delivery is free.
View more details and order tester BT-168D
As an example, I show the BT-168 tester. Its scale is made of colored sectors, indicating the current state of the current source. The position of the arrow indicates the remaining charge:
- green - normal;
- yellow - acceptable;
- red - for scrap.
A similar model of the BT-168D tester works the same way, but shows the voltage value at the terminal terminals of the current source in volts. A reference table for decoding the values is available on the back of the case.
The universal battery tester has similar capabilities.
Its design and appearance can be made in various ways to test all types of existing batteries.
However, the internal structure of all these devices is approximately the same: an electronic board with a chip and configuration elements.
I suggest watching a more detailed overview and capabilities of such devices in the video of the owner of “China Good Bai” using the example of a tester for batteries of C, AA, AAA, D, N, 9V formats.
I understand the desire of some home craftsmen to do everything with their own hands. I am publishing the next section for them.
How to check the CR2032 battery with a multimeter on the motherboard?
You can check the BIOS battery with a multimeter by removing it from the board. But if the plus and minus contacts are visible, you can touch them with the probes of the measuring device and take readings.
As you can see, this is a CR2032 battery with a voltage of 3 V. Accordingly, if the voltage during the test is lower, then it is better to change the battery. But usually such a button battery is not replaced for 3-5 years. It requires replacement if the date on the computer starts to go wrong on its own or if all sorts of computer glitches appear.
The battery shown in the picture needs to be replaced. He also reads about this species here: https://batareykaa.ru/batarejka-dlya-materinskoj-platy-i-ee-zamena/
Non-standard solution to the issue
In this case, the load fork is made in an even more interesting way, using a sewer pipe carefully cut in the longitudinal direction.
Here is a diagram of the plug design, designed to test the resistance indicators of 12-volt batteries with a capacity of several tens of ampere-hours:
- constant wire , 12 turns with an internal winding diameter of 38 mm;
- M8 studs are welded to the ends of the wire ;
- all this can fit perfectly into a sewer pipe if its diameter is 50 mm ;
- the gap is closed with a second piece of the same pipe;
- are installed on the sides , and the structure is ready.
Technical parameters: resistance value is about 0.1 Ohm , current at a voltage of 12 volts is from 110 to 120 amperes . The duration of the load in this case should be minimal, no more than 3-5 seconds (unfortunately, the device heats up very quickly). All battery indicators are measured in the same way, using a voltmeter of any type. When creating such a plug, it is recommended to use the table for calculating the resistance of wires of various lengths.
How to choose a charger?
It is best to take a battery charger with a charge indicator. This device will allow you to clearly see all the information on the display, and this is very convenient.
To get what you need, you should pay attention to the following things:
The batteries must be the same size as the charger. It is best to take the battery and charger from the same manufacturer
Universal devices are more expensive. It would be desirable to be able to charge several batteries at once. Pay attention to the plug-plug of the charger. Make sure that the cord and plug are connected to the device. If it merges with the device, it may fall out of the socket. Auto charger shutdown. Device power
The charging speed depends on it. The higher the better. Built-in indicators and display. All this will allow for high-quality process control.
If it merges with the device, it may fall out of the socket. Auto charger shutdown. Device power. The charging speed depends on it. The higher the better. Built-in indicators and display. All this will allow for high-quality process control.
You should not buy cheap chargers as they can damage the battery, and in general they are not very convenient. More expensive devices perform channel charging, that is, each battery is charged separately and is supplied with a separate module. They also have many useful functions that allow you to properly charge the battery.
Determination of the amount of residual charge
When the galvanic cell begins to discharge, an increase in its internal resistance is simultaneously observed. In other words, there is a decrease in the current charge or energy intensity that provides power to devices and radio equipment. This property makes it possible to measure the remaining charge in the battery. Measurements should be taken with a digital multimeter rated for a minimum current of 6 amps.
The device is set to the maximum current measurement, after which the probes need to touch the terminals of the element. When turned on in this way, the battery goes into an operating mode close to a short circuit, which makes it possible to measure the residual charge current of the battery. Based on the results of measurements, the elements with the highest current are considered the most suitable.
To obtain the most accurate results, it is recommended to first measure the charge level in a new and discharged battery. For this purpose, the switch is switched to current measurement mode and set to 10A. The positive red probe must be inserted into the 10A socket. The black negative probe remains in its place in the COM socket.
Then you need to touch the terminals of the new battery with the probes. The probes are immediately removed as soon as the current value on the indicator stops increasing. The measurement duration should not exceed 1-2 seconds due to the harmful effects of short circuit mode. The current in a new battery is usually from 4 to 6 A.
If, when checking the battery with a multimeter, the readings are 3-4 A, this element can be used in portable equipment for a short time. If the reading is below 3 A (1.3-2.8), the battery is only suitable for low power consumption devices, such as a remote control.
I don’t know about you, but I constantly collect a bunch of different batteries from household gadgets. They have to be sorted periodically, and some must be sent for scrap. To do this, I use various methods of electrical measurements.
In this article I tell you how to test a battery using a multimeter using accessible methods and explain how to properly store and operate it.
How to check the battery
When learning how to measure battery capacity with a multimeter, you need to consider the procedure for a vehicle battery. A full check of the autonomous power source will allow you to avoid problems in the vehicle’s electrical network and extend the life of the battery.
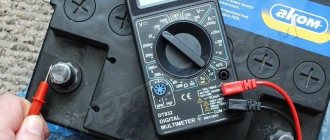
First, the battery must be disconnected from the machine system. It is allowed to disconnect only the “minus” contact. Next you need to turn on the multimeter. The test mode is set to the range from 0 to 20 V.
The multimeter probes are connected to the battery contacts. A red wire is connected to the positive terminal, and a black wire is connected to the negative terminal. If this procedure is performed correctly, the measurement result will appear on the device screen.
Measurements while the engine is running
Place the car on a level surface, open the hood, put the handbrake on and start it. When the engine is running, the generator and voltage regulator operate, which charge the battery. Therefore, the voltage at the terminals should be within 13.5-14 volts. In some cars, when the battery is discharged and the air temperature is low, the electronics automatically increases the voltage to speed up charging. In this case, it should fall smoothly as it charges. If this does not happen, the electrolysis process is activated in the banks. The electrolyte will begin to boil away rapidly. Overcharging is especially dangerous for modern gel batteries with limited gas emissions.
A voltage of less than 13.4 volts is a sign of undercharging. Operating in such conditions promotes sulfation of the plates and shortens battery life.
When measuring voltage, you need to turn off all powerful consumers: headlights, heater, audio system. Otherwise, the power of the generator when idling will not be enough to maintain the optimal voltage level.
There are several possible reasons for low voltage at the terminals:
- Poor contact.
- Generator failure.
- Voltage regulator malfunction.
You cannot operate a machine whose battery is in undercharge mode. The cause of the failure must be immediately localized and eliminated. If the voltage at the terminals and the output of the generator is very different, you need to clean the contacts on the battery with sandpaper or a file.
After checking without load, you need to turn on the headlights and other powerful energy consumers, add engine speed and repeat the measurements. If at high speeds under load the voltage drops to 13.4 volts or lower, diagnostics of the generator system and control unit is required.
How to test a battery with a multimeter with the engine turned off?
The average indicator, when checking the battery with a multimeter, with the engine not running, should be in the range of 12.5–13 V, with the upper value indicating 100% charge, and the lower value indicating 50%. The numbers are approximate, but the general picture is easy to understand. Also, do not forget that you should take readings immediately before the trip, and not after it, as soon as you have turned off the engine. It is especially good to carry it out when the car has not been used for some time, for example, in the morning after a night in the garage. This shows how well the battery can hold a charge.
Now you understand how to check the charge of a car battery with a multimeter. This device is worth purchasing for every motorist. Some rely on the on-board computer, but it does not provide sufficient accuracy. The built-in voltmeter is connected to the circuit of devices that consume energy, and not directly to the battery, therefore, part of the electricity is consumed “on the road”.
How do you know if the battery is working or not?
Below are a few options from the craziest to the most practical.
Method No. 1. The craziest.
Take 2 batteries and connect them in series, positive to negative and negative to positive. Next, wet your finger and place the negative end of the battery on it. Place your tongue on the positive one. If it pinches, then the battery is working. But don't get carried away with it.
Method No. 2. Be careful.
Pay attention to the appearance of the power supply. If liquid or oxidation is noticed on one of the poles, the battery is unusable
It is best to take it to a collection point.
This means that this battery has run out, that is, it has run out.
Method No. 3. 100% working!
To find out whether the battery is working or not, you will need a regular tester. Otherwise it is called a multimeter. Using this device you can measure the number of amperes and voltage. Such information will 100% answer the question of suitability.
It is necessary to measure the current during a short circuit. If it is less than 0.3 ampere, then such elements are considered unusable. The average ones are with a current of 0.3 to 0.7 amperes. If the current is more than 0.7 these are very good batteries!
AA batteries can also be checked by measuring voltage. If it is 1.3-1.5 volts, then in principle such an element is suitable for use.
Method No. 4. Checking with electrical appliances!
The following devices are used for this:
- Micro motor.
- Incandescent lamp 1.5-3 volts.
If the motor rotates well for 1-2 minutes, the battery can be considered working. If the engine spins normally at first, but then becomes slower and slower, you should discard the battery.
With a lamp things are almost the same. A long, bright light indicates good operation of the power supply. Well, a dim and weak glow indicates that the element has already served its purpose.
Method No. 5. Sustainability.
This method of determining whether a battery is working or not is as follows:
- Take the battery in your hands and lift it above a flat surface.
- Raise to a height of 1-3 centimeters.
- Then release the battery.
If the power supply falls, it means it is unusable. The one that will stand is quite suitable for use. While performing this experiment, make sure that your hands do not shake.
The method is not reliable as it has a high error. A fully functional battery may fall.
Suitable for testing alkaline or alkaline batteries. They contain electrolyte in the form of a gel. The presence of this substance prevents the battery from bouncing off the surface too much. When the element is discharged, the gel inside it hardens. This leads to increased jumpiness of the battery, and it falls.
Tip: If your TV remote has run out of batteries and is not working, check them with a multimeter. It is known that batteries discharge unevenly. Therefore, one battery will definitely have a higher voltage, and the other one will have a lower voltage. Where the voltage is low, you can take it to a collection point, and buy a new one for the remaining one.
Thus, using 5 ways to check, you will know whether the battery is working or not!
General information
A multimeter is a compact multifunctional device used in electrical and electronics. The device is also called a tester.
Using the device you can determine:
- mains voltage;
- current and voltage supplied to a specific circuit element;
- operability of some electrically dependent devices;
- determine the battery capacity of a portable device;
- detect a damaged section of electrical wiring in the room.
Using a multimeter, you can determine the input and output voltage on transformer installations, power supplies and network adapters. The device is also used to test electric motors for performance in the event of breakdowns or malfunctions. Multimeters are actively used to check the load current in electronic units, relays, and other automation elements.
Measuring instruments
To check the performance of the battery, several devices are used and a number of simple manipulations are performed:
- A multimeter is an affordable and convenient device that allows you to determine the condition of the battery with acceptable accuracy.
- A load fork is a device that allows you to simulate the starting load on the battery when starting the engine and at the same time measure the voltage drop at the battery terminals.
- A hydrometer is used to check the density of electrolyte in battery banks.
- A specialized window on the battery case is a color indicator of the charging status of maintenance-free and low-maintenance batteries. Green color indicates 100% charge, white indicates low electrolyte level, and black indicates the need to charge.
Recording phone battery parameters
The battery capacity of the phone is checked using a multimeter, a clock, a resistor and a charger. A fully charged battery is discharged using a resistor and then put back on charge. During the process, the duration and strength of the charging current are controlled.
If you measure only the battery recovery time, you can get a lower value than indicated in the phone's passport. This is due to the fact that the manufacturer indicates A*h when restoring by charging 3.8 V, and the standard voltage on standard chargers is about 5 V. Taking into account the charging efficiency, the voltage drops to 4.5 V.
To calculate, you need to multiply the charging amperage by the duration of full recovery, and then additionally take into account the coefficient of 4.5 V/3.8 V.
If there is no load element, you can discharge the battery with the smartphone itself.
A simple test of the battery capacity with a tester and subsequent clarification
A USB tester is often used to measure battery capacity. The device has many functions that allow you to find out the battery capacity of a smartphone, tablet and external power bank.
The USB tester connects to any portable device via a cable or adapter.
The obtained indicators help determine battery wear. The tester has a control button designed to measure various indicators. With its help, the operating modes and memory cells of the device are switched.
When the connected device has the required voltage, the tester starts working. The battery capacity value appears in the bottom corner. The tester does not give a 100% correct result.
For this reason, you can use mathematical calculations using the formula: initial current indicator * 3 = actual battery capacity. Some manufacturers list a rated capacity on the device that is higher than the actual capacity. This information is incorrect and is an advertisement.
Without a multimeter
There is a simple, popular way to check the capacity of a battery if you don’t have a multimeter at hand. Vertically drop the battery from a height of 20 cm onto the floor or other hard surface (table, stool). Keep an eye on the product. Upon impact, the battery bounced up a few centimeters, which means it is discharged. If, on the contrary, it fell on its side without rebounding, it is charged.
The idea is that the gel contained within the writing element dries out over time. As long as there is enough of it in the battery, when it falls, it softens the blow, and the element simply falls on its side. In a shrunk product, the dried gel is no longer able to extinguish kinetic energy. The method is entertaining, but does not always work.
Scientific explanation
As for bouncing, the scientific explanation is as follows.
An alkaline battery has a positive anode (zinc) and a negative cathode (manganese dioxide).
Initially, there is a gel-like mass inside the new charged element. When a battery is dropped from a height, it absorbs the entire impact and takes it upon itself.
With gradual discharge, the zinc is converted to zinc oxide (a solid). The more discharged the battery, the more zinc oxide it contains, which fills the entire internal space of the jar.
Bridges appear between the zinc oxide particles, resembling many springs.
This chemical element (zinc oxide) is even specially added to golf balls.
Although this test is the simplest, it is not worth relying on it 100%. If possible, be sure to double-check your results with a tester.
The fact is that jumping ability often depends on the shape of the “bottom” of the battery. If it is flat and perfectly level, then it will be more problematic for such an element to jump.
In the case of a convex base, the jumping ability also increases.
Moreover, such a trick is not applicable to all batteries. It all depends on their filling.
If there is initially a set of several “tablets”, and not a gel-like mass, then they will behave completely differently.
It’s bad that you can’t test the car’s battery for jumping ability.