It’s rare that a driver has never experienced a tire puncture. If there is a car repair shop nearby, this does not become a big problem, but if for some reason it is not possible to turn to a specialist for help, you will have to do the repairs yourself. How the repair work is carried out depends entirely on the type of tires used. The easiest way to deal with a puncture is to have wheels that do not have tubes. This type of tire can be repaired without even removing the wheel using a so-called “first aid kit”. You can even ride on a broken tubeless tube for quite a long time, provided that the object that damaged it is in the hole. In the place where there is a puncture, there will be a constant air leak and this will require constant pumping. But even in this case, high-quality repairs can only be carried out from the inside, which will also require disassembly. It is almost impossible to repair a tube wheel without first disassembling it. This is due to the fact that the broken chamber must first be removed for repair.
The procedure for disassembling the wheel yourself.
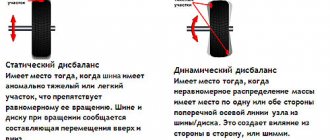
Installation of symmetrical tires
Symmetrical tires do not have sides or specified directions when the wheel rotates. Thus, their installation is carried out regardless of location. It is also worth noting the fact that improper installation of directional or asymmetrical tires will lead to deterioration in directional stability, aerodynamics, control and balancing when turning. In addition, this will cause wear and deformation of the car wheel.
When tires do not perform their intended function, the wheels lose their factory characteristics and properties. Therefore, forced driving of a car with incorrectly installed tires should be calm and uniform. That is, you cannot turn sharply and accelerate over 80 km/h. In this case, it is also not recommended to perform sharp braking. Or better yet, don’t take any risks at all and install tires depending on the direction of rotation of the wheels.
Disassembly experiment
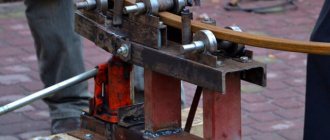
We apply our device to the disk. In this case, its hook should protrude from the mandrel by 7–8 cm. For reference, this is one hole on the retractable rod. We press the device with our hand on one side so that it goes under the protrusion of the disk, and place the hook under the disk on the opposite side. We move the levers of the device in different directions. The main thing is not to try to throw off the tire right away, but to move it off the hump gradually. Otherwise the tire may be damaged. Please note that the device should not be inserted next to the wheel valve.
Pulling out and moving the tool, we slowly move the tire from the hump along its entire circumference. You can hold the side of the boarder where there is no hook with your foot. Having removed the tire on one side, turn the wheel over and do the same work on the other. Don't forget about lubrication. By the way, it is not necessary to use liquid; a silicone compound will also work.
We removed the tire from the humps on each side. All that remains is to take the mounting blades and completely remove the tire from the rim. We treat the belt with penetrating lubricant. It is advisable to get on the inside of the wheel rim, this will make things easier. We place the first blade under the tire. This is convenient to do in the area of the wheel valve. We move the installation to the side in advance so as not to damage it during work. We hold the assembly with our foot. We insert a second spatula next to it and lift the edge of the tire with it. We do this along the entire inner circumference, also gradually. We removed the tire from one side of the rim, all that remains is to do the same on the other. Turn the wheel over. We place the blade behind the disc and begin to remove it from the tire. Once we have succeeded, we can consider the work finished.
Dismantling the wheels yourself is easier than it seems. The main thing is to stock up on the necessary tools and free time, and also take into account the characteristics of the rubber.
Please send all questions and suggestions regarding the “Technical Environment” series of issues to the following address. Other issues of the “Technical Environment” are available in our special project, as well as on our YouTube channel. Replacing car tires can be a seasonal or necessary measure. In order not to go to the tire shop every time, you can disassemble the car wheel at home. This will provide an opportunity to save the family budget.
Wheel flanging
- Insert the nipple into the hole on the rim. If this is a Presta nipple, then do not forget to tighten the nut. Align the tube between the tire and rim.
- Lightly inflate the chamber. This will allow you to avoid getting it between the rim and the mounting blade when beading.
- Seal the tire by hand as much as possible. As a rule, modern tires allow you to do without additional tools when beading, but this rule does not always work. In some cases, you will still have to tuck the tire into the rim using blades.
- Insert the assembled wheel into place. Tighten the eccentric. In the case of a V-brak, do not forget to fasten it back. In the case of a disc brake, a small unpleasant surprise may await you. Removing the wheel can change the distance between the disc and the pads and disrupt the adjustment. Most often, this violation is not critical, but further minor adjustment of the brakes may still be required.
- Bring the pressure in the chamber to the required level. There is no need to wait until the glue dries, since the pressure of the chamber against the tire acts as a press.
That's it, the bike is fixed, the puncture is repaired. You can go further.
Beading a wheel with your own hands - advice from professionals
Not knowing how to bead a wheel on a car themselves, motorists are faced with the following problem: the tire is already put on the rim, but there is no tight fit, and, therefore, it is impossible to inflate it.
In tire fitting conditions, this is done in a matter of seconds by applying excess pressure. But in road conditions, special equipment is not available.
So how can you bead a wheel on a car yourself?
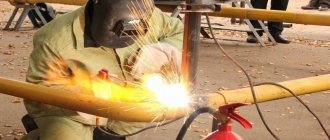
Russian ingenuity comes to the rescue. A small amount of gasoline or other flammable substance is poured inside the tire and set on fire. When ignited, the vapors sharply push out the air, create the necessary pressure and seat the tire on the disk, sealing the joints.
Craftsmen have found, perhaps, the easiest way to bead a wheel - using gasoline! But the amount of fuel to be poured will have to be determined by eye - the exact indicators for achieving the optimal effect are unknown. All you have to do is not to overdo it, otherwise the wheel may explode.
When the tire is firmly seated on the rim, inflate the wheel and check its tightness. If there is no noticeable etching of air, you can continue on your way.
A tire puncture is a very common phenomenon and almost every car owner has encountered it. This malfunction does not cause problems if there is a tire service station nearby, where repairs will be carried out quickly and inexpensively. But it’s not always possible to seek services from such a service point, but you need a car and don’t have a spare tire or it’s already in use. In this case, you will have to do the repair yourself.
Restoring the integrity of the tire directly depends on its type. Tubeless products can continue to be used, but provided that the element that punctures it remains in the tire. Of course, there will be an air leak at the puncture site and the tire will have to be pumped up periodically, but you can drive. Additionally, the tubeless can be repaired using “first aid kits” for recovery. They allow you to carry out repairs even without removing the wheel from the car.
But it is impossible to repair tube wheels without disassembling them. To repair a puncture in the chamber, it must first be removed, and this is the main problem. Note that even with tubeless tires, the highest quality repairs can only be performed on the inside of the tire, and to do this it must be removed from the rim.
Nuances of the work
Disassembly would not be a problem if not for one feature. During the operation of the car, the tire at the point of contact with the rim is gradually “welded” to the metal. And this nuance causes the most problems during disassembly.
Video: do-it-yourself home tire fitting
At tire service stations, special presses are used to break the “weld,” so all the work looks very simple. In field or garage conditions, rubber tenaciously “holding” to the metal can cause a lot of trouble. But it is still possible to solve the problem.
So, the main task when disassembling a wheel is to separate its edge from the disk, along the entire circumference and on both sides. The rest of the disassembly process is not complicated and is very easy and quick, but safety precautions must be observed.
What you need to know to bead a wheel
Re-flipping wheels requires certain “available means”, time and effort. Many, most likely, have observed how newcomers to driving a car try to remove a “stuck” tire from the rim of a wheel rim by beating a hammer on a screwdriver. This is a mistake and it is prohibited to do so. Even if initially the “injuries” on the tire are not visible, after a certain period they will “remind” themselves.
White spirit can also be used. It is necessary to process the product in the “welding” area and when 120 seconds have passed, the tire will easily move away from the car rim. After this, it is important to walk over the treated area with a dry cloth.
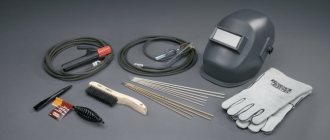
Do-it-yourself wheel disassembly is carried out using the following tools:
- jack;
- spanners;
- mounting blade – 2 pcs.
In order for the wheel to be beaded without problems, it is necessary to remove it from the car. Next, using a steel angle, you need to remove the tire from the rim: to do this, the angle is driven between the rim and the rubber and force is applied.
Wheel beading begins on the side opposite the spool. The tire goes flat. The end of the device should be properly rounded for comfortable removal of rubber and to avoid damaging the tire.
Only after turning the entire surface of the tire side onto the outside of the rim can you carefully remove the tube. Here's how to trim your wheels. Assembly is performed in the same way, but reverse to disassembly.
Useful tips
When performing tire fitting work, the following recommendations should be taken into account:
- The extreme part of the lining should not be subject to serious mechanical stress. This is due to the fact that if you make a mistake, you can create serious problems for yourself in the future with the installation of tires. The most difficulties arise when installing tubeless tires.
- The edges are lubricated with grease to eliminate the possibility of damage to the rubber. It is worth considering that the tire should be lubricated every time it is installed. By using a lubricant, the likelihood of a rupture in the rubber is significantly reduced.
- At the time of installation, it is recommended to use a soap composition or another with lubricating properties. Their use greatly simplifies the installation process.
- When installing rubber on the disc, you need to ensure that there is no gap between them. This can lead to the tire starting to flatten or the outer part of the rubber to become damaged.
- On sale you can find quite a few different special kits for installing tires. Their use allows you to significantly simplify your work. Special kits include sealing harnesses and mounts of various sizes.
Advice from experienced people
How to make a machine with your own hands:
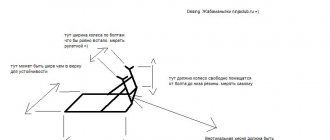
- The angle between the beading tip and the lever must be made sharp: the smaller it is, the better the rubber will fit on the disc. But this angle cannot be made too sharp, in which case the lever will scratch the disc when beading. We need to find the optimal degrees of angle.
- It is better to do a homemade tire changing machine with your own hands using drawings. You are quite capable of preparing them.
- Consider mounting it to the floor. The machine itself is lightweight, so it must be attached securely. If the floor is concrete, secure the machine with anchor bolts. If the floors are wood, use self-tapping screws.
- To reduce damage to rims and wheels, lubricate the tips and wheel rim with a thick soap solution. And don't forget to wash the wheel before work.
- Sometimes wheels may differ in the number of holes for fastenings and the distances between them. For such cases, we make metal adapters with studs 1 cm thick.
Peculiarities
On the road, the driver will be able to benefit from special kits for repairing tubeless tires. In case of severe damage, you can get to the repair site by placing a regular camera of suitable size inside the deformed tubeless camera.
It is not necessary to use a wheel bead to fit a tubeless tire onto a rim. Silicone lubricant and thin mounting will help in this process (300 mm is suitable for 16-inch wheels). The problem arises when inflating the tire; it is necessary for the bead of the element to jump over the hump of the wheel. This is not so easy to do, since it requires a significant volume of air, which is not provided by standard automotive compressors.
15-20 grams of ether contained in the “Quick Start” kit can help solve the problem. This option is also perfect for the winter. With this method of pumping, the main thing is not to overdo it with the amount of fuel.
Necessary tools for flanging flanging
If there are no blades, you will have to use improvised means. However, this greatly increases the risk of damage to bicycle parts. To be fair, it must be said that in most cases, trimming can be done without using a tool. However, this does not always happen, so there must be edits.
Moreover, they cost mere pennies, cheaper than a camera. They take up very little space and are very light. Their presence will not burden you even on a long trip, and the convenience of their use is worth a lot. You can buy mounting blades at almost any bicycle store.
Wheel beading machine: how to make it yourself
You can make the machine equipment yourself. To create the frame part that will serve as the base, experts advise using metal profile pipes. There must be at least 700 mm between them.
Two tubes are arranged in parallel and welded with a steel angle. The profile of the smallest standard size is also suitable. As an additional component, you can build adjustable legs.
When the base is made, you need to attach the tube to the frame part. Its radius is sufficient within 10-15 mm. Before welding, the flange part must be welded in advance at 400-600 mm from the floor. Vertically you need to make fasteners, which are created in the form of a steel plate. It will be needed to mount the device as a lever. The main purpose of the lever is to remove rubber from the disc rim. The lever part is a pair of shoulder and paw elements, which acts on the rubber itself.
You can also dismantle the wheel in a garage with your own hands. The main thing is to do everything correctly and not to rush. Only by listening to the advice of experts can you guarantee the success of the tire removal event.
What is it for
Situations when you have to change a tire yourself are rare. Typically this is:
- puncture of the camera on the road;
- damage to the wheel rim;
- changing tires due to seasonality or failure of the previous tire.
Puncture of tube rubber
The process of disassembling is the removal of rubber from the disk. Every driver should know how to do this at home in order to quickly solve the problem without resorting to the services of qualified specialists.
Important points and conditions for proper disassembly
There are a number of nuances, the observance of which will help with proper disassembly at home. Here they are.
- When preparing to disassemble wheels using mounting blades, you need to remember that this is a labor-intensive task and working with mounting tools requires a lot of physical strength. To make it easier to work with a spatula, it makes sense to increase its length by putting a piece of metal pipe on it, for example. The lever arm will thus be longer, and less effort will be spent.
- Before starting work, you should inspect the edges of the mounting blades. They shouldn't be too sharp. If necessary, they should be blunted with a file.
- You should never use a screwdriver in tire fitting work, even if its tip seems dull: in this case, the risk of damaging the tube increases many times over.
- Do not start removing the tire from the place located next to the spool. If you start from there, you can simply tear it away from the camera. You need to start inserting the mountings on the side opposite to the spool.
- If the tire is being changed on only one wheel, the tire must be the same type as the others. If these are summer tires, all tires must be summer tires. If it’s winter, everyone should wear winter clothes. You should also keep in mind the tire size. It should match the tires on the other wheels.
- Tire fitting work must be done on a hard, level surface. Under no circumstances should sand, small stones or dirt get inside the tire being mounted. When the car is moving, all this will act as an abrasive material and will lead to very rapid wear of the camera (even if it was new).
As you can see from the article, even a novice car enthusiast can replace a tire on a car with his own hands.
The main thing is to be careful and not to use too much force when separating the tire from the rim. Because even minor damage to the tire during this operation significantly reduces its service life
Reading time: 5 minutes
The answer to the question of how to disassemble car wheels yourself at home is of interest to every motorist. Many car owners prefer to remount the car themselves, not trusting the service technicians, since there are cases when the car tire “sticks”, and an incompetent car mechanic can simply ruin the car’s tires. Therefore, it is worth remembering how to bead the wheels yourself, then you can have 100% no doubt about the success of the disassembly.
What might be the complexity of the process?
First of all, the difficulties are related to equipment. At home, as a rule, there is no professional machine. However, many craftsmen who often carry out beading make it with their own hands. You also have to tinker a lot with a wheel that has been in long-term use. In this case, the rubber sticks to the disk on both sides; it must be carefully removed along the entire circumference, gradually moving from the spool forward along the rim.
Other nuances that may cause difficulties:
As mentioned above, the main reason for disassembly is forced. By monitoring the tire pressure, the driver detects a critically low level. It is impossible to operate the car in this form: road stability decreases, control deteriorates, and fuel consumption increases. You can, of course, replace the wheel by installing a spare tire. But it happens that she doesn’t hold air either.
Various sorting methods
The main difficulty in the process is that even the driver’s own weight is not enough to create the force to separate the tire from the bead. This can also be affected by the loss of elasticity of the rubber.
For separation, even a collision with a car on the wheel being repaired is used. Load distribution is ensured by a wide and durable board about 1-1.5 m long. The disadvantages of this non-impact method are that in some cases the rubber deteriorates. It is advisable to do this operation together in order to regulate the force and speed of the car. This option is suitable for those who want to learn how to dismantle a car wheel at home, but at the same time their car is on the move.
The most popular method is percussion. It uses a mounting bracket and a massive sledgehammer. This method was used by all drivers and tire service workers before the advent of mechanized devices. In the corner it is necessary to blunt all problem surfaces that can damage the tire.
Many non-impact methods use force, which is developed by a car jack. In some methods, even the type of jack and its design features are not important. A car can serve as a fulcrum in road conditions. Having fixed and installed the jack on the point of influence, we begin to apply force until we achieve the result
Care must be taken to ensure that the device does not fall off
Impact method
Without the participation of a car, for dismantling you will need, in addition to a jack, strong straps and a reliable metal rod, which can be replaced by a long open-end wrench or a mounting spatula. First, a duct with a fixed loop is placed under the wheel. A jack installed at the dismantling point is placed under the webbing loop. By stretching the rod or bar along the thread, pressure is created on the point of contact.
If you plan to disassemble the wheel yourself at home, you can install a rigid lever made of a pipe, channel or other construction profile into a concrete wall in a permanent garage. Such a cantilever beam will provide a reliable support for the jack.
You can do without a major rebuild by using a couple of durable boards. They are used as a lever that presses on the side of the wheel. Due to the difference in the length of the arm, a force is created on the substrate, which tears the rubber out of place.
Special devices for this operation are commercially available. Some models are bulky enough to be constantly transported in the trunk, however, they are very effective when working.
Dismantling by hitting a wheel
The main difficulty of the work is that even the weight of a person is not enough to separate the tire from the rim. This is also affected by the decrease in elasticity of rubber over time. Drivers sometimes use a car to hit a defective wheel when there is no other way to repair it.
To distribute the load more evenly, you can use a piece of wide board at least 1 meter long. This method is good because there are no shock loads, but often the rubber becomes unusable. It is recommended to perform this work with an assistant to regulate the impact speed and the force generated.
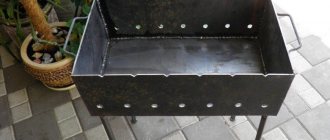
Preparation
We took a 16-inch wheel. It is easier to remove the tire if you place it on the floor. To avoid scratching the aluminum disk during work, we will place a sheet of foamed polyurethane under it, which is used in construction for noise and heat insulation. We unscrew the cap on the valve, hold it with your finger, and unscrew the spool so that it does not pop out under air pressure. The tire begins to deflate.
Before carrying out work using special tools, you need to moisten the working edge of the disk with penetrating liquid. Otherwise, we risk damaging the disk. Also, the liquid, having seeped under the lip, will make it easier to remove the wheel from the humps.
Ways to independently trim wheels
Beading is the reverse process of sorting. The tire needs to be put on the rim.
Standard method
Requires the following materials:
- soap and water;
- sledgehammer;
- two mounts.
Next, lay a clean cloth on the floor. A disk thoroughly moistened with a soap solution is placed on it with the reverse side.
Do not use lubricants that remain on the surface. This threatens to cause the tire to spin during heavy braking. Soap solution is the best option.
Place the tire with the tube in place on the rim. Press down part of the cord by pressing on top of the rim with your feet. Then, inserting the pry bar between the rubber and the disk along the entire circumference, gradually thread the rest of the cord into place. Carry out similar actions on the back side of the wheel. By lifting the free end of the crowbar, the lever method is used. If the disk is light, it can be fixed to the ground or floor so that it does not move.
Technology for tubeless tires
Partially threading the tubeless onto the disc is even easier. You will need some silicone grease. The steps are similar to those presented in the instructions for beading standard tires. But then it’s a little more complicated. But there is an effective way:
- unscrew the spool so that the tire does not burst;
- Pour a little gasoline (50 g) into the side of the tire;
- bring a source of fire to the tire, for example, a lit rag on a stick.
The gasoline vapor will instantly ignite and cause an explosion, creating quite high pressure inside the tubeless tire. She'll be fully erected and pumped up a bit. You can drive to the nearest service center where you need to re-inflate the tire.
Modern re-alignment of car wheels is carried out in various ways. If earlier the main emphasis was on hand strength and human dexterity, today the main thing is a high-quality tool.
If you have any questions, leave them in the comments below the article. We or our visitors will be happy to answer them
Methods for tearing off a stuck tire
Several methods are used to break the “welding” using improvised means. The most common of them is percussion. It does not require any special equipment and all you need is a good hammer (or better yet, a small sledgehammer) and a piece of metal corner (10 cm long and 4-5 cm on sides).
And then we do this:
- remove the wheel from the car;
- To prevent internal air pressure from arising, completely unscrew the spool;
- install the corner (the edge of one side is driven between the rim and the tire);
- standing on the opposite side of the tire corner, we hit it with a hammer (due to the damping of the rubber, the corner can fly out, so there should be no one nearby);
- after 2-3 blows, we move the corner to a new place and strike again, and so we go around the entire circumference;
- We carry out the procedure until the edge of the tire leaves the rim;
- we beat the tire around the entire circumference;
- turn the wheel over and repeat the procedure completely.
This beating method is very simple, but it has a number of disadvantages. Using a corner with non-rounded edges will certainly cause damage to the tire, albeit minor. And as a result of inaccurate blows, the edge of the rim can be bent, so at the first opportunity you need to contact a service station to have the disc rolled.
There are also non-impact methods for tearing the tire off the rim, but some of them require other materials or improvised means.
The first option is to use a regular board, but it can only be used if you have a car that can move. The essence of the work is very simple - we lay a board (you need a strong one), so that one side of it lies close to the rim. And then we ask the driver of the car to drive over this board. The weight of the car will cause the edge to come off. And then we tear it off around the circumference with our foot. Then we turn the wheel over and repeat everything.
Jack to the rescue
This method is simple, but you need another car, which may not exist. In this case, you can use a jack (a side screw jack will not work). Additionally, you will need a tow strap and a large wrench or pry bar.
The technology of work is as follows:
- Remove the wheel from the car and unscrew the spool.
- Place a key or pry bar under the wheel.
- We install a jack on the tire (close to the rim).
- We secure one end of the sling to the mount, then stretch it so that it rests on the supporting heel of the jack and again pull it to the mount, where we secure it (in this case, everything must be done so that the sling is stretched to the maximum).
- We use the jack, and in order to properly fix the wheel, it is necessary to stand on the disk. With this installation, the sling will act as a support for the jack, and with its body it will press on the tire until it comes off.
- Next, we tear off the edge along the circumference with our foot.
We perform this operation on both sides. There are several variations of lifting with a jack - instead of a sling, a supporting surface is used, which can be the car itself or something else.
Video: Dismantling and flanging a wheel using improvised tools. No tire service
Correct disassembly
After beating, you can proceed directly to the sorting itself. To carry out the work, you will need two mounting blades or conventional pry bars. It is not recommended to use a flat-head screwdriver so as not to further puncture or push through the camera during the process. But if you only have one shovel or pry bar at hand, then a screwdriver will also work, but only as an auxiliary tool.
Disassembly is done like this:
- To avoid damaging the nipple, prying off the splint should begin from there. To make it easier to remove the bead from the opposite side of the nipple, we step on the tire;
- carefully insert the pry bar between the tire and the disk (shallowly, but so that the end of the tool extends beyond the edge of the tire);
- Using a “pull towards yourself” motion, we move the tire bead over the rim and hold it in this position. We step back a little from the withdrawn edge, drive in the second blade and remove the bead section again (if a screwdriver is used, then after the first withdrawal we install it in the existing gap and use it as a holding tool, and pull out the shovel or pry bar to continue work);
- After removing a section of the bead 20-30 cm long, you can pull out a screwdriver or a second pry bar, since the tire will not sit back in place on its own. Therefore, all that remains is to pull the tire around the entire circumference by the rim (in the end it can be easily pulled out even by hand).
After disassembling, we carry out repair work and put the wheel back together.
What you will need
If you are interested in how to disassemble a wheel yourself, remember that you don’t need special professional equipment, but not every available tool will do. For example, using a hammer and pry bar can damage the tire and wheel.
A simple set for disassembling wheels
To remove a tubeless tire, you need to prepare:
- solvent - after applying it, the stuck tire will be much easier to remove from the rim;
- jack;
- wrench;
- steel corner;
- hammer;
- blades for installation.
After removing the tire, it is important to wipe the disc dry so that this does not interfere with the beading process in the future.
Features of mounting tube and tubeless tires
Today, tubeless wheels are found on many trucks and cars, but tubeless tires also have their uses. They are installed on bicycles, motorcycles, mopeds and scooters. Spoke wheels cannot properly maintain the required pressure and seal. In addition, old drivers are accustomed to cameras, who believe that it is easier to replace it or repair it on their own.
The disadvantage of tube tires is their greater weight compared to tubeless tires. Also, if damaged, it quickly deflates, and there will not be enough time to get to a car service or tire repair shop. To seal the tube you have to completely disassemble the wheel.
Advantages of tubeless tires:
- Slow loss of pressure, which makes it possible to get to a repair point.
- The wheel weight is less, which reduces the load on the suspension.
- Long service life, as it heats up less and there is no friction between the tire and the tube.
- The soft sidewall increases the comfort of the driver and passengers when driving the car.
Disadvantages of tubeless tires:
- Complex repairs and installation of tubeless tubes that require special equipment are difficult to install with your own hands.
- When a disc is damaged, the pressure in the wheel decreases.
- Driving on a flat tire often leads to tire destruction.
In a tube tire, the tube must exactly match the required size. If it is larger, folds will form that contribute to damage. Installing a tube in a tubeless tire can lead to damage to it, as an air layer appears between them. If you brake hard or make a sharp turn, the tire may collapse. When installing a tubeless tire, the contact points with the disc must be coated with a special sealing compound. There is no need to do this on tube wheels.
Tubeless wheel repair
If you need to put a tire on a wheel without using a tube, then:
Rim tape is applied. If the tire is new, then it is necessary to give it the correct shape. To do this, the wheel is assembled in a “chamber” version and it is kept in this form for one day. After a day, one side of the tire is disassembled and the chamber is removed. The nipple is inserted and secured. Sealant is poured inside the wheel. Typically, one wheel requires from 50 to 100 grams. The wheel is beaded and inflated
At this stage it is very important to use a sufficiently powerful pump. It is precisely because hand pumps cannot create strong pressure that it is difficult to repair a tubeless wheel in the field. After the wheel is inflated, you need to pump it and spin it
So that the sealant is distributed over the entire surface and seals the smallest holes.
The main advantage of tubeless wheels is their low weight and resistance to snakebite punctures. However, this comes at the cost of greater maintenance complexity and lower permissible pressure.
Old-fashioned method
In the old days, drivers caught by surprise used tried-and-true remedies. They were as follows:
- the damaged wheel was lifted with a jack and removed from the car;
- a “spare spare” was installed for a while;
- the edges of the dismantled wheel at the level of the joint with the disk were placed under one of the wheels of the car;
- several impacts were carried out along the entire diameter of the tire;
- the inner edge of the tire on one side was completely torn off the rim (sometimes the impact was replaced by blows from a powerful sledgehammer);
- two mounts were inserted into the weakened gap;
- by successive movements of the tools clockwise or counterclockwise, the rubber was picked out from the disk;
- then manipulations with the mountings were carried out on the other side of the wheel;
- the disc and tire were completely separated from each other.
Then repairs were made, which usually consisted of replacing the tube or tire.
The big disadvantages of the method were its labor intensity and the almost inevitable cases of the disk being crushed at the edges.
For tubeless tires such defects are fatal. It will definitely lose its tightness and will not hold air. To prevent this from happening, the damaged disc will have to be straightened or thrown away. In such a situation, the cash costs for a new disk are inevitable.
In a standard tire service, virtually the same operations are performed. The only difference is that there they are more thought out, mechanized, and more careful in relation to the disk. As a result, after repair it exactly retains its previous geometry. But how can you achieve this yourself?
What modern craftsmen offer
If you look on the Internet, you can see many options for homemade mechanized devices for beading wheels. The overwhelming majority of them are fundamentally focused on professional equipment in terms of capabilities. The features relate mainly only to some design solutions.
Homemade machines perform the same functions as standard mechanisms in tire shops. At the same time they:
- simpler in design;
- have a manual drive for dismantling;
- reliable in operation;
- small-sized;
- easy to disassemble and convenient to store (some models can fit in the trunk of a car);
- allow for prompt repairs outside the tire shop, directly at the accident site;
- The vast majority of all handicraft devices are designed for passenger car wheels.
It goes without saying that wheel removal is incomparably more economical for owners of such machines than a similar service at a car service center.
A few illustrative examples
- Vertical console with bracket on the table.
- an improvised table with a vertical stand (on top there is a threaded thread);
- locking washer for fixing the disk with internal thread and bushing-axis;
- movable console with bracket;
- a metal rod with blades that bend the tire bead away from the disc;
- rod fixing bolt.
Non-adjustable paddle
Handicraft design (the main drawback is the lack of a system for pressing the rod; the blade has to be constantly hammered with a sledgehammer).
Vertical console with bracket
Adjustable paddle
Modern design. The console and bracket with spatula were purchased at an auto parts store. The disadvantages include the short handle, which does not provide effective pressure on the tire.
Console and bracket with spatula
Vertical console with bracket without table
The auxiliary tool, console and bracket are presented here in a factory-made version. Any plane can be used as a table. The disadvantage is that the dismantling process is cumbersome, requiring the use of many tools at once. In addition, there is no table here - all operations have to be performed, figuratively speaking, “on the knee”.
There are many other options. There is no point in considering all inventions: they are designed approximately the same.
Let's look at one model. It eliminates as much as possible all the above-mentioned shortcomings. It is quite simple to manufacture the entire machine yourself, without resorting to the cost of purchased spare parts.
Dimensional drawings are the first place any practical activity begins. In this case, we will consider a very convenient version of the machine, combining the entire range of tire fitting tasks.
Methods for tearing rubber off the rim
The work begins with tearing the tire off the rim; this is not always easy to do. Modern tubeless tires stick to the wheel, which on the one hand is good, there is less chance of air leakage, on the other hand, a number of difficulties arise when disassembling.
To begin, place the wheel on the ground
, be sure to nipple up. Let the air out of the tire; to do this, it is better to simply unscrew the nipple. After this, stand with your feet on the rubber; in the best case, it will simply fall away from the sides. If this does not happen, then you will need to tinker, in some cases it is very difficult to disconnect the edge of the tire. For this purpose, tire shops use presses that develop a force of about a ton. The driver in a garage does not have such equipment, so he will have to use alternative methods.
Most often, you can find advice to use a sledgehammer. To do this you will need a small sledgehammer weighing 5-8 kg. It is used to deliver accented blows to the tire in the area of the nipple. Usually it's enough to hit a couple of times. The main disadvantage of this method is the need to have sufficient strength to operate the sledgehammer. There is also always the risk of accidentally hitting the disc, which could damage it.
Another way
– use of an angle and a hammer. To do this, you will need to take a long corner, it should be at least a meter, or better yet, one and a half. One end is carefully hammered between the rim and the tire, this will allow the corner to act as a lever; usually, much force is not required. There are also a number of non-impact methods for tearing off rubber. One option is a wheelie collision. A thick and wide board is placed on the edge of the tire, and the car wheel is driven over it. It turns out to be a kind of press. Another option
- usage . You will also need a recess in the wall into which the top of the jack will rest. We place the support of the device on the tire, resting the upper part against the wall so that the jack becomes a kind of spacer. We gradually extend the working part of the lift, and eventually the rubber is pressed away from the rim.
How to remove rubber from a rim: step-by-step diagram
The initial and significant step towards successfully removing tires from a rim yourself is knowing the instructions. It is necessary to jack up the car, unscrew the fasteners (it is better to twist it a little in advance, before lifting it to a height) and remove the car wheel. Next, the tire is lowered and the places where the tire touches the rim are pressed. As a result, the tires will come off faster.
A steel angle prepared in advance will help in separating the rim and rubber. It is carefully driven between the rim and the rubber. You should not put too much pressure on the tool, as the material is still soft and can easily bend.
You should work very carefully and carefully. Many drivers often use mounting blades, as they help to carry out beading more accurately without affecting the integrity of the tire. The tire must be removed from the metal carefully. Once the rubber side is free, you can slowly remove the camera.
This concludes the activities. Everyone now understands how to remove tires from a rim with their own hands. All that remains is to find out how to frame the wheels. It’s very simple: take a new tire and put it on a car rim, assembly is elementary - in the reverse order.
How to rim a wheel with a jack and cable
This is one of the simplest ways to disassemble and trim a wheel yourself. If you follow the instructions below, you can easily do this job yourself.
- Remove the wheel from the car and clean off any dirt.
- Unscrew the nipple and bleed air.
- Place the wheel with the nipple facing up.
- Tie the tow rope to the disk and jack, as shown in the photo.
- Place the jack closer to the rim on the tire. If it is chamber, then you cannot place the jack next to the fitting, otherwise it will come off when disassembling.
- Securely fasten the ends of the cable together.
- Raise the jack up by pulling the cable and moving the tire sidewall down. Do this until the tire comes off the rim.
- If you only need to replace or seal a punctured tube, then lift the sidewall of the tire with mounting blades from the side of the fitting and place it on the edge of the disk.
- Push the fitting into the inner cavity and pull the tube out of the tire.
Attention! If the nipple is in good condition, then it can be unscrewed and used for a new camera, or put in stock
Installing a new camera
Boarding work takes less time and effort, but it also needs to be done in a certain order.
Take the new camera and unscrew the nipple from it. Release the air pressure by forcing it out. Move the rubber sidewall away from the location of the fitting. Place the tube part with the fitting into the tire and insert it into the hole in the rim. Reinstall the entire camera. Pump the camera without nipple slightly so that it straightens and takes its place
This is also necessary so that when trimming it does not get caught by the mount and damage it. Using mounting spatulas, carefully bead the tire around the perimeter. Now all that remains is to install the nipple, inflate the tire to the pressure required by the manufacturer, and place the wheel on the car
Now all that remains is to install the nipple, inflate the tire to the pressure required by the manufacturer, and place the wheel on the car.
How to disassemble a car wheel at home
Thus, wheel trimming is successfully carried out at home, and even in several ways. Which one to choose is decided by the car owner himself, depending on the availability of certain tools, time and skills.
Impact method of rubber removal
This option was actively used by our fathers and grandfathers. To disassemble a tubeless tire at home, you will need strong hands and skillful actions.
To remove a tire this way you need:
Detailed algorithm of actions:
- lift the car, remove the wheel;
- release the air from the chamber by unscrewing the valve, at the end you need to stand on the tire with both feet and jump;
- beat the rubber around the entire circumference with a hammer - this must be done on both sides of the wheel;
- on the opposite side of the spool, carefully insert a steel corner or a piece of spring under the tire;
- pull the edge of the rubber towards you along the entire circumference, exerting pressure on the corner with a crowbar - as the rubber is removed, the corner must be moved forward using mounting blades;
- separate the camera;
- similarly pull out the edge of the tire from the back of the wheel;
- completely remove the camera.
The disadvantage of the impact method is the risk of damaging the tire or deforming the disk. If this happens, you will have to contact a repair center for disc rolling services.
Impactless method with a second car
A little more time and effort, but safe extraction is guaranteed. You will need a second machine and a wide, strong board.
Here's what to do:
- bleed air from the chamber;
- place the board on the tire, edge close to the rim;
- drive one wheel of the car onto the board - the edge will separate under the weight of the car;
- tear off the tire along the entire circumference, stepping with both feet as close as possible to the junction with the disk;
- Carry out similar actions on the back side of the wheel.
A second machine can be used instead of a board. Under the enormous weight of two cars, the rubber will easily come out of the rim.
Impact-free method using a jack
The second non-impact dismantling method involves the use of a jack, a strong flat rope (strap) and a pry bar.