- home
- Construction and renovation
- Electrics
>
>
⬎
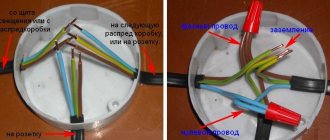
When I need to connect copper wires in a junction box, I twist and solder them. However, at the moment there is a lot of debate about reliability: some claim that the soldered connection is the most reliable, while others criticize soldering and recommend spring terminal blocks. It is worth noting that the supporters of the soldering iron are experienced, Soviet-trained electricians.
Today we will not find out which is better - in my opinion, an objective assessment of the quality of connections will be a comparative test at extreme currents, perhaps in the future we will conduct a similar test. But now let's talk about how to twist wires in junction boxes and actually solder them.
I would like to note: despite the fact that the process is simple and easy to master, it must be performed with care and accuracy. After all, all fires, as a rule, are caused by poor contact in one place or another.
Soldering and its features
To obtain a truly high-quality connection, you need to maintain a special temperature in the seam area. On average, this indicator varies between 50-100 degrees. It is also taken into account that the temperature threshold required for the solder to melt is much higher than simply for melting the metal being processed. Positive qualities of soldering:
- complete tightness of the connected parts;
- high strength of connections;
- significant savings in time and effort compared to welding processes;
- At the soldering sites, a special film layer is formed that resists corrosion and oxidation of metals.
Types of solder
Solders are a fairly specific series of substances that must meet the following conditions:
- High thermal conductivity and electrical conductivity;
- Good strength and high elongation coefficient;
- Corrosion resistance;
- Transformation into a liquid medium when exposed to welding temperature;
- Contrasting magnitude of cooling of solder metal and crystallization of solder.
These substances vary depending on the temperature of the soldering process, and are soft and hard.
Flux table
Common Problems
Beginners often encounter the following difficulties when soldering:
- Insufficient heating of components. Due to lack of temperature, “cold” soldering occurs. It can be identified by the dull color of the solder at the soldering site and its easy destructibility under mechanical stress.
- Overheating of parts. In this case, the surface is not covered with solder at all.
- Displacement of parts before the solder hardens, which often leads to broken contact.
To eliminate these problems, it is necessary to re-solder.
If overheating occurs, you need to reduce the soldering time or use a less powerful soldering iron. When cold soldering, on the contrary, you need to use a higher power soldering iron.
Soft soldering
Soft soldering can only be carried out to temperatures lower than 400 degrees Celsius. These substances make it possible to ensure the formation of a truly strong and at the same time soft seam, which will not only be relatively flexible but also have good resistance to corrosion and physical influences.
Soft solders include:
- Lead-tin
- Low tin solders
- Special and easy to melt
Solder, whose operating temperature is 185 ÷ 267˚С, combines tin and lead. Antimony is also added in small quantities. Before purchasing, be sure to check GOST, all information on solder is indicated there. For example, POS 40 - the last digit means that this substance contains 40% tin, on average 3 to 5 percent of antimony is added, the rest is lead. These solders are used for joining seams that do not require resiliency, i.e. not loaded, not subject to beating or constant vibration.
Lead-free flux is also used for soldering. They are also called low-tin compounds. They are mainly used for connecting small circuit boards, contacts on delicate electrical circuits, etc. The maximum permissible melting temperature is 330 degrees Celsius.
The most common ones are low-melting type solders, temperatures from 60 degrees to 145. They are purchased for low-temperature soldering or very careful manual welding. In particular, they cannot be called basic solders, because they have very little strength and elasticity. They are more often used for re-soldering or step soldering.
In some cases, it is necessary to produce a special composition; its properties are adjusted directly for materials that cannot be soldered (this is a flux for nickel, low-carbon steel, aluminum, tungsten and cast iron).
Consider the most popular mixtures:
- Fluxes for soldering aluminum must be tin-based; they also contain borax, zinc, cadmium, but they still contain more than 99% tin. Zinc and cadmium are necessary for increased diffusion, which can penetrate even deep layers of aluminum.
- Flux paste or gel for soldering microcircuits; such solders are also used for printed circuit boards.
Flux gel
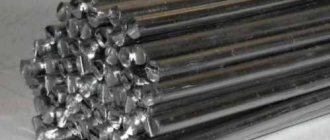
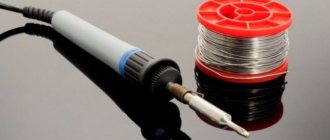
For such alloys, solders are supplied in a variety of relatively thick compositions, rods, strips and wire spools (as for welding). There are also ingots that are half filled with rosin flux.
Brazing alloys for soldering
The composition of fluxes for hard soldering is used to connect problem areas that are constantly susceptible to the negative effects of the environment (vibrations, temperature changes, shocks, etc.). These are mainly compounds for high-temperature soldering, from 400 degrees Celsius and above. These include:
- Solder for copper and zinc hard alloy (up to 1000);
- Phosphorus and copper (up to 900 degrees);
- Pure copper is used for the soldering process of high-carbon iron;
- No-clean flux, for silver soldering (up to 800 degrees inclusive).
Hard-melting solders also have their own distribution; they are refractory, with a melting temperature of 850 degrees, and low-melting - with a temperature above this temperature range.
It should be noted that a mixture of copper (grades M21, M11 and others are used) and zinc is not widespread enough; due to its low strength and relatively expensive cost, in most cases it can be successfully replaced by solder made of bronze with zinc or brass.
Copper-phosphorus type solders are substitutes for very expensive silver fluxes. They are indispensable when joining copper metals, bronze, brass and other metal compounds that should not be subject to bending or shock loads. By the way, this alloy is also called solder for flux-free soldering (but not for copper).
It is strictly forbidden to use these alloys for soldering iron, ferrous metals, low-carbon steels, because when exposed to temperature and combined with copper or phosphorus, a very fragile chemical element is formed - iron phosphides, which will cause the seam to come apart.
Due to metal-phosphorous solders, iron phosphides are formed, which are too brittle compounds and contribute to a decrease in the quality of the metal; they are not recommended for soldering iron.
Video: Making soldering flux yourself
The best option for such soldering processes is silver solders. They are the most expensive. And they are also used to connect wires, capillary mesh of wires, and very complex circuit boards made of silver components.
Other types of flux
- Fluxes with pronounced anti-corrosion properties. These are compounds based on phosphorus acid and a solvent, which when interacting form organic compounds. They are very beneficial to use because after the soldering process there is no need to use special cleaners;
- Liquid fluxes made from salicylic acid, petroleum jelly, gold and ethyl alcohol. This is the most convenient connection for radiators and soldering electrical wires. This flux ensures high seam cleanliness and neatness;
- In order to produce neutral flux for electrical devices with high precision requirements (time relays, switches, for connecting mobile phone contacts, etc.) you will need rosin-air connections. Rosin is very low-active and should only be used on prepared metals, previously cleaned and tinned; Rosin
- Activated fluxes are borax and rosin. In most cases it is used for plumbing connections and soldering of copper pipes. The main difference is the fact that borax melts at a temperature of 70 degrees, without releasing absolutely any harmful compounds. This is only one variety;
Borax - In order to prepare activated fluxes, you can use the following recipe: mix rosin, aniline, add a little anhydride, salicylic acid and diethylamine. This is a good option for making soldering for assembly fasteners.
Read also: Types of keys and their purpose
General tips on fluxes
Homemade flux for soldering is not always a profitable option; sometimes it is actually more profitable to buy it, especially since in most cases the price allows, say, smd or bga. At the moment, more than a hundred domestic companies produce fluxes and mixtures for soldering and welding, among which we can recommend LTI 120, Brazetec, Harris, RMA, Sanha, Welco (average cost from 80 rubles).
Sales are carried out in any electrical appliance store and market in all cities: Yekaterinburg, Minsk, Moscow, Novosibirsk, Kharkov, Chelyabinsk, Rostov-on-Don.
It should be noted that in any case, during the welding or soldering process, gases are released that can harm the body, but if you use professional mixtures, this harm will be much lower, so opt for well-known brands.
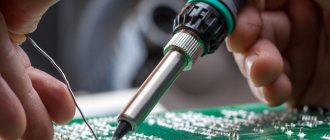
A soldering iron is most often used to connect wires, as this is the easiest and most reliable way to get a high-quality result. Various types of twisting, winding with electrical tape and other handicraft methods are not reliable or increase the resistance of the wires, which leads to overheating of certain areas and deterioration in the performance of the circuit. Soldering wires with a soldering iron is not as difficult as it seems from the very beginning, but here you need to adhere to certain rules.
To carry out this procedure, you do not need any special soldering iron for wires, since all this is done with an ordinary tool that can be purchased at any store. The main thing here is the soldering technology itself, the correct selection of the necessary materials and other features that affect the final result.
Recommendations, precautions
You should familiarize yourself with the recommendations that will allow you to perform your tasks efficiently:
- When choosing a soldering iron, you need to pay attention to models equipped with additional cones, needles and a set of replaceable tips.
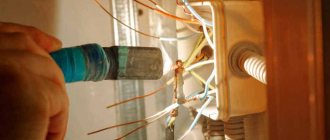
- Before you begin soldering, you need to pay special attention to cleaning the tip. If the tip is too dirty, remove all dirt using a soldering iron. You can use pieces of wood or cardboard as an aid.
- When changing the length of the soldering iron, the heating temperature of the tool also changes.
- It is not recommended to leave the soldering iron “dry” while heating the working element. The tip needs to be dipped into rosin regularly.
It is important to take precautions. You need to work in personal protective equipment: special clothing (overalls), goggles and gloves. Do not leave exposed areas of the body, otherwise severe burns may occur.
Source: strojdvor.ru
Features of soldering wires
Soldering wires with a soldering iron with acid and other types of flux is almost always carried out according to the same scheme. Regardless of what kind of flux is used and what kind of solder was selected, the same operations are performed for the connection. In some cases, if there is no great responsibility, then even consumables can become interchangeable. If we are talking about contacts that may be subject to stress, or are located in another unfavorable environment, then it is necessary to strictly follow the technology.
Many craftsmen claim that soldering wires with a soldering iron to the board and to each other is one of the simplest. In fact, this is really not the most difficult procedure. The main problem here is choosing the right solder and fixing the wires so that they remain motionless until the connection is made. Selecting a comfortable position is not always possible, since much depends on the specific situation, but when working with small household appliances and electronics, no problems arise.
This procedure is one of the most common, since it is very often encountered in everyday life when repairing various things. Thus, it is worth knowing how to properly solder wires with a soldering iron, even if the need for this has not yet arisen.
Soldering thin wires from headphones
Many people, sitting at their favorite personal computer, like to spend time on the Internet while also conducting business negotiations with their friends, watching a movie or listening to music.
Of course, everyone knows that in order to communicate verbally via the Internet you need a microphone, and in order to listen to music you need speakers or headphones. You can, of course, use a special device - a so-called headset, which combines both a microphone and headphones. Which, however, is what many people use.
Everything seems to be fine, but even the best headset fails because the wires connecting the microphone to the headphones fray. It is quite natural that when a headset breaks down, many do not run to the nearest store for a new one, but pick up a soldering iron with a screwdriver and begin to repair it. As a rule, disassembling the headset is not difficult, but replacing the wiring can cause certain difficulties (this is not surprising, since the headset is considered a consumer product that cannot be repaired).
Soldering tools
The main tool for soldering, without which this process would be completely impossible, is a soldering iron. Its main parameter is the appropriate power, which will allow the flux and solder to melt, but will not significantly exceed their boiling point.
In addition, the following additional tools and consumables may be needed:
- Flux - serves to improve the properties of solder during soldering;
- Solder is the main material with which parts are soldered to each other;
- Solvent – helps get rid of splashed consumables;
- Magnifying glass – needed mainly when working with small wires;
- Tweezers – for working with small parts and holding solder;
- Soldering iron stand;
- Pliers;
- A small file for cleaning contacts.
How to choose solders and fluxes for soldering wires
Choosing solder for soldering is a very important matter, since the quality of the connection largely depends on it. The choice is influenced by the type of metal with which you will have to work, the temperature limitations of the process, the method in which soldering occurs, the need for mechanical strength, the size of the parts and much more. Corrosion resistance may also be an important factor, although such requirements are rare.
Thick wires with a high melting point will require a solder that is more refractory than for ordinary connection wires in electrical appliances. The choice may be influenced by the electrical conductivity of the solder material when it comes to critical connections.
The choice of flux is based on the type of solder you will be working with. After all, some varieties become incompatible in practice. The flux should not have a destructive effect on the metal. It is desirable that its residues can be easily removed and cleaned. In most cases, craftsmen make do with ordinary rosin, but sometimes other types of flux may be required for wires.
How to tinning wires
Before soldering a wire with a soldering iron, you need to tin its tip, as well as the wire itself. The soldering iron and wire contacts must first be cleaned from possible residues of dirt, grease and oxidative film. A fine-grain file is suitable for this.
The metal surface should become shiny and not even small foreign particles should remain on it. After cleaning is completed, the tip is lowered first into rosin, and then into solder, after which the tip must be attached to a board or other stand. The solder should not stick directly to the tool. It is worth repeating this procedure until the tip acquires a different shade, which will mean that it is completely tinned.
Soldering copper wires with a soldering iron assumes that they also need to be tinned. The wire, stripped of insulation and stripped with a soldering iron, must be dipped in rosin and pressed down on top with a heated soldering iron. This will allow the consumable to melt. You can then remove the wire when the rosin begins to smoke and melt. Next, use a soldering iron to take a piece of solder and bring it to the rosin layer on the wire. A well-prepared clean wire can be tinned the first time.
Soldering cores
One of the main conditions for how to properly solder wires with a soldering iron is a well-prepared surface. All small particles, paint, grease, dust, varnish, PVC insulation and much more must be removed.
After cleaning the surface, you need to tin both wires and the soldering iron tip as indicated above. Then the wires are placed in a convenient position and brought as close to each other as possible, until they touch directly.
After this, with a heated soldering iron, another part of the solder is taken, which will become the material for the connection. You need to quickly move it to the wires and touch the molten solder to the place of the future connection. If everything is correctly selected and tinned, the solder should immediately spread over the surface and create a reliable connection.
Read also: DIY winch made from a worm gear
Naturally, the first time it may not work out exactly right, and sometimes problems even arise with the quality of the connection. To avoid this, you should adhere to the following rules:
- Soldering must be done quickly so that the solder does not have time to cool;
- If the first attempt is unsuccessful, then before the next one you need to let the wires cool;
- It is better to touch the soldering iron tip to consumables and joints with the entire surface of its working part.
If there are no cracks at the soldered area, and the contact itself looks smooth and has a shine, then this indicates a high level of soldering.
Conclusion
The instructions for soldering wires with a soldering iron help you understand the basic principles of the process itself and some of the preparation features. In this procedure, all details are important, even the smallest ones. But even their complete study and memorization will not give the desired result without practice, during which each person may develop individual errors.
Soldering is the primary method of electrical and mechanical joining of both parts and wiring. But despite the apparent simplicity of the process, soldering is quite complex and painstaking. That is why, before picking up a soldering iron, you need to have a good idea of what, why and, most importantly, how to solder wires.
The essence of the process
The essence of the soldering process is that metals are joined together using an alloy that has a melting point lower than the melting point of the substances being joined.
During soldering, materials are heated to the melting temperature of the solder. This ensures very strong adhesion (sticking) - the property of materials to adhere to each other at the molecular level.
However, the main parts do not melt and mix with the solder material, as happens when welding using filler material.
Tools and accessories
Soldering, like any other technical process, involves the use of certain tools and accessories. You will need a few tools: a soldering iron, a knife, pliers, a file, sandpaper. There are even fewer accessories - soldering flux and alcohol or gasoline are enough. Nevertheless, all of these are important components of the process and the choice of both must be taken extremely seriously. Both the mechanical and electrical reliability of the soldered joint will depend on the quality of the soldering iron and the availability of the necessary accessories.
Selecting and preparing a soldering iron
This is perhaps the most crucial stage. A poorly chosen or improperly prepared tool will not produce high-quality soldering.
Power and type
The main criterion for choosing a soldering iron is its power. The industry produces instruments with power from 10 to 200 W and higher. The former can be the size of a fountain pen, the latter look like a natural hammer of impressive size.
Electric soldering irons with a power of 30 (left), 60 and 200 W.
All that remains is to decide which soldering iron to choose for soldering wires. Here everything will depend on the operation being performed, or more precisely, on the thickness and massiveness of the parts that need to be soldered. The more massive the parts, the greater the heat capacity the tool should have. An approximate dependence of the recommended soldering iron power on the task being performed can be presented in the following table:
- 15-25 W – small radio elements, microcircuits, conductors with a diameter of up to 0.3-0.5 mm;
- 30-40 W – large radio elements, wires with a diameter of up to 1 mm, including multi-core ones;
- 40-60 W – fairly large parts, conductors with a diameter of up to 2 mm;
- 100 W – massive parts, wires with a diameter of up to 3-4 mm;
- more than 100 W – power wiring with a diameter of more than 4 mm.
If you don’t have a soldering iron with the necessary characteristics at hand, you can take a slightly larger one in power, but not vice versa. With a massive device, it is possible to solder thin wires with a certain skill, but with a small and low-power thick one, it is almost never possible. Ideally, your household will have several electric soldering irons of varying power.
But what to do if there is no soldering iron of the required power or if it does not exist in nature at all? Trying to solder busbars into a pencil thick with a 100-watt soldering iron? In no case! In this situation, regular fire will help. Place the parts prepared for soldering, for example, in the flame of a household gas burner or alcohol lamp and solder. Additional heating will help to perform high-quality soldering even with low-power tools. The only thing is, when heating the wires over an open flame, do not overdo it - a little additional heating is enough.
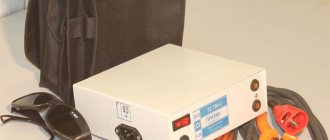
Separately, it is worth noting the so-called “pistol” or pulse soldering irons, which were widely used, and even today are in service with craftsmen on the road.
A modern version of a pistol soldering iron.
At first glance, the advantages of such a device are obvious - it heats up instantly and cools down just as quickly. But this feature is convenient only for a narrow circle of specialists - on-call specialists. He came, took it out of the suitcase, poked it, put it in the suitcase, took the money and left. But anyone who has seriously worked with such soldering irons knows very well their shortcomings.
The device is literally too heavy to lift, does not maintain the optimal temperature, and the shape of the tip, which burns catastrophically, is extremely inconvenient. As a result, soldering with a similar tool with a wire loop instead of a tip can be characterized by the phrase “ugh, looks like I’m drooling.” A pistol electric soldering iron is at least suitable for repairing a Record tube TV, and a Whirlwind vacuum cleaner, but nothing more. There can be no question of high-quality soldering, especially of wires.
Sharpening and servicing the tip
After the soldering iron is selected, it must be prepared - sharpened and tinned the tip. There are many types of sharpening tips:
Unified forms of soldering iron tip sharpening
Which one to choose depends on your personal preferences and habits. For soldering wires, the most optimal sharpening points are Nos. 3, 4 and 5. After sharpening with a regular file, the tip must be immediately tinned - covered with a layer of solder. Why do you need to do this? Briefly, the soldering process is as follows: a drop of solder is applied to the tip of a heated tip, which is subsequently transferred to the parts being soldered. But how to work with a finger tip, the untinned tip of which is covered with copper oxide and is absolutely not wetted by solder?
So, if the tool tip is sharpened or simply cleaned to a copper shine, it’s time to move on to servicing. To do this you will need regular soldering rosin and a piece of solder. Plug in the electric soldering iron and slowly, without pressing, rub the cleaned area with a piece of rosin. As the soldering iron heats up, the rosin will begin to melt and cover the tip with a thin layer.
Quickly put the rosin aside and pick up the solder, trying to “paint over” the area covered with rosin with it. As the soldering iron continues to heat up, the solder will also begin to melt and spread evenly over the tip. The operation can be considered completed. If nothing works on the first try, do not despair - cool the soldering iron (it is useless to clean the hot tip - it will immediately oxidize), repeat the cleaning and tin again.
Tool temperature
All that remains is to select the optimal tip temperature. There is an opinion that the greater the power of an electric soldering iron, the higher the temperature of its tip. This is absolutely false! Only the thermal capacity of the tool, and therefore its ability to warm up the soldering area, depends on the power. For the same reason, the higher the power of the soldering iron, the larger and thicker its tip.
As for the temperature of a soldering iron of any power, it is the same and should be such that, on the one hand, the solder easily melts, collecting a drop at the tip of the tip, and on the other, the rosin does not burn with the characteristic smell of burning resin. When soldering wires with a soldering iron with an underheated tip, you will not be able to properly heat the joint, and when working with an overheated tool, rosin or any other flux will burn faster than it has time to perform its functions. In both cases, you will end up with soldering, which installers call “slobbery.”
Read also: Desulfation of a maintenance-free battery with a charger
Usually, special devices are used to change the temperature of the soldering iron - voltage regulators. But if you do soldering only from time to time, you can get by with more budget-friendly, but quite effective methods. In order to slightly reduce the temperature of the tip, simply loosen the locking screw on the device body and slightly move the tip out of the body.
As a result, a small part of the tip, which was previously inside the heating element, will be outside and, instead of being heated, will be cooled by the surrounding air.
If the temperature of the soldering iron is insufficient, perform the opposite operation - push the tip deeper. Despite its apparent simplicity, this method is very effective.
Soldering thin wires from headphones
Many people, sitting at their favorite personal computer, like to spend time on the Internet while also conducting business negotiations with their friends, watching a movie or listening to music.
Of course, everyone knows that in order to communicate verbally via the Internet you need a microphone, and in order to listen to music you need speakers or headphones. You can, of course, use a special device - a so-called headset, which combines both a microphone and headphones. Which, however, is what many people use.
Everything seems to be fine, but even the best headset fails because the wires connecting the microphone to the headphones fray. It is quite natural that when a headset breaks down, many do not run to the nearest store for a new one, but pick up a soldering iron with a screwdriver and begin to repair it. As a rule, disassembling the headset is not difficult, but replacing the wiring can cause certain difficulties (this is not surprising, since the headset is considered a consumer product that cannot be repaired).
Soldering flux
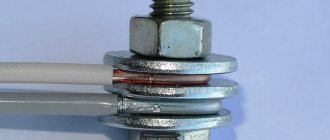
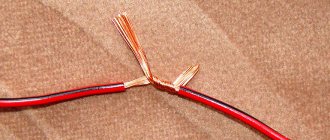
In order for soldering to be of high quality, the solder must firmly adhere to the part being soldered and moisten it. But when heated, almost any metal intensively oxidizes and is absolutely not wetted by solder. Even if you manage to depict something using a soldering iron and one solder, such soldering, called “cold” soldering among experts, will not provide either good contact or mechanical strength. An example of cold soldering can be considered a photo, which on many information resources for some reason is an example of exceptionally high-quality and correct work:
The solder did not adhere to the copper of the wires at all - this solder can be disassembled with bare hands
To ensure reliable adhesion of the solder to the metal being soldered, one or another flux is used. According to the method of influence, they are divided into two categories:
Passive fluxes, as their name suggests, do not interact with the parts being soldered. Their main purpose is to ensure good spreadability of solder and prevent the formation of an oxide film when heating the parts being soldered. Passive fluxes are easy to use, affordable, safe for humans, non-conductive and completely neutral (do not require cleaning after soldering). The disadvantages of fluxes of this type include the ineffectiveness of use on oxidized parts.
The well-known rosin is the most common passive flux.
Active fluxes not only improve the spreadability of solder and prevent the formation of an oxide film, but are also capable of destroying this film. In view of this, acid or alkaline fluxes are widely used for soldering metals that are highly oxidized or instantly oxidized in air. There are even substances that remove varnish from an enameled wire when heated with a soldering iron. The disadvantages of this type of flux include high corrosive and electrically conductive properties (the flux must be washed off after soldering) and danger to humans.
Fluxes produced by industry based on acids.
What flux is best to use for soldering wires? If you are going to work with copper, then the ideal option would be rosin or a solution of rosin in alcohol. Even if the wires are old, but it’s easy to clean them to a shine, it’s still better to use rosin. It is a good dielectric and absolutely does not interact with metal at the chemical level.
You will need active flux if the wires are heavily oxidized or made of alloys that are difficult to solder - nickel, steel, aluminum, etc. Although no one prohibits the use of these compounds for working with ordinary copper. The only thing is, if you don’t want the connection to fall apart in a month or two, do not forget to thoroughly rinse the soldering area with alcohol or gasoline after work. And, of course, immediately wash your hands with soap - acid is acid, even if it is soldering.
Additional materials
Additional materials that simplify working with a soldering iron include:
- Stand. Provides convenience and safety of work. It is made from a thin metal sheet.
- Braid to remove excess solder. Consists of flux-treated thin copper strands.
- Device with clamps and magnifying glass. Provides convenience for working with small parts and a soldering iron.
- Clamps, tweezers, pliers. Makes it easier to work with heated parts.