In the process of repairing and servicing a car, as well as any other equipment, there is often an urgent need to remove individual elements of the internal combustion engine or chassis, body panels, etc. At the same time, removing engine components, attachments and suspension is often the most problematic operation. The reason is that the units can be tightened with bolts or studs, and the tightening torque is quite large.
If we add to this temperature changes in the engine compartment, oiling, accumulation of dust, dirt and other deposits, it becomes clear that unscrewing various bolts and other fasteners is not only a responsible and time-consuming, but also often a difficult task. In this article we will talk about what you can do if a stud or bolt breaks, as well as how to unscrew a broken bolt.
I broke the thread in the cylinder block, what should I do?
The threads of the spark plug well are stripped while replacing the spark plugs. One or several candles are unscrewed along with the thread. Therefore, it will not be possible to install a new spark plug without repairing the thread.
If the breakdown occurs at a car service center, the car owner will be offered prompt repairs, which will be performed using a special tool for restoring threads.
If the thread is torn off in the field - in a garage or on the street, then the car will no longer be able to get to the nearest car service center. We advise you to find a service that has a special tool in its arsenal and agree with its employees about on-site repairs.
A tool for restoring candle threads does not require special skills to work with it. Therefore, you can carry out the repair yourself.
Often the thread breaks due to the spark plug being overtightened when screwed in. A breakdown occurs if the spark plug was replaced by an unqualified car service employee or an inexperienced car owner.
Also, the thread can be torn off due to the spark plug being skewed when screwing in. This happens if the wrong tool was used to replace the spark plug.
In addition, replacing spark plugs on a warm engine can also lead to damage. Therefore, carry out repairs only on a cold engine.
To avoid overtightening or distortion of the spark plug, it is necessary to use professional spark plug heads and a torque wrench to control the tightening torque.
There are two ways to restore the spark plug hole thread:
- Remove the cylinder head. Drill out a spark plug hole, cut a larger thread, turn out special fittings for it, etc.;
- Without dismantling the cylinder head. Restore the spark plug thread using a special tool.
The second option is much preferable because it does not require dismantling the cylinder head. Thanks to this, repairs can be completed quickly.
Special tools include spark plug taps with a set of fittings and kits for restoring spark plug threads.
The cost of a kit for repairing spark plug wells can be several times higher than the cost of a spark plug tap. We will try to figure out what this is connected with and in what case it is more advisable to make a choice in favor of one or another solution.
Taps (plug socket) and fittings of various sizes for thread repair are sold in one set. We do not advise you to save on buying a tap, because it is not suitable for thread repair in all cases.
On many cars, spark plugs are located in deep wells. Therefore, the length of a standard tap is not enough to reach the damaged thread. In this case, you must use an additional extension cord. But this can cause backlash, which complicates alignment.
If you still managed to cut the new thread correctly, then another problem arises: install the spark plug seal and place it on the thread temperature glue. This must be done efficiently, otherwise the foot will unscrew along with the candle every time you remove it. It is impossible to perform this operation in a deep well without a special tool. Therefore, it is believed that a spark plug screw with fittings is only suitable for restoring spark plug threads in shallow wells. For example, VAZ 2108, 2109 and others.
Most modern cars have a cylinder head design with deep spark plug wells. In this case, to restore and repair the candle thread you will need a professional kit.
Professional kits for restoring spark plug threads are suitable for repairs of any complexity. For this purpose, their kit contains everything necessary. Each device is responsible for a specific operation. Let's take a closer look at the package:
- Flaring tap;
- Step tap;
- Tap holder;
- Driver for tap holder;
- Device for installing spark plugs;
- A cutter for cleaning the spark plug hole from chips;
- A set of various footwear in the most popular sizes.
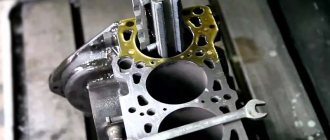
Restoring the thread of a spark plug well using a professional kit is quite simple. The new thread is cut using a step tap. It must be connected to the tap holder. After which the entire structure should be installed in the spark plug hole with damaged threads.
The cutting process usually does not cause any problems. The cylinder head is made of aluminum and is easy to tap. In this case, you need to apply grease to the tool, then cutting will be easier. In addition, the lubricant holds the chips that are formed during cutting on the tap.
We recommend screwing the tap into the damaged thread until its outer edge extends about five cm from the thread. Thus, in one operation we will remove the old thread and create a new one for the spark plug head.
Then you need to clean the edges of the spark plug hole from shavings. To do this, you should use a special cutter that is put on top of the tap. After this, the spark plug hole must be completely cleaned of any remaining chips. The fastest way to do this is with a blow gun.
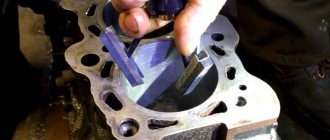
Then the tap must be unscrewed from the hole. A spark plug fitting is installed on the new thread using a special tool for installing repair fittings. This device is included in all professional thread restoration kits from the Licota brand.
The flaring tap must be connected to the tap holder, lubricated with oil and screwed into the repair fitting, which is installed in the thread. Thus, the repair liner is flared.
As soon as the fitting fits tightly into the new thread, the restoration of the spark plug thread can be considered completed. All that remains is to screw in the flaring tap and install the spark plugs. As a result of the repair, the fitting is securely installed in the spark plug well.
Final result:
- The futor is securely installed in the spark plug well;
- High speed of repairs;
- During the repair process, the risk of chips getting into the cylinder head was eliminated;
- The use of all devices did not require special skills.
Therefore, a set for restoring spark plug threads, despite the higher price, is used by both professionals and advanced car enthusiasts.
Replacing the stud
It is better to carry out planned replacement of studs and repair of the head at the same time. For a simple replacement, before unscrewing it, it should be moistened with brake fluid or a brake fluid. It should be unscrewed using a special stud puller or a gas wrench. Unscrewing, especially at the beginning, should be done smoothly, without jerking.
If the force is not enough, you can use an extension cord. It is important to feel the effort here and not miss the moment when the pin begins to twist and break. At the first sign, it is better to reapply brake fluid and let it sit. Move on to the next detail. The pin is unscrewed, move on to the next one. After unscrewing all the studs, we return to the soured part.
We are trying to unscrew it. It may work out, but often such a part breaks off. If it works, install the head with the gasket in place and begin tightening the nuts according to the diagram, observing the tightening torque:
- First, we tighten each nut, going in a circle with a special wrench with a dynamometer;
- Then we go through it several times after a short break to seal the gasket;
- We do the final tightening of the nuts. The cylinder head tightening torque is different for different engine models; it is better to find out this value from the repair manual.
Threaded hole repair (restoring damaged threads)
Our company does not restore threads. This article is intended solely to introduce you to the thread restoration process. In our stores you can buy fittings (threaded inserts), drills, taps, thread restoration kits.
The information is intended for persons carrying out repairs in a personal garage and car repair shops. In accordance with this, the text is structured and recommendations are given. The use of this method in manufacturing enterprises involves the use of specific tools and devices, and other technology.
Thread restoration method
Damaged threads can be completely restored using the following technology:
1. Drill the threaded hole to the diameter indicated in the table below 2. special profile thread in it Screw a spiral repair insert (a durable stainless steel sleeve) into the resulting thread using a special tool.
After such an operation, the thread becomes stronger than the original one in good condition. This effect is especially noticeable when the carving is made in a soft material such as aluminum. When a bolt (stud) breaks off in a threaded insert, there is no “biting” effect. A broken bolt (stud) can be easily removed.
Watch a video of how the threaded insert is used
What capabilities do threaded inserts have?
This method is especially relevant for restoring threaded holes in body parts of automobile engines, for example, a spark plug hole. The candle thread becomes very durable and reliable.
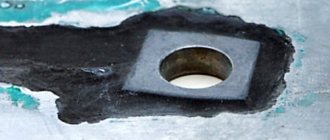
Threaded insert screwed in
Threaded insert screwed in
If the thread for a stud is broken, sometimes they drill it out and cut the thread to the next size. In this case, you have to use a stepped stud of unknown origin and dubious quality. And not every stepped hairpin can be found at the right time. If you repair the hole using a threaded insert, you still have the option of using a standard, branded pin.
Another application for repair threaded inserts is in brass exhaust manifold nuts. The result is a nut that combines a very strong thread and the property of not “sticking” to the studs.
Owners of some foreign cars should pay attention to the possibility of replacing the M12 x 1.5 thread with an M12 x 1.25 thread. It often happens that a bolt with such a thread is damaged, and it is almost impossible to find it in a retail chain in your city (we have such bolts in our store). A turner will not turn out a decent bolt, because... The threads on factory bolts are formed by pressure (knurling), which provides the necessary strength. And on a lathe, the thread is made with a cutter, while the fibers of the steel bar are cut and the threads cannot bear the required load.
If you replace the thread in the body part with the more common in Russia M12 x 1.25, it becomes possible to select a bolt of the required size and strength from the assortment of Russian and European manufacturers of automotive fasteners presented in our catalog.
Video - how a threaded insert works, demonstration
What tools are used to restore threads?
To repair the spark plug hole, a stepped tap is recommended. It is centered in the old hole with its lead-in part, and immediately cuts a new thread, bypassing the drilling operation.
A stepped tap significantly reduces the risk of damage to the spark plug hole, but it is noticeably more expensive than a regular tap.
To lengthen the tap when repairing a deeply recessed spark plug hole, you can use a regular 10-point twelve-sided socket with the appropriate tool.
3.
Spindle (tool for screwing in the insert)
The working part of the spindle is similar to the threaded part of a bolt, with a hook at the end.
The insert is a diamond-shaped spiral.
At one end there is a leash, behind which the insert is rotated by a spindle. The inserts have different lengths.
Description of thread restoration technology
Attention: this technology is used for repairing threaded holes in domestic and garage conditions.
1. Drill a hole. Periodically remove the drill from the hole and dip its end into a container of motor oil. A minimum drill speed is desirable. 2. Use a tap to cut the thread for the insert. During operation, it is necessary to constantly supply motor oil to the cutting zone, for example from a medical syringe, especially when working with aluminum. Otherwise, the thread may turn out to be “torn”, rough, and aluminum will stick to the tap. If the hole is blind, it is better to use a lubricant, such as Litol, instead of engine oil. You need to coat the working part of the tap with it so that the chips do not fall into the hole, but stick to the tap. 3. Rinse the resulting thread with kerosene. 4. Place the insert on the spindle, engage the driver and the hook.
You need to keep in mind that the insert is slightly larger than the spindle; it does not sit tightly on it, but dangles freely. When screwed into the hole, the insert is compressed and thereby secured in the hole. Screw the insert until its rear end is 1/4 of the thread pitch deep into the hole. After this, unscrew the spindle and break off the insert driver by pressing on it with a suitable rod. To do this, there is a risk on the turn behind the leash, along which the leash will break off. Note: When using a stepped tap, point 1 is excluded.
Our company does not restore threads. This article is intended solely to introduce you to the thread restoration process. In our stores you can buy fittings (threaded inserts), drills, taps, thread restoration kits.
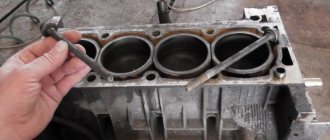
How to unscrew the threads remaining in the block?
There are two options here, but each of them begins with drilling out the fragment. To do this, you should cover the engine block with a thick cloth to prevent sparks and dirt from entering the engine, then cut off the top part with a grinder and place it strictly in the middle.
Drilling out the threads of a broken stud
Using a drill of a slightly smaller diameter, we drill out the fragments on a drilling machine, or most often with an electric drill. Here it is very important to hold the instrument strictly vertically, without distortion. We reach the edge of the trim and try to unscrew the rest of the thread. To do this, before unscrewing, you can try to drive it with a tap or try to hammer the edge of the metal inward with a thin chisel, freeing the threads.
If you fail when unscrewing or drilling, you need to move on to the second option.
Replacing a stud with a repair part and cutting a larger thread
Before carrying out work, you must purchase a repair pin. A repair stud is a part, on one side of which a thread is knurled for screwing on a nut, and the other has a larger thread.
For example, a stud on a VAZ with an M-8 thread. On the repair one, on one side there will be an M-8 thread, and on the other, the best option would be to roll an M-9 thread. With this option, we use a 7.8 mm drill to drive through our hole with the fragment. We clean the hole from the remains of the old thread. Using an M-9 machine tap, we cut the thread and screw on the repair pin. Next we install the head.
Using the same algorithm, you can replace a broken spark plug. Repairing the spark plug hole and removing the broken spark plug is carried out in several stages. There are many videos on YouTube that will tell you how to unscrew a broken spark plug. First, let's try to unscrew the fragment. As a rule, it breaks right behind the hexagon, so we wet the threads with WD-40 or brake fluid and let it sit. Then use a special wrench with a dynamometer to unscrew the fragment.
It turned out well. No, in this case we turn to a turner to turn the foot. While this is being done, we move the piston under this hole to block the channel and prevent chips and dirt from falling into the crankcase. We drill a larger hole, cut a thread and tighten the fitting. The internal thread is made to fit your spark plug, screw the spark plug into it and use the car.
Having completed all the work on replacing, repairing and cutting internal threads on the engine of your car, you gain new knowledge and skills, and also save your family budget.
Repairing threads in the cylinder head
As a rule, it is quite pointless to throw away a working part of a car because of a thread damaged in several places, and in our time of high technology it is also wasteful. Perhaps we should consider the most common case of problems of this type - damage to the threads in the cylinder head.
The first thing that comes to the mind of any motorist is to quickly “correct” the thread using a “spark” tap. However, one should not give in to emotions; as practice shows, nothing good has ever come out of this. After such a “woeful repair”, the first time you press the gas pedal, the spark plug will shoot out so that it will be very difficult to find it.
Features and advantages of cylinder head studs
Almost every car is equipped with studs, and not serial bolts, to secure the cylinder head. The steel used for their manufacture can significantly increase the level of tightness of the engine head gasket. This ensures a reliable gasket seal and eliminates the possibility of oil and coolant leaks.
If used for a long time due to metal aging, this cylinder head part requires replacement. Possible damage when removing the head. The work is quite painstaking and requires a lot of effort.
All work must be carried out in stages and some recommendations must be followed.
Setting the tap
Now perhaps the most difficult operation awaits you - to align the tap and the new hole along the same axis. If the machine allows you to rotate the spindle independently, it is advisable to place a roughing tap in the spindle and, rotating the spindle pulley clockwise, bring the tap to the hole. If you realize that the tap has been “grabbed”, you must immediately stop vertical feeding.
Remember that you need to remove the machine's drive belt during this operation, this will ensure that you do not suffer any serious injuries during repair work. After the roughing tap has already done its job, you can remove the head from the machine and, having chamfered the reverse side of the thread, process it with a finishing tap. By the way, the finishing tap should go along the thread without cutting it, this is necessary for a greater tightness of the fitting.
The hole should be degreased with gasoline or solvent, and the insert should be screwed tightly into the head. By the way, before doing this, the head threads need to be lubricated with thread locker or glue. After this, the threaded end of the fitting should be flared from the chamfer side using a regular ball from a bearing. To do this, hit it with a hammer through a metal spacer. Remember that flaring must be done to prevent the insert from being turned out of the head when unscrewing the spark plug. The last stage of this operation is calibration of the “updated” hole for the spark plug using a tap with an M14x1.25 thread. It is known that if you wrap the insert into a tight thread and flare its lower end, the thread, as a rule, is slightly deformed.
Good luck, motorists, in repairing the cylinder head threads!