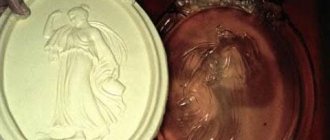
Printed concrete (stamped concrete) is a relatively new construction technology for Russia that allows you to turn a “dull gray” concrete surface into a real work of art.
That is why stamped concrete is often called “architectural concrete”. Using this technology, you can visually accurately imitate the surface of areas made of “noble” components: granite paving stones, slate, marble, brick, weathered stone, shell rock and other materials. .
Printed concrete manufacturing technology
The technology of stamped concrete is not prohibitively complex, and can be implemented on your own using relatively inexpensive universal construction tools
The essence of the process of making architectural concrete is to give the surface of the prepared concrete site texture and color: granite paving stones, boardwalk, brickwork, animal skins, whatever. For this purpose, special rubber stamps, special coloring and strengthening materials, as well as special tools and equipment are used.
To implement the technology of printed concrete on your own, you will need to have, purchase or rent special tools and equipment. In particular, you will need the following tools for stamped concrete:
- Concrete mixer, galvanized buckets, shovels and bayonet shovels for making the base - heavy concrete. Note If ready-made concrete material is purchased from the nearest bacon factory, there is no need for this equipment.
- Special rubber stamps in the amount of 6-7 pieces and a tamper for “compressing” the concrete surface with stamps.
- Angle grinder with a cutting tool “for concrete”, for opening expansion joints and correcting stamping defects.
- Scraper for leveling the surface of concrete.
- Magnesium floating strip for rubbing in color strengthening agent.
- Magnesium polisher for leveling concrete.
- Manual edge bender for forming corners.
- Steel trowel.
- Vibrating screed.
- Rustication to eliminate defects in joints.
- Texture roller for processing stamp joints.
- Paint brushes, paint roller, plastic buckets.
In addition, you will need 100x20 (25) mm edged boards for formwork, M350 concrete and a number of special finishing materials which will be discussed below. As you can see, the technology of blasted concrete will require certain costs for the purchase of special tools.
However, considering that the price for 1 m2 of printed concrete starts from 1,500 rubles and above, it makes sense to spend money. Moreover, some of the above tools will definitely be needed later for other construction work on a private or country estate.
Removing defects and washing the surface
When joining matrices, sometimes the cement mixture shifts, resulting in unclear seams. To fix this, they are rolled with a roller.
- Joint jointing, when there is a need to imitate brick or stone masonry, can be done 6 to 12 hours after the pattern is formed using matrices.
- To do this, use a suitable cutting tool, you can even use a screwdriver. Suture adjustments should occur no later than 24 hours later.
Additional processing of seams allows you to make the coating pattern more expressive
- After a day, it is necessary to wash the decorative surface to remove excess material. To do this, use ordinary water and a hose.
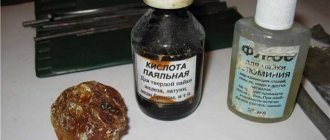
- The stamped concrete is then treated with acid, which produces different shades by opening the pores in the material.
- This also contributes to better interaction between concrete and polymer sealant, which increases the wear resistance of the material and gives the decorative surface a varnish shine and color saturation.
- In addition, the maintenance of decorative concrete is simplified. Application of 2-3 layers of sealant is carried out 24 hours after washing the surface using a roller and brush in places of deep seams.
Stages of work
As already mentioned, you can make printed concrete yourself. However, it is best to take on this work with some experience in handling concrete. Problems that inexperienced stamped concrete layers may encounter:
- The material hardens quickly, making it impossible to get a clear print.
- Difficulties in correcting typing errors.
- The need to be able to handle an angle grinder, trowel, magnesium lathe and other construction tools.
In general, the technology for producing architectural concrete consists of the following main stages:
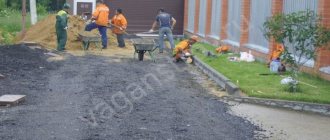
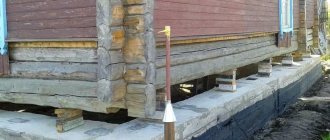
- Surface preparation. The base for pouring concrete for stamping is a standard planned area of the required dimensions. The boundaries of the site are marked with pegs and a cord. Next, along the line of the cord, the soil is removed to a depth of 20 cm. The resulting surface is compacted, a crushed stone cushion 10-12 cm thick is poured, formwork is installed from boards, and a reinforcing mesh is laid, placing pebbles 3-4 high under the mesh cm.
- Preparation (purchase) and pouring of heavy concrete grade M 350 or higher.
- Leveling the surface as a rule.
- Compacting concrete with a vibrating screed.
- Smoothing the surface with a trowel until the surface is smooth, uniform and horizontal.
- Application of the “MONOPRESS” hardener. This is a colored hardener, which is a fine powder of various colors. Work on its application begins after the initial hardening of the surface. The powder is spread manually in a format “from the center to the edges of the concrete.”
- Allow the initial layer of hardener to penetrate into the concrete for 10 minutes. Smooth the surface with a magnesium trowel and apply a second layer of color hardener.
- The edges of the corners are formed using a manual edge bender.
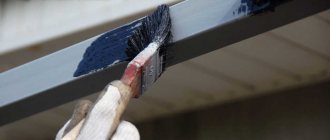
- The next stage is the application of a special separating component from Increte Systems to the concrete surface, which ensures that the loaf does not stick to the molds. The separating component is applied using a paintbrush. The brush is immersed in the container with the component, and the release powder is sprayed horizontally using double hands over the surface of the base for stamping.
- Stamping. One of the most critical stages. Before stamping, it is necessary to check that the surface has the required degree of ductility. To do this, you need to press your finger in different parts of the site. If, after pressing, an imprint with a depth of 5-6 mm remains, you can begin stamping. The available rubber stamps are laid out on the surface according to the accepted pattern, and pressed into the concrete with a tamper. After this, the prints are left to harden for 1 day.
- Elimination of stamping defects using rustication.
- Cutting temperature-shrinkable joints using a grinder and a disc for concrete.
- Washing concrete from the separating component with running water.
- Washing concrete with hydrochloric acid solution.
- Spraying Clear Seal with a paint roller and paint brush. The sealant serves as protection for stamped concrete from abrasion, and also gives its surface rich color and a pleasant shine.
- Drying. After the sealant has dried, stamped concrete is ready for use.
What to add to concrete for color at home. Working with pigment
Three types of pigments help make concrete colored:
- Metal oxides;
- Pigments from minerals and mining products;
- Chemical complex compounds.
A special feature of working with any coloring components is the difficulty of choosing a shade: each base color can have a wide range from saturated to pale, and pigments can also be combined with each other.
Dyes for tinting concrete are dry powders that are dissolved in water. The intensity of their manifestation depends on several conditions:
- Type of binder used. To obtain a pure color solution, it is advisable to use colored cement or pure white - it will not give a gray tint to the background, unlike ordinary Portland cement.
- The amount of pigment and its quality determine the intensity of the color and the duration of its preservation. Different compositions require a special approach when diluting and carrying out concrete work (temperature, humidity).
- The quality of the main components of the concrete solution - cement, sand, coarse filler (crushed stone, colored glass can be added, there may be no major incidents at all). Their purity and basic parameters must comply with GOST 26633-2012;
- The amount of water affects the color intensity and strength of the finished stone, so you should not deviate from the technology and recipe. Excess liquid will make the mixture workable, but the products most likely will not last long, and the color will wash off quickly.
The technology used to produce colored concrete is no different from mixing a regular mortar, with the exception that pigment is added to the water.
At home, you cannot do without an autonomous concrete mixer for mixing components - only with its participation can you dissolve the paint and achieve its complete distribution throughout the entire volume.
How to make colored concrete:
- Pour 7-8 liters of water into the concrete mixer;
- Pour the pigment into the water according to the instructions;
- To impart plasticity to the solution in water, it is also necessary to dissolve a plasticizer. This must be a special agent that increases the elasticity of concrete. As for the use of soap and any detergents with surfactants, opinions on the advisability of their use are controversial. In industrial construction, the use of such a component is impossible and is not considered; in private practice, many craftsmen actively use surfactants;
- Now cement and sand are added to the solution in a ratio of 1:3 (it is convenient to measure in units, 4 buckets of dry substances will require 7-8 liters of water). At the same stage, a large filler is introduced.
The technology for mixing colored masonry mortar is presented in
After mixing is completed, the mass is placed in a mold, applied to the wall or laid, depending on the purpose of the solution.
Colored cement is also sold ready-made, mixed with pigment. In this case, the kneading is carried out using conventional technology.