Decorative plaster is one of the most effective types of finishing work. It can be used for treating the external surfaces of buildings and structures, and for plastering indoor walls. To do the job efficiently, you need a special tool: a plaster spatula.
A trowel is a hand tool, polished on both sides, designed for plastering walls. The handle is made of wood or plastic with a curved shape. There is a whole group of tools that are designed for plastering work. Read below about what a trowel is and what type of tool is used to decorate work surfaces.
What is a trowel
The instrument, whose name comes from the German language (kelle), is called a trowel in Russian. You can read more about the definition of trowel on Wikipedia. The tool is designed to perform many operations related to the application and formation of a solution. You can, for example, measure the required amount of bulk components and mix the solution. Having scooped the mixture with a trowel or applied it to a spatula with a spatula, it is applied to the base using this universal tool.
The smooth, straight side edges of the trowel make it possible to pick up excess mixture from the wall surface. A flat (concave or convex) plate is used to level the mortar layer. With a trowel you can grout or create a decorative relief from the surface layer of the plaster mass.
You might be interested
Walls and ceiling How to lay tiles on a wall with your own hands: detailed instructions and what mistakes are best to avoid Ceramic tiles are one of the best materials for finishing rooms with... Evgeniy Afanasyev 2605 0
Walls and ceiling Ideal walls: how to check the craftsmen and how to prepare walls for painting with your own hands A perfectly flat and smooth wall is the optimal basis for applying absolutely... Ekaterina Volotkovich 4384 0
Walls and ceiling How to insulate a loggia from the inside: instructions and which zones to pay attention to first The loggia could well be called an additional room in the apartment, but... Evgeniy Afanasyev 5581 0
News Soundproofing in a new building: how to get along with a “human neighbor”? High audibility in new buildings is, of course, not a problem on a universal scale, but... Ekaterina Volotkovich 32933 0
Walls and ceiling How to effectively isolate yourself from noise in an apartment: TOP 12 best soundproofing materials Living in an apartment building or a country house is inevitably associated with the problem of abundance... Artem Masalsky 3795 0
Device and characteristics
The main parts of the trowel are a lamellar spatula, a handle securely attached to the base, and a handle mounted on the handle. Each of the parts in various modifications of the tool has its own shape and features. They depend on the type of operations for which the model is intended.
The main shapes of the blades are:
- triangular;
- trapezoidal;
- rectangular;
- diamond-shaped;
- teardrop-shaped;
- oval.
Each shape can have its own characteristics: rounded corners, pointed or rounded edges of the side edges. The traditional blade material is steel. Stainless steel products are popular - service life in contact with raw materials depends on the material’s resistance to corrosion.
Other metals used for blades are brass and titanium. Modern materials used are plexiglass and plastics. The thickness of the plate ranges from 0.5-2 mm.
To ensure that the solution slides off the plate easily, it is polished. The solution comes off especially easily from polished stainless steel.
The handle is in most cases made of metal.
Its connection to the plate can be:
- welded;
- screw;
- riveted;
- cast.
The working plate and the surface of the black iron handle can be covered with an insulating, refining layer. For this purpose, anodizing, painting or galvanizing is used.
The shape of the handle determines the position of the handle in relation to the base. A removable handle is put on its second end, the ends of which are completed by a metal cap (strengthening the junction of the handle and the handle) and a fungus (heel), which is used to tap the brick or laying tile during work. The metal heel protects the handle from impacts.
The handle can be wooden, plastic, rubber, polymer or metal (rubber-coated). It should be firmly fixed to the handle and be comfortable to hold with your hand. The length of the handle is no less than the width of the plasterer’s palm.
The main dimensions of the trowel are the length and maximum width of the blade, the total length of the product. Different modifications have their own parameters. Weight (on average) – 0.3-0.4 kg.
Trowels, like other construction tools, are manufactured by manufacturers in accordance with State Standard 9533-81.
Features of the spatula
Of course, it is best to apply Venetian plaster to walls using a trowel, but a spatula is also considered a very worthy alternative to this device.
To carry out such facing work, it is necessary to have a steel object that will be relatively small in size. Some people are simply uncomfortable working with a trowel. There are many options when one device can be replaced by another. That’s why you definitely shouldn’t discount the spatula.
When choosing a spatula, you must also follow some rules:
- The angles of the tool should be straight, since this shape is best suited for finishing walls.
- The spatula must be made entirely of metal. It is not recommended to use products made from other materials.
- To apply plaster, you only need to select a narrow tool to make it easier to apply the material to particularly difficult places. It should be borne in mind that to apply such a cladding, it is important to use several spatulas at once to perform some manipulations.
- The tool must fit well in the user’s hands so that the work is as comfortable as possible.
- The spatula used to apply Venetian plaster must be well polished on both sides and also have a fairly flexible blade.
Tools for finishing walls with Venetian plaster need to be selected very carefully, so that the work will be carried out correctly and comfortably, and will also bring the desired result.
If you are a beginner and are not well versed in this matter, then you need to remember that only a true professional can cope with the task using poor material. The chosen trowel must necessarily meet the best requirements that apply to the acquisition of such a tool.
Main types of trowel
| 1. Mason's trowel |
| Designed for almost all operations of laying cement composition in brickwork, namely, dosing dry components, mixing and applying mortar. The plate is triangular in shape, has a length of 12-18 cm, a width of 10 cm. This shape makes it possible to lay the mixture in hard-to-reach places and pick up excess. The handle is attached to a steel plate at the top center of the narrow edge; its angle can be changed to make it more convenient for the mason. The handle is completed with a metal fungus (heel), for tapping the brick when laying. To prevent the mortar sliding from the blade from getting on your hand while tapping, the elevation of the handle above the warping plane is made at least 40 mm. The steel must be of high quality, because a trowel is also used for chipping bricks. |
| 2. Trowel for applying glue |
| When laying aerated concrete blocks, it has teeth along the edge of the working edge (for profiling the surface of the adhesive composition). For small masonry volumes, you can use a regular toothed trowel with a rectangular plate. For large volumes, use a trowel-bucket with a serrated cutting edge. You can make such a tool yourself. |
| 3. Trowel for filling seams |
| Often used in conjunction with jointing. The wide plane of the working surface helps to hold the mortar stock. On one edge there is a raised side, which is convenient to use when filling horizontal joints, and on the other side there is a high wall with a 10 mm gap for filling vertical joints with plaster. The handle of the instrument is like that of a falcon. |
| 4. Venetian trowel for decorative plaster |
| Initially intended for working with mixtures containing marble flour or other tiny fillers. Trowels for Venetian plaster can have a perfectly flat or concave, thin, elastic, durable plate of various configurations, necessarily rounded corners, a handle placed above the spatula in the center (to evenly press the plate to the base), metal that does not leave black marks when ironing. The main dimensions of the plates are: 20x8 and 24x10 cm. Less commonly, trowels with a plate size of 28x12 cm are used to apply decorative plaster. |
| 5. Corner trowel |
| It has a metal plate bent at a right angle. Which side of the corner (external or internal) the handle is attached determines the purpose of the tool for plastering husks or stubs. |
| 6. Trowel-joint |
| Used when decorating the surface of masonry joints. Its plate is narrow, elongated, can be flat or have a concave or convex shape. The length of the plate is 10-7.5 cm, the tip can be pointed. |
| 7. Toothed trowel |
| When passing, it creates a comb relief on the surface of the solution, so the two edges of its rectangular metal plate are a series of teeth. The height of the cloves can be from 4 to 10 mm. Using these tools, an adhesive composition is applied when creating a “wet facade” system before applying reinforcing mesh and gluing facing tiles. The handle is attached to the back of the plate in the center. |
| 8. Trowel |
| Used for smoothing mortar and grouting. It is used to roll pebbles in decorative bark beetle plaster, and it is used to make iron. The dimensions of the plate are the same as the Venetian and serrated. |
| 9. Plastering trowel |
| Used for rough work when applying and leveling leveling plaster. Therefore, the size and shape of the plate should facilitate collecting a sufficient amount of mortar and throwing it onto the wall. The most convenient are drop-shaped plates with a length of 19 and a width of 16 cm. |
| 10. Tiler's trowel |
| Designed for applying and leveling the adhesive layer. The shape of the blade leaf is trapezoidal or teardrop-shaped. The corners are cut straight. The handle at the end must be reinforced with a metal element - a fungus or a cap for tapping. |
| 11. Concrete trowel |
| It is similar to a mason's trowel, differs in the length of the blade (length up to 20, width up to 16 cm), as well as the rounding of all corners of the steel plate. Rounded corners allow you to level the solution without leaving sharp stripes over a large area. |
| 12. Finisher's trowel |
| It is distinguished by a variety of plate shapes, the main advantage of which is a very high degree of smoothness of the working surface. Only stainless steel is used for plates. This includes the Venetian trowel. |
| 13. Stove-maker's trowel |
| It does not have to be large in size, since the mortar is applied only for laying one brick. Therefore, a plate 10-12 cm long and 6-8 cm wide is sufficient. Craftsmen recommend a cut flat spout, which can be used to work in narrow cavities. The corners are rounded. |
| 14. English |
| Received its name from the place where it appeared. The tool has edges with different configurations. One edge (curved and sharp) is designed for splitting bricks, the second edge (straight with a rounded edge) is for conveniently collecting mortar and picking up excess. Left-handed people learn this instrument faster. |
| 15. Philadelphia (aka Canadian) |
| It differs from the English one in the width of the blade (it is much wider than that of ordinary trowels) and in the way the edges are curved. |
| 16. Transparent trowel |
| For applying liquid wallpaper, it is made of either transparent plastic or plexiglass. A rectangular plate allows you to visually control the process of applying liquid wallpaper |
How to create texture from plaster on a wall
The texture on the plaster depends on the size and purpose of the room, available materials, the capabilities of the craftsman and the flight of imagination. Using a trowel you can create a whole series of designs on the walls. Let's look at the most popular options.
"Grotto." It looks very expensive on the walls, especially dark and rich shades.
Apply 1 layer - primer. Dries in at least 8 hours. 2nd layer – plaster 2-3 mm. Also let it dry for at least three hours. The 3rd layer is the same plaster, but it is applied in islands: the trowel is dipped horizontally into a bucket of material, and then it touches the wall parallel to the surface. Pointed light touches. As a result, so-called “mountains” are formed. Their frequency and height depends on your desire. After partial drying (touch them with your finger - they should give in a little), we again smooth them with a trowel. We very easily walk along the tops of the mountains, comparing them. You should not start all movements on one side. Try to do it chaotically - then there will be no clear lines. After drying, the walls are painted with colorless varnish using a roller, or the plaster is diluted by 30 percent with water and the wall is also painted with a roller. After this, the completely dry walls are polished with a special device or manually rubbed with a woolen rag. Grotto is ready.
“Venetian” plaster is one of the most fashionable and popular options at the moment. Light, delicate colors look best.
1 layer – primer; 2nd layer – plaster (look at the sequence of working with the grotto). Next, using a trowel, we simply apply strokes of the material in different directions. After partial drying, press it down. We take the plaster a couple of shades darker and plaster it with a trowel again. The material will fill the gaps between already dried strokes. Next comes leveling, drying, varnishing and polishing. For a more noticeable effect, you can apply a radically different color to a washcloth and gently rub it over the wall. It will give the impression of greater relief.
Decorative plaster “Ottocento” is very similar in appearance to Venetian plaster. We repeat stages 1 and 2 (primer, first layer of plaster). Next, we apply the second layer and spread it along the wall, using a trowel to draw lying figure eights - something like a mathematical infinity sign. After partial drying, press down. Next we plaster with a slightly different color from the previous layer. The next steps are also known: drying, polishing.
If you don't have artistic skills, it doesn't matter. Don't chase fancy names. Make it as texture as you can. Just make sure that it is the same along the entire length of the walls.
In small rooms, pompous textures such as grotto and Venetian are not always appropriate. But if you still want something special, improve the tool yourself: take a trowel and wrap a thread of yarn around it, a fishing line with stringed beads or beads, put on a strong plastic bag, a fishing net, attach a kitchen sponge, the imagination is endless. And then touch the plaster that has not yet dried with such a tool. The frequency and size of the pattern depends on your desire and skill.
Trowel selection criteria
The result of plastering largely depends on the correct choice of modification and quality of the tool.
Criterias of choice:
- material of the working part (for heavy cement solutions, choose a metal spatula; for gypsum mixtures, a plastic tool will do);
- plate shape;
- product dimensions;
- the shape of the bend of the blade (flatness, convexity, concavity);
- shape, material, handle comfort;
- the presence of a tip and fungus on the handle;
- tool weight;
- compliance with a certain type of work;
- the ability to replace the blade or handle;
- manufacturer;
- price.
Techniques for applying plaster with a trowel
In the plastering craft, there are two main methods of applying mortar with a trowel for plaster:
- throwing (performed when applying rough leveling plaster - layers of spray and soil);
- spreading (this technique is used to apply primer, coating, and decorative compounds).
There is another method of application, used only in decorative plastering - transferring the solution by trimming. The solution is applied to the blade with a spatula and distributed over the surface of the plate. By pressing the tool to the base and retracting it, a part of the solution is left in the form of a fringed imprint.
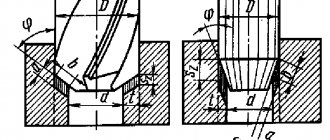
For throwing, a trowel is suitable, the handle of which is attached to the end of the tool, raised above the spatula and moved away from it. The solution is scooped onto a spatula from a container or taken from a falcon and, bringing it to the wall, with a sharp movement of the brush the mass is thrown onto the wall. Only the hand is involved in the movement, swinging and stopping abruptly. By inertia, the solution flies off the plate and flies towards the wall.
The heavier the solution, the more abruptly the brush is stopped.
For spraying, the solution is made thinner and thrown so that it splashes, pressing into the base upon impact. For soil, the throw is made softer so that the solution only lies on the base without splashing.
For spreading, use tools with rectangular blades. The tool with the mixture is brought to the wall, holding the spatula at an angle to the base. Pressing the solution against the wall with a plate, leave between the lower edge of the plate plane and the wall a distance equal to the thickness of the applied layer. By moving a spatula along the surface of the wall, the plaster mass is spread in an even layer.
In decorative plaster, strokes are of the following types: wet-dry (the beginning of a stroke on a freshly laid mortar) or dry-wet (the beginning of a stroke on an untreated surface).
The most delicate work is considered to be the application of layers of Venetian. The solution is applied to the edge of the blade with a spatula in small doses. The strokes are made arched. The mixture is applied randomly with very thin strokes (since the filler is stone flour), the gap between the free edge of the trowel and the wall is kept approximately equal to the thickness of a finger. The coating is made in three or more layers, starting with the base layer.
Sequence of work
The thickness of the decorative plaster layer must correspond to the thickness of the fraction.
Polymer compositions can be applied in 1 layer; in other cases, at least 2 are required. As an example, we consider the “fur coat” finishing technology using silicone plaster and a fur roller.
Stages of work:
Use a spatula to transfer a small amount of the composition onto the trowel; without scribbling, apply the plaster to the surface; align the tent with chaotic movements, without pressing on the trowel; Use a polyurethane float to rub the plaster in a circular motion; it is important not to press too hard on the trowel and trowel, so as not to “wash out” the filler; Before painting, the surface is covered with a primer in 1 layer and left until dry; a fur roller is lowered into the tinted composition and rolled slightly; rolling is carried out in a strictly horizontal or vertical position, starting from the top edge of the wall; as a result, the surface acquires a grainy texture; After drying, remove the falling out elements with a wet trowel and No. 320 sandpaper.
For tinting, you can use universal pigments or water-dispersion paints.
After adjusting the relief, the wall must be covered with a layer of natural wax. To do this, dip a foam roller into wax and roll it over the surface. Wearing fluffy mittens or taking a porous sponge, rub the composition into the surface. The protective layer dries in 12 to 24 hours.
DIY Venetian trowel
A trowel for decorative plaster can be made at home. For example, a Venetian trowel is made from thin sheet stainless steel.
To do this, perform the following operations:
- markings are applied to the sheet;
- cut out a rectangular blade for the blade;
- round corners;
- the metal rod for the handle is bent and one end is welded to the plate;
- at the second end a thread is cut for the nut;
- make a handle out of wood, place it on the handle, and secure it with a nut;
- process the edges of the plate with sandpaper;
- polish the entire plate.
Video on the topic of making a trowel with your own hands.
Tags
Construction trowel Characteristics of trowels making trowels Trowels in Mason's trowel Trowel for Trowel for Trowel for the difference between a trowel for the difference between a trowel and plaster plaster Plaster is applied decorative plaster differs gypsum plaster quite the most important tools construction tools. construction tools. tool on a tool. a good tool is not the best tool and such a tool is not otherwise a tool heavy tool length throwing mortar. cement mortar. laying mortar laying mortar applying adhesive mortar. and applying construction materials
varieties of design
Review of manufacturers
As usual, tools from various manufacturers, tested by many plasterers with their own hands, become popular or, conversely, are rejected.
Among those that are of high quality and recognized as the best are the following:
- For a Venetian woman, the best products are considered to be from three Italian companies: Oikos (wooden handle, blade made of Oikos Inox steel, the most expensive) is considered the best for Venetian women; Pavan (for thin-layer plasters, including Venetian plasters) costs almost twice as much; Armego A233 (blade 0.7 mm thick, price four times lower than Oikos). All these tools have rounded edges, which is convenient when working.
- For thin-layer decorative finishes, the French product Senideco is also recognized as one of the best. They perform not only Venetian plaster, but also silk plaster.
- Other good trowels for decorative plaster are the English Haris and the Italian CO ME 310LEN.
If you are building a house or are going to make repairs and do plastering decorations yourself, then you will need tools, including a trowel for decorative plaster and a trowel for leveling rough mortars, which are not the last tools. After reading the article, you will easily find your way around the large number of different models offered by the market and will be able to choose what is suitable for the implementation of your ideas.
Life hacks for using a trowel
And I would like to conclude today’s article with a selection of tips on how to use a trowel in such a way as to get the most out of it, save on its purchase, choose the best tool and simply not get into a puddle during cosmetic or construction work
- The most convenient material for a handle is wood. During contact with it, hands do not sweat as much as, say, with plastic, and at the same time, it does not heat up or cool down to an uncomfortable state for the hand.
- The best option for purchase is a little-known model in the mid-price segment. In terms of characteristics, they are no different from expensive ones, and cheap ones are too low-quality. Any consultant will tell you more about this.
- Don't use trowels that are too big or too small. When choosing, rely on the future function. If desired, the same version can be used for several types of work.
- Wholesale purchasing is cheaper than retail purchasing. Therefore, when going for everything you need for repairs, take everything at once.
- When rounding figures, take those that are closer to the smaller or larger.
- Don't trust market sellers. It is better to go to a specialized department, but be sure of the reliability of what you are buying.
IMPORTANT! Please inquire about return options. Some sellers refuse to return money for goods, arguing that this is due to the alleged rules of the trading company. This particularly applies to online companies.
And, remember, the most important thing is how this or that work was done, and not who did it.