How and with what to tie the reinforcement? At first glance, it seems that the answer to this question is simple. We take a soft annealed knitting wire, a hook and get to work. But the experience of users of our portal suggests that even in such a simple matter there are a lot of nuances, starting from the choice of wire diameter and ending with the method of binding. However, these “little things” directly affect the speed of work and final costs. So, from this article you will learn:
- Is it profitable to tie a reinforcement cage with a battery-powered knitting gun?
- How to make a homemade hook for tying reinforcement.
- How to learn to crochet reinforcement.
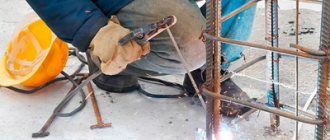
Connection method by welding
At first glance, one of the fastest, simplest and best ways to fairly reliably and firmly connect reinforcing bars to each other is to weld them.
However, like any other simple method, it has several significant disadvantages. For example, the first disadvantage is a significant decrease in the quality of the reinforcement product, which leads to a deterioration in the strength of the entire building. The next drawback is the clear need to attract both additional resources and professionals in this field to this process. Scheme of strip foundation reinforcement.
Welding significantly increases the rigidity of the reinforcement frame several times, which is usually unreasonable. Reinforcing blocks are often damaged and broken, so their displacement is very dangerous, and when the building shrinks and the density of concrete increases, this happens quite often.
Given that during the construction process concrete vibrators are often used to compact the composition, the likelihood of failure of welding joints increases.
Considering all these reasons, the method of connecting reinforcement by welding is ineffective and is rarely used.
For strip foundation
The strip foundation reinforcement has two patterns for laying rods:
- system of 4 rods : two at the base of the foundation, two at the top (used if the width of the foundation does not exceed 50 cm),
- system of 6 rods : an additional longitudinal rod is placed between the two main ones (used in cases where the foundation width is more than 50 cm).
Bent reinforcement is laid at the corners, and the ends should protrude from the corner by at least 40 cm. The reinforcement connection nodes should be located from each other at a distance of no more than 60 bar diameters . For example, if 12 mm reinforcement is used, then the strapping should be every 72 cm or more often. How to choose reinforcement for a strip foundation?
Methods
You can tie reinforcement with wire using a number of tools and devices known to everyone. Let's list them.
Special pistol. He gets the job done quickly. However, this tool is quite expensive: it costs about 1 thousand dollars. But with it it is impossible to approach the internal pins of a wide and high foundation frame. This device is convenient to work only at the extreme points of the frame.
You can soften any steel by heating it red-hot and then letting it cool under normal conditions.
If there is no opportunity or desire to purchase ready-made binding wire, then you can burn any old tire, after which only steel wire of the required softness will remain. But burned steel partially turns into scale, becomes thinner and more brittle, so this solution is a last resort.
Methods of knitting reinforcement
In most cases, it is easier and cheaper (and no less effective) to fasten reinforcement frame elements using wire binding. Devices for tying reinforcement may look different, you can knit
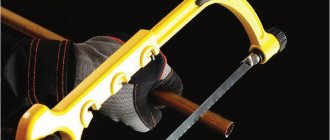
Manually, using such a simple device as a steel hook with a wooden or plastic handle. The advantages of crocheting include its low cost and the ability to make a tool “to suit your hand”, in accordance with your preferences, and from available materials (thick, up to 5 mm, wire, welding electrode, etc.) In addition , even an inexperienced reinforcement worker quickly acquires the skills of tying any knots and in a matter of days makes significant progress in labor productivity.
Among the shortcomings, the insufficient rigidity of the resulting frame is noted. But this problem can be solved by using viscous reinforcement directly in the formwork; in this case, the frame does not need to be moved anywhere, and the structure will not become loose.
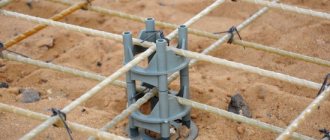
Tying reinforcement with plastic clamps does not require even the minimum training that a reinforcer needs to undergo to tie with wire using a hook. The disadvantages include the high cost of plastic clamps compared to wire, the impossibility of correcting the fastening after incorrect tying, and the absolute prohibition of moving a structure made of reinforcement fastened with such clamps. Plus the fragility of such a coupling at subzero temperatures. In addition to plastic tape clamps, during mass construction, when large batches of reinforcing structures are made from the existing size of reinforcement, special polymer elements are used in the size of the reinforcement used.
Plastic clips
- Using pliers (pliers), which are used to bite off excess wire after tying a wire knot, the speed of tying with pliers is comparable to the speed of crocheting, but there is a significant saving in wire, since they do not use pre-cut pieces, but a whole coil. First of all, due to the fact that it is possible to knit into one wire and you don’t have to make loops. The downside is that it takes much more time to learn truly productive work.
- Using a screwdriver, into which, instead of a bit or drill, a rod bent in a special way is inserted (the same hand hook, only without a handle). Using this device, the knitting process is accelerated by 2-3 times. In addition, if the speed of rotation is correctly adjusted, the wire will not break at maximum tension;
- Using a special knitting gun. This tool allows you to connect reinforcement elements with maximum speed; for experienced reinforcers, this process takes about a second. The disadvantage of such a tool is that it is bulky; it is not possible to approach the connecting elements of the reinforcement frame everywhere. In addition, the binding gun is expensive and slowly pays for itself; it is used only for industrial volumes of reinforced concrete production. And it is impossible for them to work in the rain. Then, to thread it into the clip, you need a wire of a strictly defined grade, which may not be available at the construction site, and the wire required according to GOST standards for tying reinforcement with a thickness of over 2.5 mm cannot be threaded into such a gun either - it is not structurally designed for this.
Knots and twists
The reinforcement bars from which its horizontal component is formed, or a horizontal and vertical bar, are attached to one another with a diagonal loop folded in half. In this case, the eyelet, obtained by bending the wire in half, is grabbed by the hook, and the two free ends of the wire folded together are wound by hand with a couple of turns onto the very tip of the hook. Then the hook is turned 2-3 times, thereby connecting the loop of wire and its free double end until the rods adjacent to one another are completely pressed against each other, without gaps or backlash.
In the case of tying two horizontal and one vertical bars of reinforcement, the loop for the tying is made cross-shaped, that is, mutually diagonal. And they also tighten it with a hook until all three elements of the reinforcement frame are completely attracted to each other.
Recommendations for mating
Having selected the wire of the required diameter and prepared the tool for knitting, it is recommended to follow the tips:
- to fix the immobility of perpendicular rods during knitting, you can use boards, clamping the ends of the rods with them;
- after knitting, it is necessary to check the strength of the nodes, since when pouring concrete using a concrete pump, shifts and displacements of the frame may occur;
- Corner rods need stronger reinforcement, so the wire assemblies at the corners are made and checked especially carefully.
You can check the strength of a frame made of reinforcement using the mechanical influence of a person’s weight.
Knitting the reinforcement frame is necessary when forming monolithic reinforced concrete building elements. Since the number of knots when attaching rods is quite large, it becomes necessary to choose the optimal method of twisting the wire. For this, a special hook is used, the design of which may vary. Moreover, each knitting tool has its own advantages that will be useful in certain areas of construction.
Features of connecting reinforcement with plastic clamps
The main advantages of this method are that it does not require special skills, it has a high speed of work, and reliable fixation of the reinforcement. The disadvantages of this method are the following:
- Price. For large volumes, the wire will be more economical.
- Speed of work (when compared with other methods of knitting).
- Correction. You made a mistake somewhere, you will have to bite off the clamp, it becomes unusable, but the wire can be tied up.
- Reliability. It is not advisable to move around a structure connected with plastic clamps.
- Temperature. They burst at subzero temperatures.
Based on these data, we can say that this method is more suitable for private construction, with small volumes, and it is also suitable for people who want to do the reinforcement themselves with their own hands.
Knitting or welding?
To ensure increased strength of the slab base, reinforcing bars are assembled into a load-bearing structure in several ways:
- The rods and lattice fragments are tied together with binding wire. To impart plasticity, the wire is additionally fired. When connecting parts, use a special steel hook.
- The elements of the load-bearing frame are fixed using electric current. In domestic conditions, welding is carried out in the traditional way; in industrial conditions, resistance spot welding is used.
Methods of fixation with wire and welding are characterized by their advantages and disadvantages, which, in turn, predetermines the lack of consensus among craftsmen.
So, the advantages of mating are as follows:
- preserves the structure and strength of the metal along the entire length of the steel elements;
- the cost of work is much lower than the use of electrodes.
The main disadvantages of the technology for binding the reinforcing frame:
- the mobility of the structure creates difficulties during the assembly process;
- installation requires significant time and labor costs.
Advantages of welded reinforcing frames:
- joint rigidity;
- high assembly speed;
- practicality of the technique.
Disadvantages of the method of fixing the frame by welding:
- the need for sources of electric current and a welding machine;
- a high probability of metal burnout and a decrease in the strength of steel at welding points.
Taking into account the ambiguity in the effectiveness of both methods, in practice the following recommendations are followed:
- For the construction of multi-storey buildings, which will place a significant load on the foundation, the welding method is used. Highly qualified welders are involved in the work to reduce the risk of metal burnout at joints.
- In private housing construction, the reinforcing frame is mounted using knitting wire. The method is advantageous in its ease of assembly without the use of expensive equipment, as well as the absence of increased stress at the points where the elements are joined.
Screwdriver device
Let's consider all the existing ways to connect reinforcement. Each of the options is good in some way, and is used by builders, depending on the type of building and design requirements. There are 3 ways to connect rods; with their help, a strong and reliable metal frame is created:
- Wire knitting.
- Welding.
- Plastic clamps.
These methods of tying reinforcement have their own characteristics. Each of them is correct and is applied depending on the requirements and the material used. When reinforcing a strip foundation for a private house, the reinforcement is often connected by welding rather than tied with wire. But which option is the best?
We invite you to familiarize yourself with a log bathhouse (152 photos): chopped log structures, a two-story log house-sauna, how to cut it with your own hands
Despite the fact that these are different technologies, the right choice can save money and time on construction, without sacrificing structural strength. The method of connecting elements by welding was previously considered one of the most reliable and effective. However, such technology is not always appropriate.
This method has some disadvantages:
- You need to have skills in working with a welding machine, otherwise you need to spend money on the services of a professional welder. In this case, the cost increases.
- Welding points are the weak point of the structure. There the strength of the frame becomes lower.
- The method is not suitable if you use fiberglass reinforcement. In addition, the A-400 (A-3) fittings, which are the most popular, cannot be connected by welding. Only rods with the index “C” are suitable for work, for example: A500C reinforcement.
Therefore, in modern monolithic construction, welding has been replaced by viscous welding. For private and residential houses, construction of a bathhouse, garage or other buildings, this is the best option for connecting reinforcement.
Why is this method so good? It has the following positive aspects:
- Speed of work completion. Knitting with wire takes little time, it is simple and does not require skills. However, if you do it manually, the process slows down. Next we will look at how to quickly knit reinforcement.
- Ease of troubleshooting. When working with welding, it will be more difficult to eliminate errors; you will have to take a grinder and cut the welding seam. The wire can be simply bitten off with wire cutters or unwound with a crochet hook.
- You don't need to be a professional to knit reinforcement.
- The reinforcement process can be performed in formwork.
- The cost of work is much lower.
An example of knitting a mesh of reinforcement with wire.
If we talk about shortcomings, we note the precariousness of the finished frame. True, this is not a big problem. The structure will be strong, the only problem is that when the frame is moved into the formwork, it begins to loosen, in this case it is possible to tack the reinforcement in several places by welding.
We suggest you familiarize yourself with How to set beacons from a profile
To solve this problem with fiberglass reinforcement, you need to attach several braces to make the structure more rigid and stable. By bending, the tension in the knitting areas changes, the frame moves. Therefore, you need to be careful when installing it in the formwork. It is better to knit the reinforcement in the formwork or above it if the strip foundation is being reinforced.
The main advantages of this method are that it does not require special skills, it has a high speed of work, and reliable fixation of the reinforcement. The disadvantages of this method are the following:
- Price. For large volumes, the wire will be more economical.
- Speed of work (when compared with other methods of knitting).
- Correction. You made a mistake somewhere, you will have to bite off the clamp, it becomes unusable, but the wire can be tied up.
- Reliability. It is not advisable to move around a structure connected with plastic clamps.
- Temperature. They burst at subzero temperatures.
A tool for tying reinforcement can be made using a screwdriver. A pre-prepared hook of the required length and shape is inserted into the screwdriver chuck. The work process is the same as when knitting with a manual device. The main thing is to choose the right operating mode for the equipment. The main parameter is the rotation speed.
When using an automatic gun, knot tying occurs at a speed of 1 knot per second. There is no need to cut the wire; it is cut automatically.
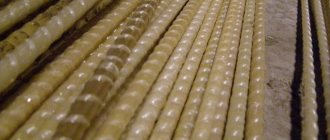
Types of reinforcement for tying
Before starting work, you need to decide on the fittings that are best suited. How to properly knit reinforcement for a strip foundation? Tying the strip foundation reinforcement is done with any pneumatic tool or hook. What if they are not around? An improvised tool is used. This is what is good about a strip foundation. Knitting of reinforcement can even be done using pliers.
Corrugated reinforcement is used in the main sections, because it has better adhesion to cement concrete, and smooth reinforcement is used for bonding in cross sections. It will cost a little less than the corrugated one.
Tying metal reinforcement
There are certain rules for mating. When choosing fittings, it is necessary to choose one that meets the requirements of GOST. During construction, a material that complies with GOST-5781-82 is often used. Has six strength classes.
It can be bent if necessary, and also welded using a welding machine. In the manufacture of the first class, low-carbon steel is used, and when the class is changed, the concentration of alloying additives increases, due to which the mechanical strength increases.
Bonding of composite reinforcement
Made from fiberglass, carbon fiber, basalt plastic. It contains fibers of carbon, basalt, as well as glass and aramid. The most common is fiberglass. It is lighter, cheaper, does not rust, does not bend, and cannot be welded with a welding machine. In the absence of welding capabilities, composite reinforcement has to be tied together. The advantage of this type is that it has low thermal conductivity.
Tying fiberglass reinforcement
Bound plastic reinforcement can be distinguished from metal reinforcement by the permissible distributed weight. When choosing fiberglass reinforcement as a reinforcing material, it is necessary to calculate the possible loads because the specific gravity it perceives is significantly different from the weight that metal reinforcement is capable of supporting. The binding process itself remains the same. The same tools and the same accompanying materials are used.
How is the quality of the wire and its compliance with GOST checked?
There are several standard ways to test finished wire:
- Immersion method. It is used to determine the uniformity and continuity of the zinc coating. Testing (GOST 4165–78) involves immersing the product in copper sulfate dissolved in water (distilled). This mixture is then filtered. If its density is in the range from 1.114 to 1.116 g/cm3, the coating is said to be of high quality. Before immersion, the samples under study are cleaned with benzene or alcohol, and lowered to a depth of 10 centimeters (the duration of stay in the solution is 60 seconds).
- Visual external examination (sometimes it is supplemented by examination of possible defects through a microscope). The purpose of this test is to establish the permissible depth of defects on the wire surface. If the depth is insignificant, the product is cleaned mechanically.
- Weight method. Designed to establish the volume of zinc on the surface of the product. It is produced by dissolving the sample in an inhibited sulfuric acid environment, then weighing the wire coil or coil and measuring the actual cross-section of the product after stripping the zinc from it.
- Gasometric volumetric technique. It is also used to determine the amount of zinc on finished wire products. But in this case, the coating is removed in acid until a complete stop in the emission of gases is observed.
In addition, other methods are used to analyze the wire we are considering. These include tests for:
- winding (the process is carried out according to State Standard 10447–80);
- rupture and stretching (Gosstandart 10446–80);
- inflection (Gosstandart 1579–80).
Tools for tying reinforcement, technology for working with them
You can make a crochet hook for reinforcement with your own hands from wire with a diameter of 4 mm. For this purpose, welding electrodes are used as they are the most durable. The manufacturing procedure is as follows:
- A small loop is formed at one end of the wire. It will serve as a support for the handle. The loop is made carefully so that the end is rounded towards the rod. During work, this place should not cling to clothing.
- In the central part, the rod is bent at an angle of 30 degrees in the shape of a rocker arm.
- Several washers are threaded onto the rod until they stop with a loop. This place will fix the handle.
The handle can be made in different versions:
- Take 2 tubes, constituting 1/3 of the length of the rod. If the rod is 4 mm in diameter, then one of the tubes should have an internal diameter of 5-6 mm. It is put on a rod. The second tube should have a larger internal diameter. It is put on from above, and the entire system is riveted with a hammer.
- 1 tube is taken. Slides onto the rod. The washer is welded to the handle and rod for fixation.
- A handle with a hole for a rod is turned from dense wood on a lathe. Instead of wood, you can use a polymer pipe. A washer is welded for the stopper.
If you do not make a ring at the bottom, then you also need to weld a washer.
Regardless of the type of device, the knitting technology is the same. The work is carried out according to the following scheme:
- The cut wire is folded in half.
- It is stretched under the intersection of the reinforcement.
- The free ends of the wire are crossed.
- The hook is pulled through the wire loop and hooks the loose ends.
- Rotational movements begin, during which the wire is wrapped.
- The hook is removed and the knot is checked for strength.
When checking the strength of the connection, the rigidity of the structure is checked. She must be motionless.
The process of knitting with a screw product is the same. The difference lies in the finishing stage. When threading a hook into a loop, you do not need to wrap it yourself. Thanks to the worm mechanism, just pull the handle towards you and the rotational movements will begin automatically.
We suggest you read How to install a round door handle
Low carbon steel is used as wire material. To prevent rupture during knitting, it must be held over the fire. After cooling, it is ready for use. Its diameter can be 1 mm, 1.2 mm, 1.4 mm. Parameters are selected based on experience. A wire that is too thin will break, and a wire that is too thick will be difficult to work with.
Nobody does the work manually. It's practically impossible. There are special tools for this purpose that speed up and simplify the process. Each tool has its own characteristics of use. The following devices are available for tying reinforcement:
- Hand hook.
- Knitting gun.
- Screwdriver.
- Ticks.
Each of the tools has its own pros and cons, we will consider them, as well as the technology for their use, and based on these data and the opinion of an expert (a reinforcement specialist with 10 years of experience), we will summarize and choose the best option for tying reinforcement.
The peculiarity of the work is that it is done manually. At first, the process will be lengthy, as you need to get better at it. The hook is made of steel, and the handle is made of wood or plastic. The cost of such a hook is 1 thousand rubles.
There are even automatic hooks on sale, but reviews about them are mixed. Some note the short lifespan, others say that it is difficult to twist wire 2 mm or more thick.
Reinforcement technology: execution order and features of the stages
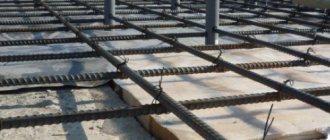
The frame for the future foundation is calculated and installed based on the dimensions of the trench, using working reinforcement and auxiliary wire. Its parameters are calculated in advance, taking into account the expected load; It is convenient to assemble the structure on a long workbench. Installation of fittings takes place in stages:
- Vertical elements (clamps) are assembled. The vertical position of the rods is checked using a plumb line.
- The lower horizontal belt is mounted. The lower belt works to deflect the foundation downwards. It is attached with a knitting wire to vertical clamps.
- The upper horizontal belt is mounted. Its task is to resist the upward bending of the foundation strip.
- Corner elements are mounted. They need to be given special attention because they connect the sides of the foundation. Additional rigidity is provided by additional vertical posts, which are laid twice as often.
- The formwork for the foundation is being prepared.
Installation of a linear fragment of a reinforcing frame Source beton-house.com
- The prepared reinforcing frame is being laid. During the installation process, pipes are laid between the reinforcement bars (the utility and ventilation systems will subsequently be laid through them).
- Concrete is poured. Filling is carried out in several stages, with each layer leveled (manually or with a vibrating platform). This technology ensures uniform distribution of the concrete mixture.
- The foundation is being waterproofed. After the concrete has dried, the foundation strip is covered with bitumen mastic or roofing felt. This operation is an important measure to preserve the foundation.
If the frame is assembled in a trench, rods are first driven into the ground, observing the calculated distances. Transverse jumpers, lower and upper reinforcing belts are fixed to them.
How to choose the most suitable wire diameter
The diameter of the tying wire used for tying the reinforcement is of great importance and depends on the diameter of the reinforcement itself.
As a rule, wire with a diameter of 1.2 mm - 1.4 mm is used for knitting. It is very convenient to knit reinforcement with a thickness of 8-12 mm with 1.2 mm wire, and for thicker reinforcement it will be easier to use thicker wire, although there are no specific restrictions here.
If you use a tie wire with a diameter of less than 1.2 mm, then most likely you will not be able to tighten it properly, it will burst. It is very inconvenient to knit reinforcement with wire thicker than 1.6 mm, and it will most likely not be possible to tighten it so that the knot is strong.
Cost calculation (price for work and materials)
Let's take as an example a strip foundation 10 by 10 meters. This is the perimeter of the house. In addition, there will be a foundation for internal load-bearing walls - two walls of 10 meters each. It turns out 60 m.p. foundation.
How much reinforcement and tying wire will be required with the right approach? Let's say the foundation is less than 50 cm wide - it will use a scheme with four longitudinal rods. In this case, in 1 linear meter of the foundation the following will be used:
- 4 longitudinal rods. That means at 60 mp. will be 240 meters.
- 4 vertical. With a foundation height of, say, 50 cm, their height will be no more than 45 cm. 4 x 45 cm = 1.8 m. In 60 meters of the foundation - 108 m.
- 4 transverse. With a foundation width of 45 cm, the width of the transverse ones will not exceed 35 cm. 4 x 35 cm = 1.40 m. In 60 meters of the foundation - 84 m.
How much is it?
For longitudinal rods we use 12 mm reinforcement costing 25-30 r/m.p. 240 x 35(30) =6000 (7200) For vertical and transverse rods, take 6-8 mm costing 12-16 r/m.p. (108+84) x 12(16)=2304 (3072)
So, the purchase of reinforcing rods for this foundation will cost from 8304 to 10072 rubles.
Now let's calculate the required amount of wire. 4 ties for a 4-bar foundation per 1 m.p. This, based on a maximum consumption of 50 cm per tie, is 2 meters of wire per meter of structure. We have 60 meters, so we need 120 meters of wire.
Attention: wire is sold in kilograms. It is necessary to convert from meters to kg.
1 m of wire with a diameter of 1.2 mm weighs 9 grams, respectively, 120 m of wire with a diameter of 1.2 mm weighs about 1 kg, which costs about 50 rubles. The wire is cheap, so you can and should buy it with a double supply - 240 meters for 100 rubles. All that remains is to calculate the cost of installation and tying of the frame. As a rule, it is not calculated separately and is included in the total cost of pouring the foundation. In the regions, such work is cheaper, but the price range is approximately the same - 1000-2000 rubles per cubic meter. This price includes the construction of a trench, installation of formwork, binding of the frame, pouring concrete and removing the formwork.
The total length of the foundation we are calculating is 60 meters, width 0.4 m, height 0.5 m. Let's calculate the volume: 60 x 0.4 x 0.5 = 12 m3. With this volume, the cost of foundation work will be 12,000 - 24,000 rubles.
How to knit reinforcement correctly
Regardless of the device used, it is important to know and apply the correct knitting techniques. The diagram below shows the main methods of twisting
The question of how to crochet reinforcement lies in the correct grip and uniform, not excessive tension on the wire. It is usually recommended to use pieces of wire 250...300 mm long. The version with loops at the ends requires a longer length, about 400 mm (about 100 of which are spent on creating loops). To quickly and efficiently knit reinforcement, a simple pattern is used. The wire is folded in half and wrapped around the knot. Next, the resulting loop is grabbed with a hook (pliers), the double ends are bent to it and twisting is performed.
When using wire with loops, the work is simpler: a single piece is passed around the joint of the rods, the loops are hooked or pliers and twisted.
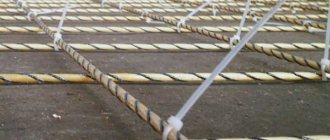
Another interesting connection method that does not require the use of a crochet hook: the reinforcement is fastened with a spring clip.
Such mounting brackets are made of fairly high-quality steel, which ensures their spring properties.
To knit fiberglass reinforcement, plastic (with or without a metal core) clamps and special fasteners made of polymer are used.
Laying and knitting of composite reinforcement is permissible using soft aluminum wire. In this case, standard techniques for steel tying wire are used.
Reinforcement of obtuse angles
With the complex geometry of the strip foundation, some angles can be much greater than 90 degrees. An obtuse angle also needs to be reinforced according to special schemes that increase the strength of the frame. There are two main ways to properly reinforce obtuse corners of a foundation.
First way
The optimal solution for reinforcing an obtuse angle is to bend the external longitudinal reinforcement at the required angle. The internal longitudinal whips are also bent at the same angle and tied to the external longitudinal component of the frame. The length of each bent part of the internal longitudinal rod is at least 50 diameters of the main reinforcement.
Second way
To strengthen the blunt corner parts of the frame, additional elements are used, bent at the required angle. The length of the arm of such a curved element must be equal to at least 50 diameters of the longitudinal reinforcement. The overlap when knitting varies from 35 to 50 reinforcement diameters, depending on the brand of cement used for the concrete mortar.
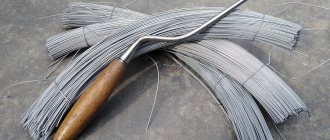
Materials for knitting reinforcement
To knit reinforcement, you must first buy everything you need. First of all, this is the reinforcement itself: steel rods of a certain diameter and length are used. The reliability and strength of the finished foundation directly depends on the thickness of the reinforcement, and the rods should not be less than 6 mm in diameter. In general, all rods are standard in length – from 6 meters. It is better to purchase reinforcement with delivery: it is convenient and will save effort and time spent on building the foundation
It is also worth paying attention to the surface of the reinforcement, because there are smooth products, and there are rods with notches, ridges, and corrugations. The latter are distinguished by better adhesion to concrete, so the result is a more durable structure
The metal rods are connected either with wire or with plastic clamps. And it is the quality of these connecting elements that directly affects the integrity and strength.
The wire for tying the reinforcement is selected with a round cross-section and a diameter of 1.2-1.4 mm: if you take a thinner one, it will not cope with the load, and if it is thicker, it will be difficult to bend. Burnt steel wire, which is usually sold in coils, is excellent for these purposes. It bends easily, quickly takes the desired shape, but at the same time is characterized by high strength and durability. It is better not to use unburnt wire for these purposes; it is much more difficult to work with: it is difficult to bend, it often breaks, but if necessary, it can be turned into baked wire. So, just hold it over an open fire, and then leave it to cool in the air for half an hour.
For knitting, you will need pieces of wire 25-30 cm long: cutting off or biting off the required piece each time is not very convenient, so experienced specialists recommend folding the wire several times, maintaining the length required for the work, and then simply cutting the bends with a grinder. Thus, in just a few minutes all the elements will be ready, and you won’t have to be distracted by constant cutting.
Nowadays, plastic clamps are becoming increasingly popular, but many builders remain conservative and do not trust this method of fastening. However, the use of clamps ensures reliable fixation of the reinforcement, but is also associated with many subtleties. Thus, a “bare” frame does not withstand dynamic loads well, and if you incorrectly step on the upper elements of the entire structure during assembly or incorrectly fill it with concrete, then some fasteners may not withstand and crack
Vibrating equipment will also need to be used with extreme caution when compacting concrete. The obvious advantage of plastic clamps is the simplest process of their use, because it is enough to simply tighten the clamp properly at the junction of two rods, and this can be done quickly and easily
Crochet technology
Scheme of knitting techniques according to the working drawing of a monolithic structure.
The technology for connecting foundation reinforcement rods is quite simple and is not determined by the type of hook: the knitting wire, one way or another, is tightened in a loop, thereby connecting the metal rods.
The reinforcement is knitted after the preparatory work has been completed and the vertical rods have been installed. To install the reinforcement, use a working drawing of a monolithic structure.
In practice, there are two main knitting technologies:
- One loop for overlapping connection.
- Two loops for butt connection.
Important! In your work, you should use only burnt wire with a round profile and a diameter of 1 mm, as it is flexible and elastic: it fits well to the rods and does not break when knitting. The principle of knitting reinforcement with one loop in the first stages does not depend on the type of hook
The only differences in how different tools work will be in the way the rod rotates: with a brush, by inertia or automatically
The principle of knitting reinforcement with one loop in the first stages does not depend on the type of hook. The only differences in how different tools work will be in the way the rod rotates: with a brush, by inertia or automatically.
To connect the frame rods you need:
- Cut the knitting wire into pieces of 20-40 cm (depending on the diameter of the rods).
- Fold the piece in half and wrap it around the joints where the rods intersect, slightly overlapping.
- Take the hook and pull it through the loop.
- Hook the two free ends of the wire with the tool.
- Twist the wire tightly, slightly lifting the tool up.
- Remove the tool from the loop and check the quality of the knot.
Diagram of types of wire knots for manual knitting.
Video description
About the intricacies of reinforcement in the video:
The corners of a strip foundation cannot be reinforced by simply overlapping the rods; This is considered a gross violation of technology. To reinforce the corners and connect adjacent linear elements with them, bent rods are used; the corner fragment is reinforced with L-shaped or U-shaped anchors.
Rods laid at the corners of a building without bending, at right angles, are unable to create a rigid structure. Such sections of the foundation are highly likely to be subject to destruction in the future.
Reinforcement of corners requires compliance with technology Source zen.yandex.ru
Reinforcement knitting process
For the foundation of a columnar or pile structure, a frame is simply necessary. Ordinary concrete with the addition of reinforcement turns into reinforced concrete, for this reason it is used in the construction of houses and other buildings.
How to knit reinforcement with your own hands? There are many ways, but builders use wire binding. Additionally, using tools such as pliers, a screwdriver or just hooks.
The crochet hook is the most popular, versatile and practical of all knitting tools. The process of performing reinforcement tying is carried out in several simple steps:
- The wire must be tied in half, then the reinforcement is thrown onto the rods, which must be laid parallel in advance.
- Next, the formed loop and the remaining free ends are placed on the hook.
- The hook is gradually rotated, thereby tightening the wire and securely fixing the reinforcement in the proper position.
- And finally the hook is removed, and in front of you is a finished connection.
If the work is to be done with a strip foundation, then this will require plastic clamps for the reinforcement. But they are usually expensive and do not provide adequate reliability.
Rules for fastening rods
According to this scheme, you can tie the reinforcement:
- The wire is tied in half.
- A hook is inserted through the loop.
- On the reverse side, the end is wrapped around the intersection and also placed in the hook.
- The wire twists.
Recommended rules and methods of work when knitting:
- The rods are pulled up, twisted, the ends are bitten off with wire cutters;
- The wire twists several turns when it is tightly stretched;
- The rods and clamps are tied.
Using paper clips, staples, clamps
If necessary, speed up the knitting using the above-mentioned materials. In these situations, knitting is done by hand without using a tool. Rods with a small diameter can be tied with self-tightening plastic clamps. Universal devices suitable for any sections. They are light, installed by hand and do not smudge. Do not forget that they have low strength and can be damaged at low temperatures.
Advantages of staples and other fasteners of the same type:
- Productivity increases;
- The density of connected nodes increases;
- Easy to use.
Calculation of reinforcement for a monolithic slab
Having learned how to knit reinforcement for the foundation, it is necessary to calculate the material. You should know that to reinforce any surface, reinforcement with a diameter of 8 mm or 10 mm is used. For slabs of multi-storey buildings, rods with a large diameter are used - 12 mm or 14 mm.
For example, it is necessary to accurately calculate the number of reinforcing bars that will be used to reinforce a slab with a total area of 64 m2. For such a surface, rods with a diameter of 10 mm will be sufficient. One grid cell will have sides of 20*20 cm. In order to find out the exact amount of reinforcement, one side of the slab (8 meters) should be divided by the side of the cell (20 cm) and multiply the result by two. Result: 80 rods. As a reserve, when calculating one side, one rod is always added, this means that the end result will be 82 rods (since there are two sides). But the reinforced mesh has upper and lower levels, and 82 rods must be multiplied by two. You will get 164 rods of a certain diameter.
To reinforce the mesh, rods of a maximum length of 6 meters are used. Therefore, the total number of reinforcement should be multiplied by the length of one product. This means that to produce one slab with a total area of 64 m2, it is necessary to purchase 984 meters of reinforcement of a pre-selected diameter.
When calculating the amount of reinforcement for the mesh, you should not forget about stands, short sections for fastening two levels, as well as rods of a certain diameter that may be needed during the entire process.
Distance between rods
According to SNiPs, the distance between horizontal threads should not exceed 40 cm; for unloaded bases, 50 cm is allowed.
Important! The edge of the metal reinforcement should not come into contact with the formwork and should not come out of the thickness of the concrete!
The minimum distance to the edge of the foundation tape is 5 cm. If the width of the base is 35 cm, subtract a margin of 10 cm and get a horizontal thread pitch of 25 cm. The value is less than the established one and meets the requirements.
- For shallow foundations up to 80 cm high, two horizontal strips are allowed. We retreat the recommended 5 cm from the bottom and top of the monolith, obtaining a height between the threads of 70 cm.
- The jumpers are installed vertically and horizontally with a minimum pitch of 30 cm.
- When constructing a main wall made of sand-lime brick, a multi-storey building, or locating the structure on moving and heaving soils, the cell pitch is reduced and the number of threads is added.
How to knit reinforcement for a foundation
Procedure for crocheting reinforcement
Since a hook is most often used when tying reinforcement, we will tell you how to use it. Cut pieces of knitting wire of the required length are folded in half and slightly bent (about a third of the length is bent). Push the bent side under the joint (diagonally). A hook is inserted into the resulting loop; the free ends, which are on the other side, are also placed on the hook and bent. Now they begin to rotate, twisting the turns and tightening the connection (clockwise or counterclockwise - depend on the situation, do what is more convenient). When the knot approaches the reinforcement, the hook is simply removed.
Here you need to decide how tightly to tighten the knot. You can’t overtighten—the wire will burst, and you can’t allow the reinforcement to dangle. It should fit snugly. The knot should not be on the side, but clearly above the intersection. Therefore, hold the hook above the cross.
https://youtube.com/watch?v=RGjEm3Pa2Nc
There is a little trick that will allow you to pull the rods well together and secure them. Approximately before the last two or three turns, the hook must be pulled towards you with force, stretching the wire. And with tension make the last turns. Due to its elasticity, the wire stretches a little, the knot becomes tighter, and the reinforcement is well tightened.
There is another way to knit reinforcement. They differ only in the way they fix the free end on the hook: put the wire a little behind the hook and start twisting. The one described first seems to be the most convenient. In the sense that one hand remains free, it can be used to hold the reinforcement.
The knot should be exactly above the junction of the reinforcement bars
After you have removed the loop, bend all the ends under the connection - this way they will not interfere, and you will not get hurt or tear your clothes during further work.
Tying reinforcement with a screwdriver
There is no process that our people will not try to modernize in their own way. So knitting reinforcement is much faster using a conventional screwdriver. The hook is pre-made, fixed in the holder, and the lowest rotation speed is set.
The procedure is the same as when using a regular hook. Only after you have secured the free ends of the wire to the hook, turn on the screwdriver for a couple of moments. After tightening the loop, turn off the tool and remove it from the hook. With practice, you can do one knitting per second.
Knitting with plastic clamps
You can tie the reinforcement with mounting plastic clamps. They are also inserted under the connection diagonally, the end is threaded into the latch and tightened. Everything happens quickly.
But how durable the connection using plastic clamps will be is a question. Most likely, nothing will harm the plastic in the screed: it is chemically neutral. But, it has a decent elongation factor. That is, under prolonged static load it will stretch. The rods will begin to “walk”, which can lead to destruction of the screed. Combined with the fact that the clamps are more expensive (albeit not much), this option does not look so attractive.
For columnar
This is a foundation that is placed on pillars that act as piles. Bound reinforcement for the foundation is placed inside the pillars before pouring. The tying of reinforcement for a columnar foundation is the same as for a strip foundation - either 4 rods, or 6 for large columnar foundations.
For vertical rods in this type of foundation, 12 mm reinforcement is used, since this is a vertical foundation. The cross rods can be thinner and smoother.
For wooden houses, it is allowed to use longitudinal and vertical reinforcement thinner than 12 mm. Sometimes, for the foundation of small wooden buildings, a welded frame is constructed from vertical rods connected with hoops like a barrel. This is incorrect, because with this bonding method you can only use welding, and this is not a completely reliable method. We have already talked about this above.