Classic (solid) rivets
Classic rivets are the oldest and most reliable type of mechanical fastener. They require a pre-prepared hole and access to the connection from both sides. Before installation, a classic rivet consists of a cylindrical rod and a head at one end
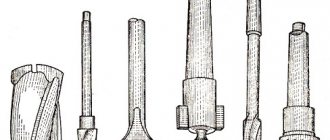
Often classic rivets are simply called solid rivets. Solid rivets are classified by head shape and shank shape. The most commonly used solid rivets are round and flat heads, and sometimes also countersunk. In addition to completely solid rods, semi-tubular and tubular (hollow) rivet rods are also used to reduce the effort required to form the second head. The characteristics of a rivet joint, including strength, significantly depend on the type of rivet, its material and shape.
(picture 1).
Figure 1 - Various types of heads and shanks of solid rivets
When installing a solid rivet, a second head is formed from its rod by plastic deformation, which tightens the materials. Because the installed rivet has heads on both sides of the joint, it can carry tensile loads (along its axis), but is designed primarily to resist shear loads (perpendicular to the axis). Bolts and screws, on the other hand, are designed primarily to resist tensile loads [1].
The process for installing a rivet depends on the type of rivet shank. The rod of a solid rivet expands in the hole during riveting and completely fills it, which ensures a tight and reliable connection (Figure 2). In the case of a semi-tubular rivet, the back of the shank flares out and creates forces that press the materials together, while the diameter of the shank inside the hole remains virtually unchanged. Therefore, semi-tubular and tubular rivets are often used to create an axis between elements that rotate relative to each other.
In aluminum structures, aluminum rivets are used almost exclusively with cold installation, that is, without preheating them. They are used where reliability and safety are required, such as aircraft load-bearing structures and critical automotive components.
Figure 2 - Installation of a solid rivet
Features of working with the tool
To quickly learn how to handle a riveter and easily perform a reliable connection of elements, it is enough to learn a simple procedure for working with it:
First of all, you need to select rivets of a suitable diameter. Most often, fasteners with a diameter of 2 to 4 mm are used. When working with large-diameter rivets, you will need a specialized tool, which is best suited to a pneumatic or pneumatic-hydraulic riveter. A hole is drilled in the working surface taking into account the outer diameter of the rivet. When using fasteners with a countersunk head, it is often necessary to first countersink the surface, which makes the rivet invisible. Before work, a rod with a thread of the required diameter should be installed in the rivet gun and a threaded rivet should be screwed onto it.
It is important to ensure that the rivet is securely fastened, otherwise it may come loose during installation. It is necessary to insert the fastener into the hole until it stops, making sure that its head is tightly adjacent to the surface of the material. The riveter is positioned strictly at right angles to the surface and begins to exert force on the handle. During operation, the rod will begin to move inside the tool, providing the necessary pressure to deform the fastener. After installing the rivet, you should unscrew the threaded rod from the socket and make sure that the rivet is seated in the hole correctly. This can be judged if there are no distortions and gaps, as well as thread deformation.
This can be judged if there are no distortions and gaps, as well as thread deformation.
How to remove a rivet
In the first case, you will need a drill with a drill slightly larger in diameter than the internal thread size. When installing the rivet, you need to monitor the process and promptly change the drill to a larger one. When the problem is solved, the fastener will be divided into two halves - the head and the inner part.
You can also remove incorrectly installed fasteners by grinding off the head. A drill will also help in solving this problem, and when the head is destroyed, all that remains is to knock the rivet out of the seat.
Installation nuances
Before installing the fastener, special attention should be paid to choosing its length. To correctly calculate this rivet parameter, you need to add the thickness of the material and the diameter of the rivet. For example, if the cross-section of the fastener is 4 mm and the thickness of the material is 2 mm, then to make a reliable connection it is recommended to use a rivet with a diameter of 6 mm
After installation, it will “sit” securely in the seat and will allow you to screw a bolt in if necessary.
For example, if the cross-section of the fastener is 4 mm and the thickness of the material is 2 mm, then to make a reliable connection it is recommended to use a rivet with a diameter of 6 mm. After installation, it will “sit” securely in the seat and will allow you to screw a bolt in if necessary.
It is no coincidence that the riveter is very popular, because it has such advantages as ease of use and practicality. Although home craftsmen very rarely share their impressions of the practical use of this tool in everyday conditions. In many construction stores, a riveter is a rarity, not to mention fasteners for it, which many are forced to order online.
https://youtube.com/watch?v=N7tjWpsqOc0
This tool has only recently become popular among the population. Most often it is used to perform reliable installation of license plates. It is also perfect for installing fences made of sheet materials, as well as mounting electricity metering devices on thin walls of panels. This installation method has surpassed in popularity even such a common type of fastening as welding, due to its reliability. And this is not surprising, since even under conditions of high loads, if the rivets begin to fail, it will not happen to all of them at the same time.
Blind rivets
Types of Blind Rivets
The main feature of blind rivets is that these fasteners are installed and riveted on one working side using a pre-prepared hole. The designs and installation methods of blind rivets have many variations (Figure 3). However, only some of them are used for structural, load-bearing connections, the rest - for auxiliary, decorative purposes.
Figure 3 - Various types of blind rivets
Standard (blind) rivets
The main type of blind rivets that are used as structural fasteners are the breakaway blind rivets. We call them “blind rivets”
Standards and terms
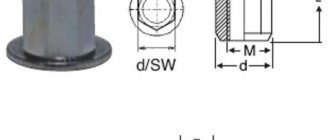
In the Russian version of the international ISO standard, GOST R ISO 14588-2005, the official general name for all such rivets is: “blind rivets” (Figure 4). In the English version of the DIN 7337 standard, which has already been replaced by European (international) standards, this type of rivet was called “break mandrel blind rivets”, that is, “blind rivets with a tear-off core.” The American industry standard IFI 114, which was the first standard for such rivets, calls them “break mandrel rivets.” In practice and, often, in technical literature, these rivets are called “blind rivets”.
Figure 4 — Terms according to GOST R ISO 14588-2005:
1 — body of a “blind” rivet, 2 — end of a “blind” rivet, 3 — head of a “blind” rivet, 4 — shank of a “blind” rivet, 5 — core of a “blind” rivet, 6 — core, 7 — head of a core, 8 - core separation zone, 9 - core shank, 10 - core end.
Advantages of blind rivets
The three main reasons for using blind rivets are:
- Low installation cost. Other methods of joining materials—welding, screws, bolts and nuts, and solid rivets—require more human labor.
- Manifold. Blind rivets are available in many types, sizes and material combinations to suit specific design requirements.
- Reliability. A correctly selected and installed blind rivet can withstand high mechanical loads and harsh climatic influences.
Limitations of blind rivets
However, blind rivets have their limitations:
- The strength of rivets is limited by the strength characteristics of the materials used in it and the features of its hollow shape.
- Can only be used for joining relatively thin materials.
Installation of blind rivets
Blind - blind - rivets are installed in a tight hole that passes through the materials being joined (steps 1 and 2) - Figure 5. A rivet tool, called a riveter, grabs the tail of the core and pulls it towards itself, while holding the rivet in place (step 3 ). As the core is pulled, it deforms the rivet and forms the back, blind head of the rivet. At a certain moment, the core breaks off and part of it, together with the head, remains in the rivet (step 4). The rivet head formed at the back of the joint firmly presses the materials together.
Core breaking force
The force required to tear off the core is given by the amount of deformation required to form the rear head of the rivet and the diameter of the groove (notch) on the core. The core rupture force is set in such a way that:
- firstly, to avoid creating too much clamping force, which could damage the materials being joined, and
- secondly, its size was sufficient to perform a tight connection of materials.
HS code 8308200000: tubular or bifurcated rivets
GENERAL PROVISIONS
This section includes base metals (including metals in a chemically pure state) and many products made from them.
A list of base metal products not included in this section is given at the end of these explanations. This section also includes native metals separated from gangue and copper, nickel or cobalt matte. Metal ores and native metals contained in rocks are not included in this section (headings 2601 - 2617). In accordance with Note 3 to this section throughout the Nomenclature, the term “base metals” means: ferrous metals, copper, nickel, aluminum, lead, zinc, tin, tungsten, molybdenum, tantalum, magnesium, cobalt, bismuth, cadmium, titanium, zirconium , antimony, manganese, beryllium, chromium, germanium, vanadium, gallium, hafnium, indium, niobium (columbium), rhenium and thallium.
Chapters 72 to 76 and 78 to 81 each cover specified unwrought base metals and articles of these metals, such as rods, bars, wire or sheets, and articles thereof, except certain specified articles of base metal which, regardless depending on the type of their constituent metal, belong to group 82 or 83, and these groups include strictly defined products.
(A) BASE METAL ALLOYS
Subject to Note 6 to this section, unless the context otherwise requires (for example, in the case of alloy steels), any reference to a base metal in Chapters 72 to 76 and 78 to 81 or elsewhere in the Nomenclature also applies to alloys this metal. Likewise, any reference in Chapter 82 or 83 or elsewhere in the Nomenclature to “base metal” also applies to alloys classified as base metal alloys.
In accordance with Note 5 to Chapter 71 and Note 5 to this section, base metal alloys are classified as follows:
- (1) From the melting of base metals with precious metals.
- These alloys are classified as base metals provided that the content of none of the precious metals (silver, gold and platinum) in the alloy does not exceed 2 wt.%. Other alloys of base metals with precious metals are included in Chapter 71.
- (2) Alloys of base metals.
- These alloys are classified as the metal whose content by weight predominates in the composition of the alloy, with the exception of ferroalloys (see Explanatory Note to heading 7202) and copper-based alloys (see Explanatory Note to heading 7405).
- (3) Alloys of base metals of this section with non-metals or metals of heading 2805.
- These alloys are classified as base metal alloys of this division provided that the total mass of base metals of this division in the alloy is equal to or greater than the total mass of the other elements present in it. Otherwise, such alloys are generally classified in heading 38.24.
- (4) Sintered mixtures, heterogeneous homogeneous mixtures obtained by fusion (except cermets), and intermetallic compounds .
- Sintered mixtures of metal powders and heterogeneous homogeneous mixtures obtained by fusion (except cermets) are considered as alloys. The latter type of mixture includes special ingots of various compositions obtained by smelting scrap metal. However, the classification of mixtures of metal powders that have not been sintered is carried out in accordance with Note 7 to this section (composite products - see paragraph (B) below). Section XV Intermetallic compounds of two or more base metals are also considered alloys. The significant difference between intermetallic compounds and alloys is that the different types of atoms in the crystal lattice of an intermetallic compound are arranged in an orderly manner, while in an alloy they are arranged randomly.
(B) PRODUCTS FROM BASE METALS
In accordance with Note 7 to this section, articles of base metal containing two or more base metals are classified as articles of the metal which, by weight, predominates in the alloy over that of each other metal, unless otherwise specified in the headings. (for example, ferrous nails with copper heads are classified in heading 74.15 even if copper is not the main component). The same rule applies to products made partly from non-metals, provided that, according to the Basic Rules of Interpretation of the Nomenclature, the base metal determines their basic property.
When calculating metal ratios for the purposes of this rule, it should be noted that:
- (1) All varieties of ferrous metals are considered to be the same metal.
- (2) An alloy is considered to be composed entirely of the metal of which it is classified as an alloy (for example, according to this, a part made of brass would be considered to be made entirely of copper).
- (3) Cermets of heading 81.13 are treated as one base metal.
(B) PARTS OF PRODUCTS
Basically, identifiable parts of products are classified as their parts in the corresponding headings of the Nomenclature.
However, general purpose parts (as defined in Note 2 to this section) presented separately are not considered to be parts of products but are classified under the appropriate headings of this section. This may apply, for example, to the case of bolts intended for central heating radiators or springs intended for cars. Bolts will fall in heading 7318 (as bolts) rather than heading 7322 (as parts of central heating radiators). Springs would be classified in heading 7320 (as springs) rather than heading 8708 (as parts of motor vehicles).
It should be noted that clock springs of all kinds are excluded from this section under Note 2(b) to this section and fall under heading 91.14.
In addition to the items listed in Note 1 to this section, the following items are also excluded:
- (a) amalgams of base metals (heading 28.53);
- (b) colloidal suspensions of base metals (usually heading 30.03 or 30.04);
- (c) dental cements and other dental filling materials (heading 3006);
- (d) sensitized photographic plates of metal, for example for photogravure (heading 37.01);
- (e) photographic flash materials of a kind used in photography (heading 37.07);
- (f) metallized thread (heading 56.05); fabrics of such threads or of metallic threads, of a kind used in clothing, as upholstery fabric or for similar purposes (heading 58.09);
- (g) embroidery and other products described in section XI, made of metal thread;
- (h) parts of footwear other than those mentioned in Note 2 to Chapter 64 (in particular protectors, loops, hooks and buckles) (heading 64.06);
- (i) coins (heading 7118);
- (j) waste and scrap of primary cells, primary batteries and electric accumulators; spent primary cells, spent primary batteries and spent electric accumulators (heading 8548);
- (l) wire brushes (heading 96.03).
Rivet connection thickness
Blind rivets are designed to join together materials with a specified overall thickness. The amount of deformation of the rivet body that occurs during its upsetting depends on this thickness (Figure 6).
Figure 6—Gripping a rivet connection
If the rivet is too long, there will be too much rivet material left on the blind side of the joint and more force will be required to break the core.
If the rivet is too short, there may not be enough rivet material on the "blind" side of the joint to ensure a tight connection between the materials.
Types of blind rivet heads
Blind rivets have several types of heads (Figure 7). Flush heads are designed for applications where the rivets must not extend beyond the plane of the surface. Wide heads are used for fastening softer materials to increase the contact area.
Figure 7 - Main types of heads
a - standard, b - hidden, c - wide
What does an aluminum rivet look like?
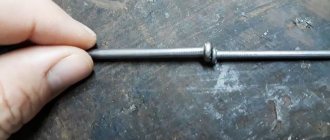
This is a cylinder-shaped rod, absolutely smooth, with a small head on one side. Once the product is installed and ready to be fixed, the back of the rivet is flattened using a hammer or special equipment.
It turns out that a second head is formed, and the rod increases its thickness by 1.5 times.
Materials of rods and cores
Blind rivets have earned their popularity due to their ease of installation and the variety of shapes and materials used. The use of blind rivets in a wide variety of industrial and construction areas creates a need for rivets made from various types of materials.
Typically, the deciding factors when selecting materials for the components of a blind rivet—the rivet itself and the core—are strength, corrosion resistance, and the materials that will be joined by the rivet.
Materials of rods and cores:
- Aluminum-magnesium alloys (5xxx series): AlMg2.5; AlMg3, AlMg5.
- Galvanized carbon steel.
- 304 or 316 stainless steels.
Manufacturing materials
The strength of rivets directly depends on the material of manufacture. Today they are made from aluminum alloys, copper, stainless or galvanized carbon steel. Aluminum is usually used in construction work. They are characterized by a high level of corrosion resistance. Stainless steel fasteners also have excellent anti-corrosion properties and very high strength. Galvanized hardware is used to fasten sheet materials to various structures. Copper rivets are used in the installation of roofing and copper gutters.
Articles about products Updated: 12/08/2020 10:41:53
Galvanic corrosion on rivets
When dissimilar metals are in contact in the presence of some electrolyte, they undergo galvanic corrosion, with one metal corroding more quickly and the other more slowly.
The rate of corrosion depends on:
- differences in chemical potentials of metals;
- degree of electrical conductivity of the electrolyte and
- relative sizes of areas of contacting metals.
Blind rivets can be used with a variety of materials such as aluminum, stainless steel, mild steel, galvanized steel and copper. When using rivets in humid, chemically contaminated and marine atmospheres, measures must be taken to minimize galvanic corrosion:
- avoid the formation of a joint from dissimilar metals by correctly selecting the material of the rivet body;
- install a barrier between dissimilar materials, for example, in the form of a layer of paint, a plastic washer or a rubber seal;
- take measures to install drainage to allow water and other electrolytes to exit the structure.
Purpose
A rivet is a fastening element made in the form of a pipe or a round rod, which is usually used in places where welding is difficult. Riveted connections are also used where it is necessary to avoid overheating or changes in the structure of materials that are in close proximity to the place of production work.
This product is most often used in instrument making, mechanical engineering, as well as in the chemical, electronics, shipbuilding and food industries.
In addition, rivet joints are used in the construction of bridge structures and other structures. It was this product that was used in the construction of the world-famous Eiffel Tower.
Features of the use of blind rivets
"Getting" the rivet
The technical characteristics of any blind rivet include minimum and maximum grip of the materials being fastened. In English it is called "grip". The maximum grip is the thickest combination of materials that a given rivet can hold together. The minimum grip is the thickness for which it is necessary to use a shorter rivet from the existing rivet size range. For example, a rivet with a minimum grip of 6 mm can be used for a smaller thickness, on the back side of the rivet there will be more body of the rivet than there should be for a normal size rivet (Figure 8, a) and b)). Sometimes this excessive length can interfere with adjacent structural parts. The so-called “multi-grip” rivets are in this sense more universal and can work in a wide grip range (Figure X, c)).
The so-called “multi-grip” rivets (Figure 8, c) are more universal in this sense and can work in a wide grip range, but they are more expensive.
Blind rivet hole size
The correct hole is very important to obtain maximum load-bearing capacity of the blind rivet. Even a small increase in size can lead to a sharp decrease in the load-bearing capacity of the rivets, both for breaking and shearing. Therefore, when installing rivets, use precisely specified drill sizes and a good drilling tool to avoid getting a broken hole, as shown in Figure 9b.
Figure 9 - a - normal, b - not allowed
Advantages and disadvantages of different riveters
The fact that there are several types of riveters on the market is due to the presence of both pros and cons of their use.
Based on them, the tool is selected for work in specific conditions:
- • One-handed models develop a small working force, so they are used for installing rivets made of soft material, such as aluminum. At the same time, they are compact and require only one hand to operate.
- • Two-handed models, due to the presence of two reinforced levers, can easily cope with rivets made of hard material, such as steel. At the same time, the work is performed with two hands, which is somewhat inconvenient.
- • Rocker models support one-handed operation. The force can be increased by leaning on the mechanism with your whole body, which also provides support for the steel rivets.
At the same time, the accordion is not suitable for installing lightweight structures that cannot withstand the high pressure exerted on them required to tighten the fasteners.