For any construction, fastening and finishing elements are needed that will reliably and firmly hold the created structure made of wood, metal, plasterboard, etc. They facilitate technological processes when constructing structures. One type of such fastener is a perforated corner. This indispensable hardware simplifies many installation-related jobs. It is strong and durable, and most importantly, it ensures a long life of structures for construction.
Can you show us clearly how to install a perforated corner?
A perforated profile (perforated corner) is installed to protect and align external corners.
Most often, such protection is installed on the outer corners of slopes, columns, openings, niches, arches.
Some craftsmen don’t bother fixing the perforated corner dry using a mounting stapler, and then apply putty on top, but I think that this is not entirely correct. The perforated profile, regardless of the material - metal or plastic, primarily serves to protect and strengthen the corner, which means the internal cavity under it should not be empty, but completely filled with strong putty, for example CE 78, FUGENFULLER, UNIFLOTT.
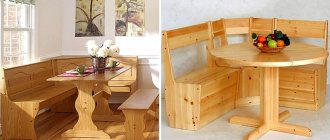
I’ll tell you step by step how I install a perforated profile on the corners of an arched opening. Installing an arched profile on both sides along the thickness of the arch is more complex and has its own nuances, unlike fastening the profile, for example, to a window slope. It is this option with an opening that we will consider.
First, we decide on which side of the opening we need to start installing the protection. To do this, use a plumber's angle to check whether the end of the opening is turned around. As a rule, this is a plasterboard partition and the plasterboarder does not always pay attention to this nuance. We start installation from the corner that protrudes the most (acute corner). If both angles are 90 degrees, it makes no difference which side to start framing from.
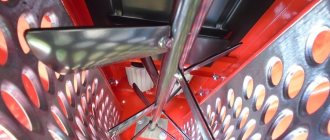
So, use a spatula to apply putty to the outer corner of the opening:
Carefully install the perforated corner, pressing it into the putty:
In our case, the first profile has already been set. Now we have to set the second profile in such a way that the framed end of the opening is not turned around, but has a 90 degree angle.
The difficulty lies in the fact that the installed perforated profile protrudes beyond the plane of the wall by 3 millimeters. If we apply the plumbing angle close to the plane of the wall, we will not get an angle of 90 degrees. To compensate for the thickness of the perforated profile, you can use, for example, cutting a wire of the required thickness:
On the curved part of the arch we set the profile with the same bench angle with a “device” to maintain a right angle. To fix the arched corner in the design position, you can use self-tapping screws, screwing them into the holes of the individual segments.
To make the plane of the wall near the opening look more or less even, you need to make a “guy” along the installed perforated corners 35-40 centimeters wide:
After “bracing” the perimeter of the openings and niches framed by a perforated corner,
Plaster corner
We simply take over part of the delivery of building materials to the site and free up your time.
- Selection of materials
- Budgeting
- Payment
- Delivery and unloading
Plaster corner
During any renovation work, sooner or later, problems will arise with leveling and plastering such hard-to-reach places as window and door slopes, ceilings consisting of several levels, as well as various junctions of corridors and other residential premises. Dealing with this seemingly difficult task is not so difficult; you just need to purchase a plaster corner . After all, its main task is to facilitate labor when plastering hard-to-reach places by creating a reliable basis for applying plaster. In addition, its installation helps to increase the strengthening of this work area.
This perforated plaster corner is used for additional protection against mechanical damage, as well as for leveling areas where two areas intersect. Due to the fact that this auxiliary building element has the shape of a right angle, it practically merges with the surface of the wall into a single whole. And the holes made along its plane allow the plaster solution to freely penetrate under its surface.
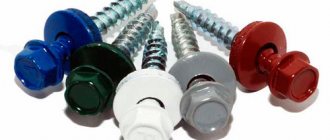
The plaster corner is made from materials:
- Polyvinyl chloride (PVC). Such a corner is not expensive, but at the same time very reliable and durable, since it is practically not subject to any corrosive processes and rotting, and is also much lighter than its metal counterparts;
- Environmentally friendly aluminum gives the finished corners durability and additional resistance to any mechanical stress. But it should not be used in combination with parts or elements made of copper and some other substances;
- Galvanized steel, thanks to a double-sided zinc coating, has excellent resistance to corrosive processes such as rust and rotting. That is why a plaster corner with a mesh, like all its other varieties made of galvanized steel, will serve you for decades, without requiring constant attention or replacement from you.
Types of plaster corners
During finishing work one has to deal with potholes of various shapes and sizes. Most of which have a semicircular or rectangular shape, for this reason the following types of corners for plastering are fundamental:
- Straight-shaped plates are used during work on reinforcing and leveling various types of surfaces, both internal and external corner joints. They are also used to hide several planes that do not fit tightly together;
- An arched profile or corner for plasterboard is used to give structures with curved edges a beautiful, even silhouette. They are used in the process of creating ceilings, niches and arches, equipped with figured elements of various shapes, and also make various patterned partitions inside residential premises.
We deliver goods ordered on our website throughout Kyiv and the Kyiv region
We deliver goods ordered on our website throughout Kyiv and the Kyiv region
We deliver goods ordered on our website throughout Kyiv and the Kyiv region
We deliver goods ordered on our website throughout Kyiv and the Kyiv region
Perforated corner: purpose, types and basis of installation
Professional finishing uses a wide variety of tools, materials and devices. Some improve the appearance, some simplify the work, and some help achieve ideal surfaces and angles. One of these types of materials is considered to be a perforated corner.
- Purpose of devices
- Arched perforated corner
- Use as a beacon
- Rules for installing the outer corner
- Modifications - corner with mesh
- Cost and efficiency
Purpose of devices
The main purpose of a perforated corner is to create an elastic and rigid base and give ideal shapes to corners and various junctions.
Less commonly, it is used as a beacon for applying plaster. Depending on the specific task, a straight perforated corner can be used or a special one for arches, flexible, and made of plastic to form the necessary bend of the opening. This is the most common type of material. Can be internal or external. The perforated corner is made from a variety of materials (plastic, galvanized) and differs in the width of the margins.
Plastic perforated devices can be easily cut with a regular stationery knife. For galvanized steel, it is better to use metal shears.
You can use perforated corner in the following finishing areas:
- slopes;
- arches;
- corners of drywall structures;
- alignment of walls.
Arched perforated corner
Working with right angles is quite simple, but if it is necessary to align and secure it, which is made in an arc, then a special arched type . He is mobile and flexible. When installing it, you can maintain the required bend line of the opening, while maintaining a clear edge of the corner. The corner can also be used in complex winding plasterboard structures.
Use as a beacon
A great way to evenly plaster a wall is to do it along the beacons. A perforated corner is perfect for solving this problem. It can be used in the area between the corner and the window. In this case, a corner is mounted on the corner of the slope, secured, and then plaster is applied to the wall. If the corner has been set accurately, then the section of the wall forms an ideal plane from the corner to the slope.
Rules for installing the outer corner
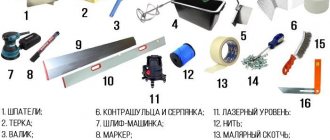
The process of mounting a perforated corner is not as complicated as it might seem at first glance. First you need to collect a small set of tools and materials:
- 2 spatulas approximately 50 and 150 mm;
- drill with attachment (mixer);
- brush;
- level;
- primer;
- gypsum putty.
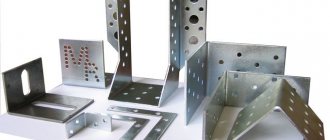
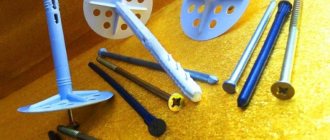
Fixture sizes
As for the size of the elements, it all depends on the variety and their purpose. If a reinforced fastening element is required, then its minimum parameters will be 65x65x55 mm, and the largest size of such an element is 100x100x90 mm. Intermediate options include fasteners with values of 95x95x40 mm and 90x90x65 mm. Such elements reach 3 m in length.
A reinforced variety of perforated joints are corners such as 25x25 and 21x21 mm. The reinforced fastening element increases the reliability of connections and has a high load-bearing capacity. Another advantage of the element is that it does not require the use of special tools and equipment for installation.
Perforated plaster corner: how to use
A perforated galvanized plaster corner helps in finishing many parts of the room. The master finisher achieved compliance of these places with the intended design thanks to experience and skill. After all, it is extremely important that the area is straight or oval, where necessary. Today, finishers come to the aid of devices that significantly simplify and speed up their work.
Today we will tell you where and how a perforated plaster corner is used. Also in the video in this article you can find out additional information about the use of this material.
Where is the corner used?
Master decorators try not to advertise that the beauty of smooth walls largely depends on the edging.
This definition implies such areas of use of putties and plaster mixtures as:
- Connection of walls with floor and ceiling;
- Internal, external corners;
- Arches, boxes, corners, channels and other similar structures
At their core, all accessories refer to perforated corners for plaster. There are only two main types of corners: arched and straight, which in turn are divided into different categories. The scope of their use is extremely wide, and covers almost all types of work related to plaster and putty.
Straight perforated corner
The perforated plaster corner is available in two versions: internal and external. The materials used for their manufacture vary from plastic to galvanized, and the width of the corner also varies.
When using one corner or another, it is worth starting from the task at hand, since there is no global difference between them. Although the galvanized corner is more rigid than others. This property allows it to be used as a beacon for plaster, especially if it is wide enough.
Attention; To use a corner, you must choose metal scissors of the appropriate quality. Otherwise, poorly cut edges of the corners will interfere in the future.
- If you use plastic corners, you can even use a stationery knife to work with them. However, if you don’t have any tools at hand, you can break the perforated corner with your hands. In this case, the edges will then have to be straightened with a hammer or pliers, or even manually.
- The straight perforated corner for plastering works looks like the English letter “V”. Moreover, its flat sides are perforated, and the top protrudes about a millimeter. It is characteristic that those corners where it is directed inward are called internal, and external, respectively, those where the top looks outward. The top serves to guide the spatula, and the perforation is necessary to attach the corner itself
Attention: You can cut a dozen corners of the required footage using a tape measure and a grinder. To do this, you need to fold the corners one to one, and then, after measuring the required length, use a grinder. To work with a small number of products, you can also use scissors, however, if there is a power tool not far away, then it is better to use it.
The purpose of the corner and how to use it
Perforated plaster corner is used to strengthen the corner and give the correct geometric shape.
Installation of this product occurs in two methods:
- Curved corner , in this case, if the radius is not large, you will need to make cuts along the stiffeners so that the corner takes the desired shape;
- Right angle , in this case the corner is simply attached along the plane in the form in which you purchased it.
Corner like a plaster beacon
In the first option, the corner will be used as a plaster beacon. To install it, the plaster is placed on the main corner. It is worth noting that if you have sufficient finances, then it is better to choose gypsum plaster; working with it is much more comfortable.
- This plaster mixture is applied not along the edge, but in strokes in the form of a cake. This is done for convenient setting of the angle. The corner is set according to the plane and level, using construction tools, in particular rules and levels.
Attention: If gypsum plaster is mixed with cement or a cement mixture, the beacon will rise within a few minutes, after which you can continue working.
- In order to avoid overlap of perpendicular planes, it is better to cut the working corners at 45 degrees. It is worth noting that it is undesirable to use an internal perforated corner as a plaster beacon. With its help it is better to emphasize the straight lines of the edging.
- In places where the outer corner is subject to frequent mechanical stress, it is worth using a corner with a plaster mesh. A plaster mesh made of fiberglass in combination with a corner made of plastic or metal, if necessary, reinforces the corner. These categories of perforated corners are used as plaster beacons. Because, to hide the mesh under the finishing putty, you will need to apply a layer of plaster at least 5 mm thick.
Attention: If you use a regular perforated corner as a reinforced one, you can glue a mesh onto its shelves - a serpyanka that grips the wall. As such a mesh, you can use materials such as non-woven fabric and fiberglass. Putty can be used as an adhesive element.
Using a corner as a protective cover
In the case when high-quality plaster has already been applied to the wall, the perforated corners under the plaster serve to protect the corner from severe mechanical damage and emphasize its straight lines.
- This corner is installed similarly to the first option. The difference is the use of a more liquid plaster mixture, and its layer should be as small as possible. For such tasks, as a rule, plaster corners made of plastic or aluminum are used.
- Moreover, it is not necessary to use plaster mixtures or putty for installation. The corner is adjacent to the surface, covering it because the base is already level. Installation of such a corner with a thin layer of plaster mixture as an adhesive element is used when working with gypsum plasterboard products.
- It is important that these structures are assembled properly. For such work, a perforated corner is used, on whose shelves self-adhesive strips are applied; such products can be used by moistening them with water.
- In some cases, there is a need to connect corners, in which case it is important that the joining corners are made of the same material. This is due to the fact that different corners may have different sizes, which in the end will negatively affect the finish.
Attention: If the room is frequently walked, then it is better to use a galvanized perforated plaster corner. It is more rigid and better withstands the loads of plastic.
Slope finishing
Slopes on windows and doors should be treated with special responsibility because... upon visual observation, they are involuntarily compared with door or window openings. In other words, the straightness of the lines is assessed. If you do everything with your own hands, then attention should be at its best.
- There should not be even minimal deviations from the door or window lines. You should also check the window openings for compliance with the level; they may collapse. Basically, when plastering slopes, craftsmen focus on the level.
- Therefore, it is recommended to use a perforated corner for this, which can also be used as a beacon. If gypsum fiber boards or gypsum boards were used when installing slopes, and the quality leaves much to be desired, the corner will help eliminate the shortcomings.
- It is important that when working with a brick slope, sandwich products, or installing gypsum boards on a slope, according to building codes and regulations, they must be plastered. A perforated corner in this case will facilitate the correct alignment of the drywall.
Installation of painting putty corners in the room on the slope or corners
Perforated corner for putty
Particular attention is paid to the location of the painting corners when attaching them to slopes. To finish window openings, plastic corners are most often used, because... they are affordable, durable, easy to install, and are fixed over a putty or plaster base. In construction stores, profiles are presented in different sizes, in most cases the angle is at least 90°. The products help hide minor irregularities and other wall defects.