A spotter is a type of welding machine and is used for spot welding. Its functionality is based on current resistance. The device works due to the fact that heat is generated in the contact zone of the welding material when electrical voltage is supplied. Conventional welding machines can become the foundation for the independent production of such a device. The model can be inverter or transformer.
A simple way to straighten and weld a body
It is clear that people have been dealing with the issue of “making it simpler and cheaper” for a long time. The method of “pulling out” dents was invented a long time ago. The matter is quite primitive: the dent was leveled with a special reverse-action hammer or using a winch and a fastening hook welded to the body.
The side effects of such folk art often exceeded the accident damage itself: during welding of the hook, the surface of the body was further deteriorated. But only if an ordinary classic welding machine was used.
But if welding is carried out with a spotter, then the quality of body straightening is much higher. Let's start with the fact that a spotter is a special device for producing high-precision welding. This is called spot welding.
If we talk about professional high-quality body straightening, you can’t do without a spotter. But you can save a lot of money without losing the quality of repair work. The method is to make a spotter with your own hands from a welding machine. Let's go, read, figure it out.
How it works: nuances
First of all, let's look at the spotter function. It is needed for only one operation: repairing a crumpled body surface without a general disassembly of the entire body. It is most valuable when repairing hard-to-reach parts that need to be straightened during the repair.
The spotter can be made from an inverter, or from a battery or transformer - there are several possible electrical circuits. The principle of operation of the device is a reverse action hammer, working in a point manner.
This is done as follows: the hammer is fixed in the place of the dent on the body surface along a special guide, along which it then moves in the form of a washer.
Most often, the spotter has the following operating modes:
- Short-term mode, in which the guide is attached to the required local location using special rings.
- Welding mode is the main one, which is carried out at minimum power and using carbon electrodes.
Core types
DIY spot welding for batteries
The cores used in welding transformers can have several different designs (picture below).
Core types
Among them, the following types of CT stand out:
- With the so-called “W-shaped” or armored core;
- With a rod base (in the shape of the letter “O”);
- And finally, with a core made in the form of a torus.
Of all the listed options, the most suitable for the purposes under consideration is a transformer with a toroidal core, which has small dimensions and relatively light weight (see the figure below).
Toroidal transformer
Additional Information. The cross-section of such a core in any transformer will be determined by the expected welding current.
For do-it-yourself spot welding to work properly, the output current of the unit must be at least 1000 Amperes. The latter means that a sufficiently thick wire must be used in the CT output winding. This requirement is fully satisfied by the selected version of the toroidal core, since there is plenty of space for placing the output winding in it.
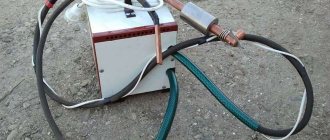
Spotter from inverter
A spotter from a welding machine is the most popular option among amateur craftsmen. The reason for this is the power of a homemade spotter: if it is not made from an inverter, it will simply be lower.
At its core, a spotter is a variant of resistance welding, but it has fundamental differences in the form of pliers. Therefore, it would be logical to consider it as an equivalent substitute for a classic electric arc welding machine.
You can reason this way in situations where voltage is passed through the car body. This happens when one contact is connected to the body, and the second contact becomes a nozzle and a metal rod. The device itself consists of two main parts: a thyristor relay and the inverter itself.
Electrical diagram of the spotter operation
Here's what you might need to assemble a home spotter made from an old welding machine:
- transformer for relay control, step down by 12 volts;
- 200 volt thyristor;
- 30 amp relay;
- control button;
- 220 volt contacts;
- diode bridge.
A transformer is required: it powers the thyristor circuit and is connected to the network using a diode bridge. A thyristor relay is also connected there.
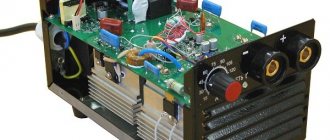
Control circuit with indicator block for spot welding spotter
Figure 2. Diagram of the control unit for the spotter.
The appearance of the control unit board with the controller is shown in photo 2.
The photo shows the appearance of the indicator block with control buttons without a decorative panel. The indicator panel with buttons and installed decorative panel is shown in another photo 3.
The control circuit has a minimum of auxiliary elements. All processes are controlled by an AtMega 16 microcontroller installed in the DIP version. The element from the manufacturer Atmel has a low cost and a large number of pins. The controller device allows the use of input and output signals on any legs of the microcircuit, so the board is as simplified as possible. In addition to configuration capabilities, the controller is equipped with high-capacity RAM and non-volatile memory, etc. In the spotter control circuit, its capabilities are used by approximately 20%.
How it works
As soon as the start is pressed, the capacitor discharge is immediately connected, the resistor and thyristor are temporarily connected, the alternating voltage through the diodes is supplied directly to the transformer, or more precisely, to its primary winding.
During the process, the parts and the electrode begin to heat up, melt and weld. As soon as the capacitor is discharged, the thyristor immediately closes, simultaneously de-energizing the entire winding of the hardware transformer.
Welding ends, charging the capacitor continues, which is quite useful for future work.
The thyristor and diode bridge are replaceable parts; they can easily be replaced with triacs. The main thing is to carefully think through the entire design of your homemade device, because its operation must be absolutely accurate and correct, regardless of the size and the money and effort spent on it.
Materials
To understand how to make a spotter from a welding machine, you need to start with the necessary materials. The thyristor itself does not overheat, only local areas near the cable and the metal rod heat up, so it is best if it is made of brass.
Spotter drawing.
It is better to take a cable with a cross-section of 70 mm². For a hammer and mass, lengths of 1.7 and 2.1 m are sufficient. The secondary transformer winding is wound with a busbar measuring 6.4 x 4.0, which is made of copper. The tire can be replaced with an aluminum one.
You need to add two more to the secondary winding. As a result, the device will consist of a 250 mm² aluminum transformer winding, which is five windings of six turns. In this case, the electrode acts as a reverse hammer.
The handle is usually made from a household glue gun. The cable must be found and selected only with a thermal insulation layer.
Accessories
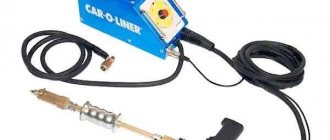
The manufactured spotter needs to be equipped with the following key elements:
- Manipulator gun;
- Welding cables;
- Reverse hammer (inopuller).
In order to choose the right welding cables, you need to know that for every 10 amperes of the maximum possible current value, you need to use 1 sq. mm section. The length of the working cable should not exceed three meters, and the cable weight should not exceed two. Otherwise, there will be large voltage losses.
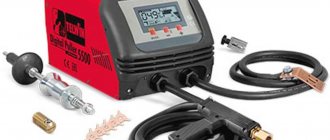
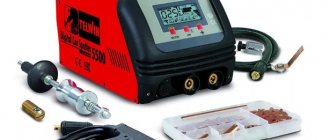
The ends of the cables must be equipped with connecting elements to connect them to the gun and spotter. To connect to a spotter, it is better to use quick-release terminals, and for connection to a gun, a threaded section would be the best option. Before assembling, familiarize yourself with the photo of the spotter and the main components of the device.
Features and Specifications
The functions of the spotter are as follows:
- welding repair washers to connect parts;
- spot welding with an electrode to pull out the metal of the panel;
- heating the parts with an electrode followed by cooling.
The forced cooling system and thermostat turn off the machine when overheated and turn it on at the desired temperature for welding.
The main technical characteristics that a homemade spotter from a welding machine should have are as follows:
- The network voltage must be 220 volts;
- AC mains frequency – 56 – 60 Hz;
- maximum permissible power – 10 kW;
- maximum operating current – 1300A;
- voltage for the secondary winding 8 - 9V;
- productivity – 15%;
- the traction condition for the needle is more than 100 kg;
- traction condition for the puck – 100 kg and above;
- device dimensions 380 mm x 290 mm x 840 mm;
- structure weight 32 kg.
How to work as a spotter
Electrical diagram of the device.
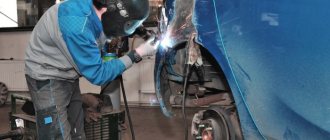
The technology of work was invented a long time ago. It is used to repair damaged car doors, body fenders and other hard-to-reach parts of various locations.
The main thing in the work is to fix the force vector in the right place - to the outside of the working surface and the deformed area, that is, to the dent. Contact welding with a spotter is carried out with incoming current, after which the working surface is leveled with an inertial hammer or stop.
The next stage is grinding the leveled surface. During work, never forget to ground the device and be sure to disconnect the negative terminal from the battery.
After thoroughly cleaning the surface of the damaged area, a grounding contact is attached to it, and special fasteners are welded. The damaged area - the dents are stretched out. The next step is to remove the welded elements using rotation, and the area is prepared for the putty process.
Regardless of the origin of the spotter - whether it is homemade or purchased industrial, the most important condition must be met: you need to be a welder, that is, have fairly serious welding skills.
As for the operating and safety rules, it is quite enough to follow the general rules. Then you will succeed.
Homemade reverse hammer
If the previous points have been completed, then difficulties should not arise in the future. Making a reverse hammer yourself is an economically profitable enterprise, since factory hammers are quite expensive.
The part of the polyurethane foam manipulator in which the container with the contents is located is best suited for this purpose. 3 rods are welded to the vacated area, which will become uprights.
In the rod of the device, you need to remove the stop and the curved part, and in its place a bracket is installed to connect the cable from the spotter.