Shelving is an excellent storage option. They are much cheaper than cabinets, and do not require any skill if you want to make them yourself. Racks are actively used to equip various storerooms and workshops.
This storage system corresponds to modern fashion trends and can be used to store items in a room for any purpose. There are various ways to make a convenient rack yourself.
Design features, types of racks
The design of the rack is a set of shelves arranged in tiers. They are fastened together by racks. In the classic version there are 4 of them in the corners. However, there are designs with three posts (2 on the sides and 1 in the center), and as the length increases, the number of supports is added.
The following types exist:
- Frame collapsible models are convenient for mobility. The supports with lintels and shelves are connected with bolts. If necessary, the structure can be easily disassembled, moved and installed in another place.
Frame collapsible model.
- Frame non-separable models do not have detachable units. All elements are connected by welding, nails, screws, which depends on the material. With large dimensions, the structure is considered stationary. It will not be possible to remove a huge rack from the room through a door or window opening without disassembling it.
- Console models differ in design. They have no sides and the shelves are attached to a solid back wall.
Console model.
4. Folding models resemble a stepladder. The main difference is the small dimensions. Folding stepladder racks are better than collapsible structures in that there is no need to disassemble them to transport them to another place. Folding and unfolding a stepladder with shelves takes 30 seconds.
Folding model.
Based on their shape, the following types of racks are distinguished:
- Rectangular models are considered classics. Usually such structures are placed near walls. Depending on the needs, they are made square or elongated in length to the required parameters.
- Triangular models are designed to be installed in a corner to take up empty space.
Triangular and rectangular models are the most popular due to ease of use. Less common are oval structures and other complex shapes.
Briefly about the main thing
Racks are in great demand both in apartments and in private houses. They are simple, do not take up much space, and due to the absence of walls they seem weightless.
Before assembling the structure yourself, you need to choose the size, shape, type and material. Racks are made of wood or metal (sometimes both materials are used); polypropylene pipes and plywood can also be used.
First of all, it is important to make a sketch and dimensions. Any rack consists of a frame and shelves.
The frame consists of sides, the shape of which resembles a staircase. Shelves are nailed to their crossbars. For greater stability, additional vertical supports are attached at equal distances along the shelves.
How to choose material for shelving
The material determines how long the structure will last under certain conditions and how much load it will withstand. If the product is an interior decoration, the design and beautiful finish are important.
For models for domestic use, it is customary to use two types of material:
- Wood is the most popular, easily processed material. There are several options: board, plywood, particle boards. With skillful processing, you will get a beautiful rack that is suitable even for use inside the house. The disadvantage of wood is the fear of dampness. Wood is destroyed by fungus, plywood delaminates, and particle boards turn into a pile of wet sawdust. Grinder beetles love to chew on wood. A wooden structure will last a long time if it is treated with protective impregnations and installed in a dry room.
When choosing wood as a material for manufacturing, you need to ensure that the boards have as few knots as possible. Boards without knots are much stronger than with them.
- Metal is an equally popular material. The structure will be durable and will withstand the load from spare parts in the garage if the frame is made from an angle, profile or round pipe.
When choosing rolled metal products, preference should be given to profile pipes, as they are the most durable.
- A decorative option is a rack with a base made of a profile used when installing drywall. The shelves will hold books, indoor flowers, and other light objects. Metal is similarly afraid of dampness and rusts, but compared to a wooden shelving, a steel structure will last longer in a damp room. To protect against corrosion, the product is painted, and it is better to use it when assembling workpieces made of stainless steel or galvanized.
Less common are racks made of plastic pipes, creative designs where glass bottles, ropes suspended from the ceiling and other devices serve as racks.
Construction made of plastic pipes.
The choice of material from which the rack will be made depends to some extent on its purpose. If you need to make a rack for the garage, then preference should be given to metal, as the most durable material.
Photo
With drawers
Shelving for home
Rack with doors
Garage rack
Unusual for toys
Did the article help you?
Features of determining the size of the rack
The choice of size is influenced by two factors: the availability of free space for installation and what items are supposed to be stored on the shelves.
The height is often limited to 2 m, so that you can easily reach the top shelf without a stand. The depth depends on the size of the items intended for storage. They shouldn't fall off the shelves, but a large supply is useless. The rack will take up the useful space of the room.
Typically, shelves for books or flowers are made 30 cm wide and up to 1 m long. It is advisable not to increase the last parameter. Long shelves bend under load. The situation is corrected by installing additional racks.
Shelves up to 50 cm wide are suitable for a garage or shed. This is enough to store spare parts, tires, work tools, and garden tools.
If the shelves of the rack are planned to be made from OSB sheets or plywood, then when calculating its width it is advisable to take into account the dimensions of such sheets. This will avoid unnecessary waste and waste of materials.
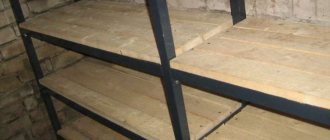
Metal rack in the garage from a profile pipe
Metal construction is often in demand in the garage. To assemble its frame, it is optimal to use a profile pipe. The design will be neat and convenient. In addition, the profile tubes fit better at the joints. It is optimal to choose the most popular size: height – 2100 mm; width – 1250 mm; depth – 300 mm.
Assembly sequence:
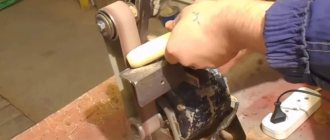
- Use a grinder to cut a pipe with a cross-section of 20x20 mm into pieces of the required size. You should get 4 elements 2100 mm long for racks, 6 blanks 1250 mm long and 6 pieces 300 mm long for shelves.
- First we make the side of the rack. On the workbench we lay 2 rack elements in parallel, connecting them with pipe sections 300 mm long at the points where the permanent shelves will be located (top, bottom and center). We fix the structure with clamps and magnetic corners.
We assemble the sidewall from profile pipes.
- We fix the parts at the joints with tack welding. Using a tape measure, measure the diagonals of the rectangular sidewall. If they are equal, completely scald the joints.
- Using a similar principle, we assemble the second side of the rack. It should turn out identical to the first workpiece with the jumpers located at the same level.
- We clean welding joints in all accessible places with a grinder.
- We lay the sidewall on the ground, weld with tacks the crossbars made of 1250 mm long tubes, forming shelves. It is important to set them strictly perpendicular.
We weld the jumpers onto the sidewall.
7. Place the second side of the rack on the free ends of the welded crossbars. We fix the joints in the same way with tacks.
We install the second side panel.
8. Use a tape measure to measure all diagonals. If necessary, we make adjustments. When the diagonals are aligned, we finally seal the joints by welding.
9. We weld a metal coin under each leg. It will prevent the posts from sinking into the ground. If the rack needs to be adjusted in height, we weld a mechanism made of a bolt and an extended nut onto the legs.
Bolt with long nut.
Three shelves are not enough for a rack with a height of 2100. Add 4 more pieces. To do this, we cut 8 blanks with a length of 1250 mm from a profile with a cross-section of 15X15 mm. At the ends of the pipe, use a grinder to cut the side about 15 mm, bend the square inward. Insert the head of a bolt with a screwed nut into the resulting sockets for fitting.
Pipes with curved edges.
We check how the bolt and nut fit into the pipe.
11. On the frame posts, mark the location of the shelves, drill holes and cut threads. We screw in the bolts with the nut screwed to the head.
Screw the bolt into the pipe.
12. We put the tubes on the resulting holders with sockets. The additional shelves are removable and reliable.
We put profile pipes on the bolts.
The frame is ready, all that remains is to paint it and attach the shelves to it. We will make them from OSB sheet. When sawing such a sheet into blanks, it is best to use a file with a fine tooth, this way you can avoid numerous chips of the edge of the sheet.
We fasten the shelves using metal screws. Before screwing in the screws, be sure to drill holes in the OSB sheet with a diameter of 2-2.5 mm. If the holes are not pre-drilled, the OSB sheet will be undermined and crumbled at the moment the screw is tightened.
We fasten the OSB sheet with self-tapping screws.
Metal rack.
Diagonal option
This type of wine placement is practiced everywhere. Any person can do it. To do this, it is enough to have some kind of wooden box or knock it down yourself.
When making it yourself you need:
- Cut four identical pieces of wood that are equal in width to the height of the bottle (or slightly less). Ideally, when assembling them, you should get a square.
- Measure the diagonals and cut 2 more pieces according to the resulting dimensions. These are the main elements.
- In the middle of each of them (up to half) a groove is cut with a width equal to the thickness of the wood.
- Insert elements into each other. You should get a design that resembles the letter “X” or a cross. It is placed in a square and secured with self-tapping screws. The bottles are placed in the resulting compartments.
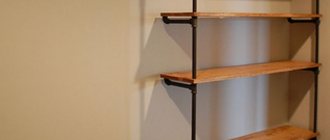
Making a rack from a plasterboard profile
The design is suitable for installation on a balcony, in a storage room or any living room in the house. For racks, a PS wall profile measuring 50x50 mm is suitable. The lintels will be used with a supporting profile of a smaller section of 50x35 mm. The dimensions can be left from the previous master class or new ones can be calculated.
Assembly sequence:
- Using metal scissors or a grinder, cut the pieces to the required size. If there are 6 shelves, then we cut 12 short jumpers for the sides of the rack and 12 long jumpers. We still leave 4 racks.
- Having laid out 2 racks in parallel on the floor, we connect them at the same distance with short jumpers. After checking the sidewall diagonally, we fix the profile at each joint with self-tapping screws with a wide head.
We assemble the sidewall from drywall profiles.
3. Using a similar example, we assemble the second sidewall.
4. We connect the two sidewalls together with long jumpers, which will serve as a frame for the shelves made of plywood sheets. To prevent the shelves from collapsing, we add more jumpers from the cut supporting profile for rigidity. You should get the same lattice as on the sides of the rack.
We assemble a lintel from drywall profiles.
To prevent the finished structure from tipping over, we fix the frame with dowels and screws to the wall. We place plywood blanks or other durable sheet material on the crossbars for the shelves.
We assemble the frame.
We are approaching the finish line. Attaching the front panels
Melamine edge
If you sheathed the rack with MDF or chipboard, then upon completion of the sheathing, you need to glue a special melamine edge to all ends of the parts. This can be accomplished using an ordinary iron. Place the edge on the end treated with sandpaper (fine-grained) and smooth it with a hot iron. Trim off any excess edges with a utility knife.
Some shelves can be closed by attaching beautiful doors to them. This type of shelving can be used every day, and its neat appearance will become a successful and original decoration for any living room.
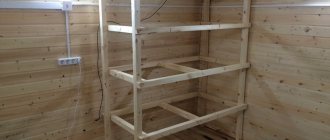
DIY wooden folding rack
It is convenient to make a stepladder-type structure from pine bars. You will need blanks with a side size of 20x40 mm for the legs and slats of any section for the shelves.
Assembly sequence:
- We cut 4 blanks from the block for the legs. You should get two paired elements with a difference in length of 90mm. Rear pillars – 1800 mm, front – 1890 mm.
- We saw off blanks 400 and 445 mm long for the lintels of the rear and front walls. The shelves will rest on 445mm long lintels. The number of blanks depends on how many shelves are provided. Optimal for a stepladder-rack - from 3 to 5 pieces.
- We apply markings to the rear pillars (length 1800 mm). We mark from above in the following sequence: 200 mm, 540 mm, 940 mm and 1400 mm. In the marking places we draw the contours of the bars for the convenience of precise drilling of holes.
We mark the installation location of the bar on both sides.
4. Using a drill with a diameter of 3 mm, drill 2 holes on each marking.
Drilling holes.
5. Between the racks we lay bars 400 mm long and tighten them with self-tapping screws. It turns out the back part of the stepladder is in the form of a ladder.
6. Using a similar example, we assemble the front part of the stepladder-rack. We use lintels with a length of 445 mm.
7. We retreat 30 mm from the upper edge of the front and back of the stepladder and drill holes with a diameter of 9 mm for an M8 furniture bolt.
Assembled stand.
8. We assemble a frame from two racks and connect the racks to each other with an M8 furniture bolt. We place an enlarged washer8 between the posts. This way the racks will not rub against each other.
M8 bolt with nut and oversized washers.
We connect the two racks together.
9. We assemble the shelves themselves from slats. We fix the longitudinal blanks with self-tapping screws to the jumpers.
We assemble the shelves.
10. Place the shelves on the crossbars of the front part. We fasten the shelves to the racks of the rear part of the rack with one self-tapping screw, driving it into the jumper. On one hardware they will rotate, which will make it possible to fold the stepladder.
All that remains is to polish the finished structure and test how it folds and unfolds freely.
The rack, assembled with your own hands, is decorated. The wood is treated with an antiseptic, the metal is degreased and primed. Painting will not only add beauty, but will also extend the life of the rack.
Drawings of a folding wooden rack
Click to enlarge.
Front pillar drawing
Drawing of the rear pillar.
Shelf drawing No. 4. The remaining shelves are assembled in the same way.
Shelving in the house and important points you need to know
- If the rack is made for the home, then the distance from the floor to the first shelf should be selected in such a way that it is convenient to clean underneath it.
- Small children often like to use structures such as stairs, so for the sake of children's safety, a rack installed at home must be screwed to the wall. This way you can avoid it tipping over and other negative consequences.
- If the rack does not have enough lateral rigidity and it easily swings from side to side, then a pair of jibs must be added to its design, which will give it the necessary rigidity.
Functional, practical furniture in a couple of hours
Many people prefer natural, environmentally friendly materials. It’s easy to assemble a wooden rack with your own hands from what you have in the house.
Old doors, pallets, beams, chipboard sheets, and boards will be used.
Note: Be sure to check the accuracy of dimensions when cutting and assembling. A few extra millimeters can lead to distortions and instability of the structure.
The simplest version of a homemade shelving unit is made from ready-made wooden boxes. The side sheathing looks interesting in the product, opens the view, and can withstand books, flower pots, things, and crafts. Before starting, you should carefully inspect the boxes for integrity, reliability of assembly, and condition of the wood.
Each box must be prepared: cleaned of dust and dirt, sanded to a smooth surface, painted with oil paint to match the color of the interior. Painting “like wood” followed by varnishing in several layers will give a special elegance to the product.
Assemble the structure according to the drawing, carefully installing the fasteners. Install in place, secure with dowels to the wall or floor.