Wooden arch: functions of the structure and requirements for execution
The arched design looks very stylish in nature. In addition to decorative functions, it can serve as a support for various botanical species, be part of a hedge, and simply be an architectural accessory.
The arched structure can serve as visual zoning of the site. Such products are collapsible, they can be purchased at any hardware store with a wide range. You can also make a wooden arch with your own hands, using available materials and available drawings.
Before building an arch on a site, it is advisable to familiarize yourself with the ergonomic and aesthetic recommendations regarding this type of structure:
- The arch is made taking into account the dimensions of all family members, as well as possible visitors.
- A structure that is too low and narrow will constantly cause inconvenience and injury, especially if it crowns a gate. The width of a standard arch is about one and a half meters, the recommended height is at least 2.5-3 meters;
- The design of the arch is made in such a way that the structure is aesthetically attractive in the autumn and winter periods, when it is open to the views of guests and household members;
- For outdoor accessories, choose materials that can withstand adverse weather conditions. Otherwise, there is a high risk that the rotten structure will collapse at an unforeseen moment.
Varieties
An awning is a simple option for creating coolness and light partial shade
Depending on the tasks, the following types of pergola are possible:
A screen separates different zones
Convenient canopy for shading
A canopy is a popular type of pergola in warm southern regions. Installed to shade south-facing windows. Reducing the heat load on the south side of the house, it has become widely used in energy-saving houses, saving on air conditioning.
Tunnel installed above the path
An arch or tunnel is a number of arches that have a common direction. Installed above the track. Can serve as a simple decoration or hide behind, for example, a vegetable garden or any outbuildings
As an element of landscape design, the pergola must be combined with the general appearance of the entire site, incl. with the architecture of the house.
Veranda attached to the house - expanding the living space: projects, tips on how to create it yourself (200 original photo ideas)
DIY wooden arch for the garden
Making an architectural structure yourself is quite simple. To do this, it is not necessary to have professional carpentry skills, because we are talking about decoration for the home garden.
Small flaws will not spoil the impression of the arched structure. All work is usually completed within one day.
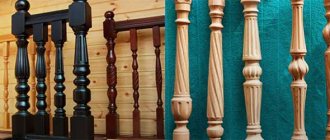
Any type of wood is used as the starting material. This can be pine, oak, birch or parts of pressed particle board material. The latter option is more affordable, but less durable.
If owners prefer practical materials, they should think about cypress or mahogany.
These rocks are less susceptible to rotting. Such arches will last much longer, and they will look more monumental.
The construction of a garden requires a small amount of material. If there is a lumber yard nearby, you can go there and select suitable pieces of wood.
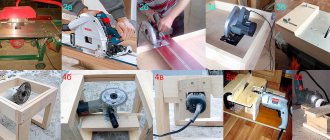
To work in the garden you will need the following tools:
- a circular saw;
- jigsaw;
- hammer;
- drill;
- shovel.
After manufacturing and installation of the architectural structure, the surface of the arch is covered with wood varnish or stain. Without additional processing, the product, when exposed to air, will rot within a matter of years.
Only thanks to the protective properties of paint and varnish products can the life of an outdoor decorative structure be extended.
Let's watch a video on how to make a wooden arch with your own hands:
Creating a plywood template
Interior arches must be built with your own hands in stages. Initially, you should prepare high-quality templates. The final result will depend on this - a do-it-yourself interior arch.
- To make a template from plywood, you need to saw off 6-10 cm. The length of the workpiece should exceed the width of the door opening by a third. If there is no plywood of the required length, it is necessary to join two pieces together, and fasten the joint using strips, bolts, and nuts;
- The finished strip is applied between opposite parts of the opening. The curvature option is selected individually, fixation is performed using a tight rope (pre-threaded into special holes made at the ends of the strip). The strength of the structure is imparted by means of a longitudinal rail, which is secured with self-tapping screws;
- The next stage of DIY production will be cutting out the arched casing. A thick plywood sheet is placed on a horizontal surface, and a finished template is placed on top. Use a pencil to mark the outline of the lower part, then move 10 cm upward and draw the upper outline;
- The future door arch from MDF is cut out according to the markings made; this will require an electric jigsaw. Two identical blanks of equal length and width are made, and then glued together using a certain glue. All irregularities must be removed using a cutter, sandpaper, or file;
- An important step in installing an arch with your own hands is preparing the vertical trims. The finished arch design involves four vertical platbands. On thick plywood you need to come up with markings: width - 10 cm, height - 20 cm more than the desired size. The sections are sawed off, if necessary, joining, grinding, and edge processing with a cutter are performed;
- When creating a bent vault for an arch in an apartment with your own hands, it is better to use thick plywood. Otherwise, the finished design will look too “budgetary”. To obtain bent plywood, you need to make longitudinal cuts on the workpiece (with a saw or cutter). The greater the curvature, the more cuts needed;
- Before installing the plywood arch, it is necessary to make the side fragments of the vertical posts. Markings should be made on the plywood. Using a jigsaw, boards are cut with a width equal to the arc of the arch;
- The finished parts are polished, excess is removed, and cuts must be made at a certain angle using a miter box.
To begin with, it is advisable to take a small piece of old plywood and practice on it first.
Photos of garden arches, options for classic designs
A wooden arch is a classic garden decoration option. The naturalness of the material allows the design to be combined with any botanical species.
Also, a wooden arch is in harmony with garden benches, tables, and gazebos. Designed within the framework of one concept, the products form an original stylish ensemble.
You can make a wooden garden arch more interesting with the help of side flower boxes. In this case, it is important to plant botanical species that will match the color and shape of the leaves:
Among classical decorations, the most monumental are arches with a clearly defined domed top.
What is required for the work
To make interior arches from wood or plywood, you will need certain tools and additional materials. To build a wooden arch you will need:
- Wooden blocks;
- Sheets of plywood with a thickness ranging from 18 to 21 mm (4-5 pieces);
- Plywood sheets with a thickness of 3 mm (4-5 pieces);
- Self-tapping screws;
- Finishing nails;
- Mastic;
- Polyurethane foam;
- Water based varnish.
To perform installation work you need the following tools:
- Hammer;
- Electric drill, set of wood drills;
- Electric jigsaw;
- Sander;
- Building level;
- Pencil;
- Twine.
Plywood for creating an arch
Exclusive arches made of wood materials
In addition to classic designs, you can decorate your garden with more original fruits of craftsmanship.
To make them, you will need less accessible materials and richer creative imagination, but the results are worth it. Just look at the ponderous beauty of the arch made of wooden logs:
Of course, to support such a structure, a metal base is required. However, if you want to make your site a local landmark, you can weld the fittings necessary to support the woodpile.
An arch woven from wicker looks very fashionable. Such a structure is a real highlight for lovers of rustic-style decoration.
This type of work requires certain skills and perseverance. You also need to take into account that the lightweight structure should not be overly burdened by climbing plants.
The wicker arch itself looks like a self-sufficient decoration.
A few bright floral splashes are enough to complete the image of a simple old Russian household.
The crudely made structure, made from round timber that was at hand, is a distinctive work in a rustic style:
Such an arch should also not be completely hidden behind flowers. Guests and household members will get more pleasure by observing this seemingly simple support.
Let's watch a video about making a wicker arch:
DIY arches for climbing plants
When making a decorative support for climbing flowers, the most difficult part is making the top round part.
To make it easier to solve the problem, craftsmen use a semicircular plywood template as a visual guide. After the arcs of the arch are formed, transverse slats are nailed to them.
The side slats are stuffed horizontally, vertically or diagonally. This is done after installing the structure in the ground and concreting the supports.
Treatment
The final design of doorways and arches involves masking the joints and fastenings. The tree must be treated with an antiseptic before installation in the opening. The fiberboard will most likely already be impregnated with protective substances.
The best option is impregnation with stain and opening with varnish. If you are afraid that the coating may be damaged during installation, carry out the work after installing the arch. According to the rules, you need to prepare the details in advance. The stain is applied at the very beginning, then you need to use varnish, it is applied in two or three layers, alternating the direction of the brush.
An alternative option for wood and MDF can be painting; this option is more relevant for modern interiors. You can also cover the parts with veneer, laminate or PVC. This should be done immediately after cutting onto a cleaned and degreased surface.
If installed and designed correctly, your doorway will look great and give the room a feeling of spaciousness, luxury and coziness.
Drawing of an arch for grapes, installation procedure
If an arch is needed for growing grapes, you can make a structure with a flat ceiling. This way, when harvesting, the owners will not have to climb too high. Such structures are also called pergolas. Their primary purpose is to protect crossings from the scorching sun.
The role of the main defender is assigned to climbing plants: ivy, grapes, petunias. In this way, it is possible to combine business with pleasure, growing delicious berries at the same time.
A drawing of a simple pergola for grapes looks like this:
- Assembly should begin from the top elements.
- After installing the structure, you need to dig a hole at least 70 cm deep for each support.
- The part of the support that will be underground is pre-treated with a special septic tank, tar or resin.
- Then crushed stone is poured into the holes and the assembled structure is installed.
- Using a level, the pergola is perfectly leveled.
- Then the pits are concreted and the decorative finishing of the structure proceeds.
Features of the extension to the building
Extension to the building
When installing an open terrace (pergola adjacent to the house), there are 2 ways to attach it:
- A support beam is attached to the wall. Planting recesses are cut out in it. For greater connection strength, use corners. They are fixed on 2 sides
- Steel plates corresponding in shape are attached to the wall.
Step-by-step installation process:
- Markings are made for the supports. The gap between the house and the supports depends on the desired depth of the canopy
- Pillars are being installed
- To secure the second ends of the beams on the wall of the building, markings are also made. This is where the support beam or plates are installed
- 2 boards or support beams are attached to the poles on top
- Finally, auxiliary beams are laid. They are attached to the support on one side, and on the building on the other.
Plants for decoration
Most arched structures benefit greatly when they are decorated with climbing plants.
In addition to grapes, these can be climbing roses - flowers with unusually bright, rich and abundant flowering. Wisteria, honeysuckle, and clematis look simpler and nicer.
You can make an arch monumental and “heavy” if you decorate it with ivy.
The arch frame can be used for vegetable crops: cucumbers, zucchini, zucchini, pumpkins, watermelons. Using lattice ceilings, you can grow any berry bushes in the form of trellises.