Question for the “happy” residents of houses with electric stoves.
I prefer an outdoor camping gas burner.
Eh. I have an electric stove. Hard case. Option 1 (expensive) Buy Lee's lead melt. Expensive, it will cost $100. I can't decide for a long time
Option 2 (harmful for life and for the stove) Buy something like a stainless steel ladle with a flat bottom and melt there Lead exhaust, heat, cast iron burners burn
Option 3 (competent) Buy a tourist primus “Bumblebee” and make it on it. Consumption - one refill (0.5 liters) per 100-200 bullets
Option 4 (safe) Go to the garage, 2 bricks + blowtorch + tin can (enough for 80-100 bullets). You can rent a lamp from your neighbors, and you can bring your own gasoline.
A blowtorch consumes too much gasoline, unlike a primus stove I had, and it was a pain in the ass to pour gasoline.
Thank you friends, so I’m thinking of adapting a gas burner for this task (a small can of hairspray type and all sorts of attachments for it, for example, I used it to tar my skis)
This is the right choice. At least it won't smell like gasoline and it's safer.
1. Using an electric iron. We fix the working surface up, a crucible on it, lead in the crucible, preferably charcoal tablets on the lead - three packs.
2. We make a pallet from galvanized sheet metal, put asbestos on the pallet, and a heating element from an electric stove on it. 220 is supplied through a thyristor power regulator 220V*1KW (I have a homemade one, now they sell electrical goods in the store). We put the crucible in the pan and fasten everything together. The stand is a regular Taganka tripod. 3. No one forbids the unfortunate owners of gas stoves from buying an electric single-burner stove. But it is necessary to use a thyristor regulator, it gives a smooth power adjustment, and the installed bimetallic ones simply turn the heating element on and off, maintaining an AVERAGE temperature, but you need a STABLE melt temperature.
My 1000 W electric stove with a flat element copes quite well. Just don’t make a ladle out of galvanized steel. Until all the zinc comes off, it will take you a long time to scrape the crap out of the melt. Better made of stainless steel or just steel.
I have a gas stove. I melt under a powerful hood at night. A lot of oxides are formed in an aluminum ladle. I switched to a homemade stainless steel ladle, small in diameter but tall. The oxidation of lead has decreased sharply. I adjusted the temperature of the alloy and it burns less. Vladimir
That's right. Ventilation is very important. Without it, my head hurts later. I melt either with a respirator or a mask for painters, but always with effective ventilation. Lead tends to accumulate in the body. It is impossible to remove it and the result can be very serious.
quote: Originally posted by Men: Option 4 (safe) Go to the garage, 2 bricks + blowtorch + tin can (enough for 80-100 bullets). You can rent a lamp from your neighbors, and you can bring your own gasoline.
take a REGULAR IRON enamel MUG, narrow/bend the spout (on the upper edge of the mug) with pliers so that it meets at the very edge at an acute angle, place it by the handle with pliers on an 800-watt portable electric stove (which is placed on 2 bricks) and 3/4 you can load scrap lead into it—YOU GET A DURABLE, EXCELLENT IRON CRUCCIBLE, remove it from the stove with the melt—using pliers by the handle—the spout, tapered to the edge, allows you to pour it into especially thin holes.
For example, I generally made bullets from a mixture of alabaster and cement - 1:2-1:4, approximately, in volume - cement - alabaster, a section (ring) of a pipe with a diameter of an inch and a quarter is filled with it (up to 1.5 inches is possible) and 1.5-1.8 cm in height - then the original bullet is pressed into it (strictly to the middle), the mixture around the pressed bullet is compacted, cleaned up flush with the edge of the pipe trim.
(it is convenient to grind the original ball bullet on a grinding wheel (from a ball from a bearing, carefully measuring it with a caliper))
- coat the resulting mold with the original bullet half inserted into it with a thin layer of grease (to avoid sticking of the two halves of the mold) and place a second such piece of pipe on top, aligning the walls with the lower half, then pour the same composition - alabaster-cement - on top into the second half of the mold - level with the cut of the pipe and is also compacted. It is necessary to pour it when the mixture in the first half has almost completely (or completely) set.
During production, alabaster and cement must be mixed to a consistency almost like cottage cheese, otherwise the shape will turn out loose, it is better to take M400-M500 cement, mix dry alabaster with cement, first. After mixing the alabaster with cement in the required proportion, add water little by little to the mixture until it reaches the consistency of thick sour cream—cottage cheese.
It is necessary to prepare the mixture for only one half of the mold at a time—because... it dries and hardens quickly.
After hardening, a day later, in both halves, 2 holes are drilled through the area free from the imprint (on the same line through the imprint) vertically with a diameter of 3 mm. For centering (for precise alignment of the halves) pins-rods made of iron wire - the resulting holes are dense lubricated with grease to prevent the mold from chipping when inserting the pins. Holes are drilled in the connected halves (perpendicular to the plane of their connection) and with the original bullet inserted into the bullet (with which it was molded) - in order to achieve precise alignment of the halves.
After unraveling the halves, in one of the sides of the mold at the junction of the halves, a needle file is used to make a recess for pouring lead - in both halves - in the shape of a funnel, with an extension to the outer edge of the mold.
That's it, the bullet gun is ready—because... the alabaster mold conveys the shape of the surface well, then after casting, ball bullets can be almost unprocessed (just bite off the protrusion on the resulting bullet at the place of casting).
Pouring lead is done as follows—
—connect the halves of the mold, insert the metal centering pins into the holes and lightly clamp the connected halves of the bullet in a light vice or clamp, then pour lead into the funnel-shaped machined hole at the junction of these 2 cylindrical forms of the bullet.
- the external metal sections of the pipes can be removed from the hardened alabaster after the bullet has hardened, or not removed.
- it can be poured frequently, gypsum (alabaster) takes a long time to heat up, holds the temperature of liquid lead well (just over 300 degrees C), and does not crack (especially when mixed with cement - it is very hard and does not crumble).
Lead is easily extracted from old batteries.
Source: guns.allzip.org
How to melt dirty lead?
#1 Post by fantomas » 12/30/2009 7:36 pm —> Added: 12/30/2009 7:36 pm Post title: How to melt dirty lead?
#2 Post by kirkinpuzel » 12/30/2009 07:41 PM —> Added: 12/30/2009 07:41 PM Post title:
#3 Message Anna Alexandrova » 12/30/2009 19:48 —> Added: 12/30/2009 19:48 Message title:
#4 Message Sergey Drovnikov » 12/30/2009 19:54 —> Added: 12/30/2009 19:54 Message title:
#5 Message by fantomas » 12/30/2009 20:04 —> Added: 12/30/2009 20:04 Message title:
And I shoot everywhere where the ground is not frozen! By the way, how is the soil in your yard?
Seriously, I bought it from a metal acceptance shop. But, I have already found out that everything can be melted locally. So the relevance of the issue has disappeared.
#6 Message Granovsky Eduard » 12/30/2009 20:04 —> Added: 12/30/2009 20:04 Message title:
#7 Message fantomas » 12/30/2009 20:14 —> Added: 12/30/2009 20:14 Message title:
I don't see anything funny. If I did not get involved in the melting of dirty lead, although I myself am a welder and an electrical mechanic, this does not mean that I am a guest of the HDPE!
#8 Message Granovsky Eduard » 12/30/2009 20:20 —> Added: 12/30/2009 20:20 Message title:
#9 Message KOTKOTKOT » 12/30/2009 21:17 —> Added: 12/30/2009 21:17 Message title: lead
#10 Message by kirkinpuzel » 12/30/2009 21:20 —> Added: 12/30/2009 21:20 Post title:
#11 Message Granovsky Eduard » 12/30/2009 21:23 —> Added: 12/30/2009 21:23 Message title:
#12 Post by kirkinpuzel » 30-12-2009 21:29 —> Added: 30-12-2009 21:29 Message title:
#13 Message Granovsky Eduard » 12/30/2009 21:32 —> Added: 12/30/2009 21:32 Message title:
#14 Post by kirkinpuzel » 12/30/2009 10:34 pm —> Added: 12/30/2009 10:34 pm Post title:
#15 Message by fantomas » 12/30/2009 22:56 —> Added: 12/30/2009 22:56 Message title:
There are no hard feelings, he is a comedian himself. I can't get enough diving cargo! , or rather, you have to do without a belt.
Firstly, the weight is about a hundred, with a tail. Secondly, the current idea is for large compulsory health insurance companies. Like, I want two bricks for quick release, and pour more sticks so that there is room left in the adjacent compartments.
And for specific advice on roaring - thanks! We'll try it at our leisure. More forms need to be made (select time).
#16 Message Anna Alexandrova » 12/31/2009 00:14 —> Added: 12/31/2009 00:14 Message title:
#17 Message KOTKOTKOT » 12/31/2009 00:28 —> Added: 12/31/2009 00:28 Message title: o
#18 Message Anna Alexandrova » 12/31/2009 00:36 —> Added: 12/31/2009 00:36 Post title: Re: about
#19 Post by kirkinpuzel » 12/31/2009 00:42 —> Added: 12/31/2009 00:42 Post title:
#20 Message Sergey Drovnikov » 12/31/2009 00:44 —> Added: 12/31/2009 00:44 Message title:
Where can I get raw materials?
As for lead, I would advise you to “make friends” with some plumber (or an employee of a car repair shop where batteries are often changed). Personally, I was very lucky - I became friends with a neighborhood plumber who “supplies” me a bunch of lead/water pipe scraps completely free of charge.
If you don’t have such friends around you, then it doesn’t matter. Just find out where metal is accepted (or recycled) in your city and go there for the weekend. Even if you have to buy “pieces” of lead raw materials, don’t worry! You will still be a serious winner, considering the rather “inflated” cost of store-bought / branded weights.
Where to find lead
Natural reserves of iron ore are gradually declining, so the question becomes urgent: where can we get lead to meet the necessary production needs? Now there are a large number of non-ferrous metal collection points that directly cooperate with processing plants, so the market for recyclable materials is developing and in many ways this is the only adequate alternative to non-ferrous metal mining.
Not everyone knows, but lead can be mined at home, and it is not necessary to explore kilometers of fields with a metal detector. You just need to know which household appliances or other products contain this valuable non-ferrous metal.
Home and industrial methods
There is literally a home method to protect lead surfaces from corrosion. Sunflower oil is always available on the farm. Pour it into a bowl and immerse the recently melted figurine in it. Hold for about five minutes, remove, place on a layer of napkins and let dry. In production, graphite lubricant is usually used to protect lead parts from oxidation. You may not have it at hand, but it is not so difficult to acquire. It is found in auto parts stores, household stores, agricultural equipment stores - in a word, where they sell industrial oil. You can order graphite lubricant through the online store. The lead product will retain its shine for a long time. If the product is large, you can simply wipe it with a cotton swab dipped in vegetable oil.
Lead deposits in nature
Lead is found in uranium and thorium ores. This heavy non-ferrous metal is used in shipbuilding, for the manufacture of lead weights, plates, and also for various repair work.
This metal has a number of properties:
- This is a fairly soft metal that can be easily scratched.
- Resistant to corrosion.
- Immunity to radioactive radiation.
- Often used for various hunting and fishing needs. The metal melts easily, so it can easily be used to make a sinker for fishing tackle or a bullet.
In addition to being used by fishermen and hunters, this metal is valued on the recyclables market because special protective sheets against radiation and various coatings in shipbuilding are made from it (due to its anti-corrosion properties). This means that it can be handed over quite profitably at collection points, especially with large batch volumes. Therefore, you need to know where to get lead at home, and whether any special tools or devices are needed to extract it.
Form for sealant weights
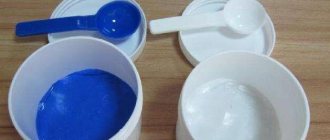
You can make a mold for making sinkers or spinning baits yourself without much difficulty, using plaster or silicone sealant, as well as a ready-made sample.
For example, it is easy and also very unusual to make a mold from a sealant like “Hermesil” and the like. The main factor when choosing a sealant is its ability not to change physical properties when exposed to high temperatures. The upper permissible temperature limits for most common sealants range from 150 to 180°C.
In this regard, the use of pure lead for casting sinkers is not very appropriate, since its melting point reaches 350°C. But you can take some alloys, namely printing alloy, Wood or Rose alloys. Their melting point ranges from 60-110°, and therefore, when using such alloys, the silicone mold will serve you for a long time and the sinker castings will be of high quality.
If lead is used as the material for the sinkers, the manufactured casting mold will withstand approximately 8-10 castings. It is also worth noting that each time the lead sinker will move further and further away from the original ideal due to the gradual burnout of the mold and sealant.
Silicone sealant can be purchased at specialized stores selling building materials or at auto stores.
Although such a mold for casting at first glance may seem completely unreliable, in fact it can withstand quite high temperatures, and thanks to its properties it will allow you to make a sinker or bait of almost any shape.
main sources
This non-ferrous metal surrounds us all in everyday life. We'll list the main sources where you can get lead, so you can choose the one that suits you best.
From battery
Failed power supplies have a large supply of non-ferrous metal. You can find batteries at a landfill or in the garage of a familiar car owner. Generally, most people will be happy to get rid of this junk.
Lead in batteries is contained in the form of lead plates. To get them, you need to drain the electrolyte into a separate container, which involves completely disassembling the battery. The plates are in acid, so they must dry for 24 hours. In addition, the disassembly itself takes a lot of time, and special care must be taken because you will have to come into contact with liquids that are hazardous to health. If you are not sure of your actions, then the battery can be returned to the collection point in a non-disassembled form. Specialists will carry out the disassembly themselves and also send potentially hazardous waste for disposal.
Cable scrap
Another source where you can get lead is scrap cables. Typically, the metal is contained in a protective shell.
At collection points, cable scrap is highly valued if it meets the following requirements:
- The metal content in the shell is at least 99%.
- Normal radioactive background.
- No oxides.
- No contamination.
Soft lead can be removed quite easily with a regular knife, but keep in mind that bitumen is applied on top of it, which must first be removed. It melts well, so you can get rid of it by simply holding it over the fire for some time. All this effort totally pays off because the cable lead is much purer than the metal you extract from the battery.
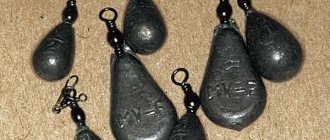
Fishing sinker
You can get them from your friends who are keen on fishing. There is another way - buy them in a special fishing store and then melt them down, but this is an extremely dubious method that is unlikely to bring you much profit.
Car wheel
The design of a car wheel has one lead part - a balancing weight. It weighs only 60 g, so this method of earning money is more suitable for specialized auto repair shops, rather than ordinary car owners. Lead is also found in shrapnel and bearings.
Other metal sources
There are places where lead is found in fairly large quantities, but access to them can be difficult for the average person. The first source is meters. This method is suitable for those who have friends who work in energy services and water utilities. They often have to put or remove seals on meters. They are made of lead, so they can be sold profitably if there are enough of them.
Another source is electrolysis baths, where this metal is found in large quantities. They become unusable over time, so this is a good solution for a company to get rid of scrap metal while making a profit.
Samples of future cargo
Samples are understood as ready-made weights taken as an example. They can be purchased products or previously made ones. The sample can be any object. For example, made from a bullet.
You can use bullets for the sample
The plaster mold can be slightly adjusted using plasticine. But not in large quantities, because when the gypsum hardens, it releases a lot of heat and the plasticine begins to melt. If a bullet is taken as the source, then you will need to equip it with wire loops, which are fixed with the same plasticine.
Loops made of wire for scaffolding are attached to the bullet
Dovetail
Here we are talking about a dowel with a sliding installation. This gear is suitable for fishing in heavy currents. The weight should have a rough surface so that it does not dangle spontaneously along the bottom. The product should also have an internal hole for fishing line.
The most popular option in this segment is considered to be the “dovetail”. Its name comes from its shape - in the form of the letter V. To make such a weight, you can use metal or homemade molds.
Sequencing:
- A steel wire pre-treated with silicone (for the channel) is placed in the mold.
- Connect and fix the parts of the form.
- Lead is heated and poured through a special hole.
- Wait for it to harden and remove the product, then polish it.
Ballerina
Another option for a sinker is “ballerina”. To melt it you will need metal, a container for melting it, and a mold. You also need to prepare stainless steel wire, heat-resistant cambric, a swivel and sandpaper.
Manufactured cargo "ballerina"
The manufacturing process itself includes the following steps:
- A mold is made from plaster, wood or other suitable material.
- A metal rod is placed in the central part.
- Lead is melted and poured.
- After hardening, the sinker is taken out.
- Sand it until smooth.
Now a swivel is installed at one end of the rod and secured with heat-shrinkable cambric.
Spoon
The easiest way to make a sinker for a donkey is to use a regular aluminum spoon. This is where its name comes from. To do this, place a container over the burner and melt lead in it. Then pour it into a spoon and wait for it to cool. Afterwards it comes off easily.
Spoon for casting weights will suit any size
The resulting shape of the weight is convenient in that the weighting material is not carried away by the current at the bottom. They lie flat and can remain in this position for a long time, holding the tackle. The disadvantage is that spoon-shaped sinkers are light in weight. After all, it is impossible to pour more than the dimensions of the cutlery dictate.
Why is it necessary to recycle non-ferrous metal?
Many people have an incorrect perception of the activities of non-ferrous metals collection points. In their view, these are semi-legal organizations that profit from the population. This opinion is largely explained by the work of points that operate unofficially, buying up even what is prohibited from being accepted under the current legislation of the Russian Federation.
is a specialized reception point that operates in strict accordance with current regulations. This is why it is profitable for us to sell lead and other non-ferrous metals:
- You make a profit - about 70-120 rubles per kg (depending on the type of scrap metal).
- For enterprises, this is a good opportunity to get rid of potentially hazardous waste, unloading their industrial territory.
- Environmental protection. This non-ferrous metal is toxic, so it must not be disposed of with other household waste.
- Processing raw materials for recycling involves lower costs than extracting metal from nature. At the same time, this is a more environmentally friendly process.
Temperature and characteristics of lead melting
Lead, designated by the symbol Pb (plumbum), is one of those metals that have been known to mankind for a long time. Lead finds in the form of beads date back to 6000 BC. In Ancient Rome, lead water pipes and dishes were made until the toxicity of lead compounds was proven.
Now it is a strategic metal, it is used in the defense industry. Explosives and current sources are made from it. Lead is inexpensive to produce and the metal is extracted from naturally occurring minerals. First, a rough alloy is obtained, then a pure one.
It is not difficult to melt lead at home; the melting point of lead and its alloys is not higher than +330–450°C, and that of solders is not higher than +230°C. The metal is not subject to corrosion damage, is ductile, malleable, and is used in many industrial fields. It is used to make household items, fishing gear, and do-it-yourself solders by filling molds with liquid lead.
Casting sinkers
Before casting a fishing sinker, the lead must be crushed. It takes 20 grams of metal to melt it. This is the only way it will completely melt and heat up to the required temperature of 450 degrees.
The mold is connected and fixed with wire or something else, but without tightening (otherwise it may burst after hot metal is poured into it). Then the lead is drowned in an appropriate container. Many fishermen use an aluminum spoon or ladle for this purpose.
Preparing for pouring
When the lead becomes liquid, the film is removed from the top. Heat the mold for 5 minutes. After this, the metal slurry is poured into a special hole in the mold until the metal begins to protrude through the air channels. After this, the workpieces are left to cool. Disclosure is carried out no earlier than after 5-6 hours.
Ready tackle
You can pour lead into paper cones (made of cardboard) placed in wet sand.
Cones can be made from aluminum foil
Characteristics and features of lead
The metal is dirty silver or silvery-bluish in color and has a high specific gravity - 11.34 g/cm 3 . Tensile strength no more than 18 MPa. for compression within 50 MPa. Due to its high ductility, it lends itself to many types of mechanical processing; it is cold rolled to the state of foil, stamped, cut, and cold-fretted. When drawn, lead breaks; wire is made from it by pressing the blanks in dies.
When cooled to -266°C, lead becomes a superconductor, despite its low electrical conductivity at room temperature (resistivity 0.22 Ohm * mm 2 /m). In air, lead quickly fades when cut, passes, and becomes covered with an oxide film characterized by low chemical activity. The metal itself is also resistant to corrosion damage, so acid-resistant vessels and containers are made from lead and alloys. Pb is the last element on the periodic table with stable isotopes. The metal is capable of retaining radioactive radiation.
The cubic, face-centered structural lattice ensures the toughness of the metal; it is difficult to break, but it cuts well and is easy to scratch and crush. When heated, the structure becomes fluid and the initial viscosity decreases.
What does that require?
An oxide film on a lead product appears quite rapidly after smelting. Is it ideal to clean it mechanically in vain? this is a rather labor-intensive process. In addition, the cleaned surface will also rapidly begin to oxidize. You can protect sinkers, figurines, beads or electrical connectors with the help of the following substances: - sunflower oil; - graphite lubricant; - varnish. Also prepare a pack of paper napkins, and for working with acid - chemical glassware, gloves and a respirator.
Melting point of lead
Melting involves a phase transition under thermal influence. Low-melting lead alloys are poured at +400–450°C, the technological temperature is achieved at home on an open flame burner, electric or gas stove burner. The reference literature indicates the melting temperature of lead as +327.4°C. For alloys, the indicators are different; they depend on the physical characteristics of the components that make up the alloys. Solders with tin and cadmium have a melting point that is 40–60 degrees lower, depending on the concentration of the additive.
At +700°C, the lead melt evaporates, forming a toxic aerosol. Metal boils at +1750°C. The oxide layer undergoes phase changes from solid to liquid only when heated to +850°C.
Application area
Despite its toxicity, lead is valued for its corrosion resistance and ability to block γ-radiation. It remains indispensable in many industries.
Up to 75% of the resulting lead is used in electrical engineering for battery plates and transformer superconductor systems, power cables. Babbitt - steel alloyed with Pb, has anti-friction properties. Alloys containing tin and cadmium are used for solders.
Plumbum is part of anti-corrosion coatings and dyes. Bullets and shot, printed font, figurines, and sinkers are cast from it. Metal sheets are used to shield X-ray installations, nuclear reactors, and bunkers at landfills. The plates are sewn into aprons, vests, and other protective clothing. Lead plates reduce vibration and seismic shocks. They are used in construction to compact masonry, foundations, and bridge supports. Nitrate is used to produce explosives with high detonation.
How to melt lead
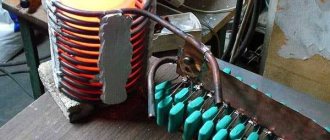
In factories, the following are used as melting tanks:
- special crucibles made of refractory ceramics or refractory metals; they are placed in electric furnaces that provide the necessary thermal conditions;
- heating baths, they are equipped with built-in shades, maintain the required temperature of the metal around the entire perimeter.
You can melt lead yourself at home, in the yard, garage or workshop in a tin can, it will replace the crucible. On one side of the tin a groove is made for pouring metal into the mold. The edges of the form are folded so that they are securely fixed in the clamp. Instead of tacks, it is more reliable to hold the hot container with pliers; the melting pot will not burn your hands while filling the mold.
You can use old household utensils to melt lead scrap: pots, pans, stainless or enamel kettles, or other heat-resistant cookware. The slag layer is removed with a special spoon with a long handle. This is done immediately before pouring the metal into prepared molds.
Melting process
The following is used as a heat source for melting scrap:
- a fire, with a smelter stand placed above it;
- blowtorch, it is fixed in a stationary position;
- a gas burner, with which the metal is heated both from below and from above, alternately;
- kitchen stove (gas or electric).
The container is installed so that the flames do not extend beyond the bottom area.
Lead smelting begins with a preparatory stage: you need to prepare a smelting container and grind the scrap. It is cleaned of impurities, possible moisture, and contaminants. Then cut into small pieces with a knife or metal scissors. It is difficult to break lead pieces; they bend well. The smaller the scrap, the faster it will melt. It is recommended to gradually add it to the melting tank. When the pieces are loaded into the melt, the risk of the melt overheating to the volatility point is reduced. You should not heat the pieces to a reddish tint, this is a signal that they are forming toxic volatile compounds.
If a container with thick walls is used for the melt, it is preheated. Dry the tin enough. The melting pot is filled no more than half, preferably 1/3. A thick layer will not heat up evenly.
The melting pot must stand firmly on the burner and not wobble. After the scrap melts, a slag cap forms on the surface. It is removed before pouring the melt into the mold. It is preheated so that there is no sharp temperature contrast. The melt is poured unevenly into a cold mold. Potholes, folds, and other defects form on the casting surface.
Melting in artisanal conditions
- Lead, whose melting point is low, allows its use for casting a variety of crafts and sinkers for fishing at home. Forming a melt is not difficult, but basic safety and care must be observed.
- Metal melting should be carried out in a well-ventilated area. You can choose a hand burner as a heat source, and use a container made of a more durable and heat-resistant metal as a vessel.
- Having placed the material in the heating container, turn on the heat source at maximum power and direct the temperature flow closer to the material being melted. It will take some time to convert a significant amount of raw material into liquid.
- After turning off the burner, the molten material can be poured into the prepared casting mold. Wearing special gloves, carefully pick up the container with liquid, gently rotating it to prevent the formation of bubbles.
- It is necessary to pour metal into the mold at a distance so as not to burn exposed parts of the body with hot lead fumes. After pouring, leave the mold to cool to a safe temperature.
- Spilled melt can be easily mechanically removed from the surface using a screwdriver or chisel and used for the next melt.
- The material mixes well with other metals, which affects the composition and quality of the casting. When working, it is necessary to use special clothing and thick gloves to protect the skin of your hands from metal dust.
- Before pouring, you need to make sure that the mold is completely dry. In the presence of moisture, instantaneous evaporation may occur, which will result in the contact of the melt on the body.
Safety precautions
When melting lead in an isolated room, it is important to take care:
- about ventilation, it is necessary to force air in with a fan so that the concentration of hot aerosol is minimal, lead compounds have a detrimental effect on the brain, liver, and kidneys;
- about respiratory protection (a respirator is needed), vision (you should wear work glasses), long-sleeved clothing made from natural materials, synthetics melt if accidentally ingested, increasing the burn area;
- fire safety, you must keep a fire extinguisher at hand.
Liquid lead has high fluidity. If it comes into contact with a wet surface, it splashes heavily. Melt splashes are possible during heating of lead scrap. In the work area, flammable items must be removed or isolated.
Pros and cons of making sinkers at home
Tackle with homemade weights has its advantages and disadvantages. The first include:
- availability of source material;
- high consumer qualities of finished products;
- the process is not labor-intensive;
- the ability for one person to smelt the required number of products;
- not costly;
- ability to choose weight and configuration.
But there are also problems. When working with heavy metal, there is a high risk of injury. It’s not always possible to get what you need on the first try. The process will require a set of tools.
As a result, weights must meet basic requirements. They should be:
- heavy so that the accuracy of casting the equipment is maximum;
- streamlined (roughness on the surface leads to the appearance of turbulence in the water, which frightens the prey);
- with reliable fastening for scaffolding;
- invisible in the aquatic environment;
- made from simple materials and in artisanal conditions with minimal use of tools.
How to extract (extract) lead from a battery? How to cast a lead sinker?
You need to extract lead from an old battery, how to do it correctly and how to cast a lead sinker.
You need to start by draining the electrolyte from the battery. (Electrolyte can be used to destroy a stump in a garden plot; just water it and that’s it, it will quickly rot.)
Fill with water several times to rinse, as there may be splashes when opened, and the acid will eat your clothes. Just be safe, preferably wearing rubber gloves and goggles.
After removing the plates, put them in the sun to dry; you can also knock out the slag (the filler in the plates) from the wet ones, but it’s easier from the dry ones.
You can melt it either on a gas stove or on a blowtorch or fire in an ordinary tin can (not aluminum). By bending the edge like a groove.
We cast the sinker depending on the required weight. Small in a teaspoon, dessert, tablespoon. A large one can be poured into any canned jar or any other. After cooling, simply tear it apart.
As children, we smelted lead from batteries like this: we drained the electrolyte, broke the case (of course there was no talk about any safety precautions) and threw blocks of plates into the fire (there were many and large batteries, the Mazov motor depot was nearby, and lead at that time was a non-ferrous metal did not pass). Then they collected what was melted, melted it in a tin can and poured it into “molds” - imprints of a spoon in the ground, so as not to have to worry about holes in their place, they stuck a match into the “mold”, the match burned out, but the holes remained. The load was called a “spoon”. In adulthood, I used only terminals and jumpers from batteries for casting weights (less fuss and more lead than on the plates), I made the mold from sibit - it is easy to process and holds several castings.
Mold making
You need to prepare the gypsum mixture according to the “powder to water” rule, in a ratio of approximately 1:1, you need to focus on the consistency, it should be creamy.
Pre-lubricate our mold and samples with the prepared fatty cream.
Pour the mixed plaster into the container to fill exactly ½ of the container and tap it on the surface, expelling air bubbles. As soon as the gypsum begins to set, it is necessary to immerse our samples halfway in the hardening plaster. The setting time of the gypsum depends on the brand of the powder itself, the minimum time is 2 minutes, i.e. after 2 minutes we begin to carefully look at the surface of the plaster. As soon as it becomes matte, it’s time!
We insert guides along the edges of our form. It can be anything, I use pieces of wire, toothpicks, lollipop tubes.
Now we wait for complete hardening, 20-30 minutes is enough.
Then we lubricate the surface of the mold and the samples recessed in it with our rich cream.
We dilute the plaster again and fill the container to the top. We also remove air bubbles by tapping and leave to harden for the same 20-30 minutes.
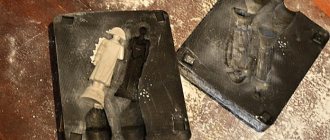
After hardening, carefully remove the mold from the container and carefully separate it into two halves, removing the samples.
That's it, the form is ready! We leave it to dry for a couple of days near the battery - the water should completely evaporate.
So I made 3 molds with different weights. Before the molds become unusable, the weights cast in them will last me for 2 or 3 seasons). The main disadvantage of such forms is their fragility. Gypsum is a fairly fragile material, so molds quickly crack, caverns and chips appear in them, especially for split molds. Bullet molds last much longer. For example, the uniform shown in the photo in the article is already in use for the second or even third season.
After the mold has completely dried, it is necessary to make sprues. To do this, mark the line of the sprue, connect the mold and drill out the sprue in the shape of a funnel using drills of different diameters. For the top point of the funnel I use a 10.1mm drill, for the bottom I use a 3.5mm drill.