A properly equipped roof can provide a beautiful and neat facade, as well as strong walls of the house that are not undermined by bad weather. It is this that can protect a building from precipitation and preserve its original appearance for a long time, ensuring the protection of materials from the harmful effects of weather conditions. The system for removing excess moisture from the roof deserves special attention, so installing flashings on the roof was, is and will be one of the priority tasks during the construction of a house. How to do it yourself? Let's look at specific examples.
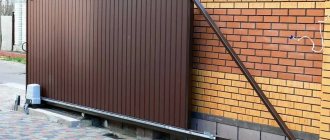
Installing roof flashings
The ebb is a rectangular or circular gutter located under the roof overhang
Structural elements of the external drainage system
When designing a drainage system, the following design elements must be taken into account:
Elements of external drainage.
- Gutters. They are the main element of the drainage system. Must be strong enough, because... not only serve to drain rainwater, but also retain large volumes of snow in winter.
- Pipes. The water coming through the gutters is discharged into special receivers or sewers.
- Funnels. They are used to collect water from gutters and supply it to pipes.
- Plugs. They are installed at the ends of gutters and serve to protect against water overflow during heavy rainfalls.
- Mounting brackets. They fix the gutters in the desired position and give the structure stability.
- Rotations of gutters and pipe bends. Necessary for directing water flows in the right direction.
- Sealing gaskets and rubber rings. Provide a hermetically sealed connection between the gutters.
- Connecting couplings and clamps. They are used to secure pipes together and fasten them to the walls of the building.
Design
The two main elements of low tide are:
- A gutter (tray) collecting water flowing from the roof.
- Gutters through which collected water is directed to the foundation of the house.
Gutters are channels open at the top, attached under the roof overhang. There are semicircular, rectangular, triangular shapes (rarely used). Contains straight and angular elements.
Drains (pipes) are also prefabricated structures of rectangular (rarely used) or cylindrical cross-section. Their elements can be straight or bent (knees).
The plugs prevent water from draining and leaking along the ends of the gutters. There are three modifications of the plugs for installation: universal, right- and left-handed.
Funnels are installed under the gutters; their purpose is to receive and redirect water into the pipes.
The leaf catcher grille protects the system from large debris entering the drainage system, preventing it from clogging.
Tees are parts required to separate the water flow.
The drain elbow is the final part of the drain that directs the flowing water away from the foundation (into the receiving cavity of the storm drain).
Couplings are parts for connection.
Clamps are used to secure the drain to the wall, preventing its vertical movement.
Brackets - fastenings.
Bypasses are used if the drainpipe needs to go around any obstacle.
Roof flashing parameters
Installing ebb linings on the roof is the last stage of work; before that, you first need to select and buy them.
Materials
At the moment, buying roof flashings is not a problem; choosing them is more difficult. I’ll tell you about prices later, but now let’s briefly go through the materials.
What are roof drains made of?
Photo
Materials
Cink Steel
The thickness of the sheet here does not exceed 1 mm, so the design is quite light, plus the price of drainage is quite reasonable.
Polymer coated steel
Here the steel sheet is coated with plastisol, polyester and other similar polymers. The stability of such a coating is an order of magnitude higher than that of conventional galvanization.
Aluminum
The main advantage of aluminum gutters is their light weight, plus this metal is not subject to corrosion, so it does not require painting.
Copper
Manufacturers provide a guarantee of 70 years for copper roof gutters, but they last much longer.
Copper is not afraid of aggressive chemicals, corrosion and other troubles, the only problem is that the price of such structures is several times higher than the cost of plastic or galvanized drainage systems.
Plastic
Now every third developer chooses plastic molding. The design is light, elegant, plus modern polymers do not fade in the sun.
Envious people say that plastic gutters are fragile, but if you choose a proper manufacturer and install the roof flashings correctly, they will last for decades.
Gutter shape
The shape of roof drains can be semicircular, rectangular or shaped. Strictly rectangular gutters, frankly speaking, are not for everyone. Their figured counterparts look original, but are much more expensive.
Semicircular types of gutters are considered the most convenient, practical and popular. Their advantage is that such structures do not have internal corners where dirt and debris constantly collect, and cleaning the roof gutter without special equipment is very problematic with your own hands.
As practice shows, semicircular roof flashings are the best option
Gutter calculation
To calculate the amount of material, you need the length of the perimeter and the square of the projection of the roof onto the ground (the square of the area under the house). According to the instructions, the length of one gutter directed into one funnel should not exceed 10 m, but in reality it is better to start from 5, maximum 7 m.
On long spans of roofing, the gutters are cut from the center to the sides, where drain funnels are installed at the corners. The arrangement of funnels and cutting points of straight roof spans depends on the configuration of the structure.
Installation of the drip tide is planned at the rate of 5 - 7 m of straight gutter per 1 drain funnel
- After measuring the roof perimeter, you need to add 10 - 15% to the total footage; they will be used for trimming and overlap at the joining points.
- If possible, a funnel should be installed at each corner of the roof.
- On average, support brackets are installed at 600 mm intervals.
When calculating the width of the gutter, this is the case. According to the rules, for every square meter of the roof plane there is 1.5 mm of width. That is, a 150 mm gutter is installed on a roof of 100 m². But in reality, professionals usually make it simpler.
- On the roofs of residential buildings with a roof area of up to 100 m², a gutter 100 mm wide is installed.
- For a square area of up to 120 m², the gutter width is taken to be 120 mm.
- For a square area of up to 150 m², the gutter width is taken to be 150 mm.
As for drainpipes, brackets and other accessories, stores usually come with it all included. You tell the width of the gutter and they select the entire system for you. When selecting fittings, it is advisable to choose pipes with a large diameter, this way there is less chance of clogging.
Metal roof drains can have several fitting options
Price issues
No matter how beautiful the roof flashings are, their price depends on 2 things. Firstly, brand awareness, and secondly, the price level in the region. I have calculated the average cost of roof drainage; you can use it as a guide, but you should not make final calculations.
Average price of roof casting
Material
Price per 1 m (Russian rubles)
Stage II. Designing a future drainage system
The rules are quite simple:
- If the roof area is less than 50 square meters, then you will need 100mm wide gutters and 75mm diameter pipes;
- If the roof is from up to 100 square meters, you need gutters of 125 mm and pipes with a diameter of 87 mm;
- If the roof covers a fairly large building and its total area exceeds 100 square meters, then install 150 mm gutters and 100 mm pipes, or another combination of them - 190 mm gutters and 120 mm pipes, this is also possible.
Now we calculate the funnels for the galvanized drain. One standard funnel can collect rainwater over an area of about 100 square meters. Although much here depends on the size of the drainage system itself. For example, if it is equal to the parameters 150x100, then one funnel will collect water from 150 square meters or from 15 linear meters of gutters. But it’s easier to calculate the number of vertical pipes: just divide the height of the building by the length of the drainpipe you purchased (usually 1-2-3 meters) and multiply by the number of funnels.
Special online calculators on our website will help you calculate the entire system more accurately.
How to make drains with your own hands
Zinc drain
Without inviting a specialist, drainage is easy to do yourself and quite inexpensive. In their manufacture, plastic, aluminum or galvanized sheet metal are most often used.
The simplest thing is to cut lengthwise a thin-walled metal pipe with a diameter of about 150 mm. The result will be: two gutters for collecting water. To prevent corrosion, it is recommended to coat these parts with special compounds or varnish of the desired color.
The last stage of work will be the direct installation of gutters using fastening material in places where moisture accumulates.
The production of ebb and flow from galvanized steel sheets is not particularly difficult. For this you will need: a sheet of galvanized metal seven millimeters thick, a machine for bending metal structures. This can be done without a machine with a hammer and mallet, using a corner or a piece of rail, but the appearance of the drain will be poor.
The galvanized sheet is cut into strips of the required width and corresponding sheet length. The strip is then placed in a machine where a cast is made from it. The finished elements are coated with a protective compound, dried and prepared for installation.
From plastic bottles
A lightweight and cheap material is plastic. Having a sufficient number of plastic bottles, you can make a drain out of them. Dark beer or kvass bottles are suitable for this so that debris is not visible.
As in the first case, we draw a diagram of the future drain. Find the perimeter of the roof and calculate the number of bottles. From 1 bottle there will be 2 halves of 12-15 cm each.
We cut off the bottom and neck of the bottle, cut the remaining part in half and model the gutter using a stapler.
Overlap the bottles by 2 cm. The gutter is attached to the roof using a screwdriver and wire.
Drainage is made from cut, but not sawn, parts, inserting one into the other. The funnel is made from a bottle with the bottom cut off and inserted into the drain. The drainage pipe can be placed in a container or brought to the ground.
Calculation of materials for roof drainage
The required cross-sectional area of the groove can be established using SP 17.13330.2011. The document states that per square meter of roofing area there should be 1.5 cm² of gutter cross-section. Any competent installation of roof tides is also accompanied by a calculation of the average annual precipitation in the region. The procedure makes it possible to determine the cross-section of drainpipes in accordance with the recommendations of SP 32.13330.2012. It remains to determine their diameter in accordance with the instructions of SP 30.13330.
Some manufacturers provide their own tables for selecting an effective drainage system. Having decided on the standard size of the drainage system, all that remains is to select the elements of the kit. For example, on a straight wall for a riser you will need:
- Funnel groove.
- One elbow for lower outlet.
- Two elbows for connecting the pipe to the wall.
- One fastening for the funnel assembly and two for each pipe.
To get around the protrusions on the wall, you will need 4 more elbows and 2 pipes for connection. The ends of the gutter must be closed with plugs. The segments are arranged in such a way as to obtain a minimum of waste. Based on the number of joints, the number of connecting elements with seals is calculated.
Each gutter component is fixed with brackets at the ends with a 150mm offset. Along the remaining length, the fastenings are distributed at a distance of no more than 600 mm from each other, which corresponds to the pitch of the rafters. To install a 3-meter gutter, you need 6 brackets with a pitch of 500 mm.
Installation instructions for window sills
The purpose of window sills is the window sill, the final element when installing windows; it removes water from the window, preventing it from getting onto the window ledge. The window sill must be installed immediately after installing the window, especially in the winter, otherwise moisture will very quickly begin to destroy the window ledge.
Window sills are made on a special bending machine. Typically, thin sheets with a thickness of 0.45-0.5 mm are used. The sheet is cut to the customer’s dimensions, then the blanks are given the required shape on the machine. In this article we will tell you how to properly install window sills.
To install ebb tides you will need:
- Screwdriver with ph2 attachment
- Tinsmith's pliers
- Metal scissors
- Low expansion foam
- Self-tapping screws press washer 16mm
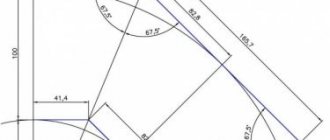
First, let's prepare the window ledge, clean it of dust, cement and plaster residues. Next, measure the length of the opening and add 4 cm to the bends. We cut the workpiece to size. Next, we trim the ebb according to the principle shown in the picture. We bend the trimmed edges of the ebb using tinsmith's pliers. We try on the ebb in place, if nothing interferes, we proceed to the next stage of installing the ebb. Temporarily set the ebb tide aside. On the prepared surface of the window ledge, apply mounting foam in a zigzag pattern from edge to edge and along the bottom. We apply the ebb, placing the rear part under the window, and press it against the window profile, securing it with self-tapping screws to the window frame. It is important to maintain a tilt angle of at least 110 degrees. After you have secured the ebb with self-tapping screws, you need to load it. To do this, you can use cans of water or other weights that will not damage the ebb. Low tides must be loaded for at least 12 hours. The ends of the flashing in contact with the walls can be additionally sealed with sanitary sealant. After installing the drip sill, do not forget to remove the protective film.
Video instructions for installing window sills
How to calculate the diameter of ebb tides
In order to correctly install ebbs on the roof, it is necessary to correctly calculate its dimensions, since ebbs of insufficient depth and width may not cope with the function assigned to it.
The following values are used for calculations:
- distance between drainage outlets and gutter turning points;
- roof area.
To determine the area of the roof, it is conditionally divided into elements in the form of geometric shapes (rectangles, triangles, etc.) and the area of each of them is calculated. Then the results obtained are summarized.
On each slope it is necessary to install two gutters with a slope towards the pipe intended for drainage. The diameter of the gutter can be 100 or 125 millimeters; it is selected based on the intensity of the expected load on the drainage system. If the building is small, you can install gutters of a smaller diameter.
Stage VII. Protects galvanized gutters from scratches and corrosion
The main enemy of galvanized gutters and drains is branches and debris that fall onto the roof with the wind and are washed into the drain by rain. These can scratch even the most resistant polymer coating (and it’s much worse without it at all), and therefore it is better to protect the entire system as much as possible.
The simplest method is gratings, which are produced today in standard parameters: slotted, perforated, stainless steel, plastic, galvanized, brass and cast iron. They need to be secured with a latch or with screws and nuts. It is important that the top surface of the grating remains 25 mm below the surface of the roofing so that rainwater drains well into the gutter.
In turn, the basket will also help to cope with the problem. Water flows through the gutters, and the basket retains the largest contaminants, such as leaves and branches. This basket is easy to remove and clean, which is its advantage. Also, such a modern element of the drainage system as a sand trap is designed for the same thing as a rain inlet, but at the same time retains smaller dirt and sand.
Here's a good example of how to protect a galvanized drain from debris:
Materials
Due to the constant impact of unfavorable environmental factors (precipitation, temperature changes, sun, wind), the correct choice of ebb material is extremely important.
Modern tides are made from different materials.
Cink Steel
. For the manufacture of castings, steel is used in sheets up to 1 mm thick. For additional protection against corrosion and to add aesthetics to the structure, a coating of polyester, pural or plastisol is used.
Aluminum
. The thickness of the original sheets is 0.8-1 mm. To protect against corrosion, a special multi-colored varnish is used, which also improves the appearance of the tides.
Copper
. Can be used both without treatment and with oxidation or brass plating. It is considered the most beautiful, high-quality and durable material for making castings. It has a significant disadvantage - a high price.
Polymers
. Due to their low cost, increased strength, noiselessness, ultraviolet resistance and durability, polyester and plastisol have become widespread in the manufacture of castings. Due to their light weight and ease of installation, it is quite possible to install roof ebbs.
Stages of installation of drip tides
Installing a low tide is considered a fairly simple process, but it, in turn, requires responsibility and care so that in the end the result suits not only you, but also everyone living in the house.
Preparation
First you need to prepare all the consumables and tools so that the installation process does not stop for a moment. You will need the following consumables and items:
- Brackets (special fastenings);
- Pipe according to the height of the house;
- Connecting inserts;
- Self-tapping screws that are suitable for fixing the material used;
- Clamps for fastening the pipe to the walls of the house;
- Funnel;
- Gutter
First you need to prepare the tools for work:
At the initial stage, you need to prepare the place where water drains from the roof. Draining the water should not harm the greenery growing in the yard, the foundation of the house, or the paving slabs. If sewerage is already installed on your site, then this problem in itself is eliminated.
Lane marking
Installation must be carried out from the marking of the strip where the low tide will be recorded. First, a water intake funnel is installed, so a transverse line is designated for it. The holders are installed at a distance of 15 centimeters from the edges of the funnel, on both sides.
The vertical line drawn from the edge of the roof must fall closer to the wall of the building, and not to the very center of the gutter; this must be taken into account when installing holders and funnels.
This design helps water not pass through the edge during heavy rainfall. To do this, you also need to give the gutter a certain slope angle.
Marking the line for fastening the holders and tilting the gutter
Take a long board and a building level, and use them to draw a “zero” line along the bottom edge of the holder all the way to the fastening area of the last holder.
You will need to calculate the difference between the mounting height of the final and installed holders. This distance is multiplied by three. The bracket must be secured, taking into account all the calculations made. This line is marked using a tracing cord. The holders are installed at a distance, this distance is approximately half a meter. First, markings are made for all the holders and only then are they fastened.
Installation of gutters along the length
Parts of the gutter must be installed in the holders so that there are spaces for connecting inserts directly between the holders. Correctly installed sections are secured with inserts that have boundary marks. The distance between the edges of the gutters should be 7-12 cm.
The assembled gutter is placed in the holders, and the inclination is checked using water. Even a large amount of liquid must pass easily through the chute; if this does not happen, it means that the system needs to be rearranged again.
Installation of a drainpipe
If there are no damages or deficiencies, then you can begin installing the drainpipe, which is installed from the funnel itself. You can secure the pipe using an elbow, this will depend on the distance to the wall
It is important to pre-prepare the required number of pipes and all fastening elements so as not to interrupt installation at its final stage
Properly installed drip linings will give your home an attractive appearance and protect your home from the negative effects of moisture.
But even roof flashings made from the highest quality materials require constant care. It consists of periodically cleaning the gutters from dirt and debris. This is especially true with the arrival of cold weather, since if there is water in them, then when it freezes it can damage the entire system. Constant maintenance of drainage systems will protect not only the structure itself, but also the walls of the house.
Roof flashings
Installation
Installation details can be seen in the presented photos to make it clearer how to properly install a metal drainage system.
Primary requirements
- To install and secure the tray, use the fastenings included with the drip tray. Depending on the specific conditions, they are screwed to the rafters, fascia board or roof board. (If the roof has no overhang or has a very small overhang, it is allowed to screw them directly to the wall).
- When installing the brackets, it is important to ensure that at the highest point of the tray, its outer edge is at least three centimeters lower than the plane of the roofing. Therefore, installation of fasteners should begin from this edge of the roof.
- The distance between the brackets affects the rigidity of the tray, so the installation step is taken to be 50-70 cm. Fasteners installed at the corners are never superfluous.
- The edge of the roof should be above the longitudinal axis of the gutter, or at a distance of 1/2 the width of the gutter. Otherwise, storm water will splash out beyond its boundaries.
- The distance between the wall of the building and the walls of the tray is 5-8 cm, so that the wall does not become damp or moldy.
- When installing and fastening tray parts, use a 1-2 mm rubber gasket to protect the paint or varnish layer of the parts.
- Gutters are installed taking into account the drainage of water into the storm drain. Therefore, they are placed opposite the storm drain. The distance from the ground to the bottom of the drain is 15-30 cm.
Carrying out work on a pitched roof
Step 1. First of all, you need to mark the axis of the funnel. If the location of the storm drain inlet is already available, then the axis of the drain (ideally) is located directly opposite its center. Otherwise, the location of the pipe is 20-30 cm from the edge of the building (see step 6.) Using a vertical level, mark the axis of the drain. The distance from the funnel to the bracket closest to it should not be less than 5 and more than 15 cm. From the outermost bracket to the end of the cornice or front board - at least 5 cm.
Step 2. Installation of fastening parts. All attention here is to maintaining the slope. The outer brackets are installed first. Having screwed one, the second is installed with a difference in height equal to the product of the slope and the distance between the brackets. For example, with a distance of 8 m and a slope of 0.005 (this is 0.5 cm/1 pm), we have a difference of 4 cm. The second bracket is screwed on, taking this difference into account. A fishing line is stretched between the fastenings, along which all intermediate fastenings are installed with the required pitch. It is necessary to install two fasteners at the junction points of the trays so that one of them supports one gutter, the second supports the other. Also, a bracket is placed on both sides of the funnel (no further than 15 cm from its edge).
Step 3: Preparing to install the funnel. The number of funnels is calculated in advance. To do this, determine the projection area of the roof surface (area) from which rainwater will flow into the tray. One drain pipe can receive sediment from an area of no more than 120 sq.m or from a slope length of no more than 12 m (the number of drains is taken according to the minimum parameter). The tray marks the location for installing the funnel. After this, a V-shaped hole with a diameter of up to 11 centimeters is cut out with a hacksaw. The edges of the hole are slightly bent outward using pliers. After this, a funnel is put on the gutter (in the lock) and attached to it on the other side with clamps. A plug is installed at the end of this tray. Before installation, the joint is coated with silicone sealant (transparent).
Step 4. Installation of drain elements begins with the installation of the first element with a funnel. Next, the gutter is assembled. When you start installing the tray elements from the bottom point, make sure that the edge of each next one lies on top of the previous one. Water flowing down should not go under the edge of the overlying element. The main thing here is to correctly position (without turning over) the tray elements and ensure that the joints are made correctly.
Step 5. The contours are mounted on the bottom of the funnel.
Step 6. The drainpipe is installed vertically. If the location of the storm sewer inlet has not yet been determined, then they usually do this: a vertical line is drawn along the vertical level at a distance of 20-30 centimeters from the corner of the building, on which clamps are installed to attach the pipes. The installation step of the clamps is 1 m. The clamp, intended for fastening the bottom of the pipe, is installed and secured at a height of 30 centimeters. At the top, the pipe may have several elements that deflect its progress. This is necessary to accurately position the top of the pipe under the funnel. For this purpose, corner elements – contours – are used. Important detail. The smoother the change in the course of the pipe, the less likely it is for debris to be retained in it. Therefore, it is advisable to use contours with a 45-degree angle.
Step 7. Water is supplied to the roof away from the funnel and from the system with a hose or a bucket of water is poured out. If water did not get past the drain and did not flow through the joints, then everything was done correctly.
If the roof is covered with bitumen shingles, it is necessary to install a drip line. The drip line is placed in a gutter so that drops bouncing off it do not fall under the roofing material.
Types of roof flashings
Roof flashings can be made of various materials - plastic, metals (galvanized steel, copper). They have different shapes. The purpose of ebb tides is to collect water from the roof and drain it into the drainage system using special devices. This drainage element must have such characteristics as: increased strength, resistance to loads and mechanical stress, the presence of an anti-corrosion coating, and an attractive appearance.
The galvanized steel casting has a thickness of no more than 1 millimeter. Such products are additionally coated with polyester, pural, and plastisol. If the steel does not have such a coating, the house will not be very comfortable to live in: the sound of raindrops is greatly enhanced.
The aluminum casting has a thickness of 0.8-1 millimeters. To protect against corrosion, it is coated with varnish on all sides. To improve the appearance of the product, varnishes of various colors can be used.
Copper castings are subjected to brass plating or oxidation. Elements made of this metal are durable and have an attractive appearance. They will last a long time, but their cost is quite high.
Choosing a gutter shape
The gutters through which water flows can be:
- rectangular;
- rounded;
- triangular.
It is into the gutters that water enters from the roof surface, which is then discharged in the desired direction. Without them installed, drainage will not flow smoothly and water can cause damage to your home.
The gutters through which water flows can be of various shapes Source staltd.ru
The shape of the gutter plays not only an aesthetic role. It depends on how well the water flows.
Advice! Experienced craftsmen consider a rounded shape to be more functional. It is less likely to cause blockages as a result of debris, dry leaves and dust. Therefore, you will have to clean it less often.
Design and purpose of drainage
The drainage system is a combination of main and auxiliary components of the structure. The main ones include gutters, funnels and pipes, and the auxiliary ones include plugs and fasteners.
Based on placement, a distinction is made between internal and external drainage systems. Internal is used for buildings with a flat roof. In this case, the roofing material is laid with an inclination towards the funnel. Water flowing down the roof is collected in a funnel, then enters a pipe located in the wall of the building or in a technical channel.
External drainage system is used for pitched roofs. All structural elements are installed on the outside of the building.
The main purpose of drainage is to drain melt and rainwater from the roof of a building to a designated place.
If there are no ebb tides, water falling from the roof will destroy the concrete blind area or paving slabs around the building.
The accumulation of excess water in the soil around the house will lead to flooding of the basement and basement floors. Absorbing into the soil, the water will wash away the foundation of the house. As a result, it will begin to sag and cracks will appear on the walls. The operation of such a building will become unsafe.
Purpose
There are three types of systems that remove moisture from precipitation from the house: storm water, drainage, and roofing. Roof flashing is a drainage system with the help of which precipitation moisture is collected from the roof and its discharge is organized to designated places for receiving. It protects the roof, blind area, and foundation from premature wear and destruction.
Materials for low tides
The drainage system consists of a set of standard products. Before making a choice of a particular material, you need to familiarize yourself with the parameters of this system.
Correctly determine how well the unified elements fit the facade of the house. The main elements of the drainage system are gutters and pipes.
The video below shows the design of a roof drainage system.
Today there are various types of these products on the market for free sale. The kit necessarily includes brackets, plugs, clamps and other elements.
When planning to install ebb tides yourself, you need to carefully familiarize yourself with the parameters of the products that are offered for sale.
Galvanized castings
Until recently, galvanized steel was widely used for the manufacture of moldings.
The main advantage of products of this type is their low price.
The destruction of zinc coating occurs under the influence of acid rain, which has become increasingly frequent in recent decades.
Aluminum ebbs
Aluminum products have a longer service life.
You can make them yourself or buy them ready-made and paint them in a color suitable for a particular building.
The gutters are secured using rivets or aluminum glue.
Sealing the joints can be done with silicone or a special paste.
Copper casts
Copper tides are considered the most durable.
The products are made from pure metal and do not have additional coatings.
The elements are connected to each other by soldering or folding.
Installation of copper gutters must be done in such a way as to avoid contact with other metals - copper or steel.
PVC sills
Today, plastic products are most widespread.
To install such systems, couplings, latches with rubber seals and special glue are used.
Plastic castings are not subject to corrosion and retain their characteristics even with maximum temperature changes.
Stage IV. Preparing the roof for gutter installation
The entire installation process of a galvanized drainage system includes 7 main stages:
- Step 1. Marking on the walls and roof.
- Step 2. Fastening the outer elements for the gutter.
- Step 3. Restore the level and level the suspension to the desired slope.
- Step 4. Installation connection of gutters.
- Step 5. Connecting the funnels.
- Step 6. Fastening the clamps for the vertical elements of the drains.
- Step 7. Fixing the drainage pipes.
This step-by-step illustration clearly shows the process itself:
In your work you will need the following tools:
Types of tides
Low tides can be made from absolutely any materials, as well as in any forms. The main task of this design is to collect water from the roof surface and then transport it to the drainage or sewer system.
Differences between casts by material:
- Flashings made of galvanized steel. The thickness of this structure does not exceed one millimeter. For these ebbs, a coating using plastisol or polyester is provided, this is done in order to muffle the noise of falling raindrops, otherwise the steel surface will only amplify this sound;
- Aluminum castings. The thickness of this structure is also about one millimeter. Aluminum castings are treated with a special varnish on both sides in order to protect the product from possible corrosion;
- Raw copper is also a material for making castings. These structures are additionally processed with an alloy of zinc and copper. They are characterized by an attractive appearance and high quality, although the price of ebb tides can be very high for some consumers.
- Moldings made of plastisol and polyester have high durability and strength. In addition, they are characterized by resistance to ultraviolet rays and low weight. Due to these characteristics, they are very popular today. Also pleasing is the convenient installation of products, which you can do yourself;
- Plastic ebbs will help highlight the individuality of your home, offering a huge range of colors for the construction. These products do not require special care and are not afraid of temperature changes. The enormous popularity of plastic sills is also explained by the fact that they create almost no noise when it rains and have an affordable price.
Factors that influence the choice of tide
All roof flashings must perform the following functions:
- high resistance to external factors, including precipitation and sudden temperature changes;
- an aesthetic function that provides a beautiful appearance to your home;
- protection of the roof and walls from moisture.
The choice of tide depends precisely on the absence or presence of these basic characteristics. Each of the above materials has its own special advantages, but some of them are more pronounced, others are not so visible.
At the moment, preference is given to ebbs made of plastic and metal. Such products are coated with a special layer that protects them from corrosion. The quality of the product depends significantly on the grade of steel and its thickness.
Castings made from non-ferrous metals are also popular due to their high quality, attractive appearance and durability. But their price is an order of magnitude higher than conventional products, so they are available only to those people who are willing to allocate the necessary (considerable) amount of money for the installation of this system.
Plastic casts
These ebbs will serve perfectly if the attic of the house is used as a living room.
The main advantages of installing plastic ebbs include:
- Ease of use and speed of installation are achieved due to the light weight of the product;
- Affordable price;
- The size of the ebb is equal to the length of the perimeter of the structure;
- A convenient connection method is a clamp lock;
- Corrosion resistance;
- Several types of material - polyethylene and PVC;
- Resistance to temperature changes and weather conditions;
- Plastic ebbs are varied in color and design, this makes it possible to choose the desired option specifically for your home project.
It should be noted that ebbs made from polyvinyl chloride are a little more reliable, this is due to their heat resistance. But they still cannot withstand low temperatures. Also, during installation, a pipe with a cross-section of at least 45 mm will be required as an addition.
Calculation of the required drainage diameter
Before starting work on installing the ebb, you need to make calculations of its dimensions, otherwise you risk building a structure that will not perform its main functions.
The roof area can be calculated according to this principle: the area is equal to the length of the roof, including the height of the roof plus the length of the slope, this value is divided in half.
It is necessary to take into account the distances between drainage systems and between the turning points of the gutter. Gutters must be located above the drainage system.
For each roof slope, it is necessary to consider installing two gutters; the diameter of one structure should be no more than 125 millimeters.
Preparatory work
First of all, you need to purchase the necessary parts for the ebb. Their number must be calculated in advance. You can calculate the footage of the ebb tray by adding approximately 10-15% to the length of the perimeter of the structure, which will be used for overlapping at the joints and trimming parts.
When choosing a gutter, pay attention to the brackets available for sale. For the chosen gutter, you need suitable fasteners (ideally original ones), as well as funnels and other parts.
If the finishing materials of the roof have not yet been laid, then use brackets with long holders that are attached to the rafters, with a small recess in the board (shallow recesses are made so that the surface of the holders is flush with the top of the rafters or boards laid on them). If the roof is completely laid, then fasteners with short holders or compact ones are chosen.
Tools:
- Tool for bending bracket holders,
- Hacksaw for metal,
- Screwdriver,
- Level,
- Fishing line or construction cord,
- Self-tapping screws,
- Silicone Grease,
- Marker,
- Adjustable pliers.
By following some simple rules, you can set the tide correctly the first time.