To assemble a simple battery-powered circuit, we have to resort to various tricks to ensure that the wires fit tightly to the poles of the battery itself. Some people make do with electrical tape and adhesive tape, others come up with various kinds of clamping devices. But the contact in this case will be imperfect, which ultimately affects the performance of the assembled circuit. Often the contact disappears or becomes loose, and the device works intermittently. To avoid this, it is best to simply solder the wires to the poles. In our article we will tell you how to solder wires to a battery so that the contact is perfect.
The simplest example of a device
The simplest battery-powered device is an ordinary electromagnet. Using his example, we will check the performance of our student soldering. We take an ordinary nail, for example a weave, and wrap copper wire around it in dense rows. We insulate the turns on top with electrical tape. The electromagnet is ready. Now all that remains is to power the device from the battery.
Of course, you can simply press the wires at each end of the battery, and the device will start working. But it is inconvenient to use. Therefore, it is best to ensure constant contact of the wires with the power source. This can be done by adding an ordinary switch (toggle switch) to the network and soldering the wires directly to the battery poles. The device will become more reliable, it will be more convenient to use, and if it is not needed, you can always turn it off by opening the circuit using the switch so that the battery does not run out. But how to solder the wires to the battery so that they do not fall off after five minutes of using the device?
How to make a cordless welding machine?
Is it possible to assemble a spot welding machine with your own hands? Yes, you can use various household appliances for this. Spot soldering is suitable for working with metal sheets with a thickness of about 1.5 mm. In this case, the device must produce a current of up to 110A. This can be achieved at home using, for example, a battery for resoldering batteries - this is an ideal option. Welding can also be used for the needs of car enthusiasts. In general, there are many applications for such a device.
Tools and consumables required for soldering
In order to reliably solder wires to the battery poles, you need the necessary set of tools. Since soldering a wire to a battery is a more complicated task than simply soldering a pair of copper wires together, we will do everything exactly according to the instructions below. In the meantime, let's prepare everything you need:
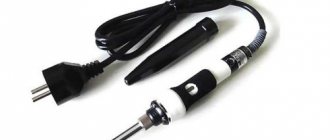
- An ordinary household hand-held soldering iron. We will use it to solder the wires to the poles of the battery.
- Sandpaper or file to clean the soldering iron tip from slag and carbon deposits.
- Sharp knife. We will use it to strip wires if they are braided.
- Flux or rosin. What soldering flux is suitable in this case? Let’s not rack our brains here, let’s take simple soldering acid, it is sold in any store that sells radio products. Well, rosin, although it often differs in color and shade, is always the same in properties.
- Brush for applying flux.
- Solder. It can be purchased in the same place as flux.
Solder the wires to a regular battery
So, how to solder wires to a 1.5V battery? This task is not difficult if everything you need is already at hand. We proceed according to the following instructions:
- Before turning on the soldering iron, you should clean its tip from scale. We do this using a fine file or sandpaper. When the soldering iron tip shines with virgin metal, the process can be considered complete.
- We turn on the soldering iron, placing it on the stand, and wait until it warms up to the required temperature. We try the heat of the tip on the solder thread. If the solder melts on contact, you can begin soldering.
- To ensure strong soldering while the soldering iron is heating up, you should first treat the surface of the battery to which we will solder the tip of the wire with flux. This is done using a special brush. Current batteries are made from alloys on which soldering holds very poorly. By treating the surface of such alloys with soldering acid, we will ensure stronger soldering. The edges of the soldered wires should also be processed. In the absence of a brush, you can use any stick. It is enough to apply a drop of acid, and the surface will already be considered treated.
- After applying the acid with a heated soldering iron, apply a layer of solder to the battery poles. We do the same with the ends of the wires.
- In the case of rosin, you will first have to tin the surface and clean the ends of the wire from varnish. But we can say with complete confidence that, even if you know how to solder with rosin correctly, such adhesion to the surface of the battery will be less effective.
- But if you don’t have acid on hand, and only have rosin, we clean the surface of the battery, use the rosin as a flux, applying a small part of it to the battery, and then take a little solder with a soldering iron tip and tin a place on the battery pole. The wire will also need to be tinned.
- With proper tinning, a strong film of solder is formed on the surface of the battery, to which soldering will need to be done.
- We attach the wire to the flux-treated or tinned part of the battery, pick up a little solder with a soldering iron and solder the wire. We do not pull the wire, do not move it, keep it straight and in one place, otherwise the soldering will not be strong.
- After the solder hardens, we do everything with the other pole of the battery.
That's it, the wires are properly soldered to the battery.
What do professionals use to properly connect 18650?
You can achieve reliability and safety in assembling a battery from several batteries using professional methods, or at least those that have proven their practicality and safety.
How to properly connect 18650 batteries:
contact welding (spot); using factory holders (holders); neodymium magnets (powerful eternal magnets); gluing; liquid plastic.
Professionals use the spot welding method - this method is also recommended for industrial assembly of products with 18650 batteries. An example of budget spot welding for the home was discussed in detail not long ago on Geektimes.
Popular in the DIY community are rare earth neodymium magnets that hold pins tightly and allow you to quickly construct temporary or small household items. For long-term, compact projects, liquid plastic or even glue is best.
To quickly assemble a configuration of several 18650 batteries, you can buy holders with a plastic case and factory contacts for manual soldering without fear of overheating of the lithium-ion batteries.
Only in certain cases, when other options are not suitable or impractical (depending on the conditions), soldering should be performed by professionals. Their responsibility falls on the choice of low-temperature solder, as well as guaranteeing the performance and safety of the battery during further operation.
Batteries and accumulators
When powering radio equipment from batteries and accumulators, it is useful to know the common connection diagrams for batteries and accumulators. The fact is that each type of battery has a permissible discharge current.
Discharge current is the most optimal value of the current consumed from the battery. If you consume a current from a battery that exceeds the discharge current, then this battery will not last long, it will not be able to fully deliver its calculated power.
You probably noticed that electromechanical watches use “finger” (AA format) or “little finger” (AAA format) batteries, and for a portable lamp flashlight larger batteries ( R14
or
R20
), which are capable of delivering significant current and have a large capacity. Battery size matters!
Sometimes it is necessary to provide battery power to a device that consumes significant current, but standard batteries (for example R20
,
R14
) cannot provide the required current; for them it is higher than the discharge current. What to do in this case?
The answer is simple!
You need to take several batteries of the same type and combine them into a battery.
So, for example, if it is necessary to provide a significant current for the device, parallel connection of batteries is used. In this case, the total voltage of the composite battery will be equal to the voltage of one battery, and the discharge current will be as many times greater as the number of batteries used.
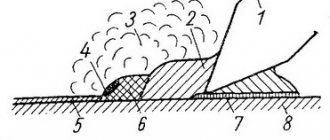
The figure shows a composite battery of three 1.5 volt batteries G1, G2, G3. If we take into account that the average value of the discharge current for 1 AA battery is 7-7.5 mA (with a load resistance of 200 Ohms), then the discharge current of a composite battery will be 3 * 7.5 = 22.5 mA. So, you have to take in quantity.
It happens that it is necessary to provide a voltage of 4.5 - 6 volts using 1.5 volt batteries. In this case, you need to connect the batteries in series, as in the figure.
The discharge current of such a composite battery will be the value for one cell, and the total voltage will be equal to the sum of the voltages of the three batteries. For three AA format (“finger”) elements, the discharge current will be 7-7.5 mA (with a load resistance of 200 Ohms), and the total voltage will be 4.5 Volts.
To assemble a simple battery-powered circuit, we have to resort to various tricks to ensure that the wires fit tightly to the poles of the battery itself. Some people make do with electrical tape and adhesive tape, others come up with various kinds of clamping devices. But the contact in this case will be imperfect, which ultimately affects the performance of the assembled circuit. Often the contact disappears or becomes loose, and the device works intermittently. To avoid this, it is best to simply solder the wires to the poles. In our article we will tell you how to solder wires to a battery so that the contact is perfect.
Solder the wires to the crown
How to solder a wire to a Krona battery? Here, soldering is carried out almost in the same way as in the case of a conventional battery. The only difference is that in the Krona battery the 9V plus and minus are located side by side on one top side of the battery. The nuances are as follows:
- In the case of flux, we treat the Krona contacts on opposite sides with acid. There we will solder the wires.
- In the case of rosin, you will need to tin the Krona contacts, also on opposite sides. Why from the opposite ones? Because in this case the risk of a short circuit between the wires is practically reduced to zero.
- The 9V Krona battery has very inconvenient contacts (poles) for soldering. At the top they open wider, and therefore for high-quality tinning and soldering from the side of such a contact, it is necessary for the soldering iron tip to be narrower or pointed.
In general, the whole process is similar to the previous one. We treat the contacts and edges of the wires with acid (or tin in the case of rosin), press the wires to the contacts, take a little solder with a soldering iron and solder them. The process is complete.
Flux treatment
To prevent subsequent oxidation of the contact, the surface of the battery, cleared of plaque, should be immediately treated with a flux mixture made from ordinary rosin.
If, for example, there are no greasy stains from oils on the phone battery contacts, just wipe them with a soft flannel soaked in ammonia.
After this, you will need to warm up the soldering iron well and solder the contact area with a few quick touches. At this point, preparation for soldering can be considered complete.
Rechargeable batteries
It is better not to solder batteries, but to make a special container for them, in which the contacts of the elements will be in close contact with the polar contacts of the container. The material of the batteries consists of alloys that are even worse for soldering than conventional lithium ones. But if you really need it, then soldering is carried out as in the case of a regular 1.5 V battery, just use flux and not rosin. Plus, soldering should be done as quickly as possible, keeping the contact of the soldering iron to the poles to a minimum, since such batteries are afraid of overheating.
Technique
In most cases, batteries have to be connected in series . Thus, to create a battery for hand-held power tools, six to eight nickel-cadmium cells are usually connected in a series garland.
Lithium-ion batteries are connected in parallel to obtain greater capacity. When composing a battery from lithium-ion cells, we must not forget that each such battery has its own charge controller. This tiny circuit prevents the lithium-ion battery from overcharging and ensures that too much current does not flow under heavy load conditions.
In difficult cases, it is necessary to connect the batteries in a mixed way. Such a battery consists of several cascades of elements connected in parallel, while the cascades themselves are connected in series.
This method provides both a significant battery capacity and the required voltage at the contacts.
In any case, when soldering batteries into a battery, specific safety precautions must be observed. Each element, although it does not have significant voltage, can deliver a good current. If you accidentally create a short circuit during operation, this can lead to a fire or even explosion of the batteries.
It is believed that ready-made compartments with spring contacts can be used to assemble batteries. Unfortunately, this is a bad way. The push contacts gradually oxidize and weaken. If the craftsman does not have a spot welding machine at his disposal, the best way to connect batteries is soldering with copper wires using tin-lead solders.
For information on how to solder batteries, see below.