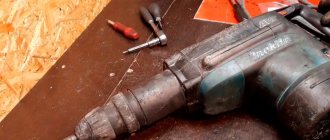
Nothing lasts forever. And the most reliable Bosch rotary hammers begin to break over time. But any malfunction can be repaired with your own hands if you have detailed instructions for performing repair work. Below we offer you a guide to troubleshooting Bosch rotary hammers and a method for eliminating them. The main causes of breakdowns are:
- careless work with the tool;
- improper storage of the hammer drill;
- heavy loads when working on working parts when chiseling or drilling;
- tool overheating;
- long work without a break;
- failure to comply with maintenance schedules.
Conventionally, faults can be divided into mechanical and electrical.
Next, we will consider faults according to their affiliation, dividing them into mechanical and electrical faults.
Diagnostics of rotary hammer faults
If, during operation, problems with the operation of the hammer drill become obvious, you should disconnect it from the power supply and carry out an external inspection.
If external signs of failure are not found, you will have to disassemble the case and look for the problem inside. One of the reasons for device failure is a break in the power cord. In this case, the rotary hammer motor does not turn on. To diagnose it, you need to carefully inspect the cable connecting the tool to the network. It must not be damaged, broken or melted. A working power cord remains cool during operation. If the wire is not in order, it should be replaced with an equivalent one. The cross-section of the conductive elements must correspond to the power consumed by the tool.
Universal diagnostic tool for electrical circuits
Conventionally, all hammer drill malfunctions can be divided into two categories - mechanical and electrical.
The mechanical category of malfunctions includes malfunctions that occur while the engine is running:
- the drill does not chisel;
- the drill does not rotate;
- the crown cannot be pulled out of the barrel (jammed);
- the chisel does not stay in the chuck (it pops out);
- extraneous sounds are heard inside the mechanism, grinding, vibration.
Electrical faults: the motor does not rotate, the brushes on the commutator spark and other types of breakdowns
The following signs indicate problems with the electrical part of the hammer drill:
- the motor does not rotate when turned on;
- the brushes on the commutator spark intensely;
- the smell of burnt insulation emanates from the body;
- Acrid smoke comes out of the tool during operation.
In order to find out and eliminate the cause of all these phenomena, the hammer drill must be disassembled.
Replacing the button and brushes
A noticeable burning smell emanating from the hammer drill indicates that the brushes are faulty and need to be replaced. When used for a long time, brushes wear out, spark, and may even start to burn. In this case, they should be replaced.
The brushes are located in the electrical part , so after removing the plastic case and disassembling the brush assembly, you need to remove the old brushes from under the lock and replace them with new ones. Now some manufacturers immediately include spare brushes in the kit, which simplifies the task for the average user.
Changing the switch button is much easier, but it is not included in the additional kit. In a disassembled case, it is enough to disconnect the damaged button and put a new one in its place.
Sometimes the problem with the switch is not that serious, and some technicians advise simply turning the button 180 degrees and continuing to use. But this life hack only helps if the problems are minor.
Replacement of main parts
When using the device, you must ensure that it is in good working order. When the first signs of a malfunction appear, urgent repairs are necessary. In order to avoid serious repairs, you need to monitor the condition and, if necessary, change the following elements: bearings, power button, graphite brushes and cartridge.
The bearing is replaced if lubricant has leaked from it, it turns hard or creaks. To perform this operation you will need a puller and a wooden hammer.
The power button is very easy to change. This requires disassembling the case. In this case, it is necessary to ensure that the device is disconnected from the network.
In order for the equipment to serve for many years, it is necessary to perform maintenance, keep it clean, regularly clean and lubricate moving parts and replace brushes and bearings. In this case, repairs may not be necessary at all; the equipment will serve properly for many years.
Daily care and storage
In order for the tool to serve the master properly for many years, during operation it is recommended:
run the device “idle” before starting work
If the hammer drill shows signs of breakdown, work is stopped and diagnostics begin. After completing the work, take care of the cleanliness of the rotary hammer - it is important to remember that electrical appliances “do not like” water; cleaning is carried out with a vacuum cleaner and rags. If the hammer drill is working in the cold or has been moved indoors from outside, do not start it right away. Allow the components to “warm up” and the lubricant to thaw. Carry the hammer drill in a special box or suitcase (usually included) to avoid dust and construction debris.
Thus, if you follow objective precautions and operating rules for the hammer drill, it will last a long time and without breakdowns. If trouble does happen, the suggested advice from the experts will help determine the essence of the problem and promptly fix the breakdown.
Repair procedure
In order to repair the equipment, it must be disassembled. To do this, you need the following equipment: wrenches, screwdrivers, vices and bearing pullers. When lubricating mechanical parts, you will need a rag and solvent.
To repair the electrical part of the hammer drill, you may need winding diagrams and wires.
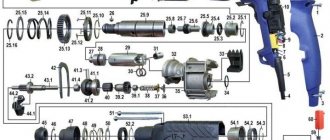
To disassemble the device, you must first remove the cartridge. After this, the body opens. If necessary, you can open only the part with the engine or the compartment with the gearbox. To repair faulty parts of a rotary hammer, you should first study photographs of such work.
Let's look at the most common equipment malfunctions, the procedure for inspecting and repairing rotary hammer problems.
Repairing a rotary hammer yourself - instructions
It is worth noting that different models may have their own technical features, so there is no single manual for non-professionals. In addition, if you are not confident in your abilities, then it is better to turn to the experts.
For DIY repairs, the process is usually as follows:
- Removing the shift lever and rubber cap;
- The dismountable cartridge is dismantled, the brushes are removed;
- By removing the screws, you can open the case and gain access to the internal parts;
- The failed part is located and replaced;
- Lubrication is provided in the right places. It is recommended not to use a CV joint;
- The hammer drill is assembled.
Mechanical malfunctions of makita 2450 and makita 2470 rotary hammers
Common mechanical malfunctions of Makita rotary hammers include:
- destruction of the quick release chuck;
- bearing failure;
- damage to the impact mechanism;
- wear of the hammer drill barrel;
- wear of the rubber striker and striker;
- gear failure.
Repair of a hammer drill chuck is carried out to replace the boot and rubber ring, as well as a conical spring and a steel ball that clamps the working tool (drill). This is indicated by the fact that the working tool? namely the drill, is poorly held in the chuck.
The main reason is wear of the steel ball 7.0 pos. 20, art. 216022-2. Ball wear occurs from contamination of the cartridge bore due to dust and dirt getting inside.
The general view and design of the Makita hammer drill chuck is shown in the photo below.
Repairing a makita 2450 hammer drill chuck with your own hands is easy. The cartridge must be disassembled, freed from old grease, discarded rubber parts, and replaced defective ones.
More complex faults require knowledge of the mechanical structure of the Makita 2450 rotary hammer.
Having determined the nature of the malfunction of the Makita rotary hammer, proceed to disassembling the mechanical part, called the gearbox.
Disassemble the mechanical part according to the attached video. Free it from old grease. Carefully inspect all parts, their integrity, and level of wear. All rubber products require replacement during any disassembly.
Let's consider repairing a hammer drill barrel. Let's analyze the mechanism completely. Video of disassembling, lubricating and assembling a Makita hammer drill
Repair of parts of the Makita 2450 hammer drill barrel
Remember! The rotor is held in the lower part of the housing by electric brushes, which must be removed.
At the next stage, the rotor must be disconnected from the removed mechanism. The rotor is detached from the mechanism simply by pulling it out, since it is held in place by the friction of two helical gears.
It turned out to be such a dirty knot.
Now we need to separate the impact mechanism shaft.
Most often, the rubber rings and the firing pin, pos. 24, compressor spring pos. 18. and cylinder parts.
This is how barrel parts wear out and break down when the tool is used incorrectly.
Let's consider the most complex malfunction - failure of the impact mechanism. Characteristic signs of failure of the impact mechanism are the absence of impact and the unpleasant noise of the rotary hammer operating in the “Impact” mode.
This malfunction is typical for those rotary hammers that, during operation, were strongly pressed against the surface being processed. Having disassembled the gearbox, we remove debris and pieces of foreign objects. We find the faulty part and clean everything of old grease.
Very often the firing pin, item 24, art. 324396-8, included in the barrel. metal ring pos. 27. art. 324216-6.
Discard damaged parts, replace with new ones, and cover with a thin layer of lubricant. The parts are ready for assembly. But more on that in the next article.
Due to the ingress of dust, dirt, and moisture, the internal lubricant becomes hard over time and does not fulfill its purpose. The hammer drill starts to make extraneous noise. When starting to repair a rotary hammer, be sure to read the attached instructions for disassembling, lubricating, and assembling components of the Makita 2450, 2470 rotary hammer. The diagram of the Makita 2450 and 2470 rotary hammer will help you correctly disassemble faulty components and find defective parts. We will also tell you how to disassemble the Makita 2450 rotary hammer.
Pros and cons of Hitachi rotary hammers
Advantages of Hitachi rotary hammers:
Wealth of choice
Hitachi currently offers the widest range of rotary hammers weighing from 2 to 18 kilograms, with various configurations and functionality. Low price with optimal quality distinguishes all Hitachi products. When choosing a hammer drill from this company, you should pay attention to the individual advantages of models of various classes. DH30PC2 is the most compact in its class yet has the fastest drilling and chiseling speeds
Assembly - Japanese. The three-mode DH28PC is equipped with a shock blocking mechanism. Assembly - China. Availability of parts for repair and the ability to repair rotary hammers in private offices. Original Japanese spare parts are an order of magnitude more expensive, but also an order of magnitude better quality.
Disadvantages of Hitachi rotary hammers:
- Inexpensive Chinese-made devices heat up quickly - you can work with such a tool continuously for no more than 30 minutes. During use, a specific smell of heated plastic often arises.
- Consumables quickly break down - plugs, cables, rubber bands on the strikers, regulators.
- A large number of Chinese counterfeits are sold in stores and resellers, which have nothing to do with original Japanese technologies or with the Hitachi company itself.
Repairing a screwdriver step by step
We take out the engine and carefully disconnect the motor and gearbox. Let's disassemble the gearbox itself. To assemble it exactly as it was, you need to photograph it or schematically sketch the location of the gearbox. If the teeth of the coupling are worn out, then replace it with a new one
It must be firmly fixed.
We carry out repairs using a bench vice, drill and drill of the required size. You will also need wire cutters and some screws.
The repair process will not take much of your time and attention. If you still decide to repair the worn teeth of the old coupling rather than buy a new one, then you will need a drill and a drill bit. To do this, you just need to drill several holes in the places where the teeth were and screw the required number of screws into these holes.
If parts of the screws protrude, then shorten them using wire cutters and turn on the screwdriver to check the functionality of the tool.
Below in the video you can visually watch the repair process itself.
Possible malfunctions, causes of their occurrence and solutions
To repair a rotary hammer with your own hands, you must first determine the external manifestations of malfunctions.
The hammer drill does not hit
If the hammer stops hitting when switching to impact mode, but the drill rotates, it is most likely that the floating bearing is damaged. The solution to the problem is to replace it with a new one.
The second possible reason is a malfunction of the striking mechanism. Often, when overloaded in work, the steel striker splits, this leads first to a weakening of the impact, and then to its complete absence. The firing pin needs to be replaced.
The third probable reason is wear or breakage of the piston group of the hammer drill. The liner and piston should be replaced.
The hammer drill does not spin and does not drill
If the chuck does not rotate when you press the start button in drilling mode, the cause can first be determined by the sound. If the electric motor hums but does not turn the chuck, most likely something is preventing the rotor from rotating inside the gearbox. What happened to the engine will have to be found out by disassembling the mechanical part of the tool.
If the engine does not hum when turned on, it is more likely that the motor has failed. Having opened the lid of the device, it is necessary to determine what exactly led to this phenomenon. This could be an open circuit, a broken start button, or a short circuit in the coil windings. Using the tester, the specific cause is determined and appropriate repairs are made.
The drill does not stay in the chuck and flies out
Incontinence of the hammer drill equipment can occur during long-term use. The drill or chisel inserted into the chuck does not hold and flies out during operation. It is not only impossible to continue chiseling with such a tool, it is also very dangerous - a flying chisel can cause injury.
The reason for equipment incontinence lies in wear or breakage of the cartridge. The cartridge needs to be disassembled and determined what the problem is. Perhaps the balls have become deformed, wear has appeared on the restrictor ring, or the retaining spring has sagged. Usually, after replacing the damaged part, the cartridge begins to function normally again.
Video: why drills fly out of a hammer drill
The brushes sparkle
Sparking brushes is a fairly common phenomenon when working with tools in dusty conditions. As a rule, sparking is a consequence of the deterioration of the material of the brushes themselves. Replacing the latter with new ones will help correct the situation; sparks will no longer fly out.
If not, the reason must be sought in the stator or rotor windings. It is possible that the large amount of dust entering the motor has caused the protective varnish covering the copper conductors to wear away. And this entails a short circuit. The presence of an interturn short circuit is checked using electrical instruments (multimeter).
The resistance between the lamellas is measured with a multimeter
In addition, it should be taken into account that dust may adhere to the lubricant of the bearing located next to the commutator. To prevent this, the collector is degreased using a swab soaked in alcohol or solvent.
The hammer drill gets very hot
If the hammer drill gets excessively hot during operation, this is a clear sign of a malfunction of the electric motor. First of all, to prevent overheating, you must observe the operating mode of the device:
- take breaks at certain intervals;
- After loading, give the tool the opportunity to idle.
When drilling, it is recommended to use a periodic mode: apply maximum power for no more than 1 minute, then turn on idle for 3-4 seconds.
If the housing temperature does not decrease, then you need to inspect the electric motor. If you notice a characteristic odor coming from under the tool casing, you must immediately stop working and disconnect the device from the network. You can disassemble it only after it has completely cooled down.
The hammer drill does not hold the chuck
Sometimes there is a situation when the cartridge flies off along with the equipment while the hammer drill is running. This occurs due to wear of the chuck body mount at the end of the raster sleeve, which is a retaining ring. If it breaks, the fixation is broken and during the push the rubber boot flies off, followed by the spring and balls.
You can restore normal operation of the cartridge by installing a new locking ring. This is done quickly and does not require any additional equipment other than a regular screwdriver.
Disassembly algorithm
Do not forget that repair of a rotary hammer is only possible in de-energized mode! Due to the similarity in the internal composition of the main part of the hammer drills, the tool disassembly scheme is approximately the same. If no external faults are observed, you should start disassembling the device from the cartridge.
Next, the following parts are removed sequentially:
- rubber boot;
- retaining ring (using a screwdriver);
- plastic boot;
- washer;
- plate;
- spring;
- small metal ball.
When the last four parts wear out, the barrel cannot stay in the cartridge and begins to fall out. To fix this, you need to replace the broken part, and clean and lubricate the remaining parts.
The next part in the parsing algorithm is the body . The first thing to do is remove the switch. To do this, it must be transferred to the “Strike” state, indicated by a drawn hammer. Then, hold the button on this mechanism and turn it until it clicks.
To complete removal, take a screwdriver and use it to pry up the switch and remove it. In order to get to the electrical fault, it is worth removing the plastic housing.
This is not difficult; it is usually held on with screws around the perimeter. If there is a problem in the gearbox, it must be dismantled and damaged bearings replaced.
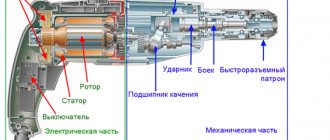
Hammer hammer impact mechanism
Most modern rotary hammers have an electro-pneumatic impact mechanism. “Electric” means that the mechanics are driven by an electric motor, and “pneumatic” means that the striker hitting the drill shank is driven by air.
- Engine rotation transmission gear
- "Drunk" bearing
- Piston
- Drummer (“flying piston”)
- Trunk
- Striker
- SDS cartridge
When you press the button, the engine transmits rotation to a shaft with a “drunk” bearing, which in turn drives the piston inside the barrel. As the piston moves forward, air pressure increases between it and the striker. The striker moves towards the striker and hits it. The striker transfers the impact energy to the drill. Then the piston moves in the opposite direction, creating a vacuum area in the barrel. Due to this, the striker returns to its original position, after which the entire cycle is repeated.
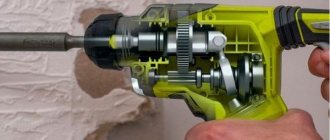
Most rotary hammers have two or three operating modes:
- combined mode: impact and rotation of the drill;
- Rotation lock mode: only the impact mechanism works;
- impact blocking mode: the hammer drill
can be used as a drill or a mixer for preparing building mixtures.
How to remove the mode switch
To diagnose internal components, it is necessary to remove the hammer housing and clean the surface of the components from dust. The analysis begins with the compartment of the operating mode regulator.
It is moved all the way - as a rule, this is the extreme right position (below the rebound mode icon), after which, using a flat screwdriver, the regulator is removed from its socket.
Mode switch
Mechanism parts may come out of the guide grooves. This may be a consequence of deformation, wear, or frequent use of the tool with the mode not fully engaged. The malfunction is eliminated by installing the parts in their places or replacing them with new ones.
How to disassemble a hammer drill
Disassemble the hammer drill sequentially. Inspect all details carefully. Even if you are looking for a problem in one unit, you may find damaged parts in other units. When disassembling the tool, the body should be cleaned of dust and dirty grease.
How to disassemble a cartridge and remove stuck equipment
Start by disassembling the cartridge so that it does not interfere with the removal of the gearbox housing.
- Remove rubber boot 1, retaining ring 2 and plastic boot 3.
- Next, be careful, as there is a ball in the grooves of the sleeve under the fixing washer 4. He might jump out.
- Carefully remove washer 4, locking plate 5, spring 6 and ball 7. Depending on the chuck model, there may also be rings, washers and balls.
If a drill or other equipment cannot be pulled out of the chuck, there are two options for solving this problem:
- Clamp the tool in a vice. Slightly shake the hammer drill and pull it towards you;
- Clamp the hammer drill in a vice through the rubber gaskets so as not to damage the plastic housing. Clamp the end of the equipment with a gas wrench. Tap the key with a hammer in the direction of the axis of the tool.
The second option is used as a last resort. If after several blows the drill or chisel cannot be pulled out, stop. You may damage the hammer drill. Disassemble the cartridge and gearbox. Try to knock out the equipment with a drift. After this procedure, the raster sleeve will most likely need to be replaced. To avoid this problem in the future, lubricate the end of the equipment.
How to remove the mode switch
In some models of hammer drills, the switch is removed by turning it to the extreme right, in others - to the extreme left. Consider the extreme right position.
- Set the mode switch to strike. If there is no impact mode, use drilling impact.
- Press the button in the switch and turn it just below the stroke until it clicks.
- Pull it towards you, pry it with a screwdriver and remove it.
Disassembly of the electrical part of the hammer drill
- Unscrew and remove the back cover.
- Unscrew the bolts securing the power cord.
- Remove the button and wires from their grooves.
- Disconnect the wires from the stator.
- Unscrew the brush holder bolts and remove the brushes.
- Clean the housing from dust.
- Unscrew the bolts connecting the electrical housing to the gearbox housing. Separate both housings with a screwdriver.
- The rotor is connected to the gearbox through a shaft and can be easily removed from it. Remove the bearings from the armature using a puller.
- Remove the air intake from the electrical housing.
- Unscrew the stator from the housing. Take a piece of wood and knock gently on the ribs of the housing, and the stator will begin to come out.
Reasons for the lack of impact
At first glance, it seems that the impact mechanism has a simple design and there is nothing to break. Load, dust and vibration gradually take their toll. Typically, the impact force decreases as the mechanism wears out and eventually disappears. The sudden disappearance of the impact is explained by the deformation or destruction of some parts.
Striker and striker
These parts are made of high-strength steel. The firing pin rarely fails, but the bushing in which it moves absorbs some of the impact energy and breaks down over time. The fragments jam the firing pin and the hammer stops hitting.
The firing pin (“flying piston”) has a compression ring. When it wears out, part of the air passes into the gap between the cylinder in the barrel and the firing pin. The more wear, the weaker the impact. The problem is solved by replacing the ring with a new one.
Sometimes the striking part of the “flying piston” breaks on the firing pin. This is usually the result of pressure on the hammer when drilling holes. The drilling speed does not increase, but the load on the mechanism increases, which accelerates wear. Repair consists of chamfering on an emery machine or replacing a part.
"Drunk" bearing
It is mounted on the shaft at an angle and drives the piston. If there is wear or damage, the bearing must be replaced.
Mode switch
Mechanism parts may come out of the guide grooves. This may be a consequence of deformation, wear, or frequent use of the tool with the mode not fully engaged. The malfunction is eliminated by installing the parts in their places or replacing them with new ones.
Lubrication
Untimely replacement of lubricant can also be the reason for the lack of shock. Working with a hammer drill involves the presence of dust, which does not have the best effect on the properties of lubricants. Dust can clog the holes in the cylinder that allow air to circulate when the impact mechanism operates. The same effect cannot be ruled out when using too thick a lubricant not intended for hammer drills.
The main reasons why a hammer drill sparks
- Incorrect installation
- Worn condition
- Incorrect installation of brush holders
- Poor fit to the manifold
- Pressing parts too hard
- Using components that are not the same brand as the tool.
In any case, for the above reasons, you should disassemble the device and inspect the components.
Replacing brushes
If it’s time to change the brushes in your hammer drill, you can take the tool to a service center for this task, or you can replace them with your own hands.
Service at a service center has a number of advantages:
- High-quality work, if you contact a specialized center
- Original components - for your tool model
- Extending the warranty if the period has not yet expired
- In addition to replacing the broken part, the service usually inspects the entire internal important parts, cleans them and lubricates them
How to repair the cartridge and impact mechanism of the barrel of a makita 2470 hammer drill
Due to the ingress of dust, dirt and moisture, the internal lubricant becomes hard over time and does not fulfill its purpose. The hammer drill starts to work with extraneous noise. When starting to repair the rotary hammer, be sure to read the attached instructions for disassembling, lubricating, and assembling components of the Makita 2450, 2470 rotary hammer. The diagram of the Makita 2450 and 2470 rotary hammer will help you correctly disassemble faulty components and find defective parts. We will also tell you how to disassemble the Makita 2450 rotary hammer.
Disassembling the Makita 2470 hammer drill begins with removing the mode switch knob.
Do-it-yourself Dewalt hammer drill repair
To carry out repairs, you will first have to disassemble the tool and then replace the broken part with a new one. The analysis should be performed according to the following algorithm:
- It is better to start working from the top nodes. To begin with, the rubber tip is removed, the washer is the second, the spring is the third, and the ball is the last;
- The second step is to remove the screws holding the case in place;
- In the next step, remove the handle cover and disconnect the stator wires;
- Remove the brush holder;
- Disconnect the gearbox and housing until you see a gap, then remove the switch;
- After all these steps, place the tool vertically on a vice and carefully remove the broken part.
Please note: when disassembling a hammer drill, always take the time to clean its body so that it serves you as long as possible. Also, be sure to be extremely careful and follow safety rules.
Source
Malfunction of stopping the drill when drilling with impact
The reasons why a Makita hammer drills with an impact and the drill rotates is due to wear on the teeth of the safety gear and the teeth of the barrel. Often this malfunction occurs when using a rotary hammer as a mixer for mixing mixtures. During operation, the safety clutch slips, and if you take into account the spring load, the load is large.
A visual inspection will not allow diagnosis. You can remove the barrel and secure it in a vice and turn the gear with a wrench, but this can be understood if there is severe wear; in most cases, only disassembling the barrel for diagnostics will help.
Advice on what to do in this case. If it is not possible to remove a suitable part or replace it, then evaluate the wear of the barrel. This is done this way: insert a new drill and move it to the sides; if the play is large, it is better to replace the barrel completely.
It is worth noting that the reason for the drill turning when drilling with impact can be:
- wear of the shaft bearings;
- the gear near the drunken bearing can be licked.
On sale, if you search, you can buy a gearbox assembly for a hammer drill and its cost is about 2000 rubles.
The reliability of some sellers is questionable, and if you consider that these are often spare parts taken from analogue tools that are sold, for example, on Avito. How
For example, there are many Chinese hammer drills similar to Makita. An example is a network hammer drill FAVOURITE RH 950 and its cost in the aisle is 3000 rubles. which is profitable to sell for spare parts.
We replace the parts with serviceable ones and get ready to assemble.
Video of quick disassembly of a Makita rotary hammer
Even very reliable Makita rotary hammers break down over time. Any breakdown can be eliminated, you just need to have straight arms and perseverance. In addition, hammer drills are also subject to mechanical breakdowns. Operating rotary hammers with hard materials in a dusty environment will shorten their service life and require user intervention to perform preventive maintenance.
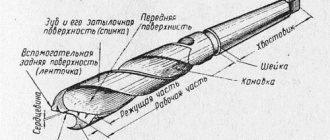
Electric drill - remember the design of the tool
An electric drill is a type of tool that is designed for drilling different types of materials, including concrete and reinforced concrete. Only for this you will need to use a tool with an impact drilling function or an impact drill. You can find out how the tool works if you take it apart. A brief description of the design of Soviet and foreign-made electric drills is described below.
It should be noted that the design of modern drills of domestic and foreign production differs from the design of Soviet tools. Only these are minor differences, which consist in the absence of reverse on an electric drill, as well as impact drilling. So, structurally, an electric drill consists of two main parts - electrical and mechanical. The mechanical part is based on the following structural elements:
- Gearbox - a set of gears, due to which the speed decreases and the torque from the electric motor shaft increases
- The cartridge is an executive body that is designed to secure working attachments
- Bearings are supporting mechanisms for shafts and axles that ensure their rotation.
- Impact mechanism - in electric impact drills this device is part of the gearbox
The electrical component of any corded electric drill consists of the following elements:
- A commutator type motor consisting of a stator (fixed part), rotor or armature (moving part) and a collector (copper plates or lamellas through which current is supplied to the armature winding)
- Graphite or carbon brushes are a transmission device through which current is transmitted to the rotor winding. Brushes are consumables, and when they spark, this indicates their wear.
- Start button - depending on the model of the electric drill, the switches can be regular or with a built-in speed controller
- Reverse button - Soviet drills do not have such devices. This is a polarity reversal mechanism through which the direction of rotation of the tool chuck changes. Installed separately or integrated into the start button
- A ferrite ring is an element (filter) through which noise in the network is smoothed out
- A capacitor is a filter element that prevents interference from entering the network
- Power cord - the link between the electrical outlet and the tool
The photo above shows the design of the drill with the main components. Sooner or later, it becomes necessary to repair the drill due to the failure of its individual components and mechanisms. To do this, you first need to inspect the tool, identify the cause of the malfunction, and eliminate it. More details about what types of drill breakdowns there are, how to identify and fix them, are described in the material.
This is interesting!
Old Soviet drills do not have a reverse mechanism or an electronic speed controller. Instead of an electronic regulator, a mechanical one is used, consisting of gears of different diameters and numbers of teeth. This method of adjustment is more reliable, since reducing the speed does not affect the power. However, this method of speed control is expensive, as it requires the additional use of a pair of gears. If one pair of gears wears out, you can continue to use the tool. Below are photos showing the design of the mechanical speed controller of an old Soviet drill.
Electrical problems
If the hammer drill is connected to the network, but upon startup there is either a lack of impact, or a lack of torsion, or both, the reasons should be sought in the electrical plane. Typically, these problems are accompanied by the following symptoms:
- extraneous sounds that are not typical during normal operation;
- the motor hums, but the drive shaft does not turn;
- graphite brushes spark;
- a distinct burning smell, visible fumes, black smoke;
- The hammer housing is very hot.
The motor hums, but there is no rotation
In this case, the source of the problem is hidden in the engine gearbox: it prevents the rotor from spinning. If there is no sound, there are more reasons:
- power supply failure;
- failure of the start button;
- short circuit in the coil windings.
One way or another, you will have to disassemble the electric motor, check for a short circuit, and only then make repairs.
Sparking graphite brushes
This malfunction is associated with wear of the brushes - they should be replaced. If the sparking does not stop even on new brushes, the reason is in the engine, or more precisely, in the stator and rotor windings. When assembling a rotary hammer at the factory, a special protective varnish is applied to these windings, which prevents dust from penetrating into the rotor and stator.
Stator with winding
If periodic maintenance is not carried out, there will be so much dust on the windings that the varnish will rub off. This may result in a short circuit. Because of this, sparks may appear on the brushes. To check for a short circuit, use a multimeter.
Preventive measures:
- periodic change of brushes;
- oil lubrication of the rotor shaft bearings;
- applying a new layer of varnish to the rotor and stator windings to replace the worn one.
Case overheating, odors, smoke
Sometimes the reason why the impact mechanism of a rotary hammer does not work is the strong heating of the body, accompanied by a burning smell and the release of smoke. It is necessary to immediately turn off the tool and give it time to cool down. Rapid warm-up after the next start-up implies the need to disassemble the engine and look for a breakdown.
Frequent breakdowns
Many years of experience of craftsmen shows that when solving a problem - why a hammer drill does not work - the cause can be found in almost any node.
This makes it difficult or completely impossible to attempt to independently diagnose and repair the instrument, although in some cases the breakdown is simple.
For example, if a hammer drill does not work in a vertical position, then with a 99% probability the cause lies in a break in the power cord at an area of 10-20 cm from the entrance to the tool and can be eliminated within a few minutes.
If a Bosch, Metabo, etc. hammer drill does not turn on, the reasons are also usually caused by a breakdown of the electrical part:
- a break in the power cable, a defective plug or power button - this is most often caused by a short circuit in the filter capacitor;
- wear or destruction of commutator brushes;
- loosening the screws of the electrical contacts;
- contamination or burnout of the collector lamellas;
- breakdown of the turns of the armature or stator winding;
- failure of the operating mode switch due to contamination.
The list of mechanical failures is even more extensive and, as a rule, requires the replacement of defective parts with new ones with similar characteristics. Any of the “Udachnaya Tekhnika Service” workshops can quickly, inexpensively and with a quality guarantee repair Bosch and other rotary hammers.
Every real man has a hammer drill at home or in his garage. But no matter how “golden” and neat hands you have, sooner or later your loud “assistant” breaks. Repair for such a device is rarely located close to home, so often the best way is to try to fix it yourself.
In this article we will look at how to quickly determine the cause of the malfunction and repair the equipment at home.
Mechanical breakdowns - how to fix them
Faults in the mechanical part of the tool are easier to detect than in the electrical component. This is due to the fact that any mechanical defects are audible. The main signs of mechanical malfunctions of the devices in question include:
- The occurrence of extraneous sounds
- Vibration and chatter of the chuck
- The tool motor can be heard running, but the chuck does not rotate
To repair the device and eliminate mechanical faults, you will first need to disassemble the housing. Knowing the design of a screwdriver, it will not be difficult to eliminate any breakdowns that occur in the mechanical part. If extraneous sounds occur, which indicates the cause of wear on the bushings and bearings of the motor armature, then these elements need to be replaced. When the bearings and bushings wear out, they need to be replaced, but first you need to buy these parts. Difficulties may arise when purchasing, since it is almost impossible to find spare parts for outdated models of tools.
This is interesting! Before installing a new bearing, it should be well treated with lubricants, for example, Litol-24 or Solidol, or even better with special lubricants.
In addition to bearing failure, the gearbox on the screwdriver may break. A number of malfunctions of this device include:
- The gearbox shaft bends due to heavy loads
- The working surfaces of the gears wear out
- The pin on which the satellites are attached breaks
- The bearing or support sleeve of the gearbox is worn out
Most often, it is the gearbox that fails, or more precisely, its component parts—gears. The causes of gearbox failure are:
- Incorrect use of the tool
- Heavy loads for which the device is not designed
- Lack of lubrication
- Material from which the devices are made
If the screwdriver is “old school”, that is, its gearbox consists of steel gears (instead of plastic), then it is advisable to repair it rather than buy a new one. To do this, you need to disassemble the device, inspect it and find the cause of the malfunction. When repairing a gearbox, it is necessary to clean the mechanism and parts from obsolete lubricant and apply new lubricants. If there are damaged gears, they need to be replaced. Do not rush to dispose of faulty gears, as you will need to buy the exact same parts (use them as a template).
This is interesting! If the tool has plastic gears, it is not recommended to replace them with steel ones. The reason is that plastic gears break under heavy loads, which protects the engine from combustion. If the device has metal gears installed from the factory, this indicates that the engine has a large power reserve.
To avoid unnecessary questions when independently repairing the mechanical part of screwdrivers, there is a table below that shows the main signs of mechanical faults, as well as ways to eliminate them.
| Symptoms of tool malfunction | Troubleshooting methods |
| The occurrence of extraneous sounds and hum | If extraneous sounds begin to appear when using the tool, this indicates wear of the bearings. To eliminate the breakdown, you need to check the integrity of the motor armature bearing and gearbox. If the bearings are in good condition, you should also check the integrity of the bushings, as they also wear out. Most often, the bearing shaft support sleeve wears out. |
| Vibration | Curvature of the reduction shaft, which contributes to the occurrence of strong beating and vibration. To solve the problem, you need to disassemble the case, assess the damage and make the appropriate decision to replace the part. |
| Clamp chuck failure occurs | If runout of the cartridge is detected, then you need to check the quality of its fixation. The part is fastened with a bolt, which is located inside the part (to see the bolt, you should separate the jaws). To screw the cartridge, the bolt must be rotated not to the right, but to the left, since it has a reverse thread |
| Jamming | If the tool is jammed, as indicated by the operation of the motor, but the chuck does not rotate, then you need to disassemble the housing and check the integrity of the gearbox. Jamming of the tool indicates displacement of the satellites, a violation of the integrity of the gears, or a violation of the integrity of the bearing. To fix the breakdown, you need to disassemble the screwdriver and find the cause of the jamming |
| Cracking and spinning at switch position | Gearbox malfunction. To eliminate it, you need to disassemble the tool and inspect the integrity of the mechanism. |
https://youtube.com/watch?v=Jr_xq9ZvvdE%3F
Preventive measures
After we have examined the main causes of hammer drill malfunction, as well as methods for repairing breakdowns, we can highlight several points on how to extend the life of your impact tool.
- In case of frequent repair work, the hammer drill should be cleaned at least once a month.
- Do not forget to lubricate the device parts regularly.
- To prevent malfunctions, you should choose a high-quality hammer drill. Cheap devices are only suitable for use a couple of times a year.
- To prevent the mechanism from overheating and the brushes from wearing out, it is worth taking breaks from work. For example, after using it for 20-30 minutes, give yourself and the hammer drill a rest for 10 minutes.
- And lastly, after you've finished working, don't leave the hammer drill dirty. Be sure to clean it after each use and put it in a special drawer.
By following these little tips, you can extend the life of your hammer drill, which will save you time on repairing it and money on buying a new tool.
Don't be afraid to disassemble it; it may have stopped working due to a small problem that you can solve yourself.
And remember about safety precautions, because this is an electrical device, which means you should handle it carefully.
To learn how to repair a rotary hammer with your own hands, see the following video.
A hammer drill is a complex device consisting of electrical and mechanical components. Constant use of this unit can lead to various breakdowns and malfunctions, especially if preventive maintenance is not carried out. To extend the service life of the tool, as well as to prevent unexpected breakdowns, you should periodically disassemble the hammer drill and carry out diagnostics. If it happens that the hammer drill refuses to function, then you should not rush to purchase a new unit, even if your tool is already ten years old. It can be taken to a repair shop, but the cost of the services will be quite high. This article will tell you how to repair a rotary hammer yourself.