Making a water device
The type is water based. The device consists of two flasks connected by a special tube measuring 5-25 meters. A scale is applied to the flasks. The device weighs from 300 to 1100 g.
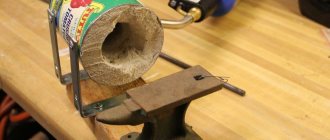
To make the device, take two syringes, first removing the needles from them. Make a hose from a dropper. First you need to get rid of the plunger in one syringe by inserting it into the hose. Fill the syringe with water, after tinting it with tea leaves. Prepare another syringe in the same way by connecting it to the other end of the hose.
The device operates on the principle of communicating vessels. On the surface of the flask, apply the markings necessary to determine the desired height. The work begins after attaching it to the desired object with tape. If the surfaces of the water meet smoothly, a perfectly flat surface is observed. It is necessary to prevent air bubbles from entering the tube to eliminate measurement errors.
Room layout
Control points in the room are in the corners of the ceiling and floor. The corners in a room that has four corners must be right so that the room is a perfect parallelepiped. The camber of the corners must be measured using a tapping cord and a plumb line.
On the ceiling, lines are drawn diagonally from corner to corner, then the diagonals are measured, they should be equal. If the diagonals are of different lengths, then you need to correct it by marking the correct points on the line. By connecting the points with segments using a painter's cord, we get a rectangle with all right angles. At least one point of the rectangle must coincide with the actual angle of the ceiling. By attaching a plumb line to the indicated points, you need to mark the corresponding points on the floor. After marking in this way, it is necessary to check that pairs of diagonals in any plane passing through four control points must be equal in length. This marking technique allows you to minimize the collapse in the corners of the walls.
Mainly, marking the room is needed in order to find out where to attach the starting profiles and hangers for the frame of the plasterboard structure.
Bubble option
You can make a bubble level using a syringe and a wooden block. Water is drawn in with a syringe so that there is minimal room for air. Use chewing gum to plug the hole for the syringe. Having secured the syringe with tape, you can begin the process. If the surface of the product is smooth, the bubble will be located directly in the center.
If you take two ampoules, you can work with vertical surfaces. One can determine the evenness of horizontal planes.
Types of laser level
At home, you can make two types of devices - rotating only in the horizontal plane or providing markings in both the horizontal and vertical planes at the same time. The second option is made in the form of two lines intersecting each other at right angles - a cross.
Method number 1. Laser level made from a pointer and a container of water.
This is the easiest way to make a laser level with your own hands; for it you will need any container into which you can fill water to the brim so that a piece of foam plastic can fit in it. As a container, you can take any bucket or pan, cut off a plastic eggplant. Also take a regular laser pointer with a dot attachment, a flat piece of foam with smooth surfaces. A piece of plasticine, a clamp or a patch is used as fastening; if you don’t have any of this, you can use any glue or sealant.
The laser level is assembled in the following sequence:
- Once you have decided where you need to mark, first place the empty container on the floor at the desired height. If you carry a pot filled with water, the water will spill.
- After installation, fill the container to the brim with water. If the container is placed on any object used as a platform (chair, box, etc.), ensure its stable position on the floor or ground. Otherwise, you will have to wait for the vibrations to die down after each touch of the level.
- Attach the laser pointer to the foam using adhesive tape or a clamp. In this case, you need to ensure the tightest and even fit of the laser pointer to the foam. Therefore, if one fixation point is not enough, stick it along the entire length. If any element protrudes above the entire surface (nozzle, plug, etc.), it should be removed or fixed to plasticine.
- Turn on the laser pointer and place the foam sheet on the surface of the water. The homemade laser level is ready.
In order to use such a device, rotate the laser pointer to the point you need and make a mark on the wall. To make further marks, rotate the laser level around its axis in the direction you need. Place marks on the wall at the appropriate points. If you draw lines, make a series of points that can then be connected to each other.
This level is much more convenient for two people to work with, so that one person controls the laser pointer, and the second makes marks on the wall. Unlike the classic bubble level, this method will reduce the time for marking a room by three times. The disadvantage of this laser level model is low accuracy. Therefore, its use is advisable in situations where there is no need to achieve millimeter precision.
Method number 2. A homemade device made from a pointer and a level.
This is a more complex version of the laser level compared to the previous model, but it allows you to set up much more accurate measurements.
To do this you will need:
- a regular laser pointer - you don’t have to spend money on expensive long-range models, they don’t make any sense;
- bubble-type building level - choose a small model of 20 - 30 cm;
- an adjustable support that can be rotated around its axis - the ideal option would be a tripod from an old chair or camera, but if you don’t have a tripod, use a round peg 0.5 - 1 m long and with a diameter of 30 to 60 mm;
- a rigid stand that can be mounted on a peg - a flat and smooth sheet of plywood, chipboard, MDF will do;
- a piece of rubber for gaskets, mounting clamps and self-tapping screws.
Rice.
1: laser level diagram Look at Figure 1, here is a diagram of a laser level for its manufacture:
- Secure the pointer to the bubble level, to do this, use the clamps as clamps, first place an elastic band between them as a spacer.
- In this case, a wooden peg is used, so it must be sharpened on one side so that this end can be easily buried in the ground.
- On the other side of the peg, screw a sheet of plywood to a flat surface using a self-tapping screw. If the other end of the peg is not level enough, it is first leveled with a hacksaw and file. The plywood must be positioned at a right angle, otherwise accurate measurements cannot be achieved.
- Place a peg with a stand in the room and deepen it to the level you need.
- Place the bubble level with the laser pointer on the stand. Now, using a bubble level, you can adjust the accuracy of the lines you draw by simply tilting the wooden peg in one direction or another.
This model has much greater accuracy in operation. But to use it you will also need two people, one of whom will monitor the level, and the second will apply markings on the walls.
To check the accuracy of the operation of such a device, you need to screw a screw into the stand at the level of the beam, step back from the wall a few meters and screw a second screw into the wall at the pointer point (Fig. 2).
Rice. 2: Level accuracy check
If by connecting these screws with a profile or board you get the correct horizon at the bubble level, then the device works accurately. If the bar needs to be raised up or lowered, then the level needs to be moved in the same direction.
Method number 3. Making a cross-shaped level with a plumb line.
This method is relevant for those jobs in which you need to carry out simultaneous markings in both the horizontal and vertical planes, and for quite a long time or on an ongoing basis. Since the manufacturing process is very labor-intensive.
To do this you will need:
- Industrial laser module with a power of 5 mW and a supply voltage of 3 V. These come with various attachments, both for a point and a cross;
- Rechargeable battery or replaceable 3V batteries, if you have a power supply, you can use it;
- Metal, plastic or wooden plates, tie rods and screws for fastening, clamps or electrical tape for fixation;
- Housing for installing the module, bearing and connecting wires.
For assembly tools you will need a hacksaw, drill, screwdriver or screwdriver, and pliers. The most important property of such a laser level is its free suspension, like a pendulum. To do this, it must move freely in two horizontal planes.
To make a laser level:
- In a metal sheet with a thickness commensurate with the width of the bearing, drill a hole along the diameter of the bearing (Fig. 3);
Rice. 3: bearing plate selection - Cut out a clamp for the bearing from a metal blank with a hole; the adjustable design will allow you to clearly fix the bearing inside;
Rice. 4: cut the clamp - Attach the laser module to a power supply with a battery; in this example, a power supply with a charger is used (Fig. 5),
Rice. 5: Attach the laser module
if you decide to power it in another way, you can skip this point;
- To fasten the laser module, use clamps; in addition, the structure can be secured with electrical tape;
- Connect the battery and laser module through a button, which then connects to the body;
Rice. 7. connect via button - Prepare the case itself, in this example a plastic box is used, at this stage remove unnecessary elements from it and make holes for the laser module in the end,
Rice. 8: module hole
on the opposite side for connecting the charger and on top for installing the button;
Rice. 9: charger hole
- Assemble a frame from metal plates in which the laser level will be suspended; in this example, round coupling bolts are used for this purpose;
Rice. 10: Assemble the frame - For a more stable position of the frame, use special self-adhesive stops, which can be purchased at a furniture store or made yourself from pieces of rubber;
Rice. 11: glue the stops - To hang the housing from the bearing, assemble a bracket, which you then screw to the housing cover;
Rice. 12: Assemble and attach the bracket - Assemble the entire structure and check its functionality.
Rice. 13: Check functionality
Rice.
14: marking example This model is the most accurate in operation and can completely replace a factory-made laser level. And due to the independent power source and the ability to recharge it from the mains, it is in no way inferior to factory ones in operation.
Tubular design
The pipe version is a type of bubble building level. To make it, you need to take several small tubes and a square element from the profile.
Place the cord on the tubes using perforated tape. Markings are applied to the profile. By applying it to any surface, you can make sure that the object, walls, door and window openings are even.
Wall marking
In order to make a beautiful and even structure from plasterboard, first of all, careful marking of the walls .
The task is to correctly mark the horizontal and vertical; these will be the base lines, from which, using a tape measure or ruler, it will be possible to draw auxiliary marking lines. Also, when marking a room, it is necessary to determine possible camber in the corners and, if necessary, to beat off the correct planes of the walls.
The ceiling, floor and walls must form a parallelepiped, with the exception of non-standard layouts.
How to draw horizontal and vertical lines: designer and builder tools
Any building must be reliable, stable, have a structure that resists destruction, and at the same time look beautiful and impressive.
Knowledge of the basic physical laws associated with acting loads and control of the distribution of gravitational forces helps to fulfill these requirements.
They constantly act on building elements and are directed towards the center of gravity of the Earth. Under their influence, any body without support falls from a height and moves along the shortest straight line - the vertical, coinciding with the direction of the lines of gravity.
This law determines the operation of two main construction devices:
- a plumb line indicating the vertical;
- level defining the horizontal.
They are built into various modern measuring instruments and allow high-quality marking and assessment of the condition of surfaces.