Even a person who is far from repairing can lay a laminated coating on his own. The process is simple, but requires preparation and the purchase of special tools. In this article we will tell you about everything you might need to lay laminate flooring yourself. The article will also be useful to those who need to repair the coating.
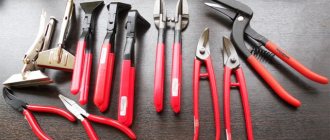
Tools for measuring and marking used when laying laminate flooring
The master makes many measurements “by eye” or “on the spot”, applying the panel to the desired point. This saves a lot of time without sacrificing quality. After all, most of the cut edges will be masked by the baseboard, and an error of half a centimeter will not matter. However, to do this you need to have a good idea of what should be cut and how. If the contours have a complex shape or the end remains open, you will need a measuring tool.
Most often used for this:
- pencil
- roulette,
- square,
- template for adjusting the panel width,
- template for transferring (copying) contours.
Pencil
Markings are usually done with a pencil or marker. To increase accuracy, it is advisable to take into account the thickness of the lead (rod), and make the marks thin and neat. Moreover, they often have to be redrawn, so you shouldn’t put pressure on the pencil. By the way, for the same reason, a professional installer tries not to use ordinary markers or felt-tip pens.
Useful: markers and felt-tip pens can be easily erased.
Tape measure and square
A tape measure and a square are simple popular tools that are often found around the house. Their features are associated with the manufacturer’s brand and are important only for large volumes of work or in special cases. However, some functions are still quite useful. For example, a clamp for a measuring tape for a tape measure, as well as guides for marking a 45° angle, provided for by the design of the square. However, an amateur tape measure 3-5 meters long and any square, even a school one, will be suitable for home use.
Square.
Note: a rectangular sheet of paper or cardboard, folded diagonally, is quite capable of becoming a square. Moreover, it will allow you to mark not only 90, but also 45°.
Template for adjusting laminate width
Fitting the last row (longitudinal markings and cuts) sometimes causes difficulties, especially for an inexperienced craftsman. Their reasons are the need to take into account the compensation gap, the curvature of the walls, as well as the possible confusion associated with the location of the end locks. The Width Adjustment Template is a laminate tool that eliminates such hassles. It is a rigid ruler about 300 mm long with two moving carriages. One of them is a guide, and the second is a marking one, with a hole for a pencil and a lock.
Template for adjusting the laminate width.
Operating principle:
- The panel is placed face up on the already laid laminate, aligning the edges, and a template is placed on top, perpendicular to the wall.
- The guide carriage is placed against the end of the lamella being processed, and the end of the template is placed against the wall.
- The marking carriage is adjusted taking into account the width of the board and the gap, and then fixed.
- A pencil or marker is inserted into the hole and fixed.
- The template is moved along the board.
- As the template moves, it moves relative to the guide carriage, which moves closer or further from the wall, depending on the curvature.
- Thus, the pencil moves along with the template, exactly copying the line of the wall.
If you don’t have a template at hand or in the store, you can do it without it. But in this case, mistakes, damage to material, and waste of time are likely. To perform this work, the panel is placed face down, pressing it against the wall, taking into account the gap. Then, guided by the edge of the laid row, mark the ends of the board. All that remains is to connect them using a long, even strip or other panel, and then saw off. Before sawing, it is advisable to attach the lamella to the wall, imagining what it will be like after cutting.
Important: an expansion gap of 0.8-1.5 cm wide is required, because the laminate will probably move or swell over time.
Template for copying outlines
Pipes and other elements protruding from the floor greatly complicate the installation of laminate flooring. After all, you need to cut grooves under them, which are not always possible to disguise. But first they need to be marked. This problem is solved using a template for copying contours.
The template consists of two flat slats connected “flat”, but with a gap. The gap is filled with thin plates standing at the ends and capable of moving. The device is also equipped with a plate clamp and a guide beacon, which serves as a guide for transferring lines.
Template for copying contours.
Operating principle:
- The template is placed on the floor, rested against the pipe for which the groove is needed.
- Thin plates are pressed by the pipe, moving out from the reverse side.
- Based on the guiding beacon, a mark is placed on the board.
- Then a template is set using this mark and the outline of the pipe obtained after shifting the plates is traced with a pencil.
There is no complete replacement for this device. Therefore, if the nearest store does not have it, you will have to mark the grooves “by eye”. Sometimes a cardboard or paper template, adjusted “in place” after several attempts, helps.
Please note: special decorative rings placed on the pipe reduce the importance of precise markings.
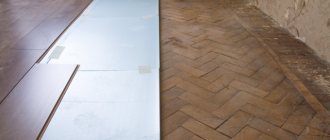
Features of preparatory work
Before you begin laying the substrate and the laminate itself, a number of preparatory work still needs to be done. This is very important for the coating to serve for many years without problems. If you neglect the preparatory stage, then soon the laminate will begin to sag under your feet, creak and deform.
Changes and depressions in the subfloor are the main cause of floor squeaks.
Expert opinion
Afanasyev E.V.
Chief editor of the pol-exp.com project Engineer.
The main requirements for the surface of the subfloor are dryness, evenness, hardness, and cleanliness. All cracks on the concrete base must be sealed and its levelness checked. Using a long (at least 1 m) building level, floor unevenness is monitored. The entire foundation is subject to such scrutiny.
Attention! The permissible curvature of the floor for every 2 m of the base is a maximum of 2 mm.
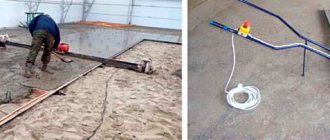
Pre-filling the floor with a self-leveling mixture will help eliminate large unevenness on the concrete base.
Pouring self-leveling floor
Attention! Laminate flooring should be laid on concrete no earlier than 1 month after pouring the concrete screed, if such work has been carried out.
However, if the floor is wooden, then first of all it is checked for strength. The coating should not creak, sag, or have serious defects or irregularities. Additionally, sheets of plywood laid on it and secured with self-tapping screws will help level the wooden floor. Also, the base prepared for laminate must be washed and dried. There should be no debris or dirt on it.
Leveling the floor
Tools for cutting and processing laminate
Sawing, trimming, sawing grooves and drilling boards is perhaps the most time-consuming part of the job. Possible difficulties are associated with those places that will remain open, for example, near pipes or door frames. This is why having cutting tools is so important.
Tools used for laminate processing:
- hacksaw,
- cutter,
- jigsaw,
- a circular saw,
- drills and drills,
- plane.
Hacksaw for laminate
Since the base of the laminate is similar to wood, it can be sawed with a regular hacksaw. However, a saw with a large tooth chips off the laminated layer, spoiling the appearance of the lamella. For this work, a fine-toothed “spike” is used, which has a weak, almost imperceptible set of teeth. The edge is clean, and the wide blade of the hacksaw ensures a straight cut. But low-quality spikes cut hard and quickly become dull, so you need to buy an expensive model.
Hacksaw for laminate (tenoning).
Note: if you get the hang of sawing from the rough side, you can use a hacksaw with a large tooth, for example, a Kremlin saw. It cuts easily and quickly, and leaves almost no chips.
Laminate cutter
There are two modifications of laminate cutters - a “hybrid” of a tile cutter and a guillotine, as well as a “pure” guillotine. The first option is only suitable for cutting panels crosswise, and practically does not deserve attention. But the guillotine does the job easily, naturally, quickly, cleanly and silently.
Laminate cutter.
It is a frame about a meter long, at the end of which a rising wide blade is fixed. There are small teeth along its edge, and a long lever handle is attached to the top. The handle together with the blade is lifted, then the panel is placed and pressed with uniform force. In this way, longitudinal cuts can also be made.
Longitudinal section of a laminate lamella using a cutter.
Useful: a cheap tool quickly becomes dull, and sharpening it is not so easy.
Jigsaw
An electric jigsaw is the most popular tool for sawing any wooden workpieces up to 5 cm thick. It has a compact body with a comfortable handle, a button and a saw attachment mechanism. The file produces translational movements, which is why sawing actually occurs.
Features of working with a jigsaw:
- if the file is new, it performs its function perfectly;
- for figured cutting, use a narrow file with a very fine tooth;
- for a straight cut, you can choose a larger file;
- For laminate, saws with the cutting edge of the teeth in the opposite direction are recommended (the cut is more accurate), but sawing with them is harder than with regular ones.
Modifications of jigsaws are equipped with a pendulum mode, backlight, speed control and other “tricks”. The most useful addition is the pendulum mode. This is a sign of a “professional” device, because it is rarely found on cheap household samples. Its meaning is that the file moves not only up and down, but also a little back and forth. Thus, productivity increases sharply, but cut quality decreases. True, it is turned on by the regulator, so it is not always used.
Please note: the main disadvantage of jigsaws is the narrow blade of the file, which makes it almost impossible to make a perfectly even cut along the entire length.
A circular saw
A hand-held circular saw (“frog”), as well as a floor-mounted “cross-cut saw” are popular carpentry tools. Their operating principle is based on the rotation of a toothed disk covered with a protective casing on top. These units are usually very noisy, and dust from them flies in all directions. Therefore, their design often includes a pipe for connecting a vacuum cleaner. The disadvantages of circular saws also include the impossibility of shaped cuts and high danger. But the cut is as fast as possible, and the cut is perfectly straight and without chips.
Useful: an angle grinder (grinder) with a disk for wood is as effective as a “frog”, but much more dangerous and “dirtier”.
Drill
Drilling into any board or panel is a simple, quick job. When laying laminate flooring, it is required when grooves for pipes or other holes are needed. True, they can be cut out with a jigsaw, but it will take much longer and the result will be worse. In addition, if the markings are made accurately, adjustments after drilling will not be necessary.
You can drill pressed wood fibers with any drill. However, you need to take into account the size of the holes, which can sometimes be significant. Then it is advisable to use a feather or core drill. In any case, the edge is of high quality.
Important: do not forget about the compensation gap near the pipes. Here it is usually 2-5 mm.
Plane
The well-known plane is an optional accessory. However, fitting cut ends is significantly faster and easier when it is at hand. In addition, they can be used to chamfer if the edge is left open, and also to cut off the lock. Sometimes it’s the only thing that interferes with the installation of the panel, and sawing off the lock with a jigsaw or, especially, a circular saw is an extra hassle.
Note: it is much easier to work with a plane at the ends of the lamellas if you periodically change the angle of inclination of the tool.
Tips for choosing a substrate
You should choose a substrate in accordance with your wishes and financial capabilities.
- The thickness of the material should not be less than 2 mm. In general, the optimal substrate thickness is from 2 to 5 mm. This takes into account the thickness of the laminate, the curvature of the subfloor, and the strength of the material.
- If the choice is made in favor of cork, then it is better to stop at sheets of about 2-3 mm. If polyethylene foam is selected, then about 5 mm. It is worth remembering that during operation the substrate will sag in any case.
- Where sound and thermal insulation must be higher, a thicker substrate is used. The main thing is that it is not too thick, otherwise the laminate will sag.
Rules for laying insulation (backing, cushion) under laminate
Laying this material is simple and does not require special knowledge and skills. The underlay is simply rolled out onto a previously prepared floor; the edges can be joined together using tape.
Laying underlay under laminate
Attention! The substrate cannot be laid in several layers. This will damage the laminate.
Tools for installing laminate slats
The complexity of installation depends, first of all, on the quality of the material. Ideally, the boards should be assembled without using the “impact” technique - inserted at the desired angle, lowered, pressed down. If everything is done correctly, installation of even inexpensive samples requires almost no hammer.
However, it is worth preparing the whole set:
- plastic wedges,
- clamp for laying laminate flooring,
- mounting bracket,
- hammer (mallet),
- impact block.
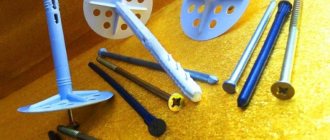
Plastic wedges
Wedges are spacers between the laminate and the wall, the thickness of which determines the width of the compensation gap. They can be factory-made plastic or homemade from any material, the same trim panels, for example. But factory products are still more convenient. After all, their shape allows you to quickly change the gap, and they themselves do not fall out or move.
Clamp for laying laminate
Clamps in this case are devices designed to seal panel joints. They come in different forms, but two popular modifications are those with suction cups and those with belts. The first option is used by “gluing” suction cups to the second or third row from the wall, inserting a stop into the gap and tightening the rows.
Clamp for laying laminate flooring.
A clamp with straps resembles a regular winch. There are stops at both ends of the belt, and between them there is a tightening mechanism. By installing several of these devices, you can firmly compact the entire laid coating. Thus, cracks in the joints will be practically eliminated.
Clamp with straps for laying laminate flooring.
Mounting bracket
A bracket is also sometimes called a clamp, although the principle of operation is completely different. This is simply a Z-shaped steel plate, one bend of which is inserted into the gap, and the second is hit with a hammer. Thus, the joint closest to the wall (longitudinal or transverse) is efficiently sealed. Advantages of the bracket: compactness, simplicity, efficiency, speed of use.
Bracket for laying laminate flooring.
Impact block
The impact block is a compact device that allows you to strike the laminate from the end without leaving damage. Its edge, which connects to the panel lock, is partially similar in design, so the pressure is evenly distributed. These bars are made from hard wood or durable plastic. A homemade replacement is a piece of lamella, the shape of which fully or partially corresponds to the place where it is applied.
Impact block for laminate flooring.
Important: the use of clamps, staples, crowbars and bars contributes to damage to the locks of the laid panels. After all, they transmit significant but poorly controlled pressure.
Hammer
The well-known hammer is a useful universal tool. Of course, you shouldn’t hit the lamellas with them, but you can use spacers, bars, etc. The mallet is not very convenient here - because of its massive shape. But an accidental blow will most likely leave no damage.
If you need to install laminate flooring only in your home or apartment, then it is advisable to purchase a set of tools for laying laminate flooring. This kit typically includes spacer wedges and a mounting bracket. In most cases, these tools are quite sufficient. The remaining tools are more interesting for professional installers.
Consumables
In addition to the tools for assembling the laminate, it is necessary to purchase building materials:
- dense polyethylene - as a waterproofing material;
- ordinary tape for fastening the joints of individual sheets or rolled strips of backing material - to prevent the backing from sliding during laying of the laminated coating;
- underlay material under the laminated floor - for thermal insulation, sound absorption and leveling of minor unevenness of the base surface;
- laminated panels in the required quantity.
Tools for installing skirting boards
The material from which the walls and partitions are built determines the tools necessary for installing the plinth. In a wooden house, for example, you can do it with self-tapping screws and a screwdriver. In most cases, you have to drill (drill) holes in the walls. Therefore, to install the plinth you will need:
- hammer drill or impact drill (screwdriver) for drilling,
- screwdriver for screwing in screws,
- hacksaw for metal.
A vacuum cleaner will also come in handy, because the debris generated as a result of drilling remains inside the baseboard. You can, of course, wash it out with a rag or sweep it with a broom, but a vacuum cleaner is much more convenient and productive. A tape measure and a knife are practically not needed, because it is better to cut the baseboard with a hacksaw, and measure locally.
Rotary hammer or impact drill
No matter how great the desire to save money, an impact drill is not an alternative to a hammer drill. It will help out when you need one or two holes in brick or plaster. But it’s a completely different matter if you need many holes in concrete.
An expensive branded impact drill, theoretically, will do the job. However, it is better to take care of such a tool by renting, for example, a hammer drill. The performance of the device depends on the class and power, but this work will not overload it. Therefore, by controlling the heating, you can use a regular household model.
Installation of baseboards.
Concrete drills for hammer drills (drills) can vary greatly in length, diameter, and tip appearance. However, the rule here is simple - the drill must match the dowel. That is, match its diameter, but be a little longer. For example, for a 6*40 mm dowel-nail, a 6*110 mm drill is used. Its working length is 50-60 mm, and the rest is the shank. By the way, the drill shank is chosen based on the model of the hammer drill. The most popular shank type is “SDS+”.
Important: drills often “burn out” when they come into contact with reinforced concrete reinforcement. Therefore, if there is a feeling that the deepening has stopped, you need to start drilling a new hole or try to change the inclination of the drill.
Screwdriver
Installing skirting boards is a job that does not require much effort from a screwdriver. Sometimes, if you use dowels and nails rather than screws, there is nothing to tighten at all. In such a situation, even a simple screwdriver, taken just in case, will help out. A cordless screwdriver is obviously more convenient.
Fastening the baseboard with a screwdriver.
If you notice an error, a non-working video or link, please select a piece of text and press Ctrl+Enter .
0
Feather drills
They are used for precise and accurate drilling in the manufacture of holes in laminate intended for heating drains or laying other utilities, including water supply. The holes need to be made 4-6 millimeters larger than the cross-section of the laid pipes.
Thus, almost all the auxiliary tools necessary for installing the laminate can be easily replaced with a more convenient and less expensive analogue that does not affect the quality of the assembly work.
Stationery or construction knife
A stationery knife is considered a universal type of tool for flooring, as it is suitable for cutting various materials:
- Usually it is used to cut the substrate and remove excess.
- It is convenient for them to open packages containing building materials.
- Sometimes a construction knife is used to cut the laminate, ensuring precise cutting several times along the marking line.
It is acceptable to leave a few millimeters of thickness, carefully breaking the lamella.
Drill
Using a drill, holes are formed for self-tapping screws in a situation where the base is planned to be formed from plywood sheets. This tool will come in handy when installing skirting boards and thresholds.
When laying and replacing flooring with your own hands, a drill is often used to form neat holes for pipe structures and communications. It is optimal to use feather drills and a crown attachment.
It must be remembered that the hole formed for the pipe should be 4-7 mm larger than the diameter of the element.
Square
Another laminate tool to ensure the panels are cut correctly is a square. When filing lamellas, it is necessary to accurately apply the markings. The cutting line should be perpendicular to the border. The square makes it possible to draw it strictly at a right angle.
A tool with a length of 25 to 35 cm is optimally suited for work. It is advisable to choose a product with a special stop, as it increases the convenience of work. It is recommended to purchase the option with the ability to change the angle if you need to get an accurate measurement of the adjacent walls and transfer it to the panel.
Tapping laminate flooring against a wall using special tools
Jigsaw
Equipment for installing and replacing laminate must include a jigsaw or hacksaw. Using a jigsaw, panels are cut, holes are cut and various bends are formed.
Working with such a tool is simple and convenient, as it allows you to create neat and straight cuts.
It is optimal to choose a tool with a power of 500 W, giving preference to the middle price segment. A cheap option can quickly break due to the load. You definitely need to purchase a set of files.
Let's summarize:
We, in principle, have presented to you all the tools that you need to lay laminate flooring with your own hands and for what specific work. As you have seen for yourself, most of the tools are already in your home. There is no difference, whether you have at least part of the basic tools or the entire set, the quality of the finished floor covering in your home will not change. Any tool can be replaced with anything at hand, the main thing is to approach the matter with great care.
Think for yourself: will the quality of the saw change if you use an ordinary saw instead of a jigsaw? I think your answer is no. This will only affect the time spent.
The video in this article will help you gain more information on this topic.
Tamping block
It is needed in order to soften the impact with which the panels are driven into each other at their ends.
The block is made from special soft plastic, although wooden samples are often found in sets. Note that a plastic block is better. It is softer, so chips do not form at the ends of the laminate.
There is exactly the same tool in the parquet set, only it is a little larger. Let us add that the block has very even ends that fit tightly to the ends of the laminate panels. If the tool is not completely straight, then it is no longer worth working with it.
How to prepare the surface
The initial stage of work on laying a laminated board floor comes down to preparing the subfloor. It is worth taking this work as responsibly as possible; the quality of the future floor covering depends on it.
To prepare the surface you need:
- Remove old thresholds and baseboards.
- If necessary, trim the door frame.
- Level the subfloor.
- Eliminate defects in the old floor.
- In the case of a concrete screed, prime the surface.
- Clean the surface.
- Remove excess moisture.