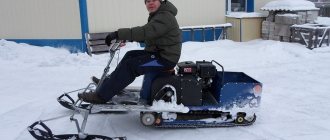
For many years, buying a bike has been every man's dream. Traveling on a two-wheeled beast with the ability to reach incredible speeds, enjoying the whistling of the wind and the cars flashing past, is truly an amazing experience. And if such a vehicle provides its owner with maximum safety and driving comfort, then the upcoming ride will be not only exciting, but also enjoyable.
Every motorcyclist must understand that his new “friend” needs appropriate maintenance, which consists of diagnosing and removing all kinds of faults. And in order to successfully carry out repair work at home, you need to equip your workshop with such a device as a motorcycle underride.
Using a motorcycle stand
Currently, rolling under a motorcycle is a very important attribute in the life of every motorcyclist. Such a solution should be present in every workshop, both at home and in a specialized one, where complex work is carried out. With the help of a tackle, you can carry out comprehensive maintenance and repair of your bike. In addition, such a device can become indispensable when repairing a car. As for two-wheeled vehicles, it is used when it is necessary to lift the rear part to replace disks or tires, or when repairing the cooling radiator. If you intend to repair the motorcycle yourself, be careful when choosing the appropriate model of stand.
Given the presence of movable wheels, such structures can be freely moved around the workshop, placing them in a specific place. As for the invention itself, it is a special type of motorcycle lift, but unlike classic models, there is no work table. Due to its compact dimensions, the roller is suitable for small chambers where a motorcycle is placed for painting or drying. The service life is practically unlimited, and no special maintenance is required.
Motorcycle lifts come in two main types, depending on the part of the vehicle that will be repaired. Based on this, a tackle occurs:
- rear;
- in front of him.
In most cases, representatives of the second category are supplied with a unique stand and a special adapter that allows you to hang the wheel and carry out a number of repair work.
Motorcycle tackle.
A motorcycle stand is a must-have tool in your garage, especially if your bike doesn't have a factory center stand. It allows you to easily lift both the rear part of the motorcycle and the front part and then calmly carry out maintenance of the bike. This article will look in detail at how, in a garage, you can make a homemade tackle for your bike, which will be no worse than expensive branded products from famous manufacturers.
A motorcycle tube from factory manufacturers can cost $100 - $200, and many motorcyclists probably thought that it was not worth paying that kind of money for several pipes welded together. After all, a homemade rolling device is not at all difficult to make with your own hands, and from what can be found in garage trash.
There are different types of tackles for motorcycles, and the design and dimensions of some devices may differ slightly, depending on the diameter of the motorcycle wheels and its dimensions. But the principle of operation and design of most factory products is quite simple and almost the same.
To properly make a tackle for your motorcycle, you first need to take some measurements on your bike (which measurements and what will be described below), then prepare the material and tools (which will also be described during the work process), and all that remains is to start...
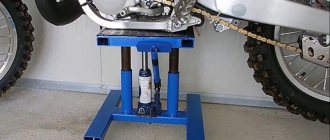
Do-it-yourself motorcycle mount (for the rear of the bike).
The simplest tackle (for example, like in the photo above) can be made from a thick-walled round pipe. However, such a product will require a pipe bender and pipe bending skills, but not everyone has a pipe bender. Secondly, such tackles do not have sufficient rigidity, especially if the motorcycle is quite heavy (for example, a cruiser).
Therefore, it is much easier to use a profile pipe, which will not need to be bent when making a roll, but you will simply need to cut the required sections of pipe with an angle grinder, and then weld them together using a welding machine, which will be described below.
So, first you should prepare the most common material - a profile pipe, since it is quite rigid, despite its low weight and small wall thickness. And a pipe measuring 40x20x3, or 45x25x3 is quite suitable. If you have a rather heavy motorcycle (for example, a cruiser), then I advise you to look at metal warehouses (or scrap metal) for a pipe with a wall thickness of not 3 mm, but 4 mm, or even 5 mm. This will result in a slightly heavier structure, but it will be stiffer and more reliable.
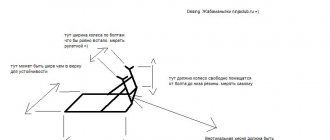
Trolley for a motorcycle - drawing 1 - distance equal to the distance from the rear axle of the wheel to the ground, 2 - distance equal to approximately 70 - 80 mm, 3 - distance equal to the width of the rear part of the pendulum, 4 - distance also equal to the width of the rear part of the pendulum.
How many pipes will be needed can be found out if you measure with a tape measure the distances shown in Figure 1. As can be seen from the figure, we need to know only 4 main distances, which I marked in the figure with the numbers 1,2,3,4. First, we measure distance 1 for the pipes, which will be equal to the distance from the axis of your rear wheel to the surface of the floor in the garage.
Just take into account that the pipes marked in the figure with red arrows will be welded to the structure at an angle of approximately 70 - 80 degrees from the floor surface, which means these pipes are cut approximately 10 cm longer than distance 1 shown in the figure.
If the pipes, marked in the figure with red arrows, are welded evenly (that is, not at an angle of 70 - 80º, but 90º to the floor surface), then such a tackle will always try to lower the motorcycle on its own, after you stop pressing the lever. I hope this is clear, let's move on.
And then we measure the distance marked in the figure with number 2, it is for the longest pipes, which will act as a lever when lifting your bike. The length of these pipes is approximately 70 - 80 cm, and the longer it is, the easier it will be to lift the back of your motorcycle off the floor (the heavier the bike, the greater this distance). But lever pipes that are too long are also bad, optimal as mentioned earlier, that is, 70 - 80 cm.
When taking measurements, it is convenient for beginners to use both a tape measure and pieces of wooden slats (preferably thick wire - something like a wire template), which allow them to more clearly see the picture of the future tackle. Next, you should measure distances 3 and 4 for the transverse pipes that will connect the longitudinal pipes. These distances (marked in the figure as numbers 3 and 4) are equal to the width of the rear part of the swingarm of your motorcycle, in the area of the rear wheel axis.
Well, all that remains is to measure the length for the reinforcing pipes (acting as gussets) which are marked in the figure with green arrows. You can, of course, do without these reinforcing pipes, as shown in the photo at the beginning of the simplest tackle, but it is still better to use them, especially if you have a motorcycle of considerable size and weight. The length of the reinforcing pipes is selected locally, that is, when the main pipes (longitudinal and transverse) are welded together.
And also, the pieces of pipes, marked in the picture above with blue arrows, will make the roll more beautiful (with smooth angles) and besides, they will allow you to lift the bike more smoothly (the length of these pipes is only 8 - 10 cm). However, if you don’t want to cut and weld additional inserts from pipes, you can make a motorcycle trolley with sharp corners in the area of the wheels (as in the photo) and this option is also quite workable, despite the fact that it is easier to manufacture (by the way, this the same option is shown in the video below the article).
After measuring the distances, pieces of pipes of the required length (10 pieces of pipes in total, or 8 in total if a roll with sharp corners in the area of the wheels is made), then you should grind off the chamfers on the ends of all the pipes with an angle grinder for a better weld, and then grab all the pipes electric welding. Then we check all the pipes for parallelism and if everything is clear, we finally weld the pipes together.
Various options for rolling stops both for the pendulum of motorcycles and for wheel axles, made of steel sheet, steel rod, angle, channel, etc.
The last two parts that will need to be welded to the vertically inclined trolley pipes (those that are welded at 70 - 80) are stops for the pendulum, and options for different stops, both for the pendulum and for the axles of the motorcycle wheels, are shown in the photo. Moreover, it is advisable to make the stops removable and different - this will expand the capabilities of your homemade tackle.
The stops can be made from a channel of suitable width (if the pendulum has a square profile), or you can cut them from a corner, a round pipe, if the pendulum of your bike is made of a round pipe.
Also quite workable is the option of stops made of sheet steel or a steel rod (they are in the photo) not for the pendulum or fork, but for the axles of the motorcycle wheels. Also, a version of the sheet steel stop is shown in the top photo, at the beginning of this article.
After welding or securing the stops for the pendulum, all that remains is to weld the axles for the wheels, which can be bought on the construction market. But I recommend using rubber skateboard wheels (you can look for them in sports stores); these wheels have normal bearings designed for decent weight, and their diameter is very small.
Ears for the axles of the rolling wheels are cut out of sheet steel and welded to the pipes.
The axles for the wheels should be ordered by a turner, and the thickness of the axles (outer diameter) is equal to the diameter of the inner race of the bearings installed in the wheels. The axles can simply be welded to the pipes, but it is much more reliable to cut out special triangular ears for the axles (as in the photo on the left), which are then welded to the pipes (a total of 4 ears are needed).
All that remains is to grind the welds, degrease, prime and paint your motorcycle tackle, and after the paint has dried, install the wheels and glue pieces of sheet rubber (approximately 4 - 6 mm thick) into the stops for the pendulum.
Universal tackle for motorcycle.
It is advisable to make such a tackle for those motorcyclists who have not one, but two or more motorcycles, or for those people who want to start their own motorcycle service. As you can see from the photo below, such a tackle has a design that allows you to change the width and height of the stops for the pendulum, thereby making it possible to service different motorcycles (with different widths of pendulums and with different distances of the rear wheel axis from the ground).
The motorcycle tackle is universal, that is, with height and width adjustable stops for the pendulum and adjustable width (thanks to pipe 5).
The design of such a universal jack is clearly visible in the photo and this jack differs from the one described above in that it is possible to extend movable stops on it (depending on the distance of the axis of the rear wheel of the motorcycle from the ground), and also thanks to pipe 5 you can change the width of the jack, depending on on the width of the motorcycle's pendulum (note that the stops for the pendulum themselves can be adjusted not only in height, but also in width, and after setting the desired width, they can only be tightened with wing screws).
Such a roll is made from square pipes, and for some pipe parts, which I indicated in the photo with red arrows, you should select square pipes that would be slightly narrower and would be inserted into the pipes (which are indicated by red arrows) without large gaps (it is desirable that the gap between telescopic pipe connections was no more than 1 mm).
Also, holes are drilled at the ends of the pipes of the parts indicated by the red arrows, then nuts are welded to the holes and wing screws are screwed into the nuts, which will clamp the movable stops (and also clamp pipe 5, which allows you to change the width of the roll, welded to the same pipe handle for lifting a motorcycle).
You don’t have to weld the nuts, but simply drill a series of through holes (as in the photo, in both pipes of the telescopic connection) and then, to adjust the lifting height of the stops (and the width of the slide), simply rearrange the through pins inserted into the holes drilled in the pipes.
The photo of a universal motorcycle stand shows the option of using both pins (to change the height of the stops) and wing screws (to change the width of the stand). The version with pins can withstand greater loads than the version with wing bolts, but the version with bolts allows you to change the height of the stops and the width of the tackle literally every millimeter. Which option for fixing the retractable pipes to choose is up to everyone to decide for themselves, but of course both options are workable.
The dimensions of all pipes are measured based on the dimensions of a motorcycle (average value) and then retractable pendulum stops are made with a length of square pipes of 20 - 25 cm (those pipes that will move and be clamped with wing screws). This length of retractable pipes with stops allows servicing almost all production motorcycles.
Well, the width of the pipe number 5 is made approximately twice as wide as the width of the swingarm of a standard motorcycle. This allows you to expand the width of this universal mount to fit almost any bike (more precisely, to fit a swingarm of any width).
A motorcycle jack for lifting its front end.
The only minor difference in the mount for the front of the motorcycle is that the stops are made not for the pendulum, but for the front fork of the motorcycle.
However, if we make a universal trolley, as described above, then the stops for the rear pendulum are simply pulled out of the trolley tubes (after unscrewing the wing screws and freeing the stop tubes) and then we make stops for the front fork and insert them instead of the stops for the pendulum.
As a result, we get a tackle for both the rear of the motorcycle and the front.
But of course, this is far from the only design of the front trolley; if you have the desire and a little more material (pipe), you can make a trolley with a stop that will rest not on the fork stays, but on the lower crossmember. This version of the tackle for lifting the front part of the motorcycle (by the lower crossbar) is shown in the photo on the left.
Moreover, a special pin is welded to the stop of the front part, which is inserted into the hole in the rod of the lower yoke, and thus the stop is securely fixed under the lower yoke of the motorcycle fork.
Of course, everyone decides for themselves which version of the motorcycle mount to choose and make, based on their capabilities and the availability of tools and materials.
If this article is useful to you, please share it on social media. networks by clicking the buttons below. Thank you.
RќСЂР°РІРёС‚СЃСЏ
Using a lift to repair a fork
It's no secret that a front lift is a useful tool for rebuilding a fork. You need to understand that existing adapters have different diameters , so you need to choose the right solution for a specific motorcycle. The front roll can be used to store the machine in winter. The design is particularly easy to use and does not require additional maintenance. As for operation, it is not at all difficult. It is enough to follow some rules and step-by-step guidance.
Tackles for the rear wheel, for example, L-shaped, are made in the form of an adjustable product, which is equipped with a comfortable handle. It can move along the surface due to movable wheels. The presence of clamps helps to hold the wheel on all sides.
When choosing the appropriate option, pay attention to the width of the clamp . It is determined by the width of the wheel. Such a roll will become an indispensable solution for workshops and repair services, where it is necessary to withstand loads of up to 300 kg, distributing the weight throughout the entire structure. Using this device, you can quickly lubricate the chain or replace it with a new one. You will also be able to hang the bike in such a way that the suspension receives maximum unloading.
Buying a factory model
Before deciding on a specific model, consider the manufacturer’s popularity and consumer trust in it. It is important to give preference to those offers that have appropriate quality guarantees and accompanying certificates.
It is no secret that all factory products are pre-tested for suitability for further use, which ensures maximum safety, both for the motorcyclist and his two-wheeled “beast”. A good tackle must have a GOST certificate.
As for affordable domestically produced products, in most cases they are quite high quality , but with imported models the situation looks completely different. Cheap lifts do not always cope with their responsibilities and are not suitable for full repairs. The wrong approach to choosing the right model can lead to great danger, creating an emergency situation or scratching the vehicle.
Offers from trusted companies are characterized by excellent performance properties and increased reliability. Such devices are purchased by professional motorcyclists who value their own safety and the safety of their iron “friend.”
In addition, self-respecting brands try to keep up with the times, so they constantly introduce advanced technologies in new developments , trying to improve existing products. Due to high competition in the production of new lifts, interesting offers are constantly coming on sale. Many of them are truly reliable and convenient and surpass previous developments in functionality and other characteristics.
A reverse handle is supplied with the tackle. A properly made product does not require complex maintenance, and it can be installed with the efforts of one worker. Transportation around the workshop is very simple, and the reliability of fixing the vehicle is maximum. Due to these advantages, the tackle allows you to successfully lift the rear part, protecting the car or motorcycle from an unexpected fall.
Factory inventions are professional equipment with many advantages. Let's highlight the most important ones:
- Such models are actively used by professional racers and motorcyclists;
- They are characterized by ideal geometry and versatility;
- The factory-made trolley comes with a handle that allows you to operate it without the help of third parties;
- Such devices are placed under pendulums or sliders;
- Lifts from stores have special regulatory elements that allow you to change the configuration of width and length;
The main advantage of tackles is their ideal geometry. But it is this parameter that determines the reliability and correctness of the bike’s fixation.
Models for two wheels are practically no different from each other. When choosing such a solution, you should pay attention only to reliability and ease of use.
Many people prefer purchased models of motorcycle lifts, because there are a huge variety of them on the market. However, others try to make a tackle with their own hands, because its cost is quite high. If you belong to the first group, carefully consider all the characteristics of your upcoming purchase when purchasing a suitable solution for the rear or front wheel. If you don’t see anything difficult in trying to complete the design yourself, be prepared to devote the necessary time and attention to the upcoming operations.
Selecting a Factory Lift
The first thing you should pay attention to when choosing a stand in a store is the manufacturer of the device. The manufacturer must certify its product and provide all quality guarantees for the device. Factory lifts undergo a series of safety and operational tests. Branded products must comply with GOST standards. Good expensive lifts are made from quality materials using modern technologies. Therefore, it is very important to choose the right model.
The motorcycle lift industry is evolving along with technological progress. New production technologies are emerging, new materials for manufacturing are being developed. Competition among manufacturers leads to the emergence of more functional and easier-to-use devices.
Branded tires are increasingly being used by professional riders around the world. The presence of a large number of additional accessories can significantly expand the capabilities of these devices and simplify their work. A modern lift can be operated by one person and allows you to lift a heavy rear end, securing it securely.
Existing types of tackles
As mentioned above, in the relevant stores you can find a wide variety of tackles for a vehicle such as a motorcycle. They are divided into several groups , having different operational properties, operating principles and prices. In order not to make a mistake in choosing the appropriate model, you need to study existing classifications in advance and review the list of popular offers.
Among the most common types of motorcycle tackles, the platform version occupies a leading place. It is characterized by special compactness, which expands its scope of use. Hydraulic inventions are necessary for repair work or maintenance of touring class bikes with large mass and dimensions. Such a solution is rolled under the motorcycle frame or engine compartment, and the use of a hydraulic drive helps raise the vehicle to a specific height.
The presence of such features gives the specialist access to all important components and parts of the motorcycle, which is necessary for successful comprehensive repairs. With the help of a good rolling tool, you can manipulate wheels, repair the chassis, and also carry out full diagnostics. In addition, lifting mechanisms are indispensable for machines of any class. Due to the presence of special adjusting screws, the motorcycle is fixed as securely as possible. In this case, the worker can adjust it according to the height and width of the device, leaving the working area free for further repairs from any side. A properly executed design allows you to get to the right place without much difficulty.
Features of creating a homemade lift
Currently, the motorcycle lift market is filled with many different offers. However, due to the high price, not every motorcyclist can afford such a purchase. In addition, choosing the right option for your “beast” is not as easy as it seems.
And although some brands produce universal versions, their fixing elements do not fit all pendulums. Because of these features, many motorcyclists try to make a tackle with their own hands. A high-quality model is capable of lifting a motorcycle and locking it in a specific position. In this case, any costs will be reduced to a minimum.
If you have at least the basic skills and know how to handle some tools, this will allow you to complete the work ahead in the shortest possible time. In this case, you can create equipment that fits the size of your iron horse .
To successfully do everything yourself, be patient. It is no secret that such an action requires a lot of patience and time, so if you are not ready to sacrifice several hours to assemble all the parts, then simply do not start the work.
Step by step guide
- You can use a variety of methods to lift the rear wheel of a motorcycle. One lifts it with a bushing placed in the rear wheel, allowing the chain to be changed or lubricated quickly and efficiently. The following method is suitable for cases where the bushings have threads for fastening to the pendulum. Here it is especially convenient to unscrew the wheel to change tires.
- When making the frame, it is necessary to use welding equipment. If you don't have one or don't know how to handle it, ask an experienced welder for help. At this stage, you should weld the bushings and then calculate the angles. Take into account such a parameter as the alignment of the roll. If it is not correct enough, you will have to start the action from scratch.
- If you have successfully built a homemade lift by following the established instructions and using only the appropriate materials and tools, it will likely have increased reliability, safety, and performance.
Every motorcycle owner wants to look after his “friend” in a special way, well and carefully. For this purpose, he is ready to take any measures to ensure that the iron horse works without failures.
Making a good motorcycle tackle at home is much easier than you might imagine. This solution will become an indispensable assistant in vehicle maintenance and repair, increasing driver safety while driving.
DIY making
A branded factory tool is a good and convenient tool for motorcycle repair. But the prices for such devices are quite high. It will also be quite difficult to choose a stand for a specific motorcycle model. Many companies offer universal stools. But, as practice shows, a universal tackle does not always have functions for a specific motorcycle.
In this case, you can make a motorized scooter with your own hands using drawings found on the Internet. A homemade lift can be perfectly adjusted to the size of your bike. It is quite simple to make, but it requires a lot of time and great care, since it must have ideal geometry. Otherwise, working with it will be quite problematic.
There are two ways to lift a motorcycle by the rear wheel. In the first case, lifting is carried out using a bushing installed in the wheel axle. In this position it is convenient to work with the chain.
In the second option, threads are made on the bushings and they are attached to the pendulum. In this position it is convenient to change wheels. When making the central frame of the tackle, you will need the help of a welder. All corners must be perfectly measured and welded securely. After all, safety and convenience during work depend on the accuracy of measurements and the quality of welding.
In conclusion, I would like to say that if possible, it is better to purchase a good branded option. If you are limited on money, then it is quite easy to make a motorcycle lift with your own hands. Drawings can be easily found on the Internet. A high-quality tackle will be an indispensable assistant in the repair and maintenance of your favorite bike.