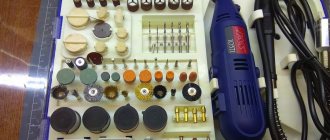
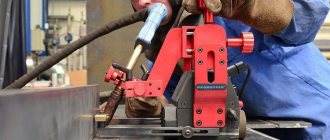
A screwdriver and a drill are those universal tools that every self-respecting craftsman should have in his work kit. For the first, the main purpose is to screw in fasteners, and for the second, to drill holes. It is worth noting that both of these devices can, in some cases, completely replace each other: a striking example here is the fact that both a drill and a screwdriver can be used for stirring adhesive construction substances. And to increase their functionality, it is possible to install all kinds of adapters on them, which include angle attachments.
Drill Guide Features
The drill stand has several important characteristics:
- Vertical stroke (how far the tool can be moved vertically).
- The diameter of the fixing flange (determines what size tool can be clamped).
- Material.
- Size and weight of the device.
Drilling stands can be mobile or stationary. The stationary guides are very reminiscent of a small drill press, they look like a tripod for a drill. Mobile guides are attachments for drilling tools. Their main advantage is their very high mobility.
An important property of the rack is the method of fastening. The most reliable option is a magnetic mount. There is also a simpler option - this is a vacuum mount.
Mobile devices fit comfortably in your hands and absorb vibration when drilling. Most people choose mobile guides. All thanks to their excellent characteristics. They are very reliable, compact and have a low price.
The rating of the best models is represented by the following tools:
Tecmobit Wolfcraft
“Caliber 96302“. An excellent budget model. It has good quality and low price. The attachment consists of two chromed metal rods and a plastic base. The device also has a special device for fixing the tool. The caliber has proven itself to be an inexpensive and reliable tool.
Caliber 96302
The Chinese model “KWB 7784“ has long been a leader. The design of this device is similar to the Russian Caliber. Consumer opinion about it is mixed. Some consumers comment on the short service life of the device and its breakdowns. The height of the device is small, only 213 mm. It has a vertical stroke of 160 mm and a tool hole diameter of 43 mm. The weight of the device is a little more than a kilogram.
KWB brand products
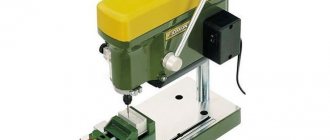
Stand DIOLD SMS-43. It consists of a base, a column and a clamp for attaching an electric drill. The base has grooves for a vice. It has a height of 500 mm and a drill hole diameter of 43 mm.
Please note the following manufacturers:
- Dremel is a company that produces machines for drills. With their help you can drill at an angle, polish and grind materials.
- Sparta – Stationary racks. Important advantages are the high quality and smooth movement of the drill.
- Skrab – Often used at home and small workshops. An excellent device for its very modest price.
And these are only the most basic vertical devices for drills; besides them, there are many more well-known and not so well-known ones.
Racks
To accurately drill the necessary holes in various materials, special stands or guide attachments are used, which can be purchased in stores - they ensure vertical movement of the drill clamped in a special basket. Their compactness, smooth operation and accurate metric scale make them attractive for equipping a small workshop, where a home craftsman can accurately drill any holes, even in round objects.
A small vice with a clamped workpiece can be installed anywhere on the bed and secured tightly, thanks to the grooves cut into the base.
Required Parts
Any drill stand, regardless of its dimensions and taking into account the purpose of such devices, has basic structural elements, each of which performs its own functions and must meet certain requirements.
- The bed is one of the main components of the described equipment, which is its base (stand) and ensures the stability of the entire structure. In addition, a vice is located on the bed for fixing the workpieces being processed. The weight and dimensions of this element depend on the power of the tool used and the list of tasks performed.
- A guide post, which is positioned strictly vertically in relation to the base. Even with a slight deviation, the workpiece being processed can be damaged and the drill or cutter can be broken. Depending on the design features of a particular model, this part can be made of different materials.
- Movement mechanism. There are no strict requirements for the design of this node; templates are not applied. Its main task is to ensure smooth movement, secured with brackets or clamps of the drilling tool along the tripod. There are many variations of such mechanisms.
- Holder for equipment (drill, hammer drill, screwdriver). Clamps, blocks and other mounting elements are used as effective fastening.
Stops
This type of device is the most widely represented and has many interpretations.
- Drilling limiter. On the auxiliary handle for an electric drill there is a metal rod with metric divisions - this is a limiter that rests against a wall or workpiece and prevents the drill from penetrating to a greater depth.
- Parallel exposure. This device is more advanced - it can control the depth of the future hole and the correct location of the tool, and is used for perpendicular drilling during construction. There are models where dust is simultaneously removed using a connected vacuum cleaner. The attachment can be made in conjunction with an additional handle, which is installed on impact drills intended for long-term use in construction.
Mechanism for moving the drill in the vertical direction
A homemade drilling machine must be equipped with a mechanism that will ensure the movement of the drill in the vertical direction. The structural elements of such a unit are:
- a handle with which the carriage with a drill attached to it is brought to the surface of the workpiece;
- a spring necessary to return the carriage with the drill to its original position.
Spring mechanism for moving the drill
You can make such a mechanism using two design schemes:
- the spring is connected directly to the handle of the machine;
- the springs are located at the bottom of the carriage - in special grooves.
According to the first option, the design is carried out according to the following scheme:
- two metal plates are fixed on the machine stand using screws, between which an axis is installed, where the installation handle will be placed;
- on the other side of the rack, plates and an axis are also installed, on which one end of the spring is fixed, and its second end is connected to the handle;
- the pin with which the handle is connected to the installation carriage is placed in a longitudinal groove made in it.
The basis was an old stand from a Crocus photo enlarger made in Poland
If the springs are located at the bottom of the return mechanism, then the handle of the device is also fixed using two plates and an axis that ensures its movement. With this design, the springs are located in the lower part of the guide grooves, which are modified using metal corners that limit their movement.
The principle of operation of a drilling machine, in which the springs are located at the bottom of the carriage, is quite simple: moving down during the drilling process, the carriage with the drill attached to it presses on the springs, compressing them; after the mechanical impact on the springs stops, they unclench, lifting the carriage and drill to their original position.
Woodworking
A drill can be used not only for drilling and as a mixer; once you attach a special device to it, it turns into an original machine or jigsaw for wood.
Lathe
What home craftsman doesn’t dream of owning his own mini woodworking machine, but such devices are very expensive. There is a way out - these are unique attachments for hand drills, which have different designs and the appropriate tool for the job. These devices are not suitable for the serial production of carved balusters and coffee table legs, but it would be advisable to use them in a country house or country house.
The design of the turning attachment for the drill is very simple and compact; any user can do it - all you need is desire and leisurely action.
Jigsaw
It’s hard to believe that you can make a jigsaw from an electric drill; they are quite different tools in their design, but nothing is impossible in the world. A designer was found who invented an attachment that converts the rotation of the drill into the reciprocating motion of a saw on wood. Now you can use a drill to cut boards of various thicknesses, and lovers of filigree woodwork can use a jigsaw to cut unique patterns from multi-layer plywood.
Features of self-production
When designing a conductor for confirmation, it is necessary to correctly calculate what functions it will have to perform in the future. It should be done for the most commonly used fasteners in the house. If such a device is required by furniture makers for constant work, then it is better to buy a factory model, which is distinguished by great precision. In addition, manufacturers often include additional fasteners, stops and templates in the kit.
The price of such a device for professional use ranges from 400 to 1100 rubles. It depends on the immediate capabilities of a particular unit, the number of holes made, their length, etc. Many people are interested in how to make a furniture jig with their own hands. Drawings with dimensions are a must for novice craftsmen, as they allow you to make a high-quality design on the first try. Similar diagrams can be found on the Internet.
Basically, the conductor has the following elements:
- The basis of the product. It is directly applied to the plane of the furniture, on which the holes will be drilled.
- Guide bushings. A drill goes through them.
- Surface clamping parts. As a rule, they are located at the end of the conductor.
Next you need to take care of the correct direction of the sleeve. It can be made from stainless pipe. The length of the sleeve should be at least twice as long as the hole in which it will be located on the angle. The bushing should fit tightly in the hole. The simplest and most common option is a shaft-type landing. A corresponding hole is drilled in the corner to fit the already known diameter of the bushing, and then the fit is made. It is recommended to use a low interference fit.
There are cases when the jig needs to be made for drilling deep holes. Then the bushing is made with a collar. The number of possible holes, their length and the distance between them is selected to suit the specific needs of each master.
Several options can be used to attach the device:
- Spring support. The conductor will adhere to the material being processed using spring force. For these purposes, you can use any flat spring with the required force.
- Fastening to wood using self-tapping screws. Using this method, the jig is pressed and held on the working surface due to friction. This fastening method allows you to use the resulting marks for subsequent centering of the part. When working with chipboard, you need to use this method with great care.
- Clamps with rubber gaskets. This method is dangerous due to possible displacement of the bushing axis. This happens because the weight of the jig increases and the bushings become bent. Therefore, you must first attach the jig to the surface, mark the future hole, and then start drilling.
Unique sharpener
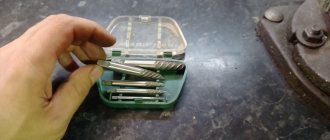
You can install special attachments on the drill for sharpening various tools - it turns into a mini sharpener that can be used for sharpening drills, circular saw blades, chisels, knives and various types of planes. The value of these attachments is that they help significantly save the family budget - the services of professional sharpeners of similar tools, especially drills, are at a fairly high price level.
The design of such attachments allows you to work at different angles, and a cylindrical attachment is used for sharpening drills. To sharpen other tools, special devices are used.
The photo shows an original attachment for sharpening drills of any diameter and a saw dressing machine. Installing various attachments on a drill is not particularly difficult.
Making a machine tripod
The machine will consist of the following parts:
- Bottom part;
- metal vertical guides;
- upper part with cartridge.
Bottom part
It is a board or thick plywood in which we drill two holes for the guides. These holes should be slightly larger in diameter than the guides so that in the future they can be set exactly at 90 degrees.
Metal vertical guides
They are two rods of the same size. They are attached to the bottom of the product using cold welding or epoxy resin.
In order to set them straight at an angle of 90 degrees, you can use a regular wooden block, in which the cuts on both sides should also be straight.
After the glue has completely dried, we make the upper part.
Upper part with chuck
It is made from a bar as follows. We accurately measure three holes on the block, two at the edges, they will be through and one in the center. In the central hole, the depth on both sides will be equal to the width of the bearings, which will be glued with the same glue to the axis of the chuck and the central hole of the upper part of the machine.
We install bushings in the side holes that will move freely along the metal guides, but there should be no play. The bushings must be selected exactly according to the diameter of the guides.
We also glue these bushings so that they are tightly secured and do not fly out.
We take the cartridge and glue the guide to its axis.
We put the guide on the cartridge axis and remove excess glue. The guide should also fit tightly onto the chuck axis. We get the following.
We install a bearing of a pre-selected size on the cartridge tube.
We coat it with glue and install it in the central hole of the upper part of the machine.
On the other side we do the same thing, install the second bearing.
As you can see, the tube is clamped in the cartridge. Instead, you can clamp a drill. It is needed in order to subsequently install the cartridge at an angle of 90 degrees relative to the bottom of the product.
After installing the cartridge and the glue has dried, remove the upper part of the product from the guides and place springs and washers on the metal rods.
Springs can be purchased at any hardware store. Then we put on the top.
You can install plugs on the vertical rods. We cut a hole in the bottom of the product for ease of drilling.
It turns out like this.
Checking the product for accuracy and quality of work
Installs a drill, drills a hole
insert a metal rod or drill of a suitable diameter into it.
We measure with a corner to make a right angle after drilling.
Our expectations and efforts were justified. The machine works accurately. Can be used when performing work.
Result of work
If you liked my article, give it a thumbs up. I hope you find it useful.
Good luck.
Brands
The described equipment is a comfortable and useful addition that provides quick and reliable fixation of drilling tools for performing stationary work with high precision. Taking into account the demand, many manufacturing companies have started producing such devices. All models presented in this market segment differ from each other in design, functions, equipment and cost.
One of the popular brands is Anchor. The company offers consumers high-quality devices for working with tools that have different characteristics (power, weight and body neck diameter).
Sparky brand products are no less in demand
In reviews, owners of this equipment draw attention to the increased stability provided by the presence of a high-quality base plate cast from cast iron
Also, today there are other models of racks in the popularity rating.
- “Caliber” is a reliable and versatile design that transforms a hand-held drilling tool into a compact, stationary machine.
- Dremel is a device characterized by functionality, long service life and affordable cost. These models allow for vertical drilling, drilling holes at an angle, polishing and grinding materials in a horizontal plane.
- Sparta – stands that turn both drills and screwdrivers into stationary devices. The main advantages include the presence of a high-quality mechanism responsible for the smooth and uniform feeding of the fixed tool.
- Skrab is a rotary modification that has become a rational option for use in small workshops, garages and home environments. The design combines strength, durability and affordable cost.
In addition to all of the above, users highlight the Diolod and Artu models. The former are used with equal efficiency in domestic and industrial conditions. Depending on the modification, the diameter of the neck of the tool body, which can be fixed in the holder, varies.
How to make a drilling device with your own hands
Before proceeding directly to the manufacture of the device, it is necessary to determine for what purposes it will be used, and then select the optimal design.
Conductors differ in functionality and type of execution. The following types of devices are most in demand:
- Invoices. The devices are placed on the part to be processed and secured to it using mechanisms or manually. Used for drilling holes in flat products.
- Rotary. The tool is used when it is necessary to make holes in products with a cylindrical cross-section. They have vertical and horizontal rotating axes, allowing drilling at the desired angle.
- Universal. Suitable for small-scale production, allowing for changeover in the shortest possible time.
- Tiltable. They are used in cases where technology requires drilling holes in several planes.
- Sliding. No mounting is required for these devices. The device is simply applied to the desired area of the workpiece.
- Pinned. They are easy to use, but are limited in movement across the surface of the product.
By making your own drilling jig, you can save a fair amount of money for more important needs.
For construction you will need:
- Bulgarian;
- welding machine;
- drill;
- locksmith tools.
The manufacture of the device is carried out in the following sequence:
- A piece of reinforcement with a square section of 10x10 mm is selected.
- A piece of the required length is cut, the edges and edges are cleaned.
- Markings are made for template holes. Their center should be located at least 8 mm from the edge. A distance of at least 32 mm is maintained between the centers of the nearest holes.
- A hole with a diameter of 5 mm is drilled in pre-marked centers.
- To create a stop, you will need a metal plate 1 mm thick and 2.5 mm wide, bent at a right angle.
- A thread is cut in the plate and in the fittings for attaching the clamp.
- Both parts are connected into a single structure.
Having certain skills in handling a simple tool, making a drilling device is not so difficult. For infrequent use in the household, such a device is quite sufficient. If all else fails, then the easiest option is to purchase the device in specialized or construction hypermarkets.