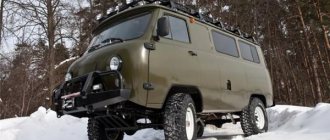
The famous loaf quite often undergoes various upgrades, since it has significant potential for this, and also does not cost the owner that much. Tuning a UAZ 452 with your own hands is quite possible if you approach it responsibly and competently. This is exactly what we will talk about: we will learn a few tips that will help you do the right lifting.
Suspension lift UAZ loaves
The lift of the UAZ-452 car, made by increasing the suspension travel, significantly increases the center of gravity and worsens its handling.
To do this, you need to take into account the height to which you are going to raise the car. You need to choose the right proportion between increased cross-country ability and the likelihood of a coup. The possibility of lifting is also limited by cardan shafts; it is necessary to take into account at what angle they will stop performing their direct work.
The greater likelihood of capsizing can be compensated for by widening the track by installing spacers in combination with wide disks and tires. You can install rear axles of the Spicer or Bars type.
It is possible to increase the track by installing disc brakes, and installing spacers between the bridge and cardan flanges and extended cardan shafts will allow us to solve the problem with the shafts.
Body lift
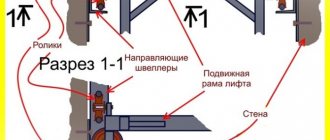
The UAZ loaf body lift is carried out using spacers that are located between the car frame and its body.
When choosing specific spacers, please note that aluminum spacers are the most suitable for the price-quality ratio. They are durable and provide rigid attachment of the body to the frame, and are also available on the market in a fairly wide range. Note: The vast majority of spacers that are produced by foreign companies are perfect for the UAZ 452. When installing spacers, the owner of the loaf will in any case have to cut the arches and wings. After this is done, it is recommended to install side mudguards that will protect the glass from dirt. There are various types of spacers, thanks to some of which the UAZ loaf frame moves away from the body by a distance of up to 80 mm. And in combination with large wheels, this increases ground clearance by as much as 15 cm.
Suspension lift options for UAZ-452
Lifting options that make it possible to raise the “loaf” suspension:
- Small elevator. If it is necessary to raise the car to a small height, it is enough to install additional leaf springs, or lengthen the spring earrings.
- Medium and large elevator. When performing a medium and high lift, we install a spacer between the bridge and the spring, or if this method is not suitable, then we install spacers on the spring mounting brackets. The advantage of lifting the suspension is that we have the ability to adjust the height and the fact that we still have original spare parts.
Basics
Before we tell you how to lift a UAZ loaf, let’s understand that there are two types of car lifting (depending on exactly how the intervention in the car’s structure is carried out):
- body lifting;
- suspension lift.
The first option is more simple and at the same time much more secure.
What does security have to do with it? The fact is that body lifting practically does not change the car’s center of gravity, so the loaf’s stable behavior when cornering or off-road is maintained. As for the suspension lift, there is a certain risk due to the increase in the center of gravity, but this method significantly improves cross-country ability.
Let's talk about each of these methods in more detail.
When turning the bridge
- The rear suspension lift leads to a change in the distance between the gearbox output shaft and the rear axle receiving flange, the front suspension lift leads to a change in the distance between the axle and transfer case flanges. With such changes, the cardans begin to operate at maximum spline overhang. In this case, it is necessary to replace the driveshaft with a new one or compensate for the length of the driveshaft using a driveshaft spacer
- the shank rises up, the cardan shafts begin to break, and the cardan cross begins to operate in critical modes. This leads to parasitic vibrations on the cardan. When driving at certain speeds, an increase in vibration is felt and, as a result, accelerated destruction of the crosspieces
- castor decreases - the angle of inclination of the wheel turning axis to the vertical. An incorrect castor angle not only leads to poor handling of the SUV, but can also damage various components of the vehicle. How to change castor yourself is described in detail in this article.
Read more about the operation of the cardan after installing the suspension lift kit and treatment methods here
Source
UAZBUKA project: Loaf Body lift (part 1)
It is well known that installing larger wheels on a Bukhanka is much more difficult than, for example, on a classic UAZ, because The wheel arches are small (relatively) in size and only fit standard 225/75-16 tires, and even then with an offset of +40. We decided to limit ourselves to a reasonable (for our purposes) 31x10.5, or in metric notation 265/70-16. 8x16 wheels with ET0 were provided by the company Baza - Everything for UAZ, which actively promotes the REDBTR brand. Looking ahead, I’ll say that we were looking for ET+15(20) but didn’t find it among the stampings, and didn’t want to take light alloy ones for the winter. To install tires of this size without cutting the body, we chose to install a 50mm body lift, as well as a new product from RIF, a full set of reinforced springs, they should provide another 80mm.
Today we will describe the first part, namely raising the body by 50mm. It should be noted that the new loaves have a significant number of differences from older years of production.
We will use a 50mm body lift kit from our sponsor Magazin4x4.ru, as well as a spacer for the RK
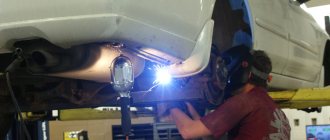
The body is supported by 10 pillows. Unscrew 10 nuts. It’s not difficult to see them, access is easy
The bolt is a furniture type, it does not need to be held from the interior; the head is held by a square in a matching square hole in the body.
The body is secured with M10 bolts. For reliability, we use M12 bolts; to do this, we drill out all 10 holes with a 12.5mm drill. And insert new M12 bolts one by one
To access up to 2 bolts of the 2nd row, you will need to remove the battery on the left and the cabin heater (stove) on the right. Otherwise, it is possible to drill only from below, but a drill will be required with a length of 300 mm.
Remove the radiator grille. We drain the coolant from the heaters through the drain plug and remove 2 clamps and the rubber hose running from the drain pipe upward to the heater tap. We buy a hose (22mm internal diameter) for extension. It is possible to do without replacing the hose (and, as a result, eliminating the airing of the stoves); you will need to move the drain pipe bracket. Next, on the left side of the vacuum brake booster, unpin the rod and remove the axle. From inside the car, on the driver's side, we unpin the same rod, but on the other side. Loosen the locknut and unscrew the fork from the axle. Pull the axle down.
Loosen the clamp on the intake manifold pipe. After installing the body spacers, slide the rubber pipe onto the metal pipe and then tighten the clamp. Nearby we disconnect the plate of the right upper radiator bracket from the body. Same with the left radiator plate. We had enough plate lengths later. But if it’s not enough, then it’s easier to drill 2 new holes. in the M6 body on the right and left. Let's see if the hose from the reservoir to the power steering pump is long enough. It is inconvenient to lower the tank lower; it is easier to loosen the fitting on the pump and turn it. Do not loosen too much, because... liquid will flow.
Remove the upper plastic steering column cover, disconnect the ignition switch connectors and 2 steering column switch connectors. We unscrew the 6 screws of the lower iron casing of the steering column, and also loosen the upper clamp. We move the casing up, unscrew the locking bolt connecting the steering shaft to the gearbox. Disconnect the 2 bolts securing the steering column to the bracket. We take out the steering column assembly with the steering wheel and lower casing. We remove the casing.
From the bottom of the car we unscrew the 4 bolts of the steering gearbox. (It is somewhat more convenient to do this after installing the body spacers) We place a 5mm thick washer under the rear upper gearbox support, thereby moving the output shaft from the edge. Otherwise, the shaft will interfere with installing the casing. Photo before the shaft turns.
Photo with the washer installed. It can be seen that the shaft is located further from the edge. Install 4 bolts back.
We carefully cut off the welded points at the casing. It is necessary to change the angle of inclination of the pipe relative to the base. By attaching the base to the body, it will become clear where modifications need to be made so that the steering shaft rotates without touching the casing. The casing pipe needs to be sawed off to approximately the required angle. You can find out how much you need to saw off (after installing the body spacers, of course) by placing the base and pipe in place. It’s better to take your time and finish it 2-3 times, or make a pipe template from cardboard. When ready, fix the base in place and attach 3-4 points by welding (remembering to disconnect the negative terminal of the battery and 2 connectors on the ASUD unit). We remove and weld with a continuous seam (semi-automatic or TIG is easier, but with an electrode it will be more difficult). Cool, clean, degrease, paint the welding area. Next, we replace the screws securing the casing to the body with M6x16 bolts. After a couple of years, it will be clearly more difficult to remove the screws. If you remember, we also use stainless steel hardware, it’s not as expensive as simply unscrewing it in the future!
We disconnect the rocker support of the RK (from the bottom of the car). It is necessary to unscrew the 3 bolts securing the bracket. Subsequently, we will install a 50mm spacer (already installed in the photo - white). The bolts need to be replaced by +50mm from the standard ones.
We disconnect 2 rods from the gearbox rocker. We loosen all the rods/cable of the handbrake lever (from the bottom of the car). From above you need to unscrew 2 screws securing the boot. Release the handbrake lever completely. After the elevator, of course, we return all the rods to their places in an already elongated state.
With traction there are 2 options. Buy a ready-made adapter (or make it yourself), or cut and weld a rod 40-50 mm long, thereby increasing the length of the rod. Keep in mind that the threads on the rods are small, it is unlikely that you will be able to find something similar ready-made. It's easier to cook it then.
While we are at the bottom, we inspect the wires and tubes, possibly bending and repositioning them, taking into account the upward stroke of 50mm. We had enough length.
We lift the body from behind with a jack (not forgetting, of course, to secure the wheels with wheel chocks). Convenient to do with an assistant. We take out the bolt from above, insert the sleeve, insert the bolt, put on the washer, tighten the nut. From the last supports at the back, alternately from right to left, we move forward. And so 10 supports. 2 front bolts d.b. 50mm longer than the others. Those. compensate for the tilt of the floor at the feet of the driver and passenger. We tighten all 10 nuts. It won’t work without an assistant; the bolt heads are now 6-sided and need to be kept from turning.
We make a spacer for the steering shaft bracket from a 50mm wide channel. Please note that the holes must be at least 14mm and be coaxial, because the bolt passes through 2 shelves of the channel and it is advisable to give a little adjustment freedom in order to clearly align the steering wheel.
We install new bolts +50mm to the standard ones, paying attention that 1 bolt is M10, and the other is M12. We also subsequently had to re-drill the holes in the bracket itself, in 2 places where the steering column is attached. The holes are located approximately 20mm below the standard ones. Correctly installing the steering column with its elements (casing, brackets, etc.) is the most difficult thing in the entire body lifting operation. In terms of time, this is also at least half. There are too many small and not very minor improvements in place. You will have to remove and install elements more than once.
After the elevator, you will have to adjust the gearbox speed switching using the link rods, the operation of the parking brake, as well as the travel of the brake pedal and the start of the brake light lamps by adjusting the sensor above the pedal.
Volume of work: 2 people/2 days. The cost of the parts is 4,100 rubles, not including auxiliary materials.
Source
Preparing for the Loaf Elevator
Lifting options for UAZ Bukhanki
Owners of Bukhanka, when starting to tune this car, first of all ask themselves the question: “How to raise a UAZ loaf?” We will try to answer this question in this article. So, first of all, let's look at the UAZ elevator methods. It could be:
- UAZ body lift
- Loaf Suspension Lift
Both options have both advantages and disadvantages. Thus, the Bukhanka body lift is easier to implement and also has a greater degree of safety. This is explained by the fact that this method of lift only slightly shifts the car’s center of gravity, which helps ensure the Loaf’s stable behavior on turns and other difficult sections of the route.
If we talk about the suspension lift, then there is some danger here due to the increase in the center of gravity. But at the same time, this method significantly changes cross-country ability for the better.
Choosing a kit for the UAZ loaf elevator
As we can see, there are several ways to raise the Loaf. Therefore, it is possible to determine which UAZ Bukhanka lift kit will be needed only by deciding on the choice of lift method. If you plan to do the lift yourself, you can buy a lift kit from a store. Such kits differ in the composition of the parts and elements included in them.
Thus, a kit for a Loaf elevator may contain:
- spring-frame spacers;
- spring-frame spacers
- bolts;
- nuts, etc.
Changing wheels
As you know, the cross-country ability of a vehicle directly depends on the wheels. Considering that the UAZ wheels are covered in fairly hard and not too large rubber, before proceeding directly to the elevator, it is necessary to mention the wheels. In addition, the tread pattern on the Bukhanka tires leaves much to be desired. All this suggests that it would not be superfluous to install suitable imported wheels on the legendary car.
As an option when choosing new wheels for the UAZ Bukhanka, you can use BF Goodrich 33×10.5 R15 tires, and, accordingly, wheels with a diameter of 15 centimeters. As for the choice of discs for them, it depends on the wishes of the owner. These can be alloy or cast wheels. Or you can leave the regular standard wheels.
However, you should not stop at this stage, because such tuning makes it difficult to control, since on sharp turns the front wheels catch the edges of the steering rods, and when the effect of crossing the axles appears, the wheels are located directly on the sides of the arches. This causes friction between the tires and the fender. Therefore, an indispensable stage of tuning after installing the wheels is the UAZ Bukhanka body lift.